
Maison >Java >javaDidacticiel >Comment Springboot intègre Shiro pour implémenter la vérification de la connexion et des autorisations
Comment Springboot intègre Shiro pour implémenter la vérification de la connexion et des autorisations

- WBOYWBOYWBOYWBOYWBOYWBOYWBOYWBOYWBOYWBOYWBOYWBOYWBavant
- 2023-05-17 14:55:111152parcourir
Série d'échafaudages de développement Springboot-cli
Springboot intègre élégamment Shiro pour la vérification de connexion et l'authentification d'autorité (avec téléchargement du code source)
Introduction
Springboo configure Shiro pour la vérification de connexion et l'authentification d'autorité, avec démonstration de démonstration ci-jointe.
Avant-propos
Nous nous engageons à permettre aux développeurs de créer rapidement un environnement de base et de faire fonctionner les applications. Nous fournissons des exemples d'utilisation auxquels les utilisateurs peuvent se référer afin que les débutants puissent démarrer rapidement.
Adresse du code source de ce projet de blog :
Adresse github du code source du projet
Adresse nationale du code source du projet
1 Environnement
Dépendance
     <!-- Shiro核心框架 -->
        <dependency>
            <groupId>org.apache.shiro</groupId>
            <artifactId>shiro-core</artifactId>
            <version>1.9.0</version>
        </dependency>
        <!-- Shiro使用Spring框架 -->
        <dependency>
            <groupId>org.apache.shiro</groupId>
            <artifactId>shiro-spring</artifactId>
            <version>1.9.0</version>
        </dependency>
        <!-- Thymeleaf中使用Shiro标签 -->
        <dependency>
            <groupId>com.github.theborakompanioni</groupId>
            <artifactId>thymeleaf-extras-shiro</artifactId>
            <version>2.1.0</version>
        </dependency>
        <dependency>
            <groupId>org.springframework.boot</groupId>
            <artifactId>spring-boot-starter-thymeleaf</artifactId>
        </dependency>
configuration yml
serveur :
port : 9999
servlet :
session :
# Laissez Tomcat obtenir uniquement les informations de session à partir du COOKIE, de sorte que lorsqu'il n'y a pas de cookie, l'URL ne sera pas automatiquement ajoutée ;jsessionid=….
Modes de suivi : COOKIEspring:
thymeleaf:
# Désactivez la mise en cache des pages pour faciliter les tests de l'environnement de développement
cache : false
# Chemin de ressource statique
préfixe : classpath:/templates/
# Fin .html par défaut de la ressource Web
mode : HTML
2. Introduction
Les trois modules fonctionnels majeurs de Shiro
Sujet
Le sujet d'authentification, fait généralement référence à l'utilisateur (laissez l'opération à SecurityManager).
SecurityManager
Gestionnaire de sécurité, responsable de la sécurité, gère tous les sujets, peut coopérer avec des composants de sécurité internes (associés à Realm)
Realm
objets de domaine, utilisés pour la vérification des informations d'autorisation, Shiro Le pont pour connecter les données, telles que notre vérification de connexion et notre vérification d'autorisation, est défini dans Realm.
3. Configuration du domaine
Définissez l'entité utilisateur User, qui peut être définie en fonction de votre propre entreprise
@Data
@Accessors(chain = true)
public class User {
    /**
     * 用户id
     */
    private Long userId;
    /**
     * 用户名
     */
    private String username;
    /**
     * 密码
     */
    private String password;
    /**
     * 用户别称
     */
    private String name;
}
Réécrivez les méthodes de vérification de connexion doGetAuthenticationInfo et d'autorisation doGetAuthorizationInfo dans AuthorizingRealm, et écrivez notre logique de vérification personnalisée.
/**
 * 自定义登录授权
 *
 * @author ding
 */
public class UserRealm extends AuthorizingRealm {
    /**
     * 授权
     * 此处权限授予
     */
    @Override
    protected AuthorizationInfo doGetAuthorizationInfo(PrincipalCollection principalCollection) {
        SimpleAuthorizationInfo info = new SimpleAuthorizationInfo();
        // 在这里为每一个用户添加vip权限
        info.addStringPermission("vip");
        return info;
    }
    /**
     * 认证
     * 此处实现我们的登录逻辑,如账号密码验证
     */
    @Override
    protected AuthenticationInfo doGetAuthenticationInfo(AuthenticationToken authenticationToken) throws AuthenticationException {
        // 获取到token
        UsernamePasswordToken token = (UsernamePasswordToken) authenticationToken;
        // 从token中获取到用户名和密码
        String username = token.getUsername();
        String password = String.valueOf(token.getPassword());
        // 为了方便,这里模拟获取用户
        User user = this.getUser();
        if (!user.getUsername().equals(username)) {
            throw new UnknownAccountException("用户不存在");
        } else if (!user.getPassword().equals(password)) {
            throw new IncorrectCredentialsException("密码错误");
        }
        // 校验完成后,此处我们把用户信息返回,便于后面我们通过Subject获取用户的登录信息
        return new SimpleAuthenticationInfo(user, password, getName());
    }
    /**
     * 此处模拟用户数据
     * 实际开发中,换成数据库查询获取即可
     */
    private User getUser() {
        return new User()
                .setName("admin")
                .setUserId(1L)
                .setUsername("admin")
                .setPassword("123456");
    }
}
4. Configuration de base
ShiroConfig.java
/**
* Shiro a des filtres intégrés, qui peuvent implémenter des intercepteurs liés aux intercepteurs
* Filtres fréquemment utilisés :
* anon : peut accéder sans authentification (login)
* authc : doit être authentifié pour accéder
* utilisateur : Si vous utilisez la fonction RememberMe, vous pouvez y accéder directement
* perms : Cette ressource doit obtenir les autorisations de ressource avant de pouvoir y accéder, formater perms[permission1, permission2]
* role : Cette ressource doit obtenir les autorisations de rôle avant d'y accéder. accessible
**/
/**
 * shiro核心管理器
 *
 * @author ding
 */
@Configuration
public class ShiroConfig {
    /**
     * 无需认证就可以访问
     */
    private final static String ANON = "anon";
    /**
     * 必须认证了才能访问
     */
    private final static String AUTHC = "authc";
    /**
     * 拥有对某个资源的权限才能访问
     */
    private final static String PERMS = "perms";
    /**
     * 创建realm,这里返回我们上一把定义的UserRealm
     */
    @Bean(name = "userRealm")
    public UserRealm userRealm() {
        return new UserRealm();
    }
    /**
     * 创建安全管理器
     */
    @Bean(name = "securityManager")
    public DefaultWebSecurityManager getDefaultWebSecurityManager(@Qualifier("userRealm") UserRealm userRealm) {
        DefaultWebSecurityManager securityManager = new DefaultWebSecurityManager();
        //绑定realm对象
        securityManager.setRealm(userRealm);
        return securityManager;
    }
    /**
     * 授权过滤器
     */
    @Bean
    public ShiroFilterFactoryBean getShiroFilterFactoryBean(@Qualifier("securityManager") DefaultWebSecurityManager defaultWebSecurityManager) {
        ShiroFilterFactoryBean bean = new ShiroFilterFactoryBean();
        // 设置安全管理器
        bean.setSecurityManager(defaultWebSecurityManager);
        // 添加shiro的内置过滤器
        Map<String, String> filterMap = new LinkedHashMap<>();
        filterMap.put("/index", ANON);
        filterMap.put("/userInfo", PERMS + "[vip]");
        filterMap.put("/table2", AUTHC);
        filterMap.put("/table3", PERMS + "[vip2]");
        bean.setFilterChainDefinitionMap(filterMap);
        // 设置跳转登陆页
        bean.setLoginUrl("/login");
        // 无权限跳转
        bean.setUnauthorizedUrl("/unAuth");
        return bean;
    }
    /**
     * Thymeleaf中使用Shiro标签
     */
    @Bean
    public ShiroDialect shiroDialect() {
        return new ShiroDialect();
    }
}
5. Écriture d'interface
IndexController.java
/**
 * @author ding
 */
@Controller
public class IndexController {
    @RequestMapping({"/", "/index"})
    public String index(Model model) {
        model.addAttribute("msg", "hello,shiro");
        return "/index";
    }
    @RequestMapping("/userInfo")
    public String table1(Model model) {
        return "userInfo";
    }
    @RequestMapping("/table")
    public String table(Model model) {
        return "table";
    }
    @GetMapping("/login")
    public String login() {
        return "login";
    }
    @PostMapping(value = "/doLogin")
    public String doLogin(@RequestParam("username") String username, @RequestParam("password") String password, Model model) {
        //获取当前的用户
        Subject subject = SecurityUtils.getSubject();
        //用来存放错误信息
        String msg = "";
        //如果未认证
        if (!subject.isAuthenticated()) {
            //将用户名和密码封装到shiro中
            UsernamePasswordToken token = new UsernamePasswordToken(username, password);
            try {
                // 执行登陆方法
                subject.login(token);
            } catch (Exception e) {
                e.printStackTrace();
                msg = "账号或密码错误";
            }
            //如果msg为空,说明没有异常,就返回到主页
            if (msg.isEmpty()) {
                return "redirect:/index";
            } else {
                model.addAttribute("errorMsg", msg);
                return "login";
            }
        }
        return "/login";
    }
    @GetMapping("/logout")
    public String logout() {
        SecurityUtils.getSubject().logout();
        return "index";
    }
    @GetMapping("/unAuth")
    public String unAuth() {
        return "unAuth";
    }
}
6. Le dossier stocke les ressources de la page
index.html
<!DOCTYPE html>
<html xmlns:th="http://www.thymeleaf.org">
<html xmlns:shiro="http://www.pollix.at/thymeleaf/shiro">
<head>
    <meta charset="UTF-8">
    <title>Title</title>
</head>
<body>
<h2>首页</h2>
<!-- 使用shiro标签 -->
<shiro:authenticated>
    <p>用户已登录</p> <a th:href="@{/logout}" rel="external nofollow" >退出登录</a>
</shiro:authenticated>
<shiro:notAuthenticated>
    <p>用户未登录</p>
</shiro:notAuthenticated>
<br/>
<a th:href="@{/userInfo}" rel="external nofollow" >用户信息</a>
<a th:href="@{/table}" rel="external nofollow" >table</a>
</body>
</html>
login.html
<!DOCTYPE html>
<html lang="en" xmlns:th="http://www.thymeleaf.org">
<head>
    <meta charset="UTF-8">
    <title>登陆页</title>
</head>
<body>
<div>
    <p th:text="${errorMsg}"></p>
    <form action="/doLogin" method="post">
        <h3>登陆页</h3>
        <h7>账号:admin,密码:123456</h7>
        <input type="text" id="username"  name="username" placeholder="admin">
        <input type="password" id="password" name="password"  placeholder="123456">
        <button type="submit">登陆</button>
    </form>
</div>
</body>
</html>
userInfo.html
<!DOCTYPE html>
<html lang="en" xmlns:shiro="http://www.pollix.at/thymeleaf/shiro">
<head>
    <meta charset="UTF-8">
    <title>table1</title>
</head>
<body>
<h2>用户信息</h2>
<!-- 利用shiro获取用户信息 -->
用户名:<shiro:principal property="username"/>
<br/>
用户完整信息: <shiro:principal/>
</body>
</html>
table.hetml
<!DOCTYPE html>
<html lang="en">
<head>
    <meta charset="UTF-8">
    <title>table</title>
</head>
<body>
<h2>table</h2>
</body>
</html>
7. Démonstration d'effet
Démarrer la saisie du navigateur de projet
127.0.0.1:9999
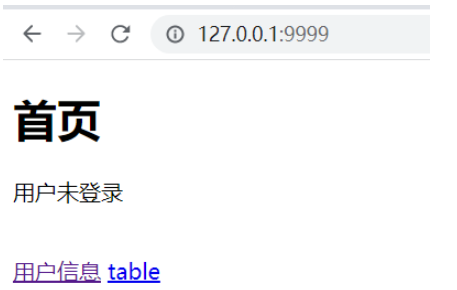 Lorsque vous cliquez sur les informations utilisateur et le tableau, vous accéderez automatiquement à la page de connexion
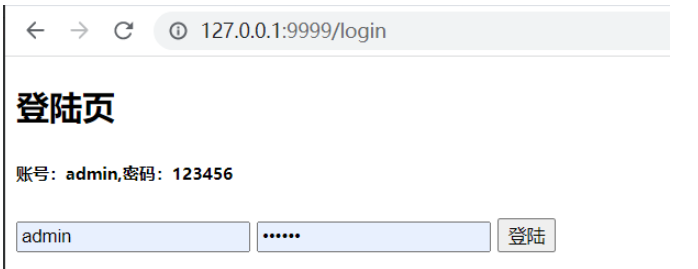 Après une connexion réussie
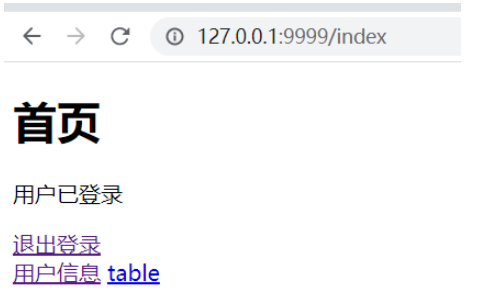 Obtenir les informations utilisateur
Ce que nous obtenons ici, ce sont les informations utilisateur renvoyées par notre précédent doGetAuthenticationInfo méthode, ici pour démonstration Tous sont renvoyés. En production réelle, le mot de passe ne peut pas être renvoyé.
Ce qui précède est le contenu détaillé de. pour plus d'informations, suivez d'autres articles connexes sur le site Web de PHP en chinois!