Maison >Opération et maintenance >Nginx >Comment utiliser nginx pour déployer le projet vue2 sous le système Windows
Comment utiliser nginx pour déployer le projet vue2 sous le système Windows
- 王林avant
- 2023-05-16 21:37:112731parcourir
第一步:下载安装nginx
1、首先我们要去nginx的官网下载windows版本的nginx
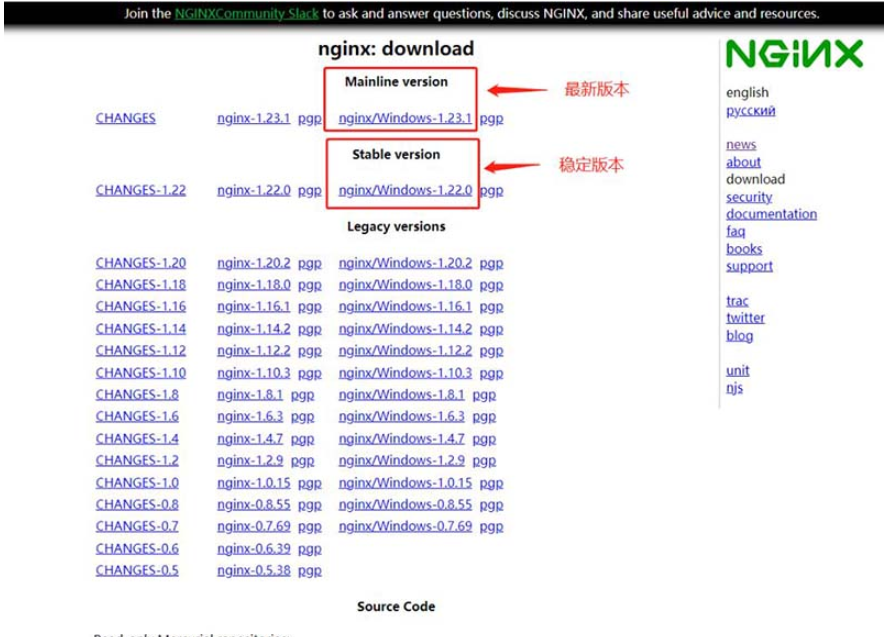
2、点击下载链接后会下载得到如下一个nginx的压缩包:

3、解压nginx压缩包,这里需要注意了哈,nginx的解压路径不能存在中文,否则nginx服务会无法正常启动的哈,不信你试试

4、我们双击nginx.exe文件启动服务,细心观察的小伙伴会发现有一个黑色的弹窗一闪而过就消失了,那这就启动就完成了。

5、然后我们打开浏览器访问:http://localhost 如果出现如下界面则表示nginx服务成功启动!

6、如果无法正常访问的话可以先查看nginx目录下logs里面的日志文件,

造成无法正常启动的原因可能有如下两点:
a、检查解压nginx的路径是否存在中文
b、打开cmd命令行窗口输入如下命令,查看80端口是否被占用了,nginx默认启动的端口是80端口
netstat -ano | findstr 0.0.0.0:80
如果输入上面命令出现如下内容则表示端口被占用

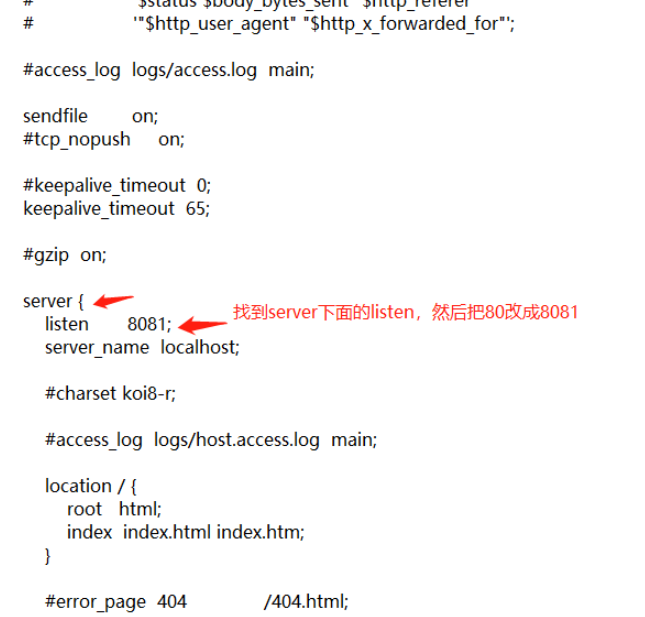
7、如果端口被占用,我们需要修改nginx的默认启动端口,使用记事本打开conf目录下的nginx.conf配置文件

在保存后,将server下的端口号80修改为8081,然后重新启动nginx目录下的nginx.exe文件
如果还是无法正常启动,可以查看nginx目录下的logs目录里面的错误日志,然后自行百度一下
8、下面来简单介绍一下nginx的几个常用命令:
注意:需要在nginx目录下才能执行这些命令:
a、启动nginx:
E:\nginx-1.22.0>start nginx 或
E:\nginx-1.22.0>nginx.exe
b、停止nginx:
E:\nginx-1.22.0>nginx.exe -s stop 或
E:\nginx-1.22.0>nginx.exe -s quit
c、重新启动nginx:
E:\nginx-1.22.0>nginx.exe -s reload
当修改了配置文件nginx.conf的内容后,需要执行上面这条命令,修改的配置才会生效。
第二步:打包部署vue2项目
1、打包vue项目:
npm run build
2、执行上面命令后会把项目打包并输出到dist目录下(打包后的文件因个人而异,这里是我公司项目打包后dist目录下的内容)
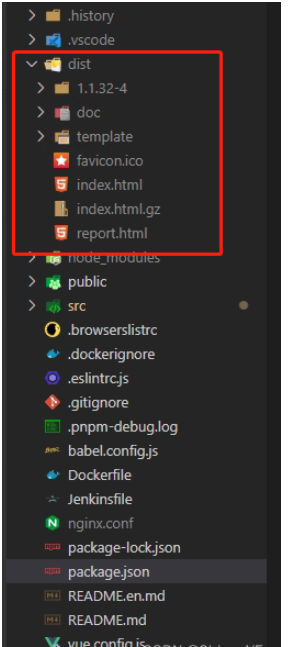
3、在nginx目录下的html目录下新建一个static目录,并把刚刚打包后dist目录下所有文件都复制到static目录下

4、修改nginx.conf配置文件
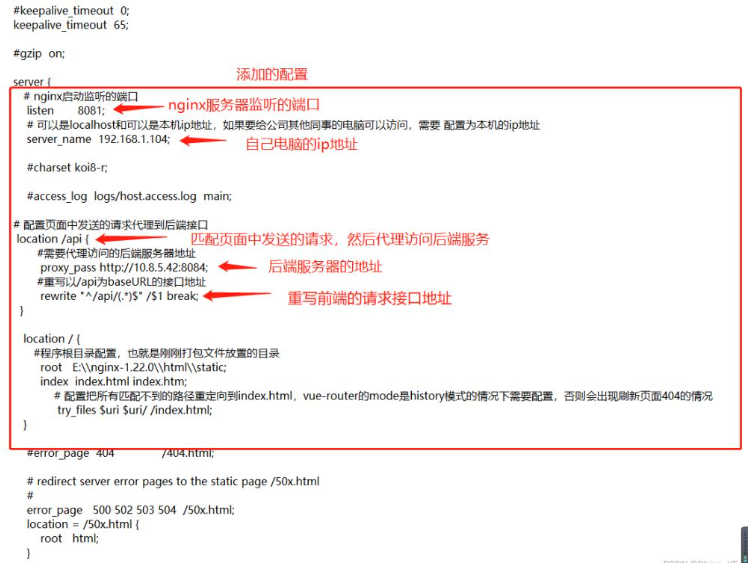
担心图片你们复制不了,就把server里面添加的配置也粘贴到下面了:
    server {
       # nginx启动监听的端口
        listen       8081;
        # 可以是localhost和可以是本机ip地址,如果要给公司其他同事的电脑可以访问,需要 配置为本机的ip地址
        server_name  192.168.1.104;


	   # 配置页面中发送的请求代理到后端接口
	   location /api {
	           #需要代理访问的后端服务器地址
	            proxy_pass http://10.8.5.42:8084;
	           #重写以/api为baseURL的接口地址
	            rewrite "^/api/(.*)$" /$1 break;
	    }

       location / {
          #程序根目录配置,也就是刚刚打包文件放置的目录
            root   E:\\nginx-1.22.0\\html\\static;
            index  index.html index.htm;
	       # 配置把所有匹配不到的路径重定向到index.html,vue-router的mode是history模式的情况下需要配置,否则会出现刷新页面404的情况
	       try_files $uri $uri/ /index.html;
       }

    }
在这里再详细说明一下上面添加的这些配置信息:
假设我现在把我windows系统上的nginx服务器的配置文件修改成上面这样子,然后启动nginx服务器,当我在浏览器中输入http://192.168.1.104:8081的时候,因为我的nginx服务器配置文件中的listen配置的端口是8081,所以浏览器的发送的http://192.168.1.104:8081这个请求会被端口为8081的nginx服务进行处理,然后会被location / {} 匹配,然后nginx就会找配置的root 路径下的index.html文件,并响应给浏览器,这时浏览器就可以访问到我们项目的页面了。

这样页面就可以访问了,但是页面中发送的请求怎么进行处理呢?
在vue项目中当我们在页面中发送请求的时候,我们打开浏览器调试工具会看到,我们发送的请求的协议、域名和端口号其实是和访问页面的协议、域名和端口号是一样的,但是真正后端服务器的接口请求地址不是这样的。
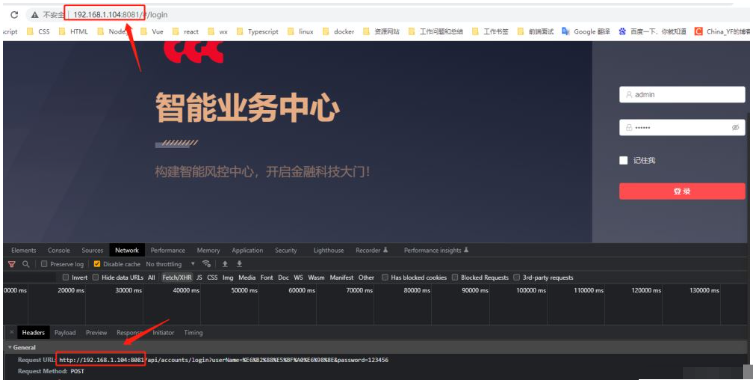
这时候我们就需要使用nginx一个强大的功能了,没错就是反向代理,我们可以配置nginx.conf文件,实现把页面中发送的请求都通过nginx进行反向代理访问真实服务器(其实这也是一种跨域的解决方案)。
假设后端服务器的地址是http://10.8.5.42:8084,请求后端服务的登录接口是http://10.8.5.42:8084/accounts/login,然后前端页面中发送的登录请求地址是:http://192.168.1.104:8081/api/accounts/login?userName=%E6%B2%88%E5%BF%A0%E6%98%8E&password=123456,这时我们就可以在nginx.conf配置文件中加入如下内容:
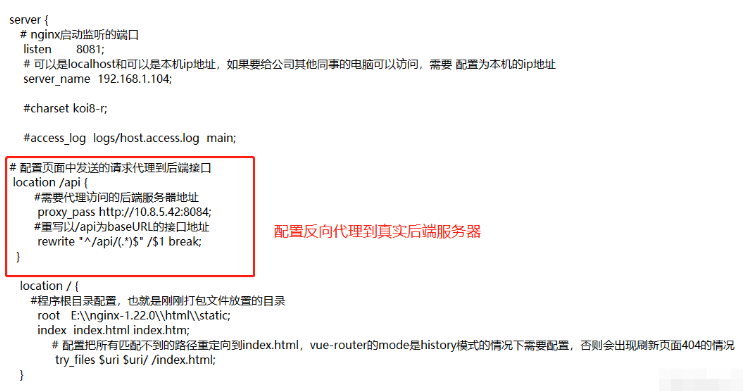
看到这里有些伙伴可能就有疑问了,配置文件中的 :
rewrite "^/api/(.*)$" /$1 break;
具体是什么意思,这里我刚刚开始也不理解????,后来查阅了很多资料,最终就理解通了,
这段配置的作用就是重写我们的请求地址,因为我这里前端页面发送的登录请求接口http://192.168.1.104:8081/api/accounts/login有加了个/api的baseUrl,但是真实的后端服务的登录接口http://10.8.5.42:8084/accounts/login是没有这个/api前缀的,所以我在这里需要重写前端发送的请求地址,把/api给去掉
当我们在nginx.conf配置文件中添加了上面这些配置后,需要执行nginx.exe -s reload命令来载入我们修改的配置,修改了配置文件一定要记得执行这条命令哦!,如果执行这个命令时出现下面的报错的话,不要慌!

出现这个问题的原因是:你的nginx并未启动,所以无法加载配置文件,你先执行start nginx命令启动nginx再执行这条命令即可!

Ce qui précède est le contenu détaillé de. pour plus d'informations, suivez d'autres articles connexes sur le site Web de PHP en chinois!

