Maison >Java >javaDidacticiel >Comment utiliser SpringBoot+SpringSecurity+JWT pour implémenter l'authentification et l'autorisation du système
Comment utiliser SpringBoot+SpringSecurity+JWT pour implémenter l'authentification et l'autorisation du système
- WBOYWBOYWBOYWBOYWBOYWBOYWBOYWBOYWBOYWBOYWBOYWBOYWBavant
- 2023-05-14 20:16:041993parcourir
1. Introduction à Spring Security
Spring Security est un projet principal de Spring. Il s'agit d'un cadre d'authentification et de contrôle d'accès puissant et hautement personnalisable. Il offre des capacités d’authentification et d’autorisation ainsi qu’une protection contre les attaques courantes, et est devenu la norme de facto pour protéger les applications basées sur Spring.
Spring Boot fournit une configuration automatique, qui peut être utilisée en introduisant la dépendance starter.
Résumé des fonctionnalités de Spring Security :
Il est facile à utiliser, fournit des dépendances de démarrage Spring Boot et s'intègre facilement aux projets Spring Boot.
Professionnel, fournissant une protection CSRF, une protection contre le détournement de clics, une protection XSS, etc., et fournissant diverses intégrations d'en-têtes de sécurité (X-XSS-Protection, X-Frame-Options, etc.).
Stockage crypté par mot de passe, prend en charge plusieurs algorithmes de cryptage
Extrêmement évolutif et personnalisable
Support d'authentification OAuth3 JWT
-
…
JWT (jeton Web Json ) est une norme ouverte basée sur JSON (RFC 7519) mise en œuvre pour transférer des revendications entre des environnements d'applications réseau. Le jeton est conçu pour être compact et sécurisé, particulièrement adapté au scénario de connexion par clic (SSO) sur un seul serveur. Les déclarations JWT sont généralement utilisées pour transférer des informations d'identité d'utilisateur authentifiées entre des fournisseurs d'identité et des fournisseurs de services afin d'obtenir des ressources à partir de serveurs de ressources. Elles peuvent également ajouter des informations de déclaration supplémentaires nécessaires à d'autres logiques métier (par exemple, des informations sur les autorisations). Une fois qu'un utilisateur reçoit un jeton, il peut accéder aux ressources sur le serveur via le jeton.
3. Spring Boot intègre Spring Security
Notez que cet article démontre l'utilisation des versions de JDK et Spring Boot comme suit :Spring Boot : 2.7.2
JDK : 11Différentes versions de Spring Boot ont des configurations différentes, mais la les principes sont les mêmes.
Ajoutez les dépendances suivantes au fichier pom.xml du projet Spring Boot :<!-- Spring Security的Spring boot starter,引入后将自动启动Spring Security的自动配置 --> <dependency> <groupId>org.springframework.boot</groupId> <artifactId>spring-boot-starter-security</artifactId> </dependency> <!-- 下面的依赖包含了OAuth3 JWT认证实现 --> <dependency> <groupId>org.springframework.boot</groupId> <artifactId>spring-boot-starter-oauth3-resource-server</artifactId> </dependency>Les deux dépendances ci-dessus suffisent.
4. Configurez Spring Security pour utiliser l'authentification JWT
Remarque :
Différentes versions de Spring Boot ont des configurations différentes, mais le principe est le même.application.ymlConfigure principalement HttpSecurity Bean pour générer SecurityFilterBean. La configuration est la suivante :
import com.nimbusds.jose.jwk.JWK;
import com.nimbusds.jose.jwk.JWKSet;
import com.nimbusds.jose.jwk.RSAKey;
import com.nimbusds.jose.jwk.source.ImmutableJWKSet;
import com.nimbusds.jose.jwk.source.JWKSource;
import com.nimbusds.jose.proc.SecurityContext;
import org.springframework.beans.factory.annotation.Value;
import org.springframework.context.annotation.Bean;
import org.springframework.context.annotation.Configuration;
import org.springframework.security.config.annotation.method.configuration.EnableMethodSecurity;
import org.springframework.security.config.annotation.web.builders.HttpSecurity;
import org.springframework.security.config.http.SessionCreationPolicy;
import org.springframework.security.oauth3.jwt.JwtDecoder;
import org.springframework.security.oauth3.jwt.JwtEncoder;
import org.springframework.security.oauth3.jwt.NimbusJwtDecoder;
import org.springframework.security.oauth3.jwt.NimbusJwtEncoder;
import org.springframework.security.oauth3.server.resource.authentication.JwtAuthenticationConverter;
import org.springframework.security.oauth3.server.resource.authentication.JwtGrantedAuthoritiesConverter;
import org.springframework.security.oauth3.server.resource.web.BearerTokenAuthenticationEntryPoint;
import org.springframework.security.oauth3.server.resource.web.access.BearerTokenAccessDeniedHandler;
import org.springframework.security.web.SecurityFilterChain;

import java.security.interfaces.RSAPrivateKey;
import java.security.interfaces.RSAPublicKey;

/**
 * Spring Security 配置
 *
 * @author cloudgyb
 * @since 2022/7/30 18:31
 */
@Configuration(proxyBeanMethods = false)
@EnableMethodSecurity
public class WebSecurityConfigurer {
    //使用RSA对JWT做签名,所以这里需要一对秘钥。
    //秘钥文件的路径在application.yml文件中做了配置(具体配置在下面)。
    @Value("${jwt.public.key}")
    private RSAPublicKey key;
    @Value("${jwt.private.key}")
    private RSAPrivateKey priv;

     /**
      * 构建SecurityFilterChain bean
      */
    @Bean
    SecurityFilterChain defaultSecurityFilterChain(HttpSecurity http) throws Exception {
        //"/login"是系统的登录接口,所以需要匿名可访问
        http.authorizeRequests().antMatchers("/login").anonymous();
        //其他请求都需认证后才能访问
        http.authorizeRequests().anyRequest().authenticated()
                .and()

                //采用JWT认证无需session保持,所以禁用掉session管理器
                .sessionManagement().sessionCreationPolicy(SessionCreationPolicy.STATELESS).and()
                //login接口可能来自其他站点,所以对login不做csrf防护
                .csrf((csrf) -> csrf.ignoringAntMatchers("/login"))
                //配置认证方式为JWT,并且配置了一个JWT认证装换器,用于去掉解析权限时的SCOOP_前缀
                .oauth3ResourceServer().jwt().jwtAuthenticationConverter(
                        JwtAuthenticationConverter()
                );
        //配置认证失败或者无权限时的处理器
        http.exceptionHandling((exceptions) -> exceptions
                .authenticationEntryPoint(new BearerTokenAuthenticationEntryPoint())
                .accessDeniedHandler(new BearerTokenAccessDeniedHandler())
        );
         //根据配置生成SecurityFilterChain对象
        return http.build();
    }


    /**
     * JWT解码器,用于认证时的JWT解码
     */
    @Bean
    JwtDecoder jwtDecoder() {
        return NimbusJwtDecoder.withPublicKey(this.key).build();
    }
    /**
     * JWT编码器,生成JWT
     */
    @Bean
    JwtEncoder jwtEncoder() {
        JWK jwk = new RSAKey.Builder(this.key).privateKey(this.priv).build();
        JWKSource<SecurityContext> jwks = new ImmutableJWKSet<>(new JWKSet(jwk));
        return new NimbusJwtEncoder(jwks);
    }

    /**
     * JWT认证解码时,去掉Spring Security对权限附带的默认前缀SCOOP_
     */
    @Bean
    JwtAuthenticationConverter JwtAuthenticationConverter() {
        final JwtGrantedAuthoritiesConverter jwtGrantedAuthoritiesConverter = new JwtGrantedAuthoritiesConverter();
        jwtGrantedAuthoritiesConverter.setAuthorityPrefix("");
        final JwtAuthenticationConverter jwtAuthenticationConverter = new JwtAuthenticationConverter();
        jwtAuthenticationConverter.setJwtGrantedAuthoritiesConverter(jwtGrantedAuthoritiesConverter);
        return jwtAuthenticationConverter;
    }
}
jwt:
  private.key: classpath:app.key
  public.key: classpath:app.pub
La configuration ci-dessus nécessite de générer une paire de clés RSA dans le répertoire Resource du projet Spring Boot. Vous pouvez utiliser le site Web suivant pour générer : http://tools.jb51.net/password/rsa_encode/, Remarque : le format de clé utilise PKCS#8 et le mot de passe de la clé privée est vide.
Encore une chose à noter, j'ai utilisé l'injection de valeur de Spring Boot dans le code :
@Value("${jwt.public.key}")
 private RSAPublicKey key;
@Value("${jwt.private.key}")
private RSAPrivateKey priv;
Êtes-vous curieux de savoir comment Spring Boot convertit le fichier correspondant à la chaîne dans le fichier yaml en RSAPublicKey et RSAPrivateKey ?
En fait, Spring Security a effectué le traitement pour nous. Cela nous a aidé à implémenter un convertisseur ResourceKeyConverterAdapter dans Spring Security. Vous pouvez lire le code source correspondant pour une compréhension plus approfondie.
Notre projet prend désormais en charge l'authentification JWT.
C'est très simple. Il peut fournir une interface de connexion, permettre à l'utilisateur de saisir le nom d'utilisateur et le mot de passe et d'émettre le jeton après une correspondance réussie.
Mais l'utilisateur doit porter un JWT légal dans l'en-tête de la demande Autorisation pour passer l'authentification puis accéder aux ressources du serveur. Alors, comment émettre un JWT légal à l'utilisateur ?
En fait, il n'est pas nécessaire de le faire. Il existe d'autres moyens, comme appeler une interface tierce. Notre approche habituelle consiste à postuler d'abord auprès du tiers. Une fois la demande approuvée, nous pouvons obtenir un. jeton. Ce processus est le même que l'émission d'un jeton après la connexion ci-dessus. Tous deux obtiennent un jeton par des moyens légaux !
5. Implémenter l'interface de connexion L'interface de connexion n'a qu'un seul objectif, qui est d'émettre des jetons aux utilisateurs légitimes !Interface API de connexion :
@RestController
public class SysLoginController {
    private final SysLoginService sysLoginService;

    public SysLoginController(SysLoginService sysLoginService) {
        this.sysLoginService = sysLoginService;
    }

    @PostMapping("/login")
    public String login(@RequestBody LoginInfo loginInfo) {
        return sysLoginService.login(loginInfo);
    }
}
Implémentation de la logique de connexion : @Service
public class SysLoginService {
private final JwtEncoder jwtEncoder;
private final SpringSecurityUserDetailsService springSecurityUserDetailsService;
public SysLoginService(JwtEncoder jwtEncoder, SpringSecurityUserDetailsService springSecurityUserDetailsService) {
this.jwtEncoder = jwtEncoder;
this.springSecurityUserDetailsService = springSecurityUserDetailsService;
}
public String login(LoginInfo loginInfo) {
//从用户信息存储库中获取用户信息
final UserDetails userDetails = springSecurityUserDetailsService.loadUserByUsername(loginInfo.getUsername());
final String password = userDetails.getPassword();
//匹配密码,匹配成功生成JWT令牌
if (password.equals(loginInfo.getPassword())) {
return generateToken(userDetails);
}
//密码不匹配,抛出异常,Spring Security发现抛出该异常后会将http响应状态码设置为401 unauthorized
throw new BadCredentialsException("密码错误!");
}
private String generateToken(UserDetails userDetails) {
Instant now = Instant.now();
//JWT过期时间为36000秒,也就是600分钟,10小时
long expiry = 36000L;
String scope = userDetails.getAuthorities().stream()
.map(GrantedAuthority::getAuthority)
.collect(Collectors.joining(" "));
//将用户权限信息使用空格分割拼为字符串,放到JWT的payload的scope字段中,注意不要改变scope这个属性,这是Spring Security OAuth3 JWT默认处理方式,在JWT解码时需要读取该字段,转为用户的权限信息!
JwtClaimsSet claims = JwtClaimsSet.builder()
.issuer("self")
.issuedAt(now)
.expiresAt(now.plusSeconds(expiry))
.subject(userDetails.getUsername())
.claim("scope", scope)
.build();
return this.jwtEncoder.encode(JwtEncoderParameters.from(claims)).getTokenValue();
}
}Les autres codes non essentiels ne seront pas publiés ici. J'ai mis le code sur github Pour plus de détails, vous pouvez aller sur https://github.com/cloudgyb/. printemps -étude-de-sécurité-jwt.
6. Test
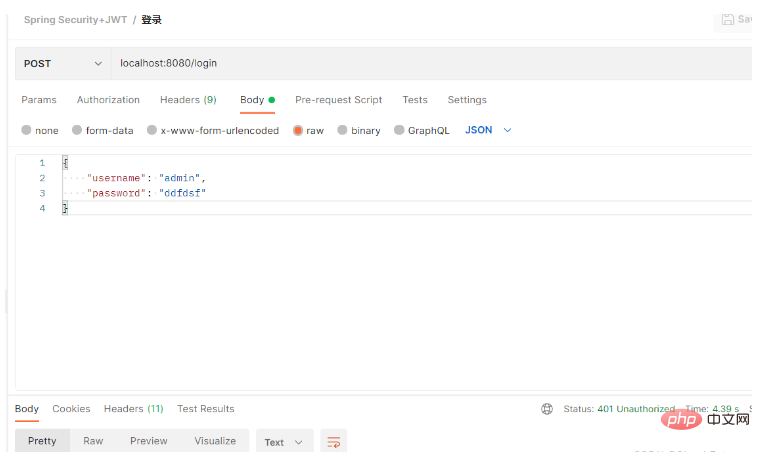
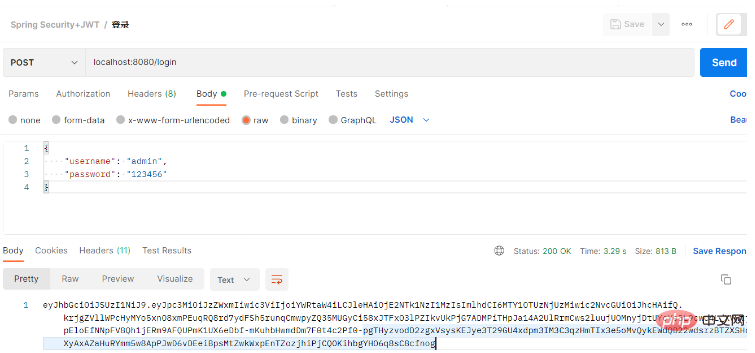
Utilisez Postman pour tester :
L'utilisation d'un mot de passe incorrect renverra un code d'état 401 non autorisé, indiquant que notre authentification a échoué
 A ce stade, le client a obtenu le token légal, et peut alors accéder aux ressources auxquelles il a accès sur le serveur.
@RestController
public class HelloController {

    @GetMapping("/")
    @PreAuthorize("hasAuthority('test')")
    public String hello(Authentication authentication) {
        return "Hello, " + authentication.getName() + "!";
    }
}
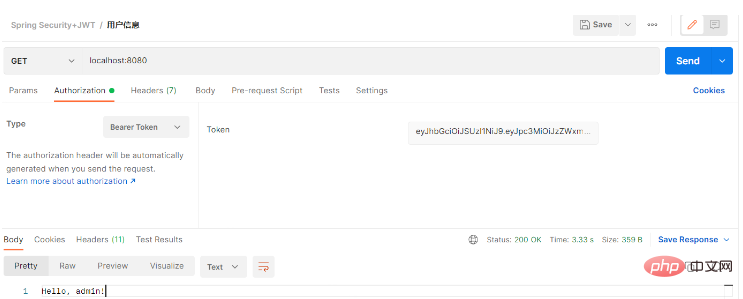
Cette interface nécessite que l'utilisateur ait l'autorisation "test", mais l'utilisateur connecté n'a pas cette autorisation (une seule autorisation d'application pour le moment, appelez l'interface : D'abord). , connectez-vous à l'étape précédente. Collez le jeton dans le jeton :
.
我们发送请求得到了403 Forbidden的响应,意思就是我们没有访问权限,此时我们将接口权限改为“app”:
@RestController
public class HelloController {

    @GetMapping("/")
    @PreAuthorize("hasAuthority('app')")
    public String hello(Authentication authentication) {
        return "Hello, " + authentication.getName() + "!";
    }
}
重启项目。再次发起请求:

Ce qui précède est le contenu détaillé de. pour plus d'informations, suivez d'autres articles connexes sur le site Web de PHP en chinois!

