Maison >Java >javaDidacticiel >Comment utiliser le conteneur Tomcat pour démarrer automatiquement au Springboot
Comment utiliser le conteneur Tomcat pour démarrer automatiquement au Springboot
- WBOYWBOYWBOYWBOYWBOYWBOYWBOYWBOYWBOYWBOYWBOYWBOYWBavant
- 2023-05-12 10:25:141129parcourir
1. Spring importe les beans via des annotations d'environ quatre manières. Nous parlons principalement des deux méthodes d'implémentation suivantes :
1 En implémentant l'interface ImportSerlector pour implémenter le chargement de Bean :
public class TestServiceImpl {
 public void testImpl() {
 System.out.println("我是通过importSelector导入进来的service");
 }
}
public class TestService implements ImportSelector {
 @Override
 public String[] selectImports(AnnotationMetadata annotationMetadata) {
 return new String[]{"com.ycdhz.service.TestServiceImpl"};
 }
}
@Configuration
@Import(value = {TestService.class})
public class TestConfig {
}
public class TestController {
 @Autowired
 private TestServiceImpl testServiceImpl;

 @RequestMapping("testImpl")
 public String testTuling() {
 testServiceImpl.testImpl();
 return "Ok";
 }
}
2. pour implémenter le chargement du Bean :
public class TestService {
 public TestService() {
 System.out.println("我是通过ImportBeanDefinitionRegistrar导入进来的组件");
 }
}
public class TestImportBeanDefinitionRegistrar implements ImportBeanDefinitionRegistrar {
 @Override
 public void registerBeanDefinitions(AnnotationMetadata importingClassMetadata, BeanDefinitionRegistry registry) {
 //定义一个BeanDefinition
 RootBeanDefinition beanDefinition = new RootBeanDefinition(TestService.class);
 //把自定义的bean定义导入到容器中
 registry.registerBeanDefinition("testService",beanDefinition);
 }
}
@Configuration
@Import(TestImportBeanDefinitionRegistrar.class)
public class TestConfig {
}
2. Springboot sera automatiquement assemblé pendant le processus de démarrage
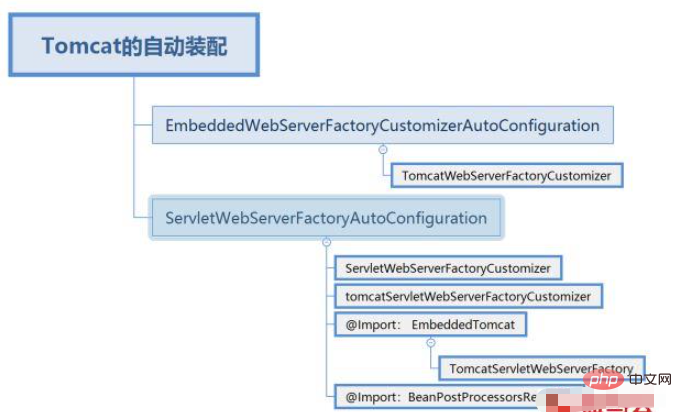
Nous avons recherché la configuration appropriée de Tomcat à partir de spring-boot-autoconfigure-2.0.6.RELEASE.jar et avons constaté qu'il existe deux configurations automatiques. classes d'assemblage Contient trois personnalisateurs (principe de responsabilité unique orienté objet) et une classe d'usine.

2.1, TomcatWebServerFactoryCustomizer : Personnalisez les fonctions spécifiques à Tomcat communes aux servlets et aux serveurs réactifs.
public class TomcatWebServerFactoryCustomizer implements
 WebServerFactoryCustomizer<configurabletomcatwebserverfactory>, Ordered {
 @Override
 public void customize(ConfigurableTomcatWebServerFactory factory) {
 ServerProperties properties = this.serverProperties;
 ServerProperties.Tomcat tomcatProperties = properties.getTomcat();
 PropertyMapper propertyMapper = PropertyMapper.get();
 propertyMapper.from(tomcatProperties::getBasedir).whenNonNull()
 .to(factory::setBaseDirectory);
 propertyMapper.from(tomcatProperties::getBackgroundProcessorDelay).whenNonNull()
 .as(Duration::getSeconds).as(Long::intValue)
 .to(factory::setBackgroundProcessorDelay);
 customizeRemoteIpValve(factory);
 propertyMapper.from(tomcatProperties::getMaxThreads).when(this::isPositive)
 .to((maxThreads) -> customizeMaxThreads(factory,
  tomcatProperties.getMaxThreads()));
 propertyMapper.from(tomcatProperties::getMinSpareThreads).when(this::isPositive)
 .to((minSpareThreads) -> customizeMinThreads(factory, minSpareThreads));
 propertyMapper.from(() -> determineMaxHttpHeaderSize()).when(this::isPositive)
 .to((maxHttpHeaderSize) -> customizeMaxHttpHeaderSize(factory,
  maxHttpHeaderSize));
 propertyMapper.from(tomcatProperties::getMaxHttpPostSize)
 .when((maxHttpPostSize) -> maxHttpPostSize != 0)
 .to((maxHttpPostSize) -> customizeMaxHttpPostSize(factory,
  maxHttpPostSize));
 propertyMapper.from(tomcatProperties::getAccesslog)
 .when(ServerProperties.Tomcat.Accesslog::isEnabled)
 .to((enabled) -> customizeAccessLog(factory));
 propertyMapper.from(tomcatProperties::getUriEncoding).whenNonNull()
 .to(factory::setUriEncoding);
 propertyMapper.from(properties::getConnectionTimeout).whenNonNull()
 .to((connectionTimeout) -> customizeConnectionTimeout(factory,
  connectionTimeout));
 propertyMapper.from(tomcatProperties::getMaxConnections).when(this::isPositive)
 .to((maxConnections) -> customizeMaxConnections(factory, maxConnections));
 propertyMapper.from(tomcatProperties::getAcceptCount).when(this::isPositive)
 .to((acceptCount) -> customizeAcceptCount(factory, acceptCount));
 customizeStaticResources(factory);
 customizeErrorReportValve(properties.getError(), factory);
 }
}</configurabletomcatwebserverfactory>
2.2. ServletWebServerFactoryCustomizer : WebServerFactoryCustomizer applique les propriétés ServerProperties au serveur Web Tomcat.
public class ServletWebServerFactoryCustomizer implements
 WebServerFactoryCustomizer<configurableservletwebserverfactory>, Ordered {
 private final ServerProperties serverProperties;
 public ServletWebServerFactoryCustomizer(ServerProperties serverProperties) {
 this.serverProperties = serverProperties;
 }
 @Override
 public int getOrder() {
 return 0;
 }
 @Override
 public void customize(ConfigurableServletWebServerFactory factory) {
 PropertyMapper map = PropertyMapper.get().alwaysApplyingWhenNonNull();
 map.from(this.serverProperties::getPort).to(factory::setPort);
 map.from(this.serverProperties::getAddress).to(factory::setAddress);
 map.from(this.serverProperties.getServlet()::getContextPath)
 .to(factory::setContextPath);
 map.from(this.serverProperties.getServlet()::getApplicationDisplayName)
 .to(factory::setDisplayName);
 map.from(this.serverProperties.getServlet()::getSession).to(factory::setSession);
 map.from(this.serverProperties::getSsl).to(factory::setSsl);
 map.from(this.serverProperties.getServlet()::getJsp).to(factory::setJsp);
 map.from(this.serverProperties::getCompression).to(factory::setCompression);
 map.from(this.serverProperties::getHttp2).to(factory::setHttp2);
 map.from(this.serverProperties::getServerHeader).to(factory::setServerHeader);
 map.from(this.serverProperties.getServlet()::getContextParameters)
 .to(factory::setInitParameters);
 }
}</configurableservletwebserverfactory>
2.3. ServletWebServerFactoryCustomizer : WebServerFactoryCustomizer applique les propriétés ServerProperties au serveur Web Tomcat.
public class TomcatServletWebServerFactoryCustomizer
 implements WebServerFactoryCustomizer<tomcatservletwebserverfactory>, Ordered {
 private final ServerProperties serverProperties;
 public TomcatServletWebServerFactoryCustomizer(ServerProperties serverProperties) {
 this.serverProperties = serverProperties;
 }
 @Override
 public void customize(TomcatServletWebServerFactory factory) {
 ServerProperties.Tomcat tomcatProperties = this.serverProperties.getTomcat();
 if (!ObjectUtils.isEmpty(tomcatProperties.getAdditionalTldSkipPatterns())) {
 factory.getTldSkipPatterns()
  .addAll(tomcatProperties.getAdditionalTldSkipPatterns());
 }
 if (tomcatProperties.getRedirectContextRoot() != null) {
 customizeRedirectContextRoot(factory,
  tomcatProperties.getRedirectContextRoot());
 }
 if (tomcatProperties.getUseRelativeRedirects() != null) {
 customizeUseRelativeRedirects(factory,
  tomcatProperties.getUseRelativeRedirects());
 }
 }
}</tomcatservletwebserverfactory>
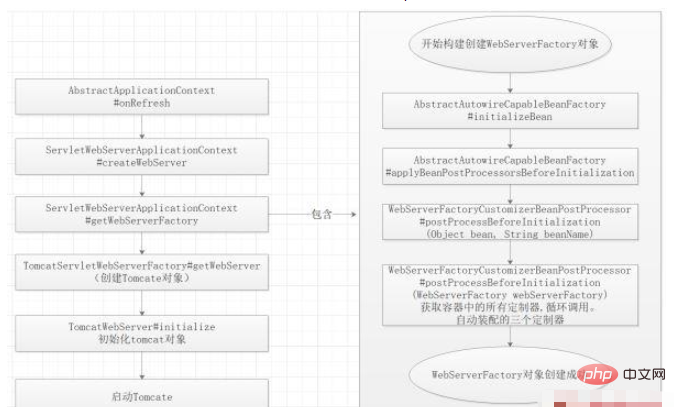
3. Avec TomcatServletWebServerFactory, cela équivaut à avoir l'entrée au chargement de Spring
Utilisez AbstractApplicationContext#onReFresh() pour conduire Tomcat à démarrer dans le conteneur IOC, puis exécutez d'autres étapes du conteneur IOC.
Nous pouvons observer tout le cycle de vie du chargement de Tomcat à travers des points d'arrêt, ainsi que le processus de chargement des trois personnalisateurs.

@Override
public WebServer getWebServer(ServletContextInitializer... initializers) {
 Tomcat tomcat = new Tomcat();
 File baseDir = (this.baseDirectory != null) ? this.baseDirectory
 : createTempDir("tomcat");
 tomcat.setBaseDir(baseDir.getAbsolutePath());
 Connector connector = new Connector(this.protocol);
 tomcat.getService().addConnector(connector);
 customizeConnector(connector);
 tomcat.setConnector(connector);
 //设置是否自动启动
 tomcat.getHost().setAutoDeploy(false);
 //创建Tomcat引擎
 configureEngine(tomcat.getEngine());
 for (Connector additionalConnector : this.additionalTomcatConnectors) {
 tomcat.getService().addConnector(additionalConnector);
 }
 //刷新上下文
 prepareContext(tomcat.getHost(), initializers);
 //准备启动
 return getTomcatWebServer(tomcat);
}
private void initialize() throws WebServerException {
 TomcatWebServer.logger
 .info("Tomcat initialized with port(s): " + getPortsDescription(false));
 synchronized (this.monitor) {
 try {
 addInstanceIdToEngineName();
 Context context = findContext();
 context.addLifecycleListener((event) -> {
 if (context.equals(event.getSource())
  && Lifecycle.START_EVENT.equals(event.getType())) {
  // Remove service connectors so that protocol binding doesn't
  // happen when the service is started.
  removeServiceConnectors();
 }
 });
 // Start the server to trigger initialization listeners
 this.tomcat.start();
 // We can re-throw failure exception directly in the main thread
 rethrowDeferredStartupExceptions();
 try {
 ContextBindings.bindClassLoader(context, context.getNamingToken(),
  getClass().getClassLoader());
 }
 catch (NamingException ex) {
 // Naming is not enabled. Continue
 }
 // Unlike Jetty, all Tomcat threads are daemon threads. We create a
 // blocking non-daemon to stop immediate shutdown
 startDaemonAwaitThread();
 }
 catch (Exception ex) {
 stopSilently();
 throw new WebServerException("Unable to start embedded Tomcat", ex);
 }
 }
}
Remarques : Dans ce processus, nous devons comprendre le cycle de vie du Bean Tomcat. Les trois personnalisateurs sont tous chargés dans le processus BeanPostProcessorsRegistrar (post-processeur Bean)
Méthode de construction-->Bean post ; Définition du processeurAvant-->InitializingBean-->init-method-->Bean post-processorAfter
org.springframework.beans.factory.support.AbstractAutowireCapableBeanFactory#doCreateBean
  org.springframework.beans.factory.support.AbstractAutowireCapableBeanFactory#initializeBean
protected Object doCreateBean(final String beanName, final RootBeanDefinition mbd, final @Nullable Object[] args)
 throws BeanCreationException {
 // Instantiate the bean.
 BeanWrapper instanceWrapper = null;
 if (mbd.isSingleton()) {
 instanceWrapper = this.factoryBeanInstanceCache.remove(beanName);
 }
 if (instanceWrapper == null) {
 //构造方法
 instanceWrapper = createBeanInstance(beanName, mbd, args);
 }
 final Object bean = instanceWrapper.getWrappedInstance();
 Class> beanType = instanceWrapper.getWrappedClass();
 if (beanType != NullBean.class) {
 mbd.resolvedTargetType = beanType;
 }
 // Initialize the bean instance.
 ......
 return exposedObject;
}
protected Object initializeBean(final String beanName, final Object bean, @Nullable RootBeanDefinition mbd) {
 if (System.getSecurityManager() != null) {
 AccessController.doPrivileged((PrivilegedAction<object>) () -> {
 invokeAwareMethods(beanName, bean);
 return null;
 }, getAccessControlContext());
 }
 else {
 invokeAwareMethods(beanName, bean);
 }
 Object wrappedBean = bean;
 if (mbd == null || !mbd.isSynthetic()) {
 //Bean后置处理器Before
 wrappedBean = applyBeanPostProcessorsBeforeInitialization(wrappedBean, beanName);
 }
 try {
 invokeInitMethods(beanName, wrappedBean, mbd);
 }
 catch (Throwable ex) {
 throw new BeanCreationException(
 (mbd != null ? mbd.getResourceDescription() : null),
 beanName, "Invocation of init method failed", ex);
 }
 if (mbd == null || !mbd.isSynthetic()) {
 //Bean后置处理器After
 wrappedBean = applyBeanPostProcessorsAfterInitialization(wrappedBean, beanName);
 }
 return wrappedBean;
}</object>
Ce qui précède est le contenu détaillé de. pour plus d'informations, suivez d'autres articles connexes sur le site Web de PHP en chinois!
Articles Liés
Voir plus- Pourquoi ne puis-je pas charger des images dans mon fichier JAR exporté depuis Eclipse ?
- Comment effectuer efficacement des opérations d'intersection et d'union sur des ArrayLists Java ?
- Comment puis-je sérialiser et désérialiser des objets Java en tableaux d'octets ?
- Analyse approfondie des méthodes objet en Java : attendre et notifier
- Utilisation du super mot-clé en Java

