
Maison >Java >javaDidacticiel >Comment utiliser Springboot pour intégrer rapidement le framework de sécurité Shiro
Comment utiliser Springboot pour intégrer rapidement le framework de sécurité Shiro

- WBOYWBOYWBOYWBOYWBOYWBOYWBOYWBOYWBOYWBOYWBOYWBOYWBavant
- 2023-04-25 08:04:061285parcourir
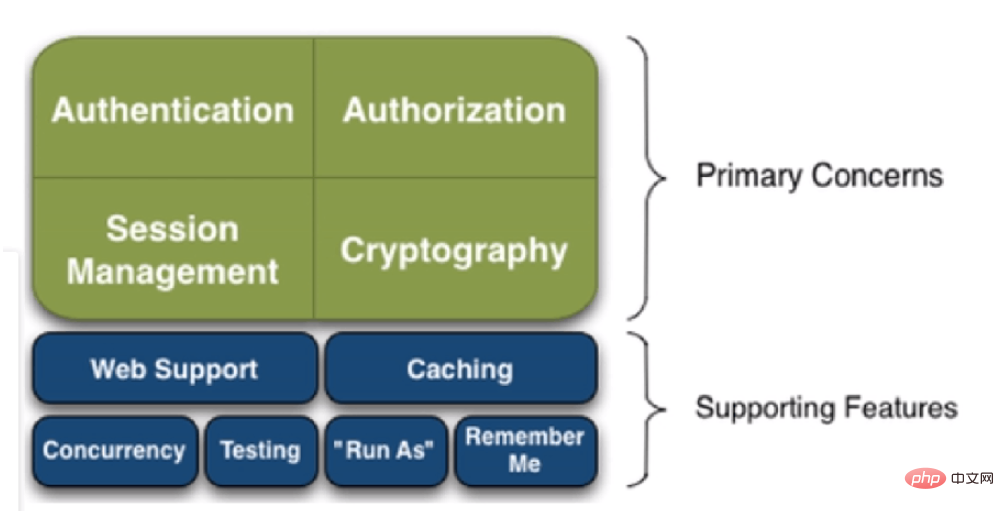
Vulgarisons d'abord ce qu'est Shiro. Le nom original de Shiro est Apache Shiro. Il s'agit d'un framework de sécurité (autorisation) Java. Shiro facilite le développement d'applications suffisamment performantes qui peuvent être utilisées non seulement dans l'environnement JavaSE, mais également dans l'environnement JavaEE. Shiro peut effectuer l'authentification, l'autorisation, le cryptage, la gestion de session, l'intégration Web, la mise en cache et d'autres applications avancées. Voir le schéma de fonction et d'architecture de shiro comme indiqué sur la figure :
Sans plus tarder, Springboot intègre shiro, passons directement au code
fichier pom.xml
<?xml version="1.0" encoding="UTF-8"?>
<project xmlns="http://maven.apache.org/POM/4.0.0" xmlns:xsi="http://www.w3.org/2001/XMLSchema-instance"
         xsi:schemaLocation="http://maven.apache.org/POM/4.0.0 https://maven.apache.org/xsd/maven-4.0.0.xsd">
    <modelVersion>4.0.0</modelVersion>
    <parent>
        <groupId>org.springframework.boot</groupId>
        <artifactId>spring-boot-starter-parent</artifactId>
        <version>2.6.11</version>
        <relativePath/> <!-- lookup parent from repository -->
    </parent>
    <groupId>com.example</groupId>
    <artifactId>demo02</artifactId>
    <version>0.0.1-SNAPSHOT</version>
    <name>demo02</name>
    <description>demo02</description>

    <properties>
        <java.version>1.8</java.version>
    </properties>

    <dependencies>
        <dependency>
            <groupId>org.apache.shiro</groupId>
            <artifactId>shiro-spring</artifactId>
            <version>1.4.1</version>
        </dependency>

        <dependency>
            <groupId>org.mybatis.spring.boot</groupId>
            <artifactId>mybatis-spring-boot-starter</artifactId>
            <version>2.1.0</version>
        </dependency>
        <dependency>
            <groupId>mysql</groupId>
            <artifactId>mysql-connector-java</artifactId>
           <version>8.0.31</version>
        </dependency>
        <!-- https://mvnrepository.com/artifact/log4j/log4j -->
        <dependency>
            <groupId>log4j</groupId>
            <artifactId>log4j</artifactId>
            <version>1.2.17</version>
        </dependency>
        <!-- https://mvnrepository.com/artifact/com.alibaba/druid -->
        <dependency>
            <groupId>com.alibaba</groupId>
            <artifactId>druid</artifactId>
            <version>1.1.12</version>
        </dependency>

        <dependency>
            <groupId>org.projectlombok</groupId>
         <artifactId>lombok</artifactId>
           <version>1.18.18</version>
            <scope>compile</scope>
        </dependency>


        <dependency>
            <groupId>org.springframework.boot</groupId>
            <artifactId>spring-boot-starter-thymeleaf</artifactId>
        </dependency>
        <dependency>
            <groupId>org.thymeleaf</groupId>
            <artifactId>thymeleaf</artifactId>
        </dependency>
        <dependency>
            <groupId>org.thymeleaf.extras</groupId>
            <artifactId>thymeleaf-extras-java8time</artifactId>
        </dependency>
        <dependency>
            <groupId>org.springframework.boot</groupId>
            <artifactId>spring-boot-starter-web</artifactId>
        </dependency>

        <dependency>
            <groupId>org.springframework.boot</groupId>
            <artifactId>spring-boot-starter-test</artifactId>
            <scope>test</scope>
        </dependency>

        <dependency>
            <groupId>com.github.theborakompanioni</groupId>
            <artifactId>thymeleaf-extras-shiro</artifactId>
            <version>2.0.0</version>
        </dependency>


    </dependencies>

    <build>
        <plugins>
            <plugin>
                <groupId>org.apache.maven.plugins</groupId>
                <artifactId>maven-compiler-plugin</artifactId>
                <version>3.8.1</version>
                <configuration>
                    <source>1.8</source>
                    <target>1.8</target>
                    <encoding>UTF-8</encoding>
                </configuration>
            </plugin>
            <plugin>
                <groupId>org.springframework.boot</groupId>
                <artifactId>spring-boot-maven-plugin</artifactId>
            </plugin>
        </plugins>
    </build>

</project>
Ensuite on crée une base de données code>/*<code> /*
Navicat MySQL Data Transfer
Source Server :
Source Server Version : 80030
Source Host : localhost:3306
Source Database : mybatis
Target Server Type : MYSQL
Target Server Version : 80030
File Encoding : 65001
Date: 2023-03-14 18:00:05
*/
SET FOREIGN_KEY_CHECKS=0;
– Table structure for user
DROP TABLE IF EXISTS user;
CREATE TABLE user (id int NOT NULL AUTO_INCREMENT,name varchar(255) DEFAULT NULL,pwd varchar(255) DEFAULT NULL,perms varchar(100) DEFAULT NULL,
PRIMARY KEY (id)
) ENGINE=InnoDB AUTO_INCREMENT=4 DEFAULT CHARSET=utf8mb4 COLLATE=utf8mb4_0900_ai_ci;
– Records of user
INSERT INTO user VALUES (‘1’, ‘qin’, ‘d1b129656359e35e95ebd56a63d7b9e0’, ‘user:add’);
INSERT INTO user VALUES (‘2’, ‘hai’, ‘123’, ‘user:insert’);
INSERT INTO userNavicat MySQL Data Transfer
Serveur source :
Version du serveur source : 80030Hôte source : localhost:3306
Base de données source : mybatisType de serveur cible : MYSQLVersion du serveur cible : 80030
Encodage du fichier : 65001
Date : 2023-03-14 18:00:05
*/
SET FOREIGN_KEY_CHECKS=0;
– >;
CREATE TABLEuser (id int NOT NULL AUTO_INCREMENT,name varchar(255) DEFAULT NULL,
pwd varchar( 255) DEFAULT NULL,<p><code>perms varchar(100) DEFAULT NULL,PRIMARY KEY (
id)) ENGINE=InnoDB AUTO_INCREMENT=4 DEFAULT CHARSET= utf8mb4 COLLATE=utf8mb4_0900_ai_ci;
– Enregistrements de l'utilisateur
INSÉRER DANS LES VALEURS utilisateur («1», ‘qin’, «d1b129656359e35e95ebd56a6 3d7b9e0», «utilisateur:ajouter»);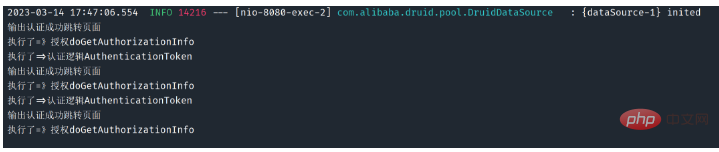 INSÉRER DANS LES VALEURS
 utilisateur («2», ‘hai’, «123», «utilisateur:insérer’);
utilisateur (« 3», « root», «d1b129656359e35e95ebd56a63d7b9e0», «user:update»); pojo layer User
spring:
   datasource:
      username: xxxx
      password: xxxxxxxxxxxx
      url: jdbc:mysql://localhost:3306/mybatis
      driver-class-name: com.mysql.cj.jdbc.Driver
      type: com.alibaba.druid.pool.DruidDataSource
mybatis:
   mapper-locations: classpath:mapper/*tat.slowSqlMillis=500
config layer Configurer deux classes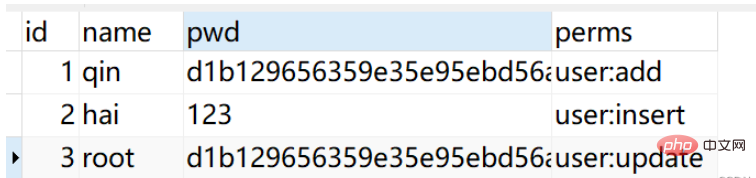 Le ShiroConfig de première classe
package com.example.demo02.controller;

import lombok.extern.slf4j.Slf4j;
import org.apache.shiro.SecurityUtils;
import org.apache.shiro.authc.IncorrectCredentialsException;
import org.apache.shiro.authc.UnknownAccountException;
import org.apache.shiro.authc.UsernamePasswordToken;
import org.apache.shiro.subject.Subject;
import org.springframework.stereotype.Controller;
import org.springframework.ui.Model;
import org.springframework.web.bind.annotation.RequestMapping;
import org.springframework.web.bind.annotation.RequestParam;
import org.springframework.web.bind.annotation.ResponseBody;

@Controller
@Slf4j
public class MyController {

    @RequestMapping("/")
    public  String toIndex(Model model){
        model.addAttribute("msg","hello,shiro");
        return "login";

    }


    @RequestMapping("/user/add")
    public String add(){
        return "user/add";
    }

    @RequestMapping("/user/update")
    public String update(){
        return  "user/update";
    }
    @RequestMapping("/toLogin")
    public String toLogin(){
        return "login";
    }

    @RequestMapping("/noauth")
    @ResponseBody
    public String noAuth(){
        return "未经授权不能访问此页面";
    }

    //登录操作
    @RequestMapping("/login")
    public String login(String username, String password, @RequestParam(defaultValue = "false")boolean rememberMe,Model model){
//使用shiro,编写认证操作
//1. 获取Subject
        Subject subject = SecurityUtils.getSubject();
//2. 封装用户的数据
        UsernamePasswordToken token = new UsernamePasswordToken(username, password,rememberMe);
//3. 执行登录的方法,只要没有异常就代表登录成功!
        try {
            subject.login(token); //登录成功!返回首页
            System.out.println("输出认证成功跳转页面");


            return "index";
        } catch (UnknownAccountException e) { //用户名不存在
            model.addAttribute("msg","用户名不存在");
            return "login";
        } catch (IncorrectCredentialsException e) { //密码错误
            model.addAttribute("msg","密码错误");
            return "login";
        }
    }
}🎜UserRealm🎜package com.example.demo02.pojo;
import lombok.AllArgsConstructor;
import lombok.Data;
import lombok.NoArgsConstructor;
@Data
@AllArgsConstructor
@NoArgsConstructor
public class User {
private int id;
private String name;
private String pwd;
private String perms;
}🎜couche de service🎜D'abord la classe UserServiceImpl🎜package com.example.demo02.config;
import at.pollux.thymeleaf.shiro.dialect.ShiroDialect;
import org.apache.shiro.authc.credential.HashedCredentialsMatcher;
import org.apache.shiro.spring.web.ShiroFilterFactoryBean;
import org.apache.shiro.web.mgt.DefaultWebSecurityManager;
import org.springframework.beans.factory.annotation.Qualifier;
import org.springframework.context.annotation.Bean;
import org.springframework.context.annotation.Configuration;
import java.util.LinkedHashMap;
import java.util.Map;
//声明为配置类
@Configuration
public class ShiroConfig {
//创建 ShiroFilterFactoryBean
@Bean
public ShiroFilterFactoryBean
getShiroFilterFactoryBean(@Qualifier("securityManager")DefaultWebSecurityManager securityManager){
ShiroFilterFactoryBean shiroFilterFactoryBean = new ShiroFilterFactoryBean();
//设置安全管理器
shiroFilterFactoryBean.setSecurityManager(securityManager);
/*
添加Shiro内置过滤器,常用的有如下过滤器:
anon: 无需认证就可以访问
authc: 必须认证才可以访问
user: 如果使用了记住我功能就可以直接访问
perms: 拥有某个资源权限才可以访问
role: 拥有某个角色权限才可以访问
*
/
*/
//进行一个拦截
Map<String,String> filterMap = new LinkedHashMap<String, String>();
// filterMap.put("/user/add","authc");
// filterMap.put("/user/update","authc");
//授权
// filterMap.put("/user/add","perms[user:add]"); //大家记得注意顺序!
filterMap.put("/user/add","perms[user:add]");
filterMap.put("/user/update","perms[user:update]");
filterMap.put("/user/*","authc");
shiroFilterFactoryBean.setFilterChainDefinitionMap(filterMap);
shiroFilterFactoryBean.setLoginUrl("/toLogin");
//未授权页面
shiroFilterFactoryBean.setUnauthorizedUrl("/noauth");
return shiroFilterFactoryBean;
}
//创建 DefaultWebSecurityManager
@Bean(name = "securityManager")
public DefaultWebSecurityManager
getDefaultWebSecurityManager(@Qualifier("userRealm")UserRealm userRealm){
DefaultWebSecurityManager securityManager = new DefaultWebSecurityManager();
//2创建加密对象,设置相关属性
HashedCredentialsMatcher matcher = new HashedCredentialsMatcher();
//2.1采用md5加密
matcher.setHashAlgorithmName("md5");
//2.2迭代加密次数
matcher.setHashIterations(3);
//3将加密对象存储到myRealm中
userRealm.setCredentialsMatcher(matcher);
//关联Realm
securityManager.setRealm(userRealm);
return securityManager;
}
//创建 realm 对象
@Bean
public UserRealm userRealm(){
return new UserRealm();
}
//配置ShiroDialect:方言,用于 thymeleaf 和 shiro 标签配合使用
@Bean
public ShiroDialect getShiroDialect(){
return new ShiroDialect();
}
}🎜Ensuite, l'interface UserService🎜package com.example.demo02.config;
import com.example.demo02.pojo.User;
import com.example.demo02.service.UserService;
import org.apache.shiro.SecurityUtils;
import org.apache.shiro.authc.*;
import org.apache.shiro.authz.AuthorizationInfo;
import org.apache.shiro.authz.SimpleAuthorizationInfo;
import org.apache.shiro.realm.AuthorizingRealm;
import org.apache.shiro.subject.PrincipalCollection;
import org.apache.shiro.subject.Subject;
import org.apache.shiro.util.ByteSource;
import org.springframework.beans.factory.annotation.Autowired;
import java.util.List;
//自定义得UserRaelm
public class UserRealm extends AuthorizingRealm {
@Autowired
UserService userService;
//授权
@Override
protected AuthorizationInfo doGetAuthorizationInfo(PrincipalCollection principalCollection) {
System.out.println("执行了=》授权doGetAuthorizationInfo");
SimpleAuthorizationInfo info=new SimpleAuthorizationInfo();
// info.addStringPermission("user:update");
info.addStringPermission("user:add");
//拿到当前用户登陆对象
Subject subject= SecurityUtils.getSubject();
User currentUser= (User) subject.getPrincipal();//拿到User对象
info.addStringPermission(currentUser.getPerms());//设置当前用户对象
return info;
}
//执行认证逻辑
@Override
protected AuthenticationInfo doGetAuthenticationInfo(AuthenticationToken token) throws AuthenticationException {
System.out.println("执行了=>认证逻辑AuthenticationToken");
//假设数据库的用户名和密码
// String name = "root";
// String password = "123456";
//1.判断用户名
UsernamePasswordToken userToken = (UsernamePasswordToken)token;
//连接真实的数据库
User user= userService.queryUserByName(userToken.getUsername());
//
if(user==null){
return null;
}
Subject subject = SecurityUtils.getSubject();
subject.getSession().setAttribute("loginUser",user);
//2. 验证密码,我们可以使用一个AuthenticationInfo实现类SimpleAuthenticationInfo
// shiro会自动帮我们验证!重点是第二个参数就是要验证的密码!
return new SimpleAuthenticationInfo(user, user.getPwd(),ByteSource.Util.bytes("salt"),"");
// if(user !=null){
// AuthenticationInfo info = new SimpleAuthenticationInfo(
// token.getPrincipal(),
// user.getPwd(),
// ByteSource.Util.bytes("salt"),
// token.getPrincipal().toString()
// );
// return info;
// }
// return null;
}
}🎜mapper layer🎜Interface Usermapper🎜package com.example.demo02.service;
import com.example.demo02.mapper.UserMapper;
import com.example.demo02.pojo.User;
import org.springframework.beans.factory.annotation.Autowired;
import org.springframework.stereotype.Service;
@Service
public class UserServiceImpl implements UserService {
@Autowired
UserMapper userMapper;
@Override
public User queryUserByName(String name) {
return userMapper.queryUserByName(name);
}
}🎜Ensuite, il y a les statiques et les modèles dans les ressources frontales🎜 🎜 🎜 🎜Implémentation backend du schéma d'authentification 🎜🎜🎜🎜🎜Les données stockées dans la base de données sont un fichier crypté🎜🎜🎜🎜Ce qui précède est le contenu détaillé de. pour plus d'informations, suivez d'autres articles connexes sur le site Web de PHP en chinois!
Articles Liés
Voir plus- Débogage d'API : meilleures pratiques pour récupérer des données de test à partir d'une base de données
- Comment AtomicInteger peut-il améliorer la programmation simultanée en Java ?
- Pourquoi ma commande Shell fonctionne-t-elle dans le terminal mais échoue-t-elle en Java ?
- Comment générer des nombres aléatoires non déterministes en Java lors de l'utilisation d'une graine fixe ?
- Pourquoi les types bruts posent-ils des problèmes lorsque vous travaillez avec des méthodes génériques en Java ?