
Maison >Périphériques technologiques >IA >PathAI utilise l'apprentissage automatique pour piloter le développement de médicaments
PathAI utilise l'apprentissage automatique pour piloter le développement de médicaments

- 王林avant
- 2023-04-11 15:07:031381parcourir
Traducteur | Zhu Xianzhong
Reviewer | Sun Shujuan
PathAI, une société de technologie d'intelligence artificielle en pathologie située à Boston, aux États-Unis, est l'un des principaux fournisseurs d'outils et de services technologiques d'intelligence artificielle en pathologie (recherche sur les maladies). La plateforme qu'ils ont développée vise à exploiter les méthodes modernes d'apprentissage automatique, telles que la segmentation d'images, les réseaux neuronaux graphiques et l'apprentissage multi-instance, pour améliorer considérablement la précision du diagnostic et l'évaluation de l'efficacité des maladies complexes.
La pathologie manuelle traditionnelle est sujette à la subjectivité et à la variabilité de l'observateur, ce qui peut avoir un impact négatif sur les essais de diagnostic et de développement de médicaments. Avant d'examiner comment utiliser Pytorch pour améliorer les flux de travail de diagnostic, introduisons d'abord un flux de travail de pathologie simulé traditionnel qui ne repose pas sur l'apprentissage automatique.
Comment fonctionnent les produits biopharmaceutiques traditionnels
Les entreprises biopharmaceutiques peuvent découvrir de nouveaux traitements ou diagnostics de plusieurs manières. Une approche s’appuie fortement sur l’analyse de lames pathologiques pour répondre à diverses questions : Comment fonctionnent les voies de communication cellulaire spécifiques ? Des états pathologiques spécifiques sont-ils associés à la présence ou à l’absence de protéines spécifiques ? Pourquoi des médicaments spécifiques dans les essais cliniques fonctionnent-ils pour certains patients mais pas pour d’autres ? Existe-t-il un lien entre les résultats pour les patients et les nouveaux biomarqueurs ? etc.
Pour répondre à ces questions, les sociétés biopharmaceutiques s'appuient généralement sur des pathologistes professionnels pour analyser les lames et les aider à évaluer les problèmes qu'elles peuvent rencontrer.
Comme vous pouvez l’imaginer, il faut un pathologiste expert certifié pour faire une interprétation et un diagnostic précis. Dans une étude, 36 pathologistes différents ont obtenu 18 diagnostics différents à partir d’une seule biopsie, allant de l’absence de traitement à un traitement agressif nécessaire. Les pathologistes sollicitent également souvent l’avis de leurs collègues sur des cas limites difficiles. Compte tenu de la complexité du problème, il peut être difficile pour les pathologistes de poser un diagnostic correct, même avec la formation et la collaboration d'experts. Cet écart potentiel pourrait être dû aux différences entre les médicaments approuvés et ceux qui échouent aux essais cliniques.
Comment PathAI utilise l'apprentissage automatique pour piloter le développement de médicaments
PathAI a développé une série de modèles d'apprentissage automatique conçus pour fournir des informations sur le développement de médicaments, les essais cliniques et les diagnostics. À cette fin, PathAI exploite le framework Pytork pour le raisonnement au niveau des diapositives, en utilisant diverses méthodes, notamment les réseaux de neurones graphiques (GNN) et l'apprentissage multi-instance. Dans ce contexte, une « diapositive » fait référence à une numérisation grandeur nature d'une lame de verre, qui est un morceau de verre avec une fine couche de tissu au milieu qui a été colorée pour révéler diverses formations cellulaires. PyTorch permet à notre équipe d'utiliser ces différentes approches pour partager un cadre commun suffisamment robuste pour fonctionner dans toutes les conditions dont nous avons besoin. De plus, la syntaxe pythonique de haut niveau, impérative et impérative de PyTorch nous permet de prototyper rapidement des modèles, puis d'étendre ces modèles une fois que nous obtenons les résultats souhaités.
Apprentissage multi-instance sur des gigaoctets d'images
Un défi unique dans l'application des techniques d'apprentissage automatique à la pathologie est la taille même des images. Ces diaporamas numériques ont généralement une résolution de 100 000 x 100 000 pixels ou plus et ont une taille de plusieurs gigaoctets. Charger une image complète dans la mémoire GPU et y appliquer des algorithmes de vision par ordinateur traditionnels est une tâche presque impossible. L'annotation d'images de diapositives complètes (100 000 x 100 000) prend également beaucoup de temps et de ressources, en particulier lorsque les annotateurs sont des experts du domaine (pathologistes certifiés). Nous construisons souvent des modèles pour prédire les étiquettes au niveau de l'image, telles que la présence ou l'absence de cancer sur une lame de patient couvrant des milliers de pixels sur l'ensemble de l'image. La zone cancéreuse ne représente parfois qu’une petite partie de la diapositive entière, ce qui rend le problème d’apprentissage automatique similaire à la recherche d’une aiguille dans une botte de foin. En revanche, certains problèmes, comme la prédiction de certains biomarqueurs histologiques, nécessitent d’agréger les informations de l’ensemble de la lame, mais cet objectif est tout aussi difficile à atteindre en raison de la taille de l’image. Tous ces facteurs ajoutent une complexité algorithmique, informatique et logique significative lors de l’application de techniques d’apprentissage automatique à des problèmes de pathologie.
Décomposer l'image en patchs plus petits, apprendre les représentations des patchs, puis fusionner ces représentations pour prédire les étiquettes au niveau de l'image est un moyen de résoudre ce problème, comme le montre la figure ci-dessous. Une méthode couramment utilisée est appelée apprentissage à instances multiples (MIL). Chaque tranche est considérée comme une « instance » et un groupe de tranches forme un « package ». Les représentations de tranches individuelles sont regroupées pour prédire les étiquettes finales au niveau du package. Algorithmiquement, les instances de tranches individuelles dans un sac ne nécessitent aucune étiquette ; nous permettant ainsi d'apprendre les étiquettes au niveau du sac de manière faiblement supervisée. Ils utilisent également une fonction de pooling invariant par permutation, rendant les prédictions indépendantes de l’ordre des tranches et permettant une agrégation efficace des informations.
Habituellement, en utilisant la fonction de pooling basée sur l'attention, non seulement une agrégation efficace est possible, mais une valeur d'attention peut également être fournie pour chaque tranche du sac. Ces valeurs indiquent l'importance de la tranche correspondante dans la prédiction et peuvent être visualisées pour mieux comprendre les prédictions du modèle. Cet élément d'interprétabilité est important pour favoriser l'adoption de ces modèles dans le monde réel, et nous utilisons des variantes telles que les modèles MIL additifs pour obtenir cette interprétabilité spatiale. Sur le plan informatique, les modèles MIL évitent les problèmes liés à l'application de réseaux de neurones à des images de grande taille, car la représentation en tranches est obtenue indépendamment de la taille de l'image.
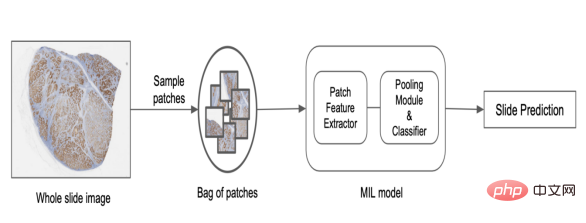
Dans PathAI, nous utilisons un modèle MIL personnalisé basé sur des réseaux profonds pour prédire les étiquettes au niveau de l'image. Le processus est décrit ci-dessous :
1. Sélectionnez des tranches de la diapositive en utilisant différentes méthodes d'échantillonnage.
2. Construisez un pack de tranches basé sur un échantillonnage aléatoire ou des règles heuristiques.
3. Générez des représentations de tranches pour chaque instance basées sur des modèles pré-entraînés ou des modèles d'apprentissage de représentation à grande échelle.
4. Appliquez la fonction de pooling invariant de permutation pour obtenir le score final du niveau de diapositive.
Maintenant, nous avons appris quelques détails avancés sur MIL dans Pytork. Examinons ensuite du code et à quel point il est facile de passer de l'idée au code de production dans Pytork. Nous définissons d'abord l'échantillonneur, la transformation et l'ensemble de données MIL :
<span style="color: rgb(0, 92, 197); margin: 0px; padding: 0px; background: none 0% 0% / auto repeat scroll padding-box border-box rgba(0, 0, 0, 0);">#创建一袋采样器,从幻灯片中随机采样切片</span><br><span style="color: rgb(89, 89, 89); margin: 0px; padding: 0px; background: none 0% 0% / auto repeat scroll padding-box border-box rgba(0, 0, 0, 0);">bag_sampler</span> <span style="color: rgb(215, 58, 73); margin: 0px; padding: 0px; background: none 0% 0% / auto repeat scroll padding-box border-box rgba(0, 0, 0, 0);">=</span> <span style="color: rgb(89, 89, 89); margin: 0px; padding: 0px; background: none 0% 0% / auto repeat scroll padding-box border-box rgba(0, 0, 0, 0);">RandomBagSampler</span>(<span style="color: rgb(89, 89, 89); margin: 0px; padding: 0px; background: none 0% 0% / auto repeat scroll padding-box border-box rgba(0, 0, 0, 0);">bag_size</span><span style="color: rgb(215, 58, 73); margin: 0px; padding: 0px; background: none 0% 0% / auto repeat scroll padding-box border-box rgba(0, 0, 0, 0);">=</span><span style="color: rgb(0, 92, 197); margin: 0px; padding: 0px; background: none 0% 0% / auto repeat scroll padding-box border-box rgba(0, 0, 0, 0);">12</span>)<br><br><span style="color: rgb(0, 92, 197); margin: 0px; padding: 0px; background: none 0% 0% / auto repeat scroll padding-box border-box rgba(0, 0, 0, 0);">#设置转换</span><br><span style="color: rgb(89, 89, 89); margin: 0px; padding: 0px; background: none 0% 0% / auto repeat scroll padding-box border-box rgba(0, 0, 0, 0);">crop_transform</span> <span style="color: rgb(215, 58, 73); margin: 0px; padding: 0px; background: none 0% 0% / auto repeat scroll padding-box border-box rgba(0, 0, 0, 0);">=</span> <span style="color: rgb(89, 89, 89); margin: 0px; padding: 0px; background: none 0% 0% / auto repeat scroll padding-box border-box rgba(0, 0, 0, 0);">FlipRotateCenterCrop</span>(<span style="color: rgb(89, 89, 89); margin: 0px; padding: 0px; background: none 0% 0% / auto repeat scroll padding-box border-box rgba(0, 0, 0, 0);">use_flips</span><span style="color: rgb(215, 58, 73); margin: 0px; padding: 0px; background: none 0% 0% / auto repeat scroll padding-box border-box rgba(0, 0, 0, 0);">=</span><span style="color: rgb(89, 89, 89); margin: 0px; padding: 0px; background: none 0% 0% / auto repeat scroll padding-box border-box rgba(0, 0, 0, 0);">True</span>)<br><br><span style="color: rgb(0, 92, 197); margin: 0px; padding: 0px; background: none 0% 0% / auto repeat scroll padding-box border-box rgba(0, 0, 0, 0);">#创建为每个包加载切片的数据集</span><br><span style="color: rgb(89, 89, 89); margin: 0px; padding: 0px; background: none 0% 0% / auto repeat scroll padding-box border-box rgba(0, 0, 0, 0);">train_dataset</span> <span style="color: rgb(215, 58, 73); margin: 0px; padding: 0px; background: none 0% 0% / auto repeat scroll padding-box border-box rgba(0, 0, 0, 0);">=</span> <span style="color: rgb(89, 89, 89); margin: 0px; padding: 0px; background: none 0% 0% / auto repeat scroll padding-box border-box rgba(0, 0, 0, 0);">MILDataset</span>(<br><span style="color: rgb(89, 89, 89); margin: 0px; padding: 0px; background: none 0% 0% / auto repeat scroll padding-box border-box rgba(0, 0, 0, 0);">bag_sampler</span><span style="color: rgb(215, 58, 73); margin: 0px; padding: 0px; background: none 0% 0% / auto repeat scroll padding-box border-box rgba(0, 0, 0, 0);">=</span><span style="color: rgb(89, 89, 89); margin: 0px; padding: 0px; background: none 0% 0% / auto repeat scroll padding-box border-box rgba(0, 0, 0, 0);">bag_sampler</span>,<br><span style="color: rgb(89, 89, 89); margin: 0px; padding: 0px; background: none 0% 0% / auto repeat scroll padding-box border-box rgba(0, 0, 0, 0);">samples_loader</span><span style="color: rgb(215, 58, 73); margin: 0px; padding: 0px; background: none 0% 0% / auto repeat scroll padding-box border-box rgba(0, 0, 0, 0);">=</span><span style="color: rgb(89, 89, 89); margin: 0px; padding: 0px; background: none 0% 0% / auto repeat scroll padding-box border-box rgba(0, 0, 0, 0);">sample_loader</span>,<br><span style="color: rgb(89, 89, 89); margin: 0px; padding: 0px; background: none 0% 0% / auto repeat scroll padding-box border-box rgba(0, 0, 0, 0);">transform</span><span style="color: rgb(215, 58, 73); margin: 0px; padding: 0px; background: none 0% 0% / auto repeat scroll padding-box border-box rgba(0, 0, 0, 0);">=</span><span style="color: rgb(89, 89, 89); margin: 0px; padding: 0px; background: none 0% 0% / auto repeat scroll padding-box border-box rgba(0, 0, 0, 0);">crop_transform</span>,<br>)
Après avoir défini l'échantillonneur et l'ensemble de données, nous devons définir le modèle qui est réellement entraîné à l'aide de cet ensemble de données. Ceci est facile à faire en utilisant la syntaxe familière de définition de modèle PyTorch, qui nous permet également de créer des modèles personnalisés.
<span style="color: rgb(89, 89, 89); margin: 0px; padding: 0px; background: none 0% 0% / auto repeat scroll padding-box border-box rgba(0, 0, 0, 0);">classifier</span> <span style="color: rgb(215, 58, 73); margin: 0px; padding: 0px; background: none 0% 0% / auto repeat scroll padding-box border-box rgba(0, 0, 0, 0);">=</span> <span style="color: rgb(89, 89, 89); margin: 0px; padding: 0px; background: none 0% 0% / auto repeat scroll padding-box border-box rgba(0, 0, 0, 0);">DefaultPooledClassifier</span>(<span style="color: rgb(89, 89, 89); margin: 0px; padding: 0px; background: none 0% 0% / auto repeat scroll padding-box border-box rgba(0, 0, 0, 0);">hidden_dims</span><span style="color: rgb(215, 58, 73); margin: 0px; padding: 0px; background: none 0% 0% / auto repeat scroll padding-box border-box rgba(0, 0, 0, 0);">=</span>[<span style="color: rgb(0, 92, 197); margin: 0px; padding: 0px; background: none 0% 0% / auto repeat scroll padding-box border-box rgba(0, 0, 0, 0);">256</span>, <span style="color: rgb(0, 92, 197); margin: 0px; padding: 0px; background: none 0% 0% / auto repeat scroll padding-box border-box rgba(0, 0, 0, 0);">256</span>], <span style="color: rgb(89, 89, 89); margin: 0px; padding: 0px; background: none 0% 0% / auto repeat scroll padding-box border-box rgba(0, 0, 0, 0);">input_dims</span><span style="color: rgb(215, 58, 73); margin: 0px; padding: 0px; background: none 0% 0% / auto repeat scroll padding-box border-box rgba(0, 0, 0, 0);">=</span><span style="color: rgb(0, 92, 197); margin: 0px; padding: 0px; background: none 0% 0% / auto repeat scroll padding-box border-box rgba(0, 0, 0, 0);">1024</span>, <span style="color: rgb(89, 89, 89); margin: 0px; padding: 0px; background: none 0% 0% / auto repeat scroll padding-box border-box rgba(0, 0, 0, 0);">output_dims</span><span style="color: rgb(215, 58, 73); margin: 0px; padding: 0px; background: none 0% 0% / auto repeat scroll padding-box border-box rgba(0, 0, 0, 0);">=</span><span style="color: rgb(0, 92, 197); margin: 0px; padding: 0px; background: none 0% 0% / auto repeat scroll padding-box border-box rgba(0, 0, 0, 0);">1</span>)<br><br><span style="color: rgb(89, 89, 89); margin: 0px; padding: 0px; background: none 0% 0% / auto repeat scroll padding-box border-box rgba(0, 0, 0, 0);">pooling</span> <span style="color: rgb(215, 58, 73); margin: 0px; padding: 0px; background: none 0% 0% / auto repeat scroll padding-box border-box rgba(0, 0, 0, 0);">=</span> <span style="color: rgb(89, 89, 89); margin: 0px; padding: 0px; background: none 0% 0% / auto repeat scroll padding-box border-box rgba(0, 0, 0, 0);">DefaultAttentionModule</span>(<br><span style="color: rgb(89, 89, 89); margin: 0px; padding: 0px; background: none 0% 0% / auto repeat scroll padding-box border-box rgba(0, 0, 0, 0);">input_dims</span><span style="color: rgb(215, 58, 73); margin: 0px; padding: 0px; background: none 0% 0% / auto repeat scroll padding-box border-box rgba(0, 0, 0, 0);">=</span><span style="color: rgb(0, 92, 197); margin: 0px; padding: 0px; background: none 0% 0% / auto repeat scroll padding-box border-box rgba(0, 0, 0, 0);">1024</span>,<br><span style="color: rgb(89, 89, 89); margin: 0px; padding: 0px; background: none 0% 0% / auto repeat scroll padding-box border-box rgba(0, 0, 0, 0);">hidden_dims</span><span style="color: rgb(215, 58, 73); margin: 0px; padding: 0px; background: none 0% 0% / auto repeat scroll padding-box border-box rgba(0, 0, 0, 0);">=</span>[<span style="color: rgb(0, 92, 197); margin: 0px; padding: 0px; background: none 0% 0% / auto repeat scroll padding-box border-box rgba(0, 0, 0, 0);">256</span>, <span style="color: rgb(0, 92, 197); margin: 0px; padding: 0px; background: none 0% 0% / auto repeat scroll padding-box border-box rgba(0, 0, 0, 0);">256</span>],<br><span style="color: rgb(89, 89, 89); margin: 0px; padding: 0px; background: none 0% 0% / auto repeat scroll padding-box border-box rgba(0, 0, 0, 0);">output_activation</span><span style="color: rgb(215, 58, 73); margin: 0px; padding: 0px; background: none 0% 0% / auto repeat scroll padding-box border-box rgba(0, 0, 0, 0);">=</span><span style="color: rgb(89, 89, 89); margin: 0px; padding: 0px; background: none 0% 0% / auto repeat scroll padding-box border-box rgba(0, 0, 0, 0);">StableSoftmax</span>()<br>)<br><br># <span style="color: rgb(89, 89, 89); margin: 0px; padding: 0px; background: none 0% 0% / auto repeat scroll padding-box border-box rgba(0, 0, 0, 0);">定义由特征化器、池模块和分类器组成的模型</span><br><span style="color: rgb(89, 89, 89); margin: 0px; padding: 0px; background: none 0% 0% / auto repeat scroll padding-box border-box rgba(0, 0, 0, 0);">model</span> <span style="color: rgb(215, 58, 73); margin: 0px; padding: 0px; background: none 0% 0% / auto repeat scroll padding-box border-box rgba(0, 0, 0, 0);">=</span> <span style="color: rgb(89, 89, 89); margin: 0px; padding: 0px; background: none 0% 0% / auto repeat scroll padding-box border-box rgba(0, 0, 0, 0);">DefaultMILGraph</span>(<span style="color: rgb(89, 89, 89); margin: 0px; padding: 0px; background: none 0% 0% / auto repeat scroll padding-box border-box rgba(0, 0, 0, 0);">featurizer</span><span style="color: rgb(215, 58, 73); margin: 0px; padding: 0px; background: none 0% 0% / auto repeat scroll padding-box border-box rgba(0, 0, 0, 0);">=</span><span style="color: rgb(89, 89, 89); margin: 0px; padding: 0px; background: none 0% 0% / auto repeat scroll padding-box border-box rgba(0, 0, 0, 0);">ShuffleNetV2</span>(), <span style="color: rgb(89, 89, 89); margin: 0px; padding: 0px; background: none 0% 0% / auto repeat scroll padding-box border-box rgba(0, 0, 0, 0);">classifier</span><span style="color: rgb(215, 58, 73); margin: 0px; padding: 0px; background: none 0% 0% / auto repeat scroll padding-box border-box rgba(0, 0, 0, 0);">=</span><span style="color: rgb(89, 89, 89); margin: 0px; padding: 0px; background: none 0% 0% / auto repeat scroll padding-box border-box rgba(0, 0, 0, 0);">classifier</span>, <span style="color: rgb(89, 89, 89); margin: 0px; padding: 0px; background: none 0% 0% / auto repeat scroll padding-box border-box rgba(0, 0, 0, 0);">pooling</span> <span style="color: rgb(215, 58, 73); margin: 0px; padding: 0px; background: none 0% 0% / auto repeat scroll padding-box border-box rgba(0, 0, 0, 0);">=</span> <span style="color: rgb(89, 89, 89); margin: 0px; padding: 0px; background: none 0% 0% / auto repeat scroll padding-box border-box rgba(0, 0, 0, 0);">pooling</span>)
Étant donné que ces modèles sont formés de bout en bout, ils constituent un moyen puissant de convertir directement des images de diapositives entières de gigapixels en étiquettes individuelles. En raison de sa large applicabilité à différents problèmes biologiques, deux aspects de sa mise en œuvre et de son déploiement sont importants :
- Contrôle configurable de chaque partie du pipeline, y compris les chargeurs de données, les parties modulaires du modèle et les interactions entre elles.
- Capable de parcourir rapidement le cycle de "formation de concept - mise en œuvre - expérimentation - productisation".
Pytork présente divers avantages en matière de modélisation MIL. Il fournit un moyen intuitif de créer des graphiques informatiques dynamiques avec un flux de contrôle flexible, ce qui est utile pour les expériences de recherche rapides. Les ensembles de données de type mappage, les échantillonneurs configurables et les échantillonneurs par lots nous permettent de personnaliser la façon dont nous construisons les packages de tuiles, permettant ainsi des expériences plus rapides. Étant donné que les modèles MIL sont gourmands en E/S, le parallélisme des données et les chargeurs de données pythoniques rendent la tâche très efficace et conviviale. Enfin, la nature orientée objet de PyTorch permet de créer des modules réutilisables, ce qui facilite une expérimentation rapide, des implémentations maintenables et des composants de composition pour une création facile de pipelines.
Explorez la structure de l'organisation spatiale avec GNN dans PyTorch
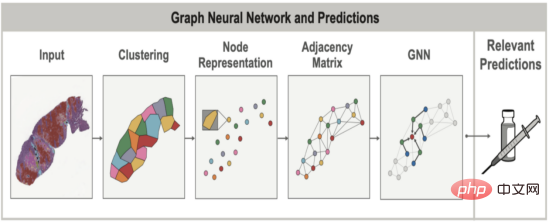
Dans les tissus sains et malades, la disposition spatiale et la structure des cellules sont souvent aussi importantes que les cellules elles-mêmes. Lors de l'évaluation du cancer du poumon, par exemple, les pathologistes tentent d'examiner le regroupement et la structure globale des cellules tumorales (forment-elles des feuilles solides ? Ou se présentent-elles en grappes plus petites et localisées ?) pour déterminer si le cancer appartient à un sous-type spécifique qui varie considérablement. Cette relation spatiale entre les cellules et d’autres structures tissulaires peut être modélisée à l’aide de graphiques pour capturer simultanément la topologie des tissus et la composition cellulaire. Les réseaux de neurones graphiques (GNN) permettent l'apprentissage de modèles spatiaux dans ces graphiques qui sont en corrélation avec d'autres variables cliniques, telles que la surexpression de gènes dans certains cancers.
Fin 2020, lorsque la société PathAI a commencé à utiliser les GNN sur des échantillons de tissus, PyTorch a obtenu le support le meilleur et le plus mature pour la fonctionnalité GNN via le package PyG. Cela a fait de PyTork un choix naturel pour notre équipe, car nous savions que les modèles GNN constituaient un concept d'apprentissage automatique important que nous souhaitions explorer.
L'une des principales valeurs ajoutées des GNN dans le contexte d'échantillons de tissus est que le graphique lui-même peut révéler des relations spatiales qui seraient autrement difficiles à trouver par la seule inspection visuelle. Dans notre récente publication AACR, nous avons noté qu’en utilisant les GNN, nous pouvons mieux comprendre l’impact de la présence d’agrégats de cellules immunitaires (en particulier les structures lymphoïdes tertiaires, ou TLS) dans le microenvironnement tumoral sur les résultats pour les patients. Dans ce cas, les méthodes GNN ont été utilisées pour prédire l'expression génique associée à la présence de TLS et pour identifier les caractéristiques histologiques liées au TLS en dehors de la région TLS. Cet aperçu de l’expression des gènes serait difficile à identifier à partir d’images d’échantillons de tissus sans l’aide de modèles ML.
L'une des variantes GNN les plus prometteuses que nous avons utilisées avec succès est le pooling de graphiques d'auto-attention. Voyons ensuite comment nous définissons le modèle Self-Attention Graph Pooling (SAGPool) à l'aide de PyTorch et PyG :
<span style="color: rgb(215, 58, 73); margin: 0px; padding: 0px; background: none 0% 0% / auto repeat scroll padding-box border-box rgba(0, 0, 0, 0);">class</span> <span style="color: rgb(0, 92, 197); margin: 0px; padding: 0px; background: none 0% 0% / auto repeat scroll padding-box border-box rgba(0, 0, 0, 0);">SAGPool</span>(<span style="color: rgb(89, 89, 89); margin: 0px; padding: 0px; background: none 0% 0% / auto repeat scroll padding-box border-box rgba(0, 0, 0, 0);">torch</span>.<span style="color: rgb(0, 92, 197); margin: 0px; padding: 0px; background: none 0% 0% / auto repeat scroll padding-box border-box rgba(0, 0, 0, 0);">nn</span>.<span style="color: rgb(0, 92, 197); margin: 0px; padding: 0px; background: none 0% 0% / auto repeat scroll padding-box border-box rgba(0, 0, 0, 0);">Module</span>):<br><span style="color: rgb(89, 89, 89); margin: 0px; padding: 0px; background: none 0% 0% / auto repeat scroll padding-box border-box rgba(0, 0, 0, 0);">def</span> <span style="color: rgb(89, 89, 89); margin: 0px; padding: 0px; background: none 0% 0% / auto repeat scroll padding-box border-box rgba(0, 0, 0, 0);">__init__</span>(<span style="color: rgb(89, 89, 89); margin: 0px; padding: 0px; background: none 0% 0% / auto repeat scroll padding-box border-box rgba(0, 0, 0, 0);">self</span>, <span style="color: rgb(31, 127, 154); margin: 0px; padding: 0px; background: none 0% 0% / auto repeat scroll padding-box border-box rgba(0, 0, 0, 0);">...</span>):<br><span style="color: rgb(215, 58, 73); margin: 0px; padding: 0px; background: none 0% 0% / auto repeat scroll padding-box border-box rgba(0, 0, 0, 0);">super</span>().<span style="color: rgb(0, 92, 197); margin: 0px; padding: 0px; background: none 0% 0% / auto repeat scroll padding-box border-box rgba(0, 0, 0, 0);">__init__</span>()<br><span style="color: rgb(89, 89, 89); margin: 0px; padding: 0px; background: none 0% 0% / auto repeat scroll padding-box border-box rgba(0, 0, 0, 0);">self</span>.<span style="color: rgb(0, 92, 197); margin: 0px; padding: 0px; background: none 0% 0% / auto repeat scroll padding-box border-box rgba(0, 0, 0, 0);">conv1</span> <span style="color: rgb(215, 58, 73); margin: 0px; padding: 0px; background: none 0% 0% / auto repeat scroll padding-box border-box rgba(0, 0, 0, 0);">=</span> <span style="color: rgb(89, 89, 89); margin: 0px; padding: 0px; background: none 0% 0% / auto repeat scroll padding-box border-box rgba(0, 0, 0, 0);">GraphConv</span>(<span style="color: rgb(89, 89, 89); margin: 0px; padding: 0px; background: none 0% 0% / auto repeat scroll padding-box border-box rgba(0, 0, 0, 0);">in_features</span>, <span style="color: rgb(89, 89, 89); margin: 0px; padding: 0px; background: none 0% 0% / auto repeat scroll padding-box border-box rgba(0, 0, 0, 0);">hidden_features</span>, <span style="color: rgb(89, 89, 89); margin: 0px; padding: 0px; background: none 0% 0% / auto repeat scroll padding-box border-box rgba(0, 0, 0, 0);">aggr</span><span style="color: rgb(215, 58, 73); margin: 0px; padding: 0px; background: none 0% 0% / auto repeat scroll padding-box border-box rgba(0, 0, 0, 0);">=</span><span style="color: rgb(102, 153, 0); margin: 0px; padding: 0px; background: none 0% 0% / auto repeat scroll padding-box border-box rgba(0, 0, 0, 0);">'mean'</span>)<br><span style="color: rgb(89, 89, 89); margin: 0px; padding: 0px; background: none 0% 0% / auto repeat scroll padding-box border-box rgba(0, 0, 0, 0);">self</span>.<span style="color: rgb(0, 92, 197); margin: 0px; padding: 0px; background: none 0% 0% / auto repeat scroll padding-box border-box rgba(0, 0, 0, 0);">convs</span> <span style="color: rgb(215, 58, 73); margin: 0px; padding: 0px; background: none 0% 0% / auto repeat scroll padding-box border-box rgba(0, 0, 0, 0);">=</span> <span style="color: rgb(89, 89, 89); margin: 0px; padding: 0px; background: none 0% 0% / auto repeat scroll padding-box border-box rgba(0, 0, 0, 0);">torch</span>.<span style="color: rgb(0, 92, 197); margin: 0px; padding: 0px; background: none 0% 0% / auto repeat scroll padding-box border-box rgba(0, 0, 0, 0);">nn</span>.<span style="color: rgb(0, 92, 197); margin: 0px; padding: 0px; background: none 0% 0% / auto repeat scroll padding-box border-box rgba(0, 0, 0, 0);">ModuleList</span>()<br><span style="color: rgb(89, 89, 89); margin: 0px; padding: 0px; background: none 0% 0% / auto repeat scroll padding-box border-box rgba(0, 0, 0, 0);">self</span>.<span style="color: rgb(0, 92, 197); margin: 0px; padding: 0px; background: none 0% 0% / auto repeat scroll padding-box border-box rgba(0, 0, 0, 0);">pools</span> <span style="color: rgb(215, 58, 73); margin: 0px; padding: 0px; background: none 0% 0% / auto repeat scroll padding-box border-box rgba(0, 0, 0, 0);">=</span> <span style="color: rgb(89, 89, 89); margin: 0px; padding: 0px; background: none 0% 0% / auto repeat scroll padding-box border-box rgba(0, 0, 0, 0);">torch</span>.<span style="color: rgb(0, 92, 197); margin: 0px; padding: 0px; background: none 0% 0% / auto repeat scroll padding-box border-box rgba(0, 0, 0, 0);">nn</span>.<span style="color: rgb(0, 92, 197); margin: 0px; padding: 0px; background: none 0% 0% / auto repeat scroll padding-box border-box rgba(0, 0, 0, 0);">ModuleList</span>()<br><span style="color: rgb(89, 89, 89); margin: 0px; padding: 0px; background: none 0% 0% / auto repeat scroll padding-box border-box rgba(0, 0, 0, 0);">self</span>.<span style="color: rgb(0, 92, 197); margin: 0px; padding: 0px; background: none 0% 0% / auto repeat scroll padding-box border-box rgba(0, 0, 0, 0);">convs</span>.<span style="color: rgb(0, 92, 197); margin: 0px; padding: 0px; background: none 0% 0% / auto repeat scroll padding-box border-box rgba(0, 0, 0, 0);">extend</span>([<span style="color: rgb(89, 89, 89); margin: 0px; padding: 0px; background: none 0% 0% / auto repeat scroll padding-box border-box rgba(0, 0, 0, 0);">GraphConv</span>(<span style="color: rgb(89, 89, 89); margin: 0px; padding: 0px; background: none 0% 0% / auto repeat scroll padding-box border-box rgba(0, 0, 0, 0);">hidden_features</span>, <span style="color: rgb(89, 89, 89); margin: 0px; padding: 0px; background: none 0% 0% / auto repeat scroll padding-box border-box rgba(0, 0, 0, 0);">hidden_features</span>, <span style="color: rgb(89, 89, 89); margin: 0px; padding: 0px; background: none 0% 0% / auto repeat scroll padding-box border-box rgba(0, 0, 0, 0);">aggr</span><span style="color: rgb(215, 58, 73); margin: 0px; padding: 0px; background: none 0% 0% / auto repeat scroll padding-box border-box rgba(0, 0, 0, 0);">=</span><span style="color: rgb(102, 153, 0); margin: 0px; padding: 0px; background: none 0% 0% / auto repeat scroll padding-box border-box rgba(0, 0, 0, 0);">'mean'</span>) <span style="color: rgb(215, 58, 73); margin: 0px; padding: 0px; background: none 0% 0% / auto repeat scroll padding-box border-box rgba(0, 0, 0, 0);">for</span> <span style="color: rgb(89, 89, 89); margin: 0px; padding: 0px; background: none 0% 0% / auto repeat scroll padding-box border-box rgba(0, 0, 0, 0);">i</span> <span style="color: rgb(215, 58, 73); margin: 0px; padding: 0px; background: none 0% 0% / auto repeat scroll padding-box border-box rgba(0, 0, 0, 0);">in</span> <span style="color: rgb(89, 89, 89); margin: 0px; padding: 0px; background: none 0% 0% / auto repeat scroll padding-box border-box rgba(0, 0, 0, 0);">range</span>(<span style="color: rgb(89, 89, 89); margin: 0px; padding: 0px; background: none 0% 0% / auto repeat scroll padding-box border-box rgba(0, 0, 0, 0);">num_layers</span> <span style="color: rgb(215, 58, 73); margin: 0px; padding: 0px; background: none 0% 0% / auto repeat scroll padding-box border-box rgba(0, 0, 0, 0);">-</span> <span style="color: rgb(0, 92, 197); margin: 0px; padding: 0px; background: none 0% 0% / auto repeat scroll padding-box border-box rgba(0, 0, 0, 0);">1</span>)])<br><span style="color: rgb(89, 89, 89); margin: 0px; padding: 0px; background: none 0% 0% / auto repeat scroll padding-box border-box rgba(0, 0, 0, 0);">self</span>.<span style="color: rgb(0, 92, 197); margin: 0px; padding: 0px; background: none 0% 0% / auto repeat scroll padding-box border-box rgba(0, 0, 0, 0);">pools</span>.<span style="color: rgb(0, 92, 197); margin: 0px; padding: 0px; background: none 0% 0% / auto repeat scroll padding-box border-box rgba(0, 0, 0, 0);">extend</span>([<span style="color: rgb(89, 89, 89); margin: 0px; padding: 0px; background: none 0% 0% / auto repeat scroll padding-box border-box rgba(0, 0, 0, 0);">SAGPooling</span>(<span style="color: rgb(89, 89, 89); margin: 0px; padding: 0px; background: none 0% 0% / auto repeat scroll padding-box border-box rgba(0, 0, 0, 0);">hidden_features</span>, <span style="color: rgb(89, 89, 89); margin: 0px; padding: 0px; background: none 0% 0% / auto repeat scroll padding-box border-box rgba(0, 0, 0, 0);">ratio</span>, <span style="color: rgb(89, 89, 89); margin: 0px; padding: 0px; background: none 0% 0% / auto repeat scroll padding-box border-box rgba(0, 0, 0, 0);">GNN</span><span style="color: rgb(215, 58, 73); margin: 0px; padding: 0px; background: none 0% 0% / auto repeat scroll padding-box border-box rgba(0, 0, 0, 0);">=</span><span style="color: rgb(89, 89, 89); margin: 0px; padding: 0px; background: none 0% 0% / auto repeat scroll padding-box border-box rgba(0, 0, 0, 0);">GraphConv</span>, <span style="color: rgb(89, 89, 89); margin: 0px; padding: 0px; background: none 0% 0% / auto repeat scroll padding-box border-box rgba(0, 0, 0, 0);">min_score</span><span style="color: rgb(215, 58, 73); margin: 0px; padding: 0px; background: none 0% 0% / auto repeat scroll padding-box border-box rgba(0, 0, 0, 0);">=</span><span style="color: rgb(89, 89, 89); margin: 0px; padding: 0px; background: none 0% 0% / auto repeat scroll padding-box border-box rgba(0, 0, 0, 0);">min_score</span>) <span style="color: rgb(215, 58, 73); margin: 0px; padding: 0px; background: none 0% 0% / auto repeat scroll padding-box border-box rgba(0, 0, 0, 0);">for</span> <span style="color: rgb(89, 89, 89); margin: 0px; padding: 0px; background: none 0% 0% / auto repeat scroll padding-box border-box rgba(0, 0, 0, 0);">i</span> <span style="color: rgb(215, 58, 73); margin: 0px; padding: 0px; background: none 0% 0% / auto repeat scroll padding-box border-box rgba(0, 0, 0, 0);">in</span> <span style="color: rgb(89, 89, 89); margin: 0px; padding: 0px; background: none 0% 0% / auto repeat scroll padding-box border-box rgba(0, 0, 0, 0);">range</span>((<span style="color: rgb(89, 89, 89); margin: 0px; padding: 0px; background: none 0% 0% / auto repeat scroll padding-box border-box rgba(0, 0, 0, 0);">num_layers</span>) <span style="color: rgb(106, 115, 125); margin: 0px; padding: 0px; background: none 0% 0% / auto repeat scroll padding-box border-box rgba(0, 0, 0, 0);">// 2)])</span><br><span style="color: rgb(89, 89, 89); margin: 0px; padding: 0px; background: none 0% 0% / auto repeat scroll padding-box border-box rgba(0, 0, 0, 0);">self</span>.<span style="color: rgb(0, 92, 197); margin: 0px; padding: 0px; background: none 0% 0% / auto repeat scroll padding-box border-box rgba(0, 0, 0, 0);">jump</span> <span style="color: rgb(215, 58, 73); margin: 0px; padding: 0px; background: none 0% 0% / auto repeat scroll padding-box border-box rgba(0, 0, 0, 0);">=</span> <span style="color: rgb(89, 89, 89); margin: 0px; padding: 0px; background: none 0% 0% / auto repeat scroll padding-box border-box rgba(0, 0, 0, 0);">JumpingKnowledge</span>(<span style="color: rgb(89, 89, 89); margin: 0px; padding: 0px; background: none 0% 0% / auto repeat scroll padding-box border-box rgba(0, 0, 0, 0);">mode</span><span style="color: rgb(215, 58, 73); margin: 0px; padding: 0px; background: none 0% 0% / auto repeat scroll padding-box border-box rgba(0, 0, 0, 0);">=</span><span style="color: rgb(102, 153, 0); margin: 0px; padding: 0px; background: none 0% 0% / auto repeat scroll padding-box border-box rgba(0, 0, 0, 0);">'cat'</span>)<br><span style="color: rgb(89, 89, 89); margin: 0px; padding: 0px; background: none 0% 0% / auto repeat scroll padding-box border-box rgba(0, 0, 0, 0);">self</span>.<span style="color: rgb(0, 92, 197); margin: 0px; padding: 0px; background: none 0% 0% / auto repeat scroll padding-box border-box rgba(0, 0, 0, 0);">lin1</span> <span style="color: rgb(215, 58, 73); margin: 0px; padding: 0px; background: none 0% 0% / auto repeat scroll padding-box border-box rgba(0, 0, 0, 0);">=</span> <span style="color: rgb(89, 89, 89); margin: 0px; padding: 0px; background: none 0% 0% / auto repeat scroll padding-box border-box rgba(0, 0, 0, 0);">Linear</span>(<span style="color: rgb(89, 89, 89); margin: 0px; padding: 0px; background: none 0% 0% / auto repeat scroll padding-box border-box rgba(0, 0, 0, 0);">num_layers</span> <span style="color: rgb(215, 58, 73); margin: 0px; padding: 0px; background: none 0% 0% / auto repeat scroll padding-box border-box rgba(0, 0, 0, 0);">*</span> <span style="color: rgb(89, 89, 89); margin: 0px; padding: 0px; background: none 0% 0% / auto repeat scroll padding-box border-box rgba(0, 0, 0, 0);">hidden_features</span>, <span style="color: rgb(89, 89, 89); margin: 0px; padding: 0px; background: none 0% 0% / auto repeat scroll padding-box border-box rgba(0, 0, 0, 0);">hidden_features</span>)<br><span style="color: rgb(89, 89, 89); margin: 0px; padding: 0px; background: none 0% 0% / auto repeat scroll padding-box border-box rgba(0, 0, 0, 0);">self</span>.<span style="color: rgb(0, 92, 197); margin: 0px; padding: 0px; background: none 0% 0% / auto repeat scroll padding-box border-box rgba(0, 0, 0, 0);">lin2</span> <span style="color: rgb(215, 58, 73); margin: 0px; padding: 0px; background: none 0% 0% / auto repeat scroll padding-box border-box rgba(0, 0, 0, 0);">=</span> <span style="color: rgb(89, 89, 89); margin: 0px; padding: 0px; background: none 0% 0% / auto repeat scroll padding-box border-box rgba(0, 0, 0, 0);">Linear</span>(<span style="color: rgb(89, 89, 89); margin: 0px; padding: 0px; background: none 0% 0% / auto repeat scroll padding-box border-box rgba(0, 0, 0, 0);">hidden_features</span>, <span style="color: rgb(89, 89, 89); margin: 0px; padding: 0px; background: none 0% 0% / auto repeat scroll padding-box border-box rgba(0, 0, 0, 0);">out_features</span>)<br><span style="color: rgb(89, 89, 89); margin: 0px; padding: 0px; background: none 0% 0% / auto repeat scroll padding-box border-box rgba(0, 0, 0, 0);">self</span>.<span style="color: rgb(0, 92, 197); margin: 0px; padding: 0px; background: none 0% 0% / auto repeat scroll padding-box border-box rgba(0, 0, 0, 0);">out_activation</span> <span style="color: rgb(215, 58, 73); margin: 0px; padding: 0px; background: none 0% 0% / auto repeat scroll padding-box border-box rgba(0, 0, 0, 0);">=</span> <span style="color: rgb(89, 89, 89); margin: 0px; padding: 0px; background: none 0% 0% / auto repeat scroll padding-box border-box rgba(0, 0, 0, 0);">out_activation</span><br><span style="color: rgb(89, 89, 89); margin: 0px; padding: 0px; background: none 0% 0% / auto repeat scroll padding-box border-box rgba(0, 0, 0, 0);">self</span>.<span style="color: rgb(0, 92, 197); margin: 0px; padding: 0px; background: none 0% 0% / auto repeat scroll padding-box border-box rgba(0, 0, 0, 0);">dropout</span> <span style="color: rgb(215, 58, 73); margin: 0px; padding: 0px; background: none 0% 0% / auto repeat scroll padding-box border-box rgba(0, 0, 0, 0);">=</span> <span style="color: rgb(89, 89, 89); margin: 0px; padding: 0px; background: none 0% 0% / auto repeat scroll padding-box border-box rgba(0, 0, 0, 0);">dropout</span>
在上面的代码中,我们首先定义一个卷积图层,然后添加两个模块列表层,允许我们传入可变数量的层。然后,我们获取空模块列表,并附加可变数量的GraphConv层,后跟可变数量的SAGPooling层。然后,我们通过添加JumpingKnowledge层、两个线性层、激活函数和退出值来完成SAGPool定义。PyTorch直观的语法使我们能够抽象出使用最先进方法(如SAG池)的复杂性,同时保持我们熟悉的通用模型开发方法。
像我们上面描述的使用一个SAG池这样的模型只是GNN与PyTorch如何允许我们探索新想法的一个例子。我们最近还探索了多模式CNN-GNN混合模型,其结果比传统病理学家共识分数高20%。这些创新以及传统CNN和GNN之间的相互作用,再次得益于从研究到生产的短期模型开发循环。
改善患者预后
总而言之,为了实现我们使用人工智能驱动的病理学改善患者预后的使命,PathAI需要借助于ML开发框架,该框架:(1)在开发和探索的初始阶段促进快速迭代和轻松扩展(即模型配置为代码)(2)将模型训练和推理扩展到海量图像(3)轻松可靠地为我们产品的生产使用(在临床试验及以后)提供模型。
正如我们在本文中所展示的,PyTorch为我们提供了所有上述功能以及更多功能支持。我们对PyTorch框架的未来感到无比兴奋,甚至迫不及待地想看到我们可以使用该框架解决哪些其他有影响力的挑战。
译者介绍
朱先忠,51CTO社区编辑,51CTO专家博客、讲师,潍坊一所高校计算机教师,自由编程界老兵一枚。早期专注各种微软技术(编著成ASP.NET AJX、Cocos 2d-X相关三本技术图书),近十多年投身于开源世界(熟悉流行全栈Web开发技术),了解基于OneNet/AliOS+Arduino/ESP32/树莓派等物联网开发技术与Scala+Hadoop+Spark+Flink等大数据开发技术。
原文标题:Case Study: PathAI Uses PyTorch to Improve Patient Outcomes with AI-powered Pathology,作者:Logan Kilpatrick, Harshith Padigela, Syed Ashar Javed, Robert Egger
Ce qui précède est le contenu détaillé de. pour plus d'informations, suivez d'autres articles connexes sur le site Web de PHP en chinois!
Articles Liés
Voir plus- Tendances technologiques à surveiller en 2023
- Comment l'intelligence artificielle apporte un nouveau travail quotidien aux équipes des centres de données
- L'intelligence artificielle ou l'automatisation peuvent-elles résoudre le problème de la faible efficacité énergétique des bâtiments ?
- Co-fondateur d'OpenAI interviewé par Huang Renxun : les capacités de raisonnement de GPT-4 n'ont pas encore atteint les attentes
- Bing de Microsoft surpasse Google en termes de trafic de recherche grâce à la technologie OpenAI