
Maison >Opération et maintenance >exploitation et maintenance Linux >Qu'est-ce que le processus numéro 0 sous Linux ?
Qu'est-ce que le processus numéro 0 sous Linux ?

- 青灯夜游original
- 2023-03-15 19:31:193963parcourir
Sous Linux, le processus n°0 fait référence au processus inactif, qui est le premier processus démarré par Linux ; le champ comm de sa task_struct est "swapper", il est donc également appelé processus swpper. Le processus n ° 0 est le seul processus qui n'est pas généré via fork ou kernel_thread, car init_task est une variable statique (variable globale initialisée) et les PCB des autres processus sont créés par fork ou kernel_thread en appliquant dynamiquement de la mémoire.

L'environnement d'exploitation de ce tutoriel : système linux7.3, ordinateur Dell G3.
1. Processus n°0
Le processus n°0 est généralement également appelé processus inactif ou processus swapper.
Chaque processus possède un bloc de contrôle de processus PCB (Process Control Block). Le type de structure de données du PCB est struct task_struct. Le PCB correspondant au processus inactif est struct task_struct init_task.
Le processus inactif est le seul processus qui n'est pas généré via fork ou kernel_thread, car init_task est une variable statique (variable globale initialisée) et les PCB d'autres processus sont créés par fork ou kernel_thread en appliquant dynamiquement de la mémoire.
Chaque processus a une fonction correspondante. La fonction du processus inactif est start_kernel(), car avant d'entrer dans cette fonction, le pointeur de pile SP a déjà pointé vers le haut de la pile init_task. Le processus dans lequel vous vous trouvez dépend du processus. empiler les points SP.
Le processus n°0 est le premier processus démarré par Linux. Le champ comm de sa task_struct est "swapper", il est donc également appelé processus swpper.
#define INIT_TASK_COMM "swapper"
Lorsque tous les processus du système sont opérationnels, le processus n°0 dégénère en un processus inactif. Lorsqu'il n'y a aucune tâche à exécuter sur un noyau, le processus inactif sera exécuté. Une fois le processus inactif en cours d'exécution, le cœur peut entrer dans un mode basse consommation, qui est WFI sur ARM.
Notre objectif dans cette section est de savoir comment le processus 0 est démarré. Dans le noyau Linux, une structure statique task_struct est spécialement définie pour le processus n°0, appelée init_task.
/*
 * Set up the first task table, touch at your own risk!. Base=0,
 * limit=0x1fffff (=2MB)
 */
struct task_struct init_task
= {
#ifdef CONFIG_THREAD_INFO_IN_TASK
    .thread_info    = INIT_THREAD_INFO(init_task),
    .stack_refcount    = ATOMIC_INIT(1),
#endif
    .state        = 0,
    .stack        = init_stack,
    .usage        = ATOMIC_INIT(2),
    .flags        = PF_KTHREAD,
    .prio        = MAX_PRIO - 20,
    .static_prio    = MAX_PRIO - 20,
    .normal_prio    = MAX_PRIO - 20,
    .policy        = SCHED_NORMAL,
    .cpus_allowed    = CPU_MASK_ALL,
    .nr_cpus_allowed= NR_CPUS,
    .mm        = NULL,
    .active_mm    = &init_mm,
    .tasks        = LIST_HEAD_INIT(init_task.tasks),
    .ptraced    = LIST_HEAD_INIT(init_task.ptraced),
    .ptrace_entry    = LIST_HEAD_INIT(init_task.ptrace_entry),
    .real_parent    = &init_task,
    .parent        = &init_task,
    .children    = LIST_HEAD_INIT(init_task.children),
    .sibling    = LIST_HEAD_INIT(init_task.sibling),
    .group_leader    = &init_task,
    RCU_POINTER_INITIALIZER(real_cred, &init_cred),
    RCU_POINTER_INITIALIZER(cred, &init_cred),
    .comm        = INIT_TASK_COMM,
    .thread        = INIT_THREAD,
    .fs        = &init_fs,
    .files        = &init_files,
    .signal        = &init_signals,
    .sighand    = &init_sighand,
    .blocked    = {{0}},
    .alloc_lock    = __SPIN_LOCK_UNLOCKED(init_task.alloc_lock),
    .journal_info    = NULL,
    INIT_CPU_TIMERS(init_task)
    .pi_lock    = __RAW_SPIN_LOCK_UNLOCKED(init_task.pi_lock),
    .timer_slack_ns = 50000, /* 50 usec default slack */
    .thread_pid    = &init_struct_pid,
    .thread_group    = LIST_HEAD_INIT(init_task.thread_group),
    .thread_node    = LIST_HEAD_INIT(init_signals.thread_head),
};
EXPORT_SYMBOL(init_task);
Les membres de cette structure sont tous définis statiquement Pour une explication simple, cette structure a été simplement supprimée. Dans le même temps, nous ne prêtons attention qu'aux champs suivants dans cette structure et ne prêtons pas attention aux autres.
.thread_info = INIT_THREAD_INFO(init_task), cette structure est décrite en détail dans la relation entre thread_info et la pile du noyau
.stack = init_stack, init_stack est la définition statique de la pile du noyau
. comm = INIT_TASK_COMM, le nom du processus 0.
Thread_info et stack impliquent Init_stack, alors regardez d'abord où init_stack est défini.
J'ai finalement découvert que init_task est défini dans le script de l'éditeur de liens.
#define INIT_TASK_DATA(align)                        \
    . = ALIGN(align);                        \
    __start_init_task = .;                        \
    init_thread_union = .;                        \
    init_stack = .;                            \
    KEEP(*(.data..init_task))                    \
    KEEP(*(.data..init_thread_info))                \
    . = __start_init_task + THREAD_SIZE;                \
    __end_init_task = .;
définit une macro INIT_TASK_DATA dans le script de lien.
Parmi eux, __start_init_task est l'adresse de base de la pile noyau du processus n°0. Bien sûr, init_thread_union=init_task=__start_init_task.
L'adresse de fin de la pile du noyau du processus 0 est égale à __start_init_task + THREAD_SIZE La taille de THREAD_SIZE est généralement de 16 Ko ou 32 Ko dans ARM64. Alors __end_init_task est l'adresse de fin de la pile noyau du processus n°0.
Le processus inactif est automatiquement créé par le système et s'exécute dans l'état du noyau. Le processus inactif a pid=0. Son prédécesseur est le premier processus créé par le système et le seul processus qui n'est pas généré via fork ou kernel_thread. Une fois le système chargé, il évolue vers la planification et l'échange de processus.
2. Démarrage du noyau Linux
Les amis qui connaissent le noyau Linux savent que le chargeur de démarrage est généralement utilisé pour terminer le chargement du noyau Linux. Le chargeur de démarrage effectuera une initialisation matérielle, puis passera au noyau Linux. . Montez à l'adresse courante.
Si vous connaissez l'architecture ARM, vous savez également que l'architecture ARM64 est divisée en EL0, EL1, EL2 et EL3. Le démarrage normal commence généralement du mode privilège élevé au mode privilège faible. De manière générale, ARM64 exécute d'abord EL3, puis EL2, puis intercepte EL2 vers EL1, qui est notre noyau Linux.
Jetons un coup d'œil au code de démarrage du noyau Linux.
Chemin du code : dans le fichier arch/arm64/kernel/head.S
/*
 * Kernel startup entry point.
 * ---------------------------
 *
 * The requirements are:
 *   MMU = off, D-cache = off, I-cache = on or off,
 *   x0 = physical address to the FDT blob.
 *
 * This code is mostly position independent so you call this at
 * __pa(PAGE_OFFSET + TEXT_OFFSET).
 *
 * Note that the callee-saved registers are used for storing variables
 * that are useful before the MMU is enabled. The allocations are described
 * in the entry routines.
 */
    /*
     * The following callee saved general purpose registers are used on the
     * primary lowlevel boot path:
     *
     *  Register   Scope                      Purpose
     *  x21        stext() .. start_kernel()  FDT pointer passed at boot in x0
     *  x23        stext() .. start_kernel()  physical misalignment/KASLR offset
     *  x28        __create_page_tables()     callee preserved temp register
     *  x19/x20    __primary_switch()         callee preserved temp registers
     */
ENTRY(stext)
    bl    preserve_boot_args
    bl    el2_setup            // Drop to EL1, w0=cpu_boot_mode
    adrp    x23, __PHYS_OFFSET
    and    x23, x23, MIN_KIMG_ALIGN - 1    // KASLR offset, defaults to 0
    bl    set_cpu_boot_mode_flag
    bl    __create_page_tables
    /*
     * The following calls CPU setup code, see arch/arm64/mm/proc.S for
     * details.
     * On return, the CPU will be ready for the MMU to be turned on and
     * the TCR will have been set.
     */
    bl    __cpu_setup            // initialise processor
    b    __primary_switch
ENDPROC(stext)
Ce qui précède est le travail principal effectué par le noyau avant d'appeler start_kernel.
preserve_boot_args est utilisé pour conserver les paramètres passés par le bootloader, comme l'adresse du dtb habituel sur ARM
el2_setup : D'après les commentaires, il est utilisé pour piéger vers EL1, indiquant que nous sommes toujours en EL2 avant d'exécuter ceci command
__create_page_tables : Utilisation Pour créer une table de pages, Linux ne dispose que de pages pour gérer la mémoire physique. Avant d'utiliser l'adresse virtuelle, vous devez définir la page puis ouvrir la MMU. Il fonctionne toujours sur l'adresse physique
__primary_switch : La tâche principale est de terminer l'ouverture du MMU
__primary_switch:
    adrp    x1, init_pg_dir
    bl    __enable_mmu
    ldr    x8, =__primary_switched
    adrp    x0, __PHYS_OFFSET
    br    x8
ENDPROC(__primary_switch)
主要是调用__enable_mmu来打开mmu,之后我们访问的就是虚拟地址了
调用__primary_switched来设置0号进程的运行内核栈,然后调用start_kernel函数
/*
 * The following fragment of code is executed with the MMU enabled.
 *
 *   x0 = __PHYS_OFFSET
 */
__primary_switched:
    adrp    x4, init_thread_union
    add    sp, x4, #THREAD_SIZE
    adr_l    x5, init_task
    msr    sp_el0, x5            // Save thread_info

    adr_l    x8, vectors            // load VBAR_EL1 with virtual
    msr    vbar_el1, x8            // vector table address
    isb

    stp    xzr, x30, [sp, #-16]!
    mov    x29, sp

    str_l    x21, __fdt_pointer, x5        // Save FDT pointer

    ldr_l    x4, kimage_vaddr        // Save the offset between
    sub    x4, x4, x0            // the kernel virtual and
    str_l    x4, kimage_voffset, x5        // physical mappings

    // Clear BSS
    adr_l    x0, __bss_start
    mov    x1, xzr
    adr_l    x2, __bss_stop
    sub    x2, x2, x0
    bl    __pi_memset
    dsb    ishst                // Make zero page visible to PTW

    add    sp, sp, #16
    mov    x29, #0
    mov    x30, #0
    b    start_kernel
ENDPROC(__primary_switched)
init_thread_union就是我们在链接脚本中定义的,也就是0号进程的内核栈的栈底
add sp, x4, #THREAD_SIZE: 设置堆栈指针SP的值,就是内核栈的栈底+THREAD_SIZE的大小。现在SP指到了内核栈的顶端
最终通过b start_kernel就跳转到我们熟悉的linux内核入口处了。 至此0号进程就已经运行起来了。
三、1号进程
3.1 1号进程的创建
当一条b start_kernel指令运行后,内核就开始的内核的全面初始化操作。
asmlinkage __visible void __init start_kernel(void)
{
    char *command_line;
    char *after_dashes;
    set_task_stack_end_magic(&init_task);
    smp_setup_processor_id();
    debug_objects_early_init();
    cgroup_init_early();
    local_irq_disable();
    early_boot_irqs_disabled = true;
    /*
     * Interrupts are still disabled. Do necessary setups, then
     * enable them.
     */
    boot_cpu_init();
    page_address_init();
    pr_notice("%s", linux_banner);
    setup_arch(&command_line);
    /*
     * Set up the the initial canary and entropy after arch
     * and after adding latent and command line entropy.
     */
    add_latent_entropy();
    add_device_randomness(command_line, strlen(command_line));
    boot_init_stack_canary();
    mm_init_cpumask(&init_mm);
    setup_command_line(command_line);
    setup_nr_cpu_ids();
    setup_per_cpu_areas();
    smp_prepare_boot_cpu();    /* arch-specific boot-cpu hooks */
    boot_cpu_hotplug_init();
    build_all_zonelists(NULL);
    page_alloc_init();
    。。。。。。。
    acpi_subsystem_init();
    arch_post_acpi_subsys_init();
    sfi_init_late();
    /* Do the rest non-__init'ed, we're now alive */
    arch_call_rest_init();
}
void __init __weak arch_call_rest_init(void)
{
    rest_init();
}
start_kernel函数就是内核各个重要子系统的初始化,比如mm, cpu, sched, irq等等。最后会调用一个rest_init剩余部分初始化,start_kernel在其最后一个函数rest_init的调用中,会通过kernel_thread来生成一个内核进程,后者则会在新进程环境下调 用kernel_init函数,kernel_init一个让人感兴趣的地方在于它会调用run_init_process来执行根文件系统下的 /sbin/init等程序。
noinline void __ref rest_init(void)
{
    struct task_struct *tsk;
    int pid;
    rcu_scheduler_starting();
    /*
     * We need to spawn init first so that it obtains pid 1, however
     * the init task will end up wanting to create kthreads, which, if
     * we schedule it before we create kthreadd, will OOPS.
     */
    pid = kernel_thread(kernel_init, NULL, CLONE_FS);
    /*
     * Pin init on the boot CPU. Task migration is not properly working
     * until sched_init_smp() has been run. It will set the allowed
     * CPUs for init to the non isolated CPUs.
     */
    rcu_read_lock();
    tsk = find_task_by_pid_ns(pid, &init_pid_ns);
    set_cpus_allowed_ptr(tsk, cpumask_of(smp_processor_id()));
    rcu_read_unlock();
    numa_default_policy();
    pid = kernel_thread(kthreadd, NULL, CLONE_FS | CLONE_FILES);
    rcu_read_lock();
    kthreadd_task = find_task_by_pid_ns(pid, &init_pid_ns);
    rcu_read_unlock();
    /*
     * Enable might_sleep() and smp_processor_id() checks.
     * They cannot be enabled earlier because with CONFIG_PREEMPT=y
     * kernel_thread() would trigger might_sleep() splats. With
     * CONFIG_PREEMPT_VOLUNTARY=y the init task might have scheduled
     * already, but it's stuck on the kthreadd_done completion.
     */
    system_state = SYSTEM_SCHEDULING;
    complete(&kthreadd_done);
}
在这个rest_init函数中我们只关系两点:
pid = kernel_thread(kernel_init, NULL, CLONE_FS);
pid = kernel_thread(kthreadd, NULL, CLONE_FS | CLONE_FILES);
/*
 * Create a kernel thread.
 */
pid_t kernel_thread(int (*fn)(void *), void *arg, unsigned long flags)
{
    return _do_fork(flags|CLONE_VM|CLONE_UNTRACED, (unsigned long)fn,
        (unsigned long)arg, NULL, NULL, 0);
}
很明显这是创建了两个内核线程,而kernel_thread最终会调用do_fork根据参数的不同来创建一个进程或者内核线程。关系do_fork的实现我们在后面会做详细的介绍。当内核线程创建成功后就会调用设置的回调函数。
当kernel_thread(kernel_init)成功返回后,就会调用kernel_init内核线程,其实这时候1号进程已经产生了。1号进程的执行函数就是kernel_init, 这个函数被定义init/main.c中,接下来看下kernel_init主要做什么事情。
static int __ref kernel_init(void *unused)
{
    int ret;
    kernel_init_freeable();
    /* need to finish all async __init code before freeing the memory */
    async_synchronize_full();
    ftrace_free_init_mem();
    free_initmem();
    mark_readonly();
    /*
     * Kernel mappings are now finalized - update the userspace page-table
     * to finalize PTI.
     */
    pti_finalize();
    system_state = SYSTEM_RUNNING;
    numa_default_policy();
    rcu_end_inkernel_boot();
    if (ramdisk_execute_command) {
        ret = run_init_process(ramdisk_execute_command);
        if (!ret)
            return 0;
        pr_err("Failed to execute %s (error %d)\n",
               ramdisk_execute_command, ret);
    }
    /*
     * We try each of these until one succeeds.
     *
     * The Bourne shell can be used instead of init if we are
     * trying to recover a really broken machine.
     */
    if (execute_command) {
        ret = run_init_process(execute_command);
        if (!ret)
            return 0;
        panic("Requested init %s failed (error %d).",
              execute_command, ret);
    }
    if (!try_to_run_init_process("/sbin/init") ||
        !try_to_run_init_process("/etc/init") ||
        !try_to_run_init_process("/bin/init") ||
        !try_to_run_init_process("/bin/sh"))
        return 0;
    panic("No working init found.  Try passing init= option to kernel. "
          "See Linux Documentation/admin-guide/init.rst for guidance.");
}
kernel_init_freeable函数中就会做各种外设驱动的初始化。
最主要的工作就是通过execve执行/init可以执行文件。它按照配置文件/etc/initab的要求,完成系统启动工作,创建编号为1号、2号...的若干终端注册进程getty。每个getty进程设置其进程组标识号,并监视配置到系统终端的接口线路。当检测到来自终端的连接信号时,getty进程将通过函数execve()执行注册程序login,此时用户就可输入注册名和密码进入登录过程,如果成功,由login程序再通过函数execv()执行shell,该shell进程接收getty进程的pid,取代原来的getty进程。再由shell直接或间接地产生其他进程。
我们通常将init称为1号进程,其实在刚才kernel_init的时候1号线程已经创建成功,也可以理解kernel_init是1号进程的内核态,而我们所熟知的init进程是用户态的,调用execve函数之前属于内核态,调用之后就属于用户态了,执行的代码段与0号进程不在一样。
1号内核线程负责执行内核的部分初始化工作及进行系统配置,并创建若干个用于高速缓存和虚拟主存管理的内核线程。
至此1号进程就完美的创建成功了,而且也成功执行了init可执行文件。
3.2 init进程
随后,1号进程调用do_execve运行可执行程序init,并演变成用户态1号进程,即init进程。
init进程是linux内核启动的第一个用户级进程。init有许多很重要的任务,比如像启动getty(用于用户登录)、实现运行级别、以及处理孤立进程。
它按照配置文件/etc/initab的要求,完成系统启动工作,创建编号为1号、2号…的若干终端注册进程getty。
每个getty进程设置其进程组标识号,并监视配置到系统终端的接口线路。当检测到来自终端的连接信号时,getty进程将通过函数do_execve()执行注册程序login,此时用户就可输入注册名和密码进入登录过程,如果成功,由login程序再通过函数execv()执行shell,该shell进程接收getty进程的pid,取代原来的getty进程。再由shell直接或间接地产生其他进程。
上述过程可描述为:0号进程->1号内核进程->1号用户进程(init进程)->getty进程->shell进程
注意,上述过程描述中提到:1号内核进程调用执行init函数并演变成1号用户态进程(init进程),这里前者是init是函数,后者是进程。两者容易混淆,区别如下:
kernel_init函数在内核态运行,是内核代码
init进程是内核启动并运行的第一个用户进程,运行在用户态下。
一号内核进程调用execve()从文件/etc/inittab中加载可执行程序init并执行,这个过程并没有使用调用do_fork(),因此两个进程都是1号进程。
当内核启动了自己之后(已被装入内存、已经开始运行、已经初始化了所有的设备驱动程序和数据结构等等),通过启动用户级程序init来完成引导进程的内核部分。因此,init总是第一个进程(它的进程号总是1)。
当init开始运行,它通过执行一些管理任务来结束引导进程,例如检查文件系统、清理/tmp、启动各种服务以及为每个终端和虚拟控制台启动getty,在这些地方用户将登录系统。
Une fois le système complètement opérationnel, init redémarre getty pour chaque terminal duquel l'utilisateur s'est déconnecté (afin que l'utilisateur suivant puisse se connecter). init collecte également les processus orphelins : lorsqu'un processus démarre un processus enfant et se termine avant le processus enfant, le processus enfant devient immédiatement un processus enfant d'init. Ceci est important pour diverses raisons techniques, mais il est également bénéfique de le savoir car cela facilite la compréhension des listes de processus et des diagrammes d'arborescence de processus. Il existe très peu de variantes d'initialisation. La plupart des distributions Linux utilisent sysinit (écrit par Miguel van Smoorenburg), basé sur la conception init de System V. La version BSD d'UNIX a un init différent. La principale différence est le niveau d'exécution : System V l'a et BSD ne l'a pas (du moins traditionnellement). Cette distinction n'est pas primordiale. Ici, nous discutons uniquement de sysvinit. Configurez init pour démarrer getty : fichier /etc/inittab.
3.3 programme init
Le processus n°1 exécute le programme init via execve pour entrer dans l'espace utilisateur et devenir le processus init
Le noyau recherche init à plusieurs endroits. Les emplacements étaient auparavant couramment utilisés pour placer init, mais l'emplacement le plus approprié pour init (sur les systèmes Linux) est /sbin/init. Si le noyau ne trouve pas init, il essaiera d'exécuter /bin/sh. S'il échoue toujours, le démarrage du système échouera.
Par conséquent, le programme init est un processus qui peut être écrit par l'utilisateur. Si vous souhaitez voir le code source du programme init, vous pouvez vous y référer.
| init package | Instructions |
| sysvinit | L'outil de processus d'initialisation utilisé dans certaines versions antérieures disparaît progressivement de la phase d'historique de Linux. sysvinit est le système d'initialisation de style système V comme son nom. suggère qu'il provient de la série System V UNIX. Il offre une plus grande flexibilité que les systèmes d'initialisation de style BSD. Il s'agit d'un système d'initialisation UNIX populaire depuis des décennies et utilisé par diverses distributions Linux. |
| upstart | debian, Ubuntu et d'autres systèmes utilisent initdaemon |
| systemd | Systemd est le dernier système d'initialisation (init) des systèmes Linux. Son principal objectif de conception est de surmonter les défauts inhérents à sysvinit et de l'améliorer. le système. La vitesse de démarrage |
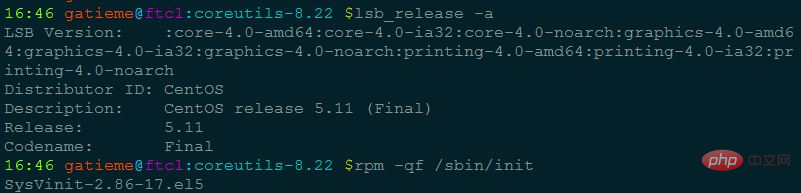
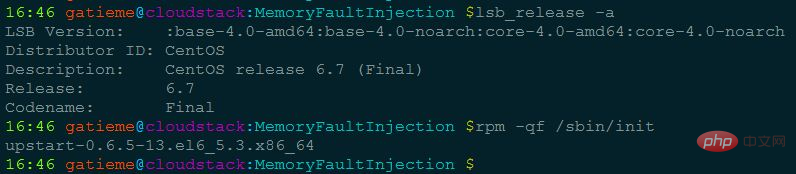
Ubuntu等使用deb包的系统可以通过dpkg -S查看程序所在的包

CentOS等使用rpm包的系统可以通过rpm -qf查看系统程序所在的包
四、2号进程
2号进程,也是由0号进程创建的。而且2号进程是所有内核线程父进程。
2号进程就是刚才rest_init中创建的另外一个内核线程。kernel_thread(kthreadd, NULL, CLONE_FS | CLONE_FILES);
当kernel_thread(kthreadd)返回时,2号进程已经创建成功了。而且会回调kthreadd函数。
int kthreadd(void *unused)
{
    struct task_struct *tsk = current;
    /* Setup a clean context for our children to inherit. */
    set_task_comm(tsk, "kthreadd");
    ignore_signals(tsk);
    set_cpus_allowed_ptr(tsk, cpu_all_mask);
    set_mems_allowed(node_states[N_MEMORY]);
    current->flags |= PF_NOFREEZE;
    cgroup_init_kthreadd();
    for (;;) {
        set_current_state(TASK_INTERRUPTIBLE);
        if (list_empty(&kthread_create_list))
            schedule();
        __set_current_state(TASK_RUNNING);
        spin_lock(&kthread_create_lock);
        while (!list_empty(&kthread_create_list)) {
            struct kthread_create_info *create;
            create = list_entry(kthread_create_list.next,
                        struct kthread_create_info, list);
            list_del_init(&create->list);
            spin_unlock(&kthread_create_lock);
            create_kthread(create);
            spin_lock(&kthread_create_lock);
        }
        spin_unlock(&kthread_create_lock);
    }
    return 0;
}
这段代码大概的意思也很简单明显;
- 设置当前进程的名字为"kthreadd",也就是task_struct的comm字段
- 然后就是while循环,设置当前的进程的状态是TASK_INTERRUPTIBLE是可以中断的
- 判断kthread_create_list链表是不是空,如果是空则就调度出去,让出cpu
- 如果不是空,则从链表中取出一个,然后调用kthread_create去创建一个内核线程。
- 所以说所有的内核线程的父进程都是2号进程,也就是kthreadd。
五、总结
linux启动的第一个进程是0号进程,是静态创建的,称为idle进程或者swapper进程。
在0号进程启动后会接连创建两个进程,分别是1号进程和2和进程。
1号进程最终会使用execve函数去调用可init可执行文件,init进程最终会去创建所有的应用进程,所以被称为inti进程。
2号进程会在内核中负责创建所有的内核线程,被称为kthreadd进程。
所以说0号进程是1号和2号进程的父进程;1号进程是所有用户态进程的父进程;2号进程是所有内核线程的父进程。
我们通过ps命令就可以详细的观察到这一现象。
root@ubuntu:zhuxl$ ps -eF
UID         PID   PPID  C    SZ   RSS PSR STIME TTY          TIME CMD
root          1      0  0 56317  5936   2 Feb16 ?        00:00:04 /sbin/init
root          2      0  0     0     0   1 Feb16 ?        00:00:00 [kthreadd]
上面很清晰的显示:PID=1的进程是init,PID=2的进程是kthreadd。而他们俩的父进程PPID=0,也就是0号进程。
UID         PID   PPID  C    SZ   RSS PSR STIME TTY          TIME CMD
root          4      2  0     0     0   0 Feb16 ?        00:00:00 [kworker/0:0H]
root          6      2  0     0     0   0 Feb16 ?        00:00:00 [mm_percpu_wq]
root          7      2  0     0     0   0 Feb16 ?        00:00:10 [ksoftirqd/0]
root          8      2  0     0     0   1 Feb16 ?        00:02:11 [rcu_sched]
root          9      2  0     0     0   0 Feb16 ?        00:00:00 [rcu_bh]
root         10      2  0     0     0   0 Feb16 ?        00:00:00 [migration/0]
root         11      2  0     0     0   0 Feb16 ?        00:00:00 [watchdog/0]
root         12      2  0     0     0   0 Feb16 ?        00:00:00 [cpuhp/0]
root         13      2  0     0     0   1 Feb16 ?        00:00:00 [cpuhp/1]
root         14      2  0     0     0   1 Feb16 ?        00:00:00 [watchdog/1]
root         15      2  0     0     0   1 Feb16 ?        00:00:00 [migration/1]
root         16      2  0     0     0   1 Feb16 ?        00:00:11 [ksoftirqd/1]
root         18      2  0     0     0   1 Feb16 ?        00:00:00 [kworker/1:0H]
root         19      2  0     0     0   2 Feb16 ?        00:00:00 [cpuhp/2]
root         20      2  0     0     0   2 Feb16 ?        00:00:00 [watchdog/2]
root         21      2  0     0     0   2 Feb16 ?        00:00:00 [migration/2]
root         22      2  0     0     0   2 Feb16 ?        00:00:11 [ksoftirqd/2]
root         24      2  0     0     0   2 Feb16 ?        00:00:00 [kworker/2:0H]
再来看下,所有内核线性的PPI=2, 也就是所有内核线性的父进程都是kthreadd进程。
UID         PID   PPID  C    SZ   RSS PSR STIME TTY          TIME CMD
root        362      1  0 21574  6136   2 Feb16 ?        00:00:03 /lib/systemd/systemd-journald
root        375      1  0 11906  2760   3 Feb16 ?        00:00:01 /lib/systemd/systemd-udevd
systemd+    417      1  0 17807  2116   3 Feb16 ?        00:00:02 /lib/systemd/systemd-resolved
systemd+    420      1  0 35997   788   3 Feb16 ?        00:00:00 /lib/systemd/systemd-timesyncd
root        487      1  0 43072  6060   0 Feb16 ?        00:00:00 /usr/bin/python3 /usr/bin/networkd-dispatcher --run-startup-triggers
root        489      1  0  8268  2036   2 Feb16 ?        00:00:00 /usr/sbin/cron -f
root        490      1  0  1138   548   0 Feb16 ?        00:00:01 /usr/sbin/acpid
root        491      1  0 106816 3284   1 Feb16 ?        00:00:00 /usr/sbin/ModemManager
root        506      1  0 27628  2132   2 Feb16 ?        00:00:01 /usr/sbin/irqbalance --foreground
所有用户态的进程的父进程PPID=1,也就是1号进程都是他们的父进程。
相关推荐:《Linux视频教程》
Ce qui précède est le contenu détaillé de. pour plus d'informations, suivez d'autres articles connexes sur le site Web de PHP en chinois!