
Maison >interface Web >js tutoriel >Un article pour parler du cluster dans Node.js
Un article pour parler du cluster dans Node.js

- 青灯夜游avant
- 2023-01-22 05:30:012962parcourir

Dans le travail quotidien, l'utilisation de Node.js est relativement superficielle. Apprenons quelque chose d'un peu plus avancé alors que je suis encore jeune. Commençons par le cluster.
Nicholas Zhang San a dit : « C'est une meilleure façon d'étudier avec des questions », alors essayons.
Lorsque j'ai utilisé le cluster pour la première fois, j'étais toujours curieux de savoir comment il pouvait permettre à plusieurs processus enfants d'écouter le même port sans conflit, comme le code suivant :
const cluster = require('cluster')
const net = require('net')
const cpus = require('os').cpus()
if (cluster.isPrimary) {
for (let i = 0; i < cpus.length; i++) {
cluster.fork()
}
} else {
net
.createServer(function (socket) {
socket.on('data', function (data) {
socket.write(`Reply from ${process.pid}: ` + data.toString())
})
socket.on('end', function () {
console.log('Close')
})
socket.write('Hello!\n')
})
.listen(9999)
}Ce code est exporté via le processus parent fork Plusieurs processus enfants sont créés, et ces processus enfants écoutent tous le port 9999 et peuvent fournir des services normalement. Comment cela se fait-il ? Étudions-le. [Tutoriels associés recommandés : tutoriel vidéo nodejs, Enseignement de la programmation]fork 出了多个子进程,且这些子进程都监听了 9999 这个端口并能正常提供服务,这是如何做到的呢?我们来研究一下。【相关教程推荐:nodejs视频教程、编程教学】
准备调试环境
学习 Node.js 官方提供库最好的方式当然是调试一下,所以,我们先来准备一下环境。注:本文的操作系统为 macOS Big Sur 11.6.6,其他系统请自行准备相应环境。
编译 Node.js
下载 Node.js 源码
git clone https://github.com/nodejs/node.git
然后在下面这两个地方加入断点,方便后面调试用:
// lib/internal/cluster/primary.js
function queryServer(worker, message) {
  debugger;
  // Stop processing if worker already disconnecting
  if (worker.exitedAfterDisconnect) return;

  ...
}
// lib/internal/cluster/child.js
send(message, (reply, handle) => {
debugger
if (typeof obj._setServerData === 'function') obj._setServerData(reply.data)
if (handle) {
// Shared listen socket
shared(reply, {handle, indexesKey, index}, cb)
} else {
// Round-robin.
rr(reply, {indexesKey, index}, cb)
}
})进入目录,执行
./configure --debug
make -j4
之后会生成 out/Debug/node
准备 IDE 环境
使用 vscode 调试,配置好 launch.json 就可以了(其他 IDE 类似,请自行解决):
{
  "version": "0.2.0",
  "configurations": [
    {
      "name": "Debug C++",
      "type": "cppdbg",
      "program": "/Users/youxingzhi/ayou/node/out/Debug/node",
      "request": "launch",
      "args": ["/Users/youxingzhi/ayou/node/index.js"],
      "stopAtEntry": false,
      "cwd": "${workspaceFolder}",
      "environment": [],
      "externalConsole": false,
      "MIMode": "lldb"
    },
    {
      "name": "Debug Node",
      "type": "node",
      "runtimeExecutable": "/Users/youxingzhi/ayou/node/out/Debug/node",
      "request": "launch",
      "args": ["--expose-internals", "--nolazy"],
      "skipFiles": [],
      "program": "${workspaceFolder}/index.js"
    }
  ]
}
其中第一个是用于调式 C++ 代码(需要安装 C/C++ 插件),第二个用于调式 JS 代码。接下来就可以开始调试了,我们暂时用调式 JS 代码的那个配置就好了。
Cluster 源码调试
准备好调试代码(为了调试而已,这里启动一个子进程就够了):
debugger
const cluster = require('cluster')
const net = require('net')

if (cluster.isPrimary) {
  debugger
  cluster.fork()
} else {
  const server = net.createServer(function (socket) {
    socket.on('data', function (data) {
      socket.write(`Reply from ${process.pid}: ` + data.toString())
    })
    socket.on('end', function () {
      console.log('Close')
    })
    socket.write('Hello!\n')
  })
  debugger
  server.listen(9999)
}
很明显,我们的程序可以分父进程和子进程这两部分来进行分析。
首先进入的是父进程:
执行 require('cluster') 时,会进入 lib/cluster.js 这个文件:
const childOrPrimary = 'NODE_UNIQUE_ID' in process.env ? 'child' : 'primary'
module.exports = require(`internal/cluster/${childOrPrimary}`)
会根据当前 process.env 上是否有 NODE_UNIQUE_ID 来引入不同的模块,此时是没有的,所以会引入 internal/cluster/primary.js 这个模块:
...
const cluster = new EventEmitter();
...
module.exports = cluster

const handles = new SafeMap()
cluster.isWorker = false
cluster.isMaster = true // Deprecated alias. Must be same as isPrimary.
cluster.isPrimary = true
cluster.Worker = Worker
cluster.workers = {}
cluster.settings = {}
cluster.SCHED_NONE = SCHED_NONE // Leave it to the operating system.
cluster.SCHED_RR = SCHED_RR // Primary distributes connections.
...
cluster.schedulingPolicy = schedulingPolicy

cluster.setupPrimary = function (options) {
...
}

// Deprecated alias must be same as setupPrimary
cluster.setupMaster = cluster.setupPrimary

function setupSettingsNT(settings) {
...
}

function createWorkerProcess(id, env) {
  ...
}

function removeWorker(worker) {
 ...
}

function removeHandlesForWorker(worker) {
 ...
}

cluster.fork = function (env) {
  ...
}
该模块主要是在 cluster 对象上挂载了一些属性和方法,并导出,这些后面回过头再看,我们继续往下调试。往下调试会进入 if (cluster.isPrimary) 分支,代码很简单,仅仅是 fork 出了一个新的子进程而已:
// lib/internal/cluster/primary.js
cluster.fork = function (env) {
  cluster.setupPrimary()
  const id = ++ids
  const workerProcess = createWorkerProcess(id, env)
  const worker = new Worker({
    id: id,
    process: workerProcess,
  })

  ...

  worker.process.on('internalMessage', internal(worker, onmessage))
  process.nextTick(emitForkNT, worker)
  cluster.workers[worker.id] = worker
  return worker
}cluster.setupPrimary():比较简单,初始化一些参数啥的。
createWorkerProcess(id, env):
// lib/internal/cluster/primary.js
function createWorkerProcess(id, env) {
  const workerEnv = {...process.env, ...env, NODE_UNIQUE_ID: `${id}`}
  const execArgv = [...cluster.settings.execArgv]

  ...

  return fork(cluster.settings.exec, cluster.settings.args, {
    cwd: cluster.settings.cwd,
    env: workerEnv,
    serialization: cluster.settings.serialization,
    silent: cluster.settings.silent,
    windowsHide: cluster.settings.windowsHide,
    execArgv: execArgv,
    stdio: cluster.settings.stdio,
    gid: cluster.settings.gid,
    uid: cluster.settings.uid,
  })
}
可以看到,该方法主要是通过 fork 启动了一个子进程来执行我们的 index.js,且启动子进程的时候设置了环境变量 NODE_UNIQUE_ID,这样 index.js 中 require('cluster') 的时候,引入的就是 internal/cluster/child.js 模块了。
worker.process.on('internalMessage', internal(worker, onmessage)):监听子进程传递过来的消息并处理。
接下来就进入了子进程的逻辑:
前面说了,此时引入的是 internal/cluster/child.js 模块,我们先跳过,继续往下,执行 server.listen(9999) 时实际上是调用了 Server 上的方法:
// lib/net.js
Server.prototype.listen = function (...args) {
  ...
      listenInCluster(
        this,
        null,
        options.port | 0,
        4,
        backlog,
        undefined,
        options.exclusive
      );
}
可以看到,最终是调用了 listenInCluster:
// lib/net.js
function listenInCluster(
  server,
  address,
  port,
  addressType,
  backlog,
  fd,
  exclusive,
  flags,
  options
) {
  exclusive = !!exclusive

  if (cluster === undefined) cluster = require('cluster')

  if (cluster.isPrimary || exclusive) {
    // Will create a new handle
    // _listen2 sets up the listened handle, it is still named like this
    // to avoid breaking code that wraps this method
    server._listen2(address, port, addressType, backlog, fd, flags)
    return
  }

  const serverQuery = {
    address: address,
    port: port,
    addressType: addressType,
    fd: fd,
    flags,
    backlog,
    ...options,
  }
  // Get the primary's server handle, and listen on it
  cluster._getServer(server, serverQuery, listenOnPrimaryHandle)

  function listenOnPrimaryHandle(err, handle) {
    err = checkBindError(err, port, handle)

    if (err) {
      const ex = exceptionWithHostPort(err, 'bind', address, port)
      return server.emit('error', ex)
    }

    // Reuse primary's server handle
    server._handle = handle
    // _listen2 sets up the listened handle, it is still named like this
    // to avoid breaking code that wraps this method
    server._listen2(address, port, addressType, backlog, fd, flags)
  }
}
由于是在子进程中执行,所以最后会调用 cluster._getServer(server, serverQuery, listenOnPrimaryHandle):
// lib/internal/cluster/child.js
// 这里的 cb 就是上面的 listenOnPrimaryHandle
cluster._getServer = function (obj, options, cb) {
  ...
  send(message, (reply, handle) => {
    debugger
    if (typeof obj._setServerData === 'function') obj._setServerData(reply.data)

    if (handle) {
      // Shared listen socket
      shared(reply, {handle, indexesKey, index}, cb)
    } else {
      // Round-robin.
      rr(reply, {indexesKey, index}, cb)
    }
  })

  ...
}
该函数最终会向父进程发送 queryServer 的消息,父进程处理完后会调用回调函数,回调函数中会调用 cb 即 listenOnPrimaryHandle。看来,listen 的逻辑是在父进程中进行的了。
接下来进入父进程:
父进程收到 queryServer 的消息后,最终会调用 queryServer 这个方法:
// lib/internal/cluster/primary.js
function queryServer(worker, message) {
// Stop processing if worker already disconnecting
if (worker.exitedAfterDisconnect) return
const key =
`${message.address}:${message.port}:${message.addressType}:` +
`${message.fd}:${message.index}`
let handle = handles.get(key)
if (handle === undefined) {
let address = message.address
// Find shortest path for unix sockets because of the ~100 byte limit
if (
message.port < 0 &&
typeof address === 'string' &&
process.platform !== 'win32'
) {
address = path.relative(process.cwd(), address)
if (message.address.length < address.length) address = message.address
}
// UDP is exempt from round-robin connection balancing for what should
// be obvious reasons: it's connectionless. There is nothing to send to
// the workers except raw datagrams and that's pointless.
if (
schedulingPolicy !== SCHED_RR ||
message.addressType === 'udp4' ||
message.addressType === 'udp6'
) {
handle = new SharedHandle(key, address, message)
} else {
handle = new RoundRobinHandle(key, address, message)
}
handles.set(key, handle)
}
...
}可以看到,这里主要是对 handle 的处理,这里的 handle 指的是调度策略,分为 SharedHandle 和 RoundRobinHandle
Préparer l'environnement de débogage
Apprentissage Bien sûr, la meilleure façon de déboguer la bibliothèque officielle Node.js est de la déboguer, préparons donc d'abord l'environnement. Remarque : Le système d'exploitation de cet article est macOS Big Sur 11.6.6. Veuillez préparer l'environnement correspondant pour les autres systèmes. 🎜🎜Compile Node.js🎜- 🎜 Téléchargez le code source de Node.js 🎜
// lib/internal/cluster/shared_handle.js
function SharedHandle(key, address, {port, addressType, fd, flags}) {
  this.key = key
  this.workers = new SafeMap()
  this.handle = null
  this.errno = 0

  let rval
  if (addressType === 'udp4' || addressType === 'udp6')
    rval = dgram._createSocketHandle(address, port, addressType, fd, flags)
  else rval = net._createServerHandle(address, port, addressType, fd, flags)

  if (typeof rval === 'number') this.errno = rval
  else this.handle = rval
}
🎜 Ajoutez ensuite des points d'arrêt aux deux endroits suivants pour faciliter le débogage ultérieur : 🎜// lib/net.js
function createServerHandle(address, port, addressType, fd, flags) {
...
} else {
handle = new TCP(TCPConstants.SERVER);
isTCP = true;
}
if (address || port || isTCP) {
...
err = handle.bind6(address, port, flags);
} else {
err = handle.bind(address, port);
}
}
...
return handle;
}// lib/internal/cluster/primary.js
function queryServer(worker, message) {
...
if (!handle.data) handle.data = message.data
// Set custom server data
handle.add(worker, (errno, reply, handle) => {
const {data} = handles.get(key)
if (errno) handles.delete(key) // Gives other workers a chance to retry.
send(
worker,
{
errno,
key,
ack: message.seq,
data,
...reply,
},
handle // TCP 对象
)
})
...
}- 🎜Entrez dans le répertoire et exécutez 🎜
// lib/internal/cluster/child.js
// `obj` is a net#Server or a dgram#Socket object.
cluster._getServer = function (obj, options, cb) {
...
send(message, (reply, handle) => {
if (typeof obj._setServerData === 'function') obj._setServerData(reply.data)
if (handle) {
// Shared listen socket
shared(reply, {handle, indexesKey, index}, cb)
} else {
// Round-robin.
rr(reply, {indexesKey, index}, cb) // cb 是 listenOnPrimaryHandle
}
})
...
}🎜 générera out/Debug/node🎜🎜🎜🎜Utilisez vscode pour déboguer et configurer launch.json (d'autres IDE sont similaires, veuillez le résoudre vous-même) : 🎜// lib/net.js
function listenOnPrimaryHandle(err, handle) {
err = checkBindError(err, port, handle)
if (err) {
const ex = exceptionWithHostPort(err, 'bind', address, port)
return server.emit('error', ex)
}
// Reuse primary's server handle 这里的 server 是 index.js 中 net.createServer 返回的那个对象
server._handle = handle
// _listen2 sets up the listened handle, it is still named like this
// to avoid breaking code that wraps this method
server._listen2(address, port, addressType, backlog, fd, flags)
}🎜Le premier est utilisé pour déboguer le code C++ (nécessite l'installation du plug-in C/C++), et le second est utilisé pour déboguer le code JS. Ensuite, vous pouvez commencer le débogage. Pour le moment, nous pouvons utiliser la configuration pour déboguer le code JS. 🎜Débogage du code source du cluster
🎜Préparez-vous à déboguer le code (à des fins de débogage, il suffit de démarrer un processus enfant ici) : 🎜// lib/net.js
function setupListenHandle(address, port, addressType, backlog, fd, flags) {
debug('setupListenHandle', address, port, addressType, backlog, fd)
// If there is not yet a handle, we need to create one and bind.
// In the case of a server sent via IPC, we don't need to do this.
if (this._handle) {
debug('setupListenHandle: have a handle already')
} else {
...
}
this[async_id_symbol] = getNewAsyncId(this._handle)
this._handle.onconnection = onconnection
this._handle[owner_symbol] = this
// Use a backlog of 512 entries. We pass 511 to the listen() call because
// the kernel does: backlogsize = roundup_pow_of_two(backlogsize + 1);
// which will thus give us a backlog of 512 entries.
const err = this._handle.listen(backlog || 511)
if (err) {
const ex = uvExceptionWithHostPort(err, 'listen', address, port)
this._handle.close()
this._handle = null
defaultTriggerAsyncIdScope(
this[async_id_symbol],
process.nextTick,
emitErrorNT,
this,
ex
)
return
}
}🎜Évidemment, notre programme peut être divisé en parents. Le processus et le sous-processus sont analysés en deux parties. 🎜🎜Le processus parent est entré en premier :🎜🎜Lors de l'exécution de require('cluster'), le fichier lib/cluster.js sera entré:🎜function queryServer(worker, message) {
debugger;
// Stop processing if worker already disconnecting
if (worker.exitedAfterDisconnect) return;
const key =
`${message.address}:${message.port}:${message.addressType}:` +
`${message.fd}:${message.index}`;
let handle = handles.get(key);
...
}🎜 introduira différents modules selon qu'il y a ou non NODE_UNIQUE_ID sur le process.env actuel. Il n'y en a pas pour le moment, donc internal/cluster. / sera introduit.primary.js Ce module : 🎜// lib/internal/cluster/round_robin_handle.js
function RoundRobinHandle(
key,
address,
{port, fd, flags, backlog, readableAll, writableAll}
) {
...
this.server = net.createServer(assert.fail)
...
else if (port >= 0) {
this.server.listen({
port,
host: address,
// Currently, net module only supports `ipv6Only` option in `flags`.
ipv6Only: Boolean(flags & constants.UV_TCP_IPV6ONLY),
backlog,
})
}
...
this.server.once('listening', () => {
this.handle = this.server._handle
this.handle.onconnection = (err, handle) => {
this.distribute(err, handle)
}
this.server._handle = null
this.server = null
})
}🎜Ce module monte principalement certaines propriétés et méthodes sur l'objet cluster et les exporte. Nous y reviendrons plus tard, et nous allons continuer le débogage. Lors du débogage, vous entrerez dans la branche if (cluster.isPrimary). Le code est très simple. Il suffit de fork créer un nouveau processus enfant : 🎜// lib/net.js
function setupListenHandle(address, port, addressType, backlog, fd, flags) {
debug('setupListenHandle', address, port, addressType, backlog, fd)
// If there is not yet a handle, we need to create one and bind.
// In the case of a server sent via IPC, we don't need to do this.
if (this._handle) {
debug('setupListenHandle: have a handle already')
} else {
debug('setupListenHandle: create a handle')
let rval = null
// Try to bind to the unspecified IPv6 address, see if IPv6 is available
if (!address && typeof fd !== 'number') {
rval = createServerHandle(DEFAULT_IPV6_ADDR, port, 6, fd, flags)
if (typeof rval === 'number') {
rval = null
address = DEFAULT_IPV4_ADDR
addressType = 4
} else {
address = DEFAULT_IPV6_ADDR
addressType = 6
}
}
if (rval === null)
rval = createServerHandle(address, port, addressType, fd, flags)
if (typeof rval === 'number') {
const error = uvExceptionWithHostPort(rval, 'listen', address, port)
process.nextTick(emitErrorNT, this, error)
return
}
this._handle = rval
}
this[async_id_symbol] = getNewAsyncId(this._handle)
this._handle.onconnection = onconnection
this._handle[owner_symbol] = this
...
}🎜. cluster .setupPrimary() : relativement simple, initialisation de certains paramètres et ainsi de suite. 🎜🎜createWorkerProcess(id, env) : 🎜// lib/internal/cluster/child.js
// `obj` is a net#Server or a dgram#Socket object.
cluster._getServer = function (obj, options, cb) {
...
send(message, (reply, handle) => {
if (typeof obj._setServerData === 'function') obj._setServerData(reply.data)
if (handle) {
// Shared listen socket
shared(reply, {handle, indexesKey, index}, cb)
} else {
// Round-robin.
rr(reply, {indexesKey, index}, cb) // cb 是 listenOnPrimaryHandle
}
})
...
}🎜Vous pouvez voir que cette méthode démarre principalement un processus enfant via fork pour exécuter notre index jscode>, et la variable d'environnement <code>NODE_UNIQUE_ID est définie lors du démarrage du processus enfant, de sorte que require('cluster') dans index.js lorsque , le module internal/cluster/child.js a été introduit. 🎜🎜worker.process.on('internalMessage', internal(worker, onmessage)) : écoutez le message transmis par le processus enfant et traitez-le. 🎜🎜Ensuite, nous entrons dans la logique du processus enfant :🎜🎜Comme mentionné précédemment, le module internal/cluster/child.js est introduit à ce moment, sautons-le d'abord, en continuant, lors de l'exécution de server.listen(9999), la méthode sur Server est en fait appelée : 🎜function rr(message, {indexesKey, index}, cb) {
...
// Faux handle. Mimics a TCPWrap with just enough fidelity to get away
// with it. Fools net.Server into thinking that it's backed by a real
// handle. Use a noop function for ref() and unref() because the control
// channel is going to keep the worker alive anyway.
const handle = {close, listen, ref: noop, unref: noop}
if (message.sockname) {
handle.getsockname = getsockname // TCP handles only.
}
assert(handles.has(key) === false)
handles.set(key, handle)
debugger
cb(0, handle)
}🎜Vous pouvez voir qu'à la fin, ListenInCluster : 🎜// lib/internal/cluster/round_robin_handle.js
this.server.once('listening', () => {
this.handle = this.server._handle
this.handle.onconnection = (err, handle) => {
this.distribute(err, handle)
}
this.server._handle = null
this.server = null
})🎜Puisqu'elle est exécutée dans le processus enfant, elle finira par appeler cluster._getServer(server, serverQuery, ListenOnPrimaryHandle) : 🎜// lib/internal/cluster/round_robin_handle.js
RoundRobinHandle.prototype.handoff = function (worker) {
...
const message = { act: 'newconn', key: this.key };
// 这里的 handle 是 clientHandle
sendHelper(worker.process, message, handle, (reply) => {
if (reply.accepted) handle.close();
else this.distribute(0, handle); // Worker is shutting down. Send to another.
this.handoff(worker);
});
};🎜Cette fonction sera éventuellement appelée pour le processus parent Envoyez le message de queryServer, et le processus parent appellera la fonction de rappel après le traitement. La fonction de rappel appellera cb, c'est-à-dire listenOnPrimaryHandle<.>. Il semble que la logique de <code>listen soit exécutée dans le processus parent. 🎜🎜Entrez ensuite le processus parent :🎜🎜Une fois que le processus parent a reçu le message de queryServer, il finira par appeler la méthode queryServer : 🎜 // lib/internal/cluster/child.js
process.on('internalMessage', internal(worker, onmessage))
send({act: 'online'})
function onmessage(message, handle) {
if (message.act === 'newconn') onconnection(message, handle)
else if (message.act === 'disconnect')
ReflectApply(_disconnect, worker, [true])
}🎜 Comme vous pouvez le voir, il s'agit principalement du traitement du handle. Le handle fait ici référence à la stratégie de planification, qui est divisée en SharedHandle et <code>RoundRobinHandle , correspondant respectivement aux deux stratégies de préemption et de polling (il y a des exemples de comparaison entre les deux dans la section supplémentaire en fin d'article). 🎜Node.js 中默认是 RoundRobinHandle 策略,可通过环境变量 NODE_CLUSTER_SCHED_POLICY 来修改,取值可以为 none(SharedHandle) 或 rr(RoundRobinHandle)。
<span style="font-size: 18px;">SharedHandle</span>
首先,我们来看一下 SharedHandle,由于我们这里是 TCP 协议,所以最后会通过 net._createServerHandle 创建一个 TCP 对象挂载在 handle 属性上(注意这里又有一个 handle,别搞混了):
// lib/internal/cluster/shared_handle.js
function SharedHandle(key, address, {port, addressType, fd, flags}) {
this.key = key
this.workers = new SafeMap()
this.handle = null
this.errno = 0
let rval
if (addressType === 'udp4' || addressType === 'udp6')
rval = dgram._createSocketHandle(address, port, addressType, fd, flags)
else rval = net._createServerHandle(address, port, addressType, fd, flags)
if (typeof rval === 'number') this.errno = rval
else this.handle = rval
}在 createServerHandle 中除了创建 TCP 对象外,还绑定了端口和地址:
// lib/net.js
function createServerHandle(address, port, addressType, fd, flags) {
  ...
  } else {
    handle = new TCP(TCPConstants.SERVER);
    isTCP = true;
  }

  if (address || port || isTCP) {
      ...
      err = handle.bind6(address, port, flags);
    } else {
      err = handle.bind(address, port);
    }
  }

  ...
  return handle;
}然后,queryServer 中继续执行,会调用 add 方法,最终会将 handle 也就是 TCP 对象传递给子进程:
// lib/internal/cluster/primary.js
function queryServer(worker, message) {
  ...
  if (!handle.data) handle.data = message.data

  // Set custom server data
  handle.add(worker, (errno, reply, handle) => {
    const {data} = handles.get(key)

    if (errno) handles.delete(key) // Gives other workers a chance to retry.

    send(
      worker,
      {
        errno,
        key,
        ack: message.seq,
        data,
        ...reply,
      },
      handle // TCP 对象
    )
  })
  ...
}之后进入子进程:
子进程收到父进程对于 queryServer 的回复后,会调用 shared:
// lib/internal/cluster/child.js
// `obj` is a net#Server or a dgram#Socket object.
cluster._getServer = function (obj, options, cb) {
  ...

  send(message, (reply, handle) => {
    if (typeof obj._setServerData === 'function') obj._setServerData(reply.data)

    if (handle) {
      // Shared listen socket
      shared(reply, {handle, indexesKey, index}, cb)
    } else {
      // Round-robin.
      rr(reply, {indexesKey, index}, cb) // cb 是 listenOnPrimaryHandle
    }
  })
  ...
}shared 中最后会调用 cb 也就是 listenOnPrimaryHandle:
// lib/net.js
function listenOnPrimaryHandle(err, handle) {
  err = checkBindError(err, port, handle)

  if (err) {
    const ex = exceptionWithHostPort(err, 'bind', address, port)
    return server.emit('error', ex)
  }
  // Reuse primary's server handle 这里的 server 是 index.js 中 net.createServer 返回的那个对象
  server._handle = handle
  // _listen2 sets up the listened handle, it is still named like this
  // to avoid breaking code that wraps this method
  server._listen2(address, port, addressType, backlog, fd, flags)
}这里会把 handle 赋值给 server._handle,这里的 server 是 index.js 中 net.createServer 返回的那个对象,并调用 server._listen2,也就是 setupListenHandle:
// lib/net.js
function setupListenHandle(address, port, addressType, backlog, fd, flags) {
  debug('setupListenHandle', address, port, addressType, backlog, fd)
  // If there is not yet a handle, we need to create one and bind.
  // In the case of a server sent via IPC, we don't need to do this.
  if (this._handle) {
    debug('setupListenHandle: have a handle already')
  } else {
    ...
  }

  this[async_id_symbol] = getNewAsyncId(this._handle)
  this._handle.onconnection = onconnection
  this._handle[owner_symbol] = this

  // Use a backlog of 512 entries. We pass 511 to the listen() call because
  // the kernel does: backlogsize = roundup_pow_of_two(backlogsize + 1);
  // which will thus give us a backlog of 512 entries.
  const err = this._handle.listen(backlog || 511)

  if (err) {
    const ex = uvExceptionWithHostPort(err, 'listen', address, port)
    this._handle.close()
    this._handle = null
    defaultTriggerAsyncIdScope(
      this[async_id_symbol],
      process.nextTick,
      emitErrorNT,
      this,
      ex
    )
    return
  }
}首先会执行 this._handle.onconnection = onconnection,由于客户端请求过来时会调用 this._handle(也就是 TCP 对象)上的 onconnection 方法,也就是会执行lib/net.js 中的 onconnection 方法建立连接,之后就可以通信了。为了控制篇幅,该方法就不继续往下了。
然后调用 listen 监听,注意这里参数 backlog 跟之前不同,不是表示端口,而是表示在拒绝连接之前,操作系统可以挂起的最大连接数量,也就是连接请求的排队数量。我们平时遇到的 listen EADDRINUSE: address already in use 错误就是因为这行代码返回了非 0 的错误。
如果还有其他子进程,也会同样走一遍上述的步骤,不同之处是在主进程中 queryServer 时,由于已经有 handle 了,不需要再重新创建了:
function queryServer(worker, message) {
  debugger;
  // Stop processing if worker already disconnecting
  if (worker.exitedAfterDisconnect) return;

  const key =
    `${message.address}:${message.port}:${message.addressType}:` +
    `${message.fd}:${message.index}`;
  let handle = handles.get(key);
  ...
}以上内容整理成流程图如下:
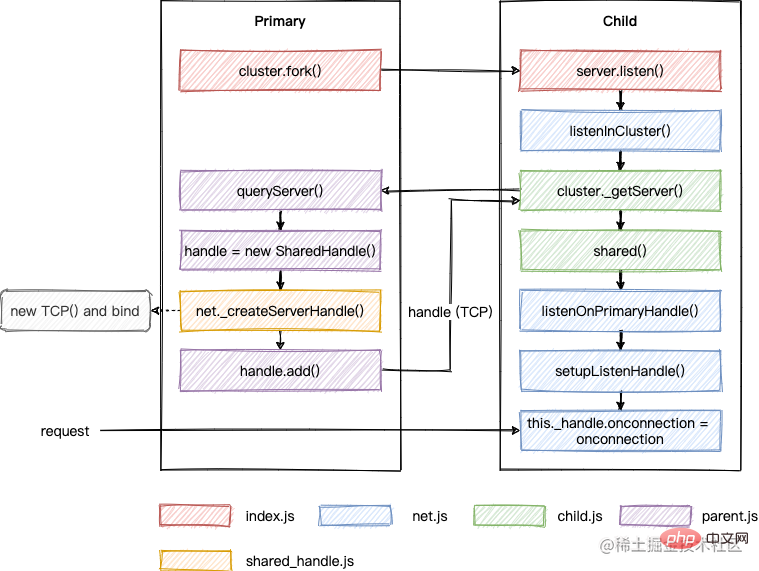
所谓的 SharedHandle,其实是在多个子进程中共享 TCP 对象的句柄,当客户端请求过来时,多个进程会去竞争该请求的处理权,会导致任务分配不均的问题,这也是为什么需要 RoundRobinHandle 的原因。接下来继续看看这种调度方式。
<span style="font-size: 18px;">RoundRobinHandle</span>
// lib/internal/cluster/round_robin_handle.js
function RoundRobinHandle(
  key,
  address,
  {port, fd, flags, backlog, readableAll, writableAll}
) {
  ...
  this.server = net.createServer(assert.fail)

  ...
  else if (port >= 0) {
    this.server.listen({
      port,
      host: address,
      // Currently, net module only supports `ipv6Only` option in `flags`.
      ipv6Only: Boolean(flags & constants.UV_TCP_IPV6ONLY),
      backlog,
    })
  }
  ...
  this.server.once('listening', () => {
    this.handle = this.server._handle
    this.handle.onconnection = (err, handle) => {
      this.distribute(err, handle)
    }
    this.server._handle = null
    this.server = null
  })
}如上所示,RoundRobinHandle 会调用 net.createServer() 创建一个 server,然后调用 listen 方法,最终会来到 setupListenHandle:
// lib/net.js
function setupListenHandle(address, port, addressType, backlog, fd, flags) {
  debug('setupListenHandle', address, port, addressType, backlog, fd)
  // If there is not yet a handle, we need to create one and bind.
  // In the case of a server sent via IPC, we don't need to do this.
  if (this._handle) {
    debug('setupListenHandle: have a handle already')
  } else {
    debug('setupListenHandle: create a handle')

    let rval = null

    // Try to bind to the unspecified IPv6 address, see if IPv6 is available
    if (!address && typeof fd !== 'number') {
      rval = createServerHandle(DEFAULT_IPV6_ADDR, port, 6, fd, flags)

      if (typeof rval === 'number') {
        rval = null
        address = DEFAULT_IPV4_ADDR
        addressType = 4
      } else {
        address = DEFAULT_IPV6_ADDR
        addressType = 6
      }
    }

    if (rval === null)
      rval = createServerHandle(address, port, addressType, fd, flags)

    if (typeof rval === 'number') {
      const error = uvExceptionWithHostPort(rval, 'listen', address, port)
      process.nextTick(emitErrorNT, this, error)
      return
    }
    this._handle = rval
  }

  this[async_id_symbol] = getNewAsyncId(this._handle)
  this._handle.onconnection = onconnection
  this._handle[owner_symbol] = this

  ...
}且由于此时 this._handle 为空,会调用 createServerHandle() 生成一个 TCP 对象作为 _handle。之后就跟 SharedHandle 一样了,最后也会回到子进程:
// lib/internal/cluster/child.js
// `obj` is a net#Server or a dgram#Socket object.
cluster._getServer = function (obj, options, cb) {
  ...

  send(message, (reply, handle) => {
    if (typeof obj._setServerData === 'function') obj._setServerData(reply.data)

    if (handle) {
      // Shared listen socket
      shared(reply, {handle, indexesKey, index}, cb)
    } else {
      // Round-robin.
      rr(reply, {indexesKey, index}, cb) // cb 是 listenOnPrimaryHandle
    }
  })
  ...
}不过由于 RoundRobinHandle 不会传递 handle 给子进程,所以此时会执行 rr:
function rr(message, {indexesKey, index}, cb) {
  ...
  // Faux handle. Mimics a TCPWrap with just enough fidelity to get away
  // with it. Fools net.Server into thinking that it's backed by a real
  // handle. Use a noop function for ref() and unref() because the control
  // channel is going to keep the worker alive anyway.
  const handle = {close, listen, ref: noop, unref: noop}

  if (message.sockname) {
    handle.getsockname = getsockname // TCP handles only.
  }

  assert(handles.has(key) === false)
  handles.set(key, handle)
  debugger
  cb(0, handle)
}可以看到,这里构造了一个假的 handle,然后执行 cb 也就是 listenOnPrimaryHandle。最终跟 SharedHandle 一样会调用 setupListenHandle 执行 this._handle.onconnection = onconnection。
RoundRobinHandle 逻辑到此就结束了,好像缺了点什么的样子。回顾下,我们给每个子进程中的 server 上都挂载了一个假的 handle,但它跟绑定了端口的 TCP 对象没有任何关系,如果客户端请求过来了,是不会执行它上面的 onconnection 方法的。之所以要这样写,估计是为了保持跟之前 SharedHandle 代码逻辑的统一。
此时,我们需要回到 RoundRobinHandle,有这样一段代码:
// lib/internal/cluster/round_robin_handle.js
this.server.once('listening', () => {
  this.handle = this.server._handle
  this.handle.onconnection = (err, handle) => {
    this.distribute(err, handle)
  }
  this.server._handle = null
  this.server = null
})在 listen 执行完后,会触发 listening 事件的回调,这里重写了 handle 上面的 onconnection。
所以,当客户端请求过来时,会调用 distribute 在多个子进程中轮询分发,这里又有一个 handle,这里的 handle 姑且理解为 clientHandle,即客户端连接的 handle,别搞混了。总之,最后会将这个 clientHandle 发送给子进程:
// lib/internal/cluster/round_robin_handle.js
RoundRobinHandle.prototype.handoff = function (worker) {
  ...

  const message = { act: 'newconn', key: this.key };
  // 这里的 handle 是 clientHandle
  sendHelper(worker.process, message, handle, (reply) => {
    if (reply.accepted) handle.close();
    else this.distribute(0, handle); // Worker is shutting down. Send to another.

    this.handoff(worker);
  });
};而子进程在 require('cluster') 时,已经监听了该事件:
// lib/internal/cluster/child.js
process.on('internalMessage', internal(worker, onmessage))
send({act: 'online'})

function onmessage(message, handle) {
  if (message.act === 'newconn') onconnection(message, handle)
  else if (message.act === 'disconnect')
    ReflectApply(_disconnect, worker, [true])
}最终也同样会走到 net.js 中的 function onconnection(err, clientHandle) 方法。这个方法第二个参数名就叫 clientHandle,这也是为什么前面的 handle 我想叫这个名字的原因。
还是用图来总结下:
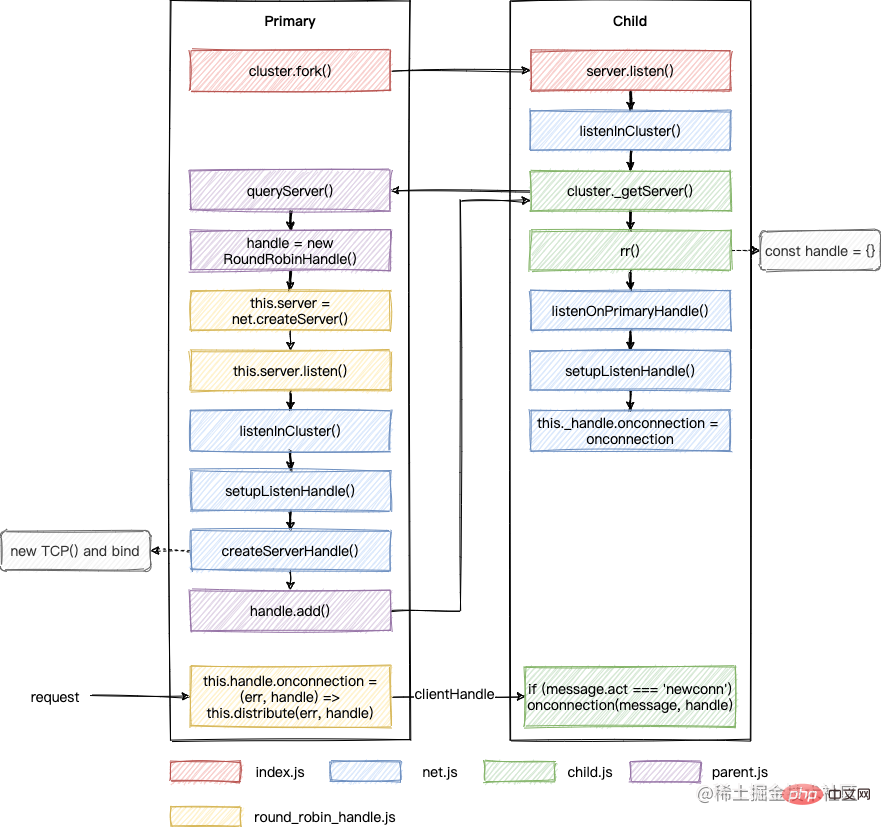
跟 SharedHandle 不同的是,该调度策略中 onconnection 最开始是在主进程中触发的,然后通过轮询算法挑选一个子进程,将 clientHandle 传递给它。
为什么端口不冲突
cluster 模块的调试就到此告一段落了,接下来我们来回答一下一开始的问题,为什么多个进程监听同一个端口没有报错?
网上有些文章说是因为设置了 SO_REUSEADDR,但其实跟这个没关系。通过上面的分析知道,不管什么调度策略,最终都只会在主进程中对 TCP 对象 bind 一次。
我们可以修改一下源代码来测试一下:
// deps/uv/src/unix/tcp.c 下面的 SO_REUSEADDR 改成 SO_DEBUG
if (setsockopt(tcp->io_watcher.fd, SOL_SOCKET, SO_REUSEADDR, &on, sizeof(on)))
编译后执行发现,我们仍然可以正常使用 cluster 模块。
那这个 SO_REUSEADDR 到底影响的是啥呢?我们继续来研究一下。
SO_REUSEADDR
首先,我们我们知道,下面的代码是会报错的:
const net = require('net')
const server1 = net.createServer()
const server2 = net.createServer()
server1.listen(9999)
server2.listen(9999)
但是,如果我稍微修改一下,就不会报错了:
const net = require('net')
const server1 = net.createServer()
const server2 = net.createServer()
server1.listen(9999, '127.0.0.1')
server2.listen(9999, '10.53.48.67')
原因在于 listen 时,如果不指定 address,则相当于绑定了所有地址,当两个 server 都这样做时,请求到来就不知道要给谁处理了。
我们可以类比成找对象,port 是对外貌的要求,address 是对城市的要求。现在甲乙都想要一个 port 是 1米7以上 不限城市的对象,那如果有一个 1米7以上 来自 深圳 的对象,就不知道介绍给谁了。而如果两者都指定了城市就好办多了。
那如果一个指定了 address,一个没有呢?就像下面这样:
const net = require('net')
const server1 = net.createServer()
const server2 = net.createServer()
server1.listen(9999, '127.0.0.1')
server2.listen(9999)
结果是:设置了 SO_REUSEADDR 可以正常运行,而修改成 SO_DEBUG 的会报错。
还是上面的例子,甲对城市没有限制,乙需要是来自 深圳 的,那当一个对象来自 深圳,我们可以选择优先介绍给乙,非 深圳 的就选择介绍给甲,这个就是 SO_REUSEADDR 的作用。
补充
<span style="font-size: 18px;">SharedHandle</span> 和 <span style="font-size: 18px;">RoundRobinHandle</span> 两种模式的对比
先准备下测试代码:
// cluster.js
const cluster = require('cluster')
const net = require('net')
if (cluster.isMaster) {
for (let i = 0; i < 4; i++) {
cluster.fork()
}
} else {
const server = net.createServer()
server.on('connection', (socket) => {
console.log(`PID: ${process.pid}!`)
})
server.listen(9997)
}// client.js
const net = require('net')
for (let i = 0; i < 20; i++) {
net.connect({port: 9997})
}RoundRobin先执行 node cluster.js,然后执行 node client.js,会看到如下输出,可以看到没有任何一个进程的 PID 是紧挨着的。至于为什么没有一直按照一样的顺序,后面再研究一下。
PID: 42904!
PID: 42906!
PID: 42905!
PID: 42904!
PID: 42907!
PID: 42905!
PID: 42906!
PID: 42907!
PID: 42904!
PID: 42905!
PID: 42906!
PID: 42907!
PID: 42904!
PID: 42905!
PID: 42906!
PID: 42907!
PID: 42904!
PID: 42905!
PID: 42906!
PID: 42904!
Shared
先执行 NODE_CLUSTER_SCHED_POLICY=none node cluster.js,则 Node.js 会使用 SharedHandle,然后执行 node client.js,会看到如下输出,可以看到同一个 PID 连续输出了多次,所以这种策略会导致进程任务分配不均的现象。就像公司里有些人忙到 996,有些人天天摸鱼,这显然不是老板愿意看到的现象,所以不推荐使用。
PID: 42561!
PID: 42562!
PID: 42561!
PID: 42562!
PID: 42564!
PID: 42561!
PID: 42562!
PID: 42563!
PID: 42561!
PID: 42562!
PID: 42563!
PID: 42564!
PID: 42564!
PID: 42564!
PID: 42564!
PID: 42564!
PID: 42563!
PID: 42563!
PID: 42564!
PID: 42563!
更多node相关知识,请访问:nodejs 教程!
Ce qui précède est le contenu détaillé de. pour plus d'informations, suivez d'autres articles connexes sur le site Web de PHP en chinois!