
Maison >interface Web >Voir.js >[Du moins profond au plus profond] Résumé et partage du développement pratique de la bibliothèque de composants vue
[Du moins profond au plus profond] Résumé et partage du développement pratique de la bibliothèque de composants vue

- 青灯夜游avant
- 2022-12-27 19:58:423149parcourir
Je suis content que le titre puisse rattraper son retard fin 2022. Cet article passe des niveaux les plus superficiels aux niveaux les plus profonds et résume le processus de développement de la bibliothèque de composants.

En raison de l'espace limité, le contenu de la partie ombrée sera introduit au milieu/dans l'article suivant.
Pas grand chose à dire, allons droit au but.
yarn workspace + lerna : Gérer les bibliothèques de composants et leurs projets écologiques
Considérant que la bibliothèque de composants globale a besoin d'un support de ressources multilatérales, telles que le code source des composants, le site de documentation de la bibliothèque, color-gen et d'autres outils de bibliothèque de classes, La configuration des spécifications de code, les plug-ins vite, les échafaudages, les livres d'histoires, etc. doivent être séparés en de nombreux packages, et les packages sont liés les uns aux autres. Par conséquent, envisagez d'utiliser la méthode de gestion monorepo, tout en utilisant fil comme outil de gestion des packages et. lerna comme outil de publication de packages. [Recommandations associées : tutoriel vidéo vuejs, développement web front-end]
Avant monorepo, le répertoire racine était un espace de travail, et nous pouvions gérer le package directement via l'ajout/suppression/exécution de fil, etc. Cependant, dans le projet monorepo, il existe plusieurs sous-packages dans le répertoire racine et la commande Yarn ne peut pas exploiter directement les sous-packages. Par exemple, la commande dev dans le sous-package package-a ne peut pas être démarrée via Yarn Run. dev dans le répertoire racine. Dans ce cas, nous devons activer la fonction Yarn. Workspaces, chaque sous-paquet correspond à un espace de travail, puis nous pouvons démarrer la commande dev dans package-a via yarn workspace package-a run. développeur. yarn workspace package-a run dev启动package-a中的dev命令了。
你可能会想,我们直接cd到package-a下运行就可以了,不错,但yarn workspaces的用武之地并不只此,像auto link,依赖提升,单.lock等才是它在monorepo中的价值所在。
启用yarn workspaces
我们在根目录packge.json中启用yarn workspaces:
{
  "private": true,
  "workspaces": [
    "packages/*"
  ]
}
packages目录下的每个直接子目录作为一个workspace。由于我们的根项目是不需要发布出去的,因此设置private为true。
安装lerna并初始化
不得不说,yarn workspaces已经具备了lerna部分功能,之所以使用它,是想借用它的发布工作流以弥补workspaces在monorepo下在这方面的不足。下面我们开始将lerna集成到项目中。
首先我们先安装一下lerna:
# W指workspace-root,即在项目根目录下安装,下同
yarn add lerna -D -W
# 由于经常使用lerna命令也推荐全局安装
yarn global add lerna
or
npm i lerna -g
执行lerna init初始化项目,成功之后会帮我们创建了一个lerna.json文件
lerna init
// lerna.json
{
  "$schema": "node_modules/lerna/schemas/lerna-schema.json",
  "useWorkspaces": true,
  "version": "0.0.0"
}$schema指向的lerna-schema.json描述了如何配置lerna.json,配置此字段后,鼠标悬浮在属性上会有对应的描述。注意,以上的路径值需要你在项目根目录下安装lerna。useWorkspaces定义了在lerna bootstrap期间是否结合yarn workspace。由于lerna默认的工作模式是固定模式,即发布时每个包的版本号一致。这里我们修改为
independent独立模式,同时将npm客户端设置为yarn。如果你喜欢pnpm,just do it!
// lerna.json
{
  "version": "independent",
  "npmClient": "yarn"
}至此yarn workspaces搭配lerna的monorepo项目就配置好了,非常简单!
额外的lerna配置
By the way!由于项目会使用commitlint对提交信息进行校验是否符合Argular规范,而lerna version默认为我们commit的信息是"Publish",因此我们需要进行一些额外的配置。
// lerna.json
{
  "command": {
    "version": {
      "message": "chore(release): publish",
      "conventionalCommits": true
    }
  }
}可以看到,我们使用符合Argular团队提交规范的"chore(release): publish"代替默认的"Publish"。
conventionalCommits表示当我们运行lerna version,实际上会运行lerna version --conventional-commits帮助我们生成CHANGELOG.md。
小结
在lerna刚发布的时候,那时的包管理工具还没有可用的workspaces解决方案,因此lerna自身实现了一套解决方案。时至今日,现代的包管理工具几乎都内置了workspaces功能,这使得lerna和yarn有许多功能重叠,比如执行包pkg-a的dev命令lerna run dev --stream --scope=pkg-a,我们完全可以使用yarn workspace pkg-a run dev代替。lerna bootstrap --hoist将安装包提升到根目录,而在yarn workspaces中直接运行yarn就可以了。
Anyway, 使用yarn作为软件包管理工具,lerna作为软件包发布工具,是在monorepo
Activer les espaces de travail de fil
Nous activons les espaces de travail de fil dans le répertoire racine package.json:cd argo-eslint-config yarn add eslint npx eslint --initChaque sous-répertoire direct du répertoire packages sert d'espace de travail. Puisque notre projet racine n'a pas besoin d'être publié, définissez private sur true. 🎜
🎜Installez et initialisez lerna🎜
🎜Je dois dire que les espaces de travail de fil ont déjà certaines des fonctions de lerna. La raison de son utilisation est d'emprunter sa publication. workflow Pour combler les lacunes des espaces de travail dans ce domaine sous monorepo. Ensuite, nous commençons à intégrer lerna dans le projet. 🎜🎜Nous installons d'abord lerna:🎜// argo-eslint-config/package.json
{
scripts: {
"lint:script": "npx eslint --ext .js,.jsx,.ts,.tsx --fix --quiet ./"
}
}🎜Exécutons lerna init pour initialiser le projet. Après succès, un fichier lerna.json sera créé pour nous🎜// settings.json
{
"editor.defaultFormatter": "dbaeumer.vscode-eslint",
"editor.codeActionsOnSave": {
"source.fixAll.eslint": true
}
}module.exports = {
env: {
browser: true,
es2021: true,
node: true
},
extends: ['plugin:vue/vue3-essential', 'standard-with-typescript'],
overrides: [],
parserOptions: {
ecmaVersion: 'latest',
sourceType: 'module'
},
plugins: ['vue'],
rules: {}
}- 🎜
$schemapointe vers lerna-schema.json, qui décrit comment configurer lerna.json. Après avoir configuré ce champ, passez la souris. sur l'attribut sera Il y a une description correspondante. Notez que la valeur du chemin ci-dessus nécessite que vous installiez lerna dans le répertoire racine du projet. 🎜 - 🎜
useWorkspacesdéfinit s'il faut combiner l'espace de travail de fil pendant lelerna bootstrap. 🎜 - 🎜Étant donné que le mode de fonctionnement par défaut de lerna est le mode fixe, c'est-à-dire que le numéro de version de chaque package est le même lors de sa sortie. Ici, nous le changeons en mode indépendant
independentet définissons le client npm suryarn. Si vous aimezpnpm, faites-le !🎜
// argo-eslint-config/package.json
{
"main": "index.js"
}🎜Il s'agit du projet monorepo de yarn workspaces avec lerna Configuré, très simple !🎜🎜Configuration lerna supplémentaire🎜
🎜Au fait ! Parce que le projet utiliseracommitlint pour soumettre les informations Vérifier si elle est conforme à la spécification Argular, et si la version lerna est par défaut "Publier" pour nos informations de validation, nous devons donc effectuer quelques configurations supplémentaires. 🎜// argo-eslint-config/package.json
{
"devDependencies": {
"@argo-design/eslint-config": "^1.0.0"
},
"eslintConfig": {
"root": true,
"extends": [
"@argo-design"
]
}
}🎜Comme vous pouvez le voir, nous utilisons "chore(release):publier" qui est conforme aux spécifications de soumission de l'équipe Argular au lieu du "Publier" par défaut. 🎜🎜conventionalCommits signifie que lorsque nous exécuterons la lerna version, il exécutera en fait la lerna version --conventional-commits pour nous aider à générer CHANGELOG.md . 🎜Résumé
🎜Lorsque lerna a été publié pour la première fois, il n'y avait pas de solutionworkspaces disponible pour les outils de gestion de paquets à cette époque, donc lerna lui-même Une solution a été mise en œuvre. Aujourd'hui, presque tous les outils modernes de gestion de paquets ont des fonctions workspaces intégrées, ce qui fait que lerna et Yarn ont de nombreuses fonctions qui se chevauchent, comme l'exécution de la commande dev du package pkg-a lerna run dev - - stream --scope=pkg-a, nous pouvons utiliser yarn workspace pkg-a run dev à la place. lerna bootstrap --hoist élèvera le package d'installation au répertoire racine et exécutera simplement Yarn directement dans les espaces de travail Yarn. 🎜🎜 Quoi qu'il en soit, utiliser yarn comme outil de gestion de progiciels et lerna comme outil de publication de progiciels est une bonne pratique dans le cadre de la méthode de gestion monorepo ! 🎜🎜🎜Intégrer l'outil Lint pour standardiser le code🎜🎜🎜C'est très impuissant, je sais que la plupart des gens n'aiment pas Lint, mais pour moi, c'est un must. 🎜集成eslint
packages目录下创建名为@argo-design/eslint-config(非文件夹名)的package
1. 安装eslint
cd argo-eslint-config
yarn add eslint
npx eslint --init
注意这里没有-D或者--save-dev。选择如下:
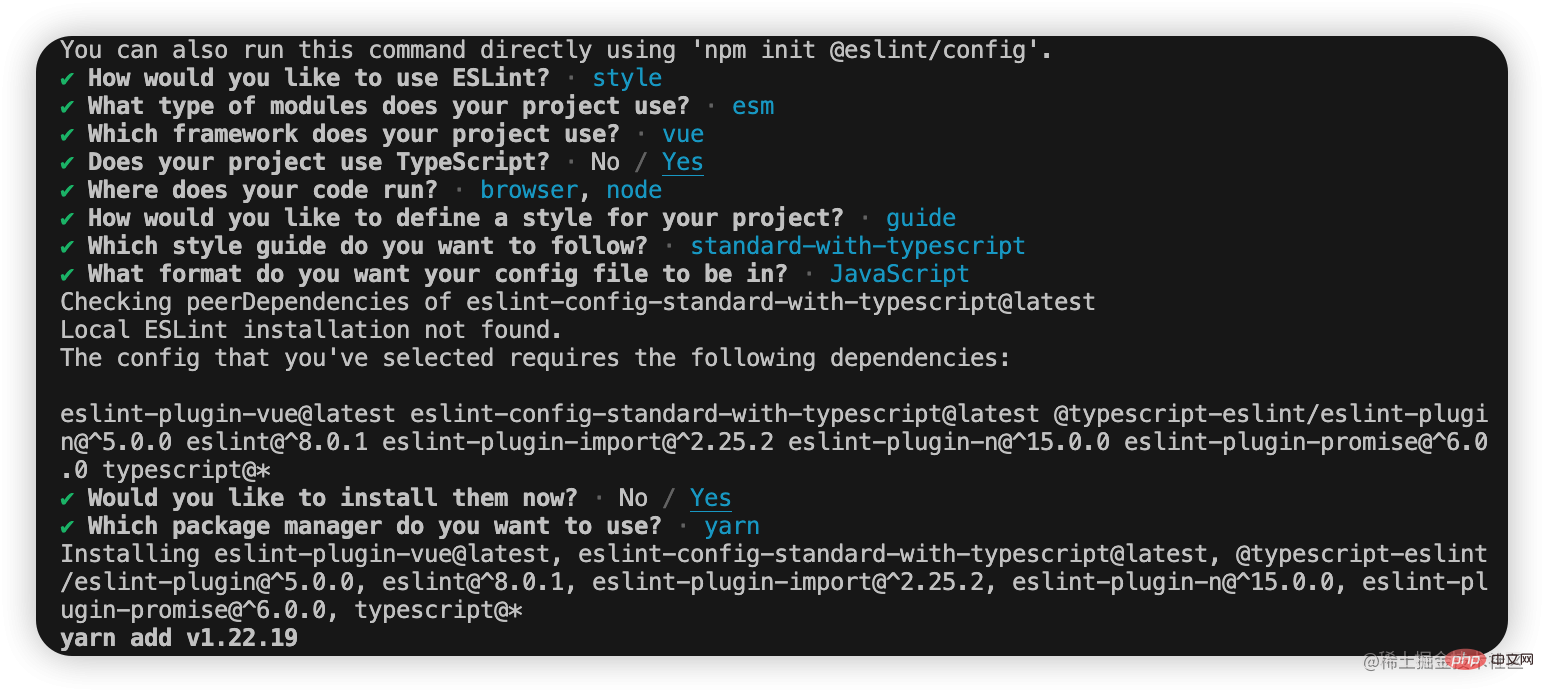
安装完成后手动将devDependencies下的依赖拷贝到dependencies中。或者你手动安装这一系列依赖。
2. 使用
// argo-eslint-config/package.json
{
  scripts: {
    "lint:script": "npx eslint --ext .js,.jsx,.ts,.tsx --fix --quiet ./"
  }
}运行yarn lint:script,将会自动修复代码规范错误警告(如果可以的话)。
3. VSCode保存时自动修复
安装VSCode Eslint插件并进行如下配置,此时在你保存代码时,也会自动修复代码规范错误警告。
// settings.json
{
  "editor.defaultFormatter": "dbaeumer.vscode-eslint",
  "editor.codeActionsOnSave": {
    "source.fixAll.eslint": true
  }
}4. 集成到项目全局
在argo-eslint-config中新建包入口文件index.js,并将.eslintrc.js的内容拷贝到index.js中
module.exports = {
  env: {
    browser: true,
    es2021: true,
    node: true
  },
  extends: ['plugin:vue/vue3-essential', 'standard-with-typescript'],
  overrides: [],
  parserOptions: {
    ecmaVersion: 'latest',
    sourceType: 'module'
  },
  plugins: ['vue'],
  rules: {}
}确保package.json配置main指向我们刚刚创建的index.js。
// argo-eslint-config/package.json
{
   "main": "index.js"
}根目录package.json新增如下配置
// argo-eslint-config/package.json
{
  "devDependencies": {
    "@argo-design/eslint-config": "^1.0.0"
  },
  "eslintConfig": {
    "root": true,
    "extends": [
      "@argo-design"
    ]
  }
}最后运行yarn重新安装依赖。
注意包命名与extends书写规则;root表示根配置,对eslint配置文件冒泡查找到此为止。
集成prettier
接下来我们引入formatter工具prettier。首先我们需要关闭eslint规则中那些与prettier冲突或者不必要的规则,最后由prettier代为实现这些规则。前者我们通过eslint-config-prettier实现,后者借助插件eslint-plugin-prettier实现。比如冲突规则尾逗号,eslint-config-prettier帮我们屏蔽了与之冲突的eslint规则:
{
  "comma-dangle": "off",
  "no-comma-dangle": "off",
  "@typescript-eslint/comma-dangle": "off",
  "vue/comma-dangle": "off",
}通过配置eslint规则"prettier/prettier": "error"让错误暴露出来,这些错误交给eslint-plugin-prettier收拾。
prettier配置我们也新建一个package@argo-design/prettier-config。
1. 安装
cd argo-prettier-config
yarn add prettier
yarn add eslint-config-prettier eslint-plugin-prettier
2. 使用
// argo-prettier-config/index.js
module.exports = {
  printWidth: 80, //一行的字符数,如果超过会进行换行,默认为80
  semi: false, // 行尾是否使用分号,默认为true
  trailingComma: 'none', // 是否使用尾逗号
  bracketSpacing: true // 对象大括号直接是否有空格
};
完整配置参考官网 prettier配置
3. 配置eslint
回到argo-eslint-config/index.js,只需新增如下一条配置即可
module.exports = {
   "extends": ["plugin:prettier/recommended"]
};plugin:prettier/recommended指的eslint-plugin-prettierpackage下的recommended.js。该扩展已经帮我们配置好了
{
  "extends": ["eslint-config-prettier"],
  "plugins": ["eslint-plugin-prettier"],
  "rules": {
    "prettier/prettier": "error",
    "arrow-body-style": "off",
    "prefer-arrow-callback": "off"
  }
}
4. 集成到项目全局
根目录package.json新增如下配置
{
  "devDependencies": {
    "@argo-design/prettier-config": "^1.0.0"
  },
  "prettier": "@argo-design/prettier-config"
}
运行yarn重新安装依赖。
5. VSCode安装prettier扩展并将其设置成默认格式化工具
// settings.json
{
  "editor.defaultFormatter": "esbenp.prettier-vscode"
}
集成stylelint
stylelint配置我们也新建一个package@argo-design/stylelint-config。
1. 安装
cd argo-stylelint-config
yarn add stylelint stylelint-prettier stylelint-config-prettier stylelint-order stylelint-config-rational-order postcss-html postcss-less
# 单独postcss8
yarn add postcss@^8.0.0
对于结合prettier这里不在赘述。
stylelint-order允许我们自定义样式属性名称顺序。而stylelint-config-rational-order为我们提供了一套合理的开箱即用的顺序。
值得注意的是,stylelint14版本不在默认支持less,sass等预处理语言。并且stylelint14依赖postcss8版本,可能需要单独安装,否则vscode 的stylellint扩展可能提示报错TypeError: this.getPosition is not a function at LessParser.inlineComment....
2. 使用
// argo-stylelint-config/index.js
module.exports = {
  plugins: [
    "stylelint-prettier",
  ],
  extends: [
    // "stylelint-config-standard",
    "stylelint-config-standard-vue",
    "stylelint-config-rational-order",
    "stylelint-prettier/recommended"
  ],
  rules: {
    "length-zero-no-unit": true, // 值为0不需要单位
    "plugin/rational-order": [
      true,
      {
        "border-in-box-model": true, // Border理应作为盒子模型的一部分 默认false
        "empty-line-between-groups": false // 组之间添加空行 默认false
      }
    ]
  },
  overrides: [
    {
      files: ["*.html", "**/*.html"],
      customSyntax: "postcss-html"
    },
    {
      files: ["**/*.{less,css}"],
      customSyntax: "postcss-less"
    }
  ]
};
3. 集成到项目全局
根目录package.json新增如下配置
{
  "devDependencies": {
    "@argo-design/stylelint-config": "^1.0.0"
  },
  "stylelint": {
    "extends": [
      "@argo-design/stylelint-config"
    ]
  }
}
运行yarn重新安装依赖。
4. VSCode保存时自动修复
VSCode安装Stylelint扩展并添加配置
// settings.json
{
  "editor.codeActionsOnSave": {
    "source.fixAll.eslint": true,
    "source.fixAll.stylelint": true
  },
  "stylelint.validate": ["css", "less", "vue", "html"],
  "css.validate": false,
  "less.validate": false
}
修改settings.json之后如不能及时生效,可以重启一下vscode。如果你喜欢,可以将eslint,prettier,stylelint配置安装到全局并集成到编辑器。
集成husky
为防止一些非法的commit或push,我们借助git hooks工具在对代码提交前进行 ESLint 与 Stylelint的校验,如果校验通过,则成功commit,否则取消commit。
1. 安装
# 在根目录安装husky
yarn add husky -D -W
2. 使用
npm pkg set scripts.prepare="husky install"
npm run prepare
# 添加pre-commit钩子,在提交前运行代码lint
npx husky add .husky/pre-commit "yarn lint"
至此,当我们执行git commit -m "xxx"时就会先执行lint校验我们的代码,如果lint通过,成功commit,否则终止commit。具体的lint命令请自行添加。
集成lint-staged: 仅校验staged中文件
现在,当我们git commit时,会对整个工作区的代码进行lint。当工作区文件过多,lint的速度就会变慢,进而影响开发体验。实际上我们只需要对暂存区中的文件进行lint即可。下面我们引入·lint-staged解决我们的问题。
1. 安装
在根目录安装lint-staged
yarn add lint-staged -D -W
2. 使用
在根目录package.json中添加如下的配置:
{
  "lint-staged": {
    "*.{js,ts,jsx,tsx}": [
      "eslint --fix",
      "prettier --write"
    ],
    "*.{less,css}": [
      "stylelint --fix",
      "prettier --write"
    ],
    "**/*.vue": [
      "eslint --fix",
      "stylelint --fix",
      "prettier --write"
    ]
  }
}在monorepo中,lint-staged运行时,将始终向上查找并应用最接近暂存文件的配置,因此我们可以在根目录下的package.json中配置lint-staged。值得注意的是,每个glob匹配的数组中的命令是从左至右依次运行,和webpack的loder应用机制不同!
最后,我们在.husky文件夹中找到pre-commit,并将yarn lint修改为npx --no-install lint-staged。
#!/usr/bin/env sh
. "$(dirname -- "$0")/_/husky.sh"

npx --no-install lint-staged
至此,当我们执行git commit -m "xxx"时,lint-staged会如期运行帮我们校验staged(暂存区)中的代码,避免了对工作区的全量检查。
集成commitlint: 规范化commit message
除了代码规范检查之后,Git 提交信息的规范也是不容忽视的一个环节,规范精准的 commit 信息能够方便自己和他人追踪项目和把控进度。这里,我们使用大名鼎鼎的Angular团队提交规范。
commit message格式规范
commit message 由 Header、Body、Footer 组成。其中Herder时必需的,Body和Footer可选。
Header
Header 部分包括三个字段 type、scope和 subject。
<type>(<scope>): <subject>
type
其中type 用于说明 commit 的提交类型(必须是以下几种之一)。
| 值 | 描述 |
|---|---|
| feat | Feature) 新增一个功能 |
| fix | Bug修复 |
| docs | Documentation) 文档相关 |
| style | 代码格式(不影响功能,例如空格、分号等格式修正),并非css样式更改 |
| refactor | 代码重构 |
| perf | Performent) 性能优化 |
| test | 测试相关 |
| build | 构建相关(例如 scopes: webpack、gulp、npm 等) |
| ci | 更改持续集成软件的配置文件和 package 中的 scripts 命令,例如 scopes: Travis, Circle 等 |
| chore | 变更构建流程或辅助工具,日常事务 |
| revert | git revert |
scope
scope 用于指定本次 commit 影响的范围。
subject
subject 是本次 commit 的简洁描述,通常遵循以下几个规范:
用动词开头,第一人称现在时表述,例如:change 代替 changed 或 changes
第一个字母小写
结尾不加句号
.
Body(可选)
body 是对本次 commit 的详细描述,可以分成多行。跟 subject 类似。
Footer(可选)
如果本次提交的代码是突破性的变更或关闭Issue,则 Footer 必需,否则可以省略。
集成commitizen(可选)
我们可以借助工具帮我们生成规范的message。
1. 安装
yarn add commitizen -D -W
2. 使用
安装适配器
yarn add cz-conventional-changelog -D -W
这行命令做了两件事:
安装
cz-conventional-changelog到开发依赖在根目录下的package.json中增加了:
"config": {
  "commitizen": {
    "path": "./node_modules/cz-conventional-changelog"
  }
}
添加npm scriptscm
"scripts": {
  "cm": "cz"
},至此,执行yarn cm,就能看到交互界面了!跟着交互一步步操作就能自动生成规范的message了。

集成commitlint: 对最终提交的message进行校验
1. 安装
首先在根目录安装依赖:
yarn add commitlint @commitlint/cli @commitlint/config-conventional -D -W
2. 使用
接着新建.commitlintrc.js:
module.exports = {
  extends: ["@commitlint/config-conventional"]
};最后向husky中添加commit-msg钩子,终端执行:
npx husky add .husky/commit-msg "npx --no-install commitlint -e $HUSKY_GIT_PARAMS"
执行成功之后就会在.husky文件夹中看到commit-msg文件了:
#!/usr/bin/env sh
. "$(dirname -- "$0")/_/husky.sh"

npx --no-install commitlint -e
至此,当你提交代码时,如果pre-commit钩子运行成功,紧接着在commit-msg钩子中,commitlint会如期运行对我们提交的message进行校验。
关于lint工具的集成到此就告一段落了,在实际开发中,我们还会对lint配置进行一些小改动,比如ignore,相关rules等等。这些和具体项目有关,我们不会变更package里的配置。
千万别投机取巧拷贝别人的配置文件!复制一时爽,代码火葬场。
图标库
巧妇难为无米之炊。组件库通常依赖很多图标,因此我们先开发一个支持按需引入的图标库。
假设我们现在已经拿到了一些漂亮的svg图标,我们要做的就是将每一个图标转化生成.vue组件与一个组件入口index.ts文件。然后再生成汇总所有组件的入口文件。比如我们现在有foo.svg与bar.svg两个图标,最终生成的文件及结构如下:
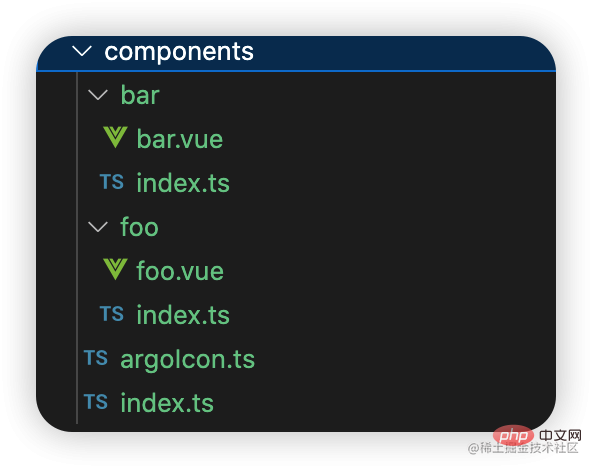
相应的内容如下:
// bar.ts
import _Bar from "./bar.vue";

const Bar = Object.assign(_Bar, {
  install: (app) => {
    app.component(_Bar.name, _Bar);
  }
});

export default Bar;
// foo.ts
import _Foo from "./foo.vue";
const Foo = Object.assign(_Foo, {
install: (app) => {
app.component(_Foo.name, _Foo);
}
});
export default Foo;// argoIcon.ts
import Foo from "./foo";
import Bar from "./bar";
const icons = [Foo, Bar];
const install = (app) => {
for (const key of Object.keys(icons)) {
app.use(icons[key]);
}
};
const ArgoIcon = {
...icons,
install
};
export default ArgoIcon;// index.ts
export { default } from "./argoIcon";
export { default as Foo } from "./foo";
export { default as Bar } from "./bar";之所以这么设计是由图标库最终如何使用决定的,除此之外argoIcon.ts也将会是打包umd的入口文件。
// 全量引入import ArgoIcon from "图标库";
app.use(ArgoIcon);

// 按需引入import { Foo } from "图标库";
app.use(Foo);
图标库的整个构建流程大概分为以下3步:

1. svg图片转.vue文件
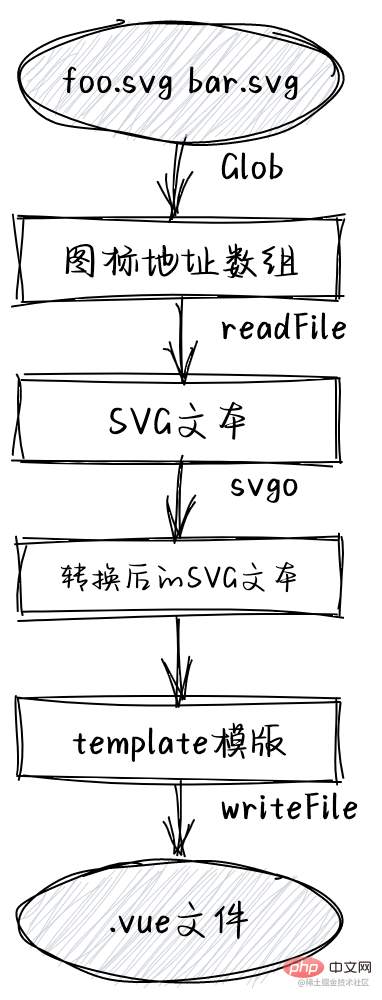
整个流程很简单,我们通过glob匹配到.svg拿到所有svg的路径,对于每一个路径,我们读取svg的原始文本信息交由第三方库svgo处理,期间包括删除无用代码,压缩,自定义属性等,其中最重要的是为svg标签注入我们想要的自定义属性,就像这样:
<svg
  :class="cls"
  :style="innerStyle"
  :stroke-linecap="strokeLinecap"
  :stroke-linejoin="strokeLinejoin"
  :stroke-width="strokeWidth">
  <path d="..."></path>
</svg>
之后这段svgHtml会传送给我们预先准备好的摸板字符串:
const template = `
<template>
  ${svgHtml}
</template>

<script setup>
defineProps({
    "stroke-linecap": String;
    // ...
  })
  // 省略逻辑代码...
</script>
`
为摸板字符串填充数据后,通过fs模块的writeFile生成我们想要的.vue文件。
2. 打包vue组件
在打包构建方案上直接选择vite为我们提供的lib模式即可,开箱即用,插件扩展(后面会讲到),基于rollup,能帮助我们打包生成ESM,这是按需引入的基础。当然,commonjs与umd也是少不了的。整个过程我们通过Vite 的JavaScript API实现:
import { build } from "vite";
import fs from "fs-extra";

const CWD = process.cwd();
const ES_DIR = resolve(CWD, "es");
const LIB_DIR = resolve(CWD, "lib");

interface compileOptions {
  umd: boolean;
  target: "component" | "icon";
}

async function compileComponent({
  umd = false,
  target = "component"
}: compileOptions): Promise<void> {
  await fs.emptyDir(ES_DIR);
  await fs.emptyDir(LIB_DIR);
  const config = getModuleConfig(target);
  await build(config);

  if (umd) {
    await fs.emptyDir(DIST_DIR);
    const umdConfig = getUmdConfig(target);
    await build(umdConfig);
  }
}
import { InlineConfig } from "vite";
import glob from "glob";
const langFiles = glob.sync("components/locale/lang/*.ts");
export default function getModuleConfig(type: "component" | "icon"): InlineConfig {
const entry = "components/index.ts";
const input = type === "component" ? [entry, ...langFiles] : entry;
return {
mode: "production",
build: {
emptyOutDir: true,
minify: false,
brotliSize: false,
rollupOptions: {
input,
output: [
{
format: "es", // 打包模式
dir: "es", // 产物存放路径
entryFileNames: "[name].js", // 入口模块的产物文件名
preserveModules: true, // 保留模块结构,否则所有模块都将打包在一个bundle文件中
/*
* 保留模块的根路径,该值会在打包后的output.dir中被移除
* 我们的入口是components/index.ts,打包后文件结构为:es/components/index.js
* preserveModulesRoot设为"components",打包后就是:es/index.js
*/
preserveModulesRoot: "components"
},
{
format: "commonjs",
dir: "lib",
entryFileNames: "[name].js",
preserveModules: true,
preserveModulesRoot: "components",
exports: "named" // 导出模式
}
]
},
// 开启lib模式
lib: {
entry,
formats: ["es", "cjs"]
}
},
plugins: [
// 自定义external忽略node_modules
external(),
// 打包声明文件
dts({
outputDir: "es",
entryRoot: C_DIR
})
]
};
};export default function getUmdConfig(type: "component" | "icon"): InlineConfig {
const entry =
type === "component"
? "components/argo-components.ts"
: "components/argo-icons.ts";
const entryFileName = type === "component" ? "argo" : "argo-icon";
const name = type === "component" ? "Argo" : "ArgoIcon";
return {
mode: "production",
build: {
target: "modules", // 支持原生 ES 模块的浏览器
outDir: "dist", // 打包产物存放路径
emptyOutDir: true, // 如果outDir在根目录下,则清空outDir
sourcemap: true, // 生成sourcemap
minify: false, // 是否压缩
brotliSize: false, // 禁用 brotli 压缩大小报告。
rollupOptions: { // rollup打包选项
external: "vue", // 匹配到的模块不会被打包到bundle
output: [
{
format: "umd", // umd格式
entryFileNames: `${entryFileName}.js`, // 即bundle名
globals: {
/*
* format为umd/iife时,标记外部依赖vue,打包后以Vue取代
* 未定义时打包结果如下
* var ArgoIcon = function(vue2) {}(vue);
* rollup自动猜测是vue,但实际是Vue.这会导致报错
* 定义后
* var ArgoIcon = function(vue) {}(Vue);
*/
vue: "Vue"
}
},
{
format: "umd",
entryFileNames: `${entryFileName}.min.js`,
globals: {
vue: "Vue"
},
plugins: [terser()] // terser压缩
},
]
},
// 开启lib模式
lib: {
entry, // 打包入口
name // 全局变量名
}
},
plugins: [vue(), vueJsx()]
};
};export const CWD = process.cwd(); export const C_DIR = resolve(CWD, "components");
可以看到,我们通过type区分组件库和图标库打包。实际上打包图标库和组件库都是差不多的,组件库需要额外打包国际化相关的语言包文件。图标样式内置在组件之中,因此也不需要额外打包。
3. 打包声明文件
我们直接通过第三方库 vite-plugin-dts 打包图标库的声明文件。
import dts from "vite-plugin-dts";

plugins: [
  dts({
    outputDir: "es",
    entryRoot: C_DIR
  })
]
关于打包原理可参考插件作者的这片文章。
4. 实现按需引入
我们都知道实现tree-shaking的一种方式是基于ESM的静态性,即在编译的时候就能摸清依赖之间的关系,对于"孤儿"会残忍的移除。但是对于import "icon.css"这种没导入导出的模块,打包工具并不知道它是否具有副作用,索性移除,这样就导致页面缺少样式了。sideEffects就是npm与构建工具联合推出的一个字段,旨在帮助构建工具更好的为npm包进行tree-shaking。
使用上,sideEffects设置为false表示所有模块都没有副作用,也可以设置数组,每一项可以是具体的模块名或Glob匹配。因此,实现图标库的按需引入,只需要在argo-icons项目下的package.json里添加以下配置即可:
{
  "sideEffects": false,
}
这将告诉构建工具,图标库没有任何副作用,一切没有被引入的代码或模块都将被移除。前提是你使用的是ESM。
指定入口
Last but important!当图标库在被作为npm包导入时,我们需要在package.json为其配置相应的入口文件。
{
"main": "lib/index.js", // 以esm形式被引入时的入口
"module": "es/index.js", // 以commonjs形式被引入时的入口
"types": "es/index.d.ts" // 指定声明文件
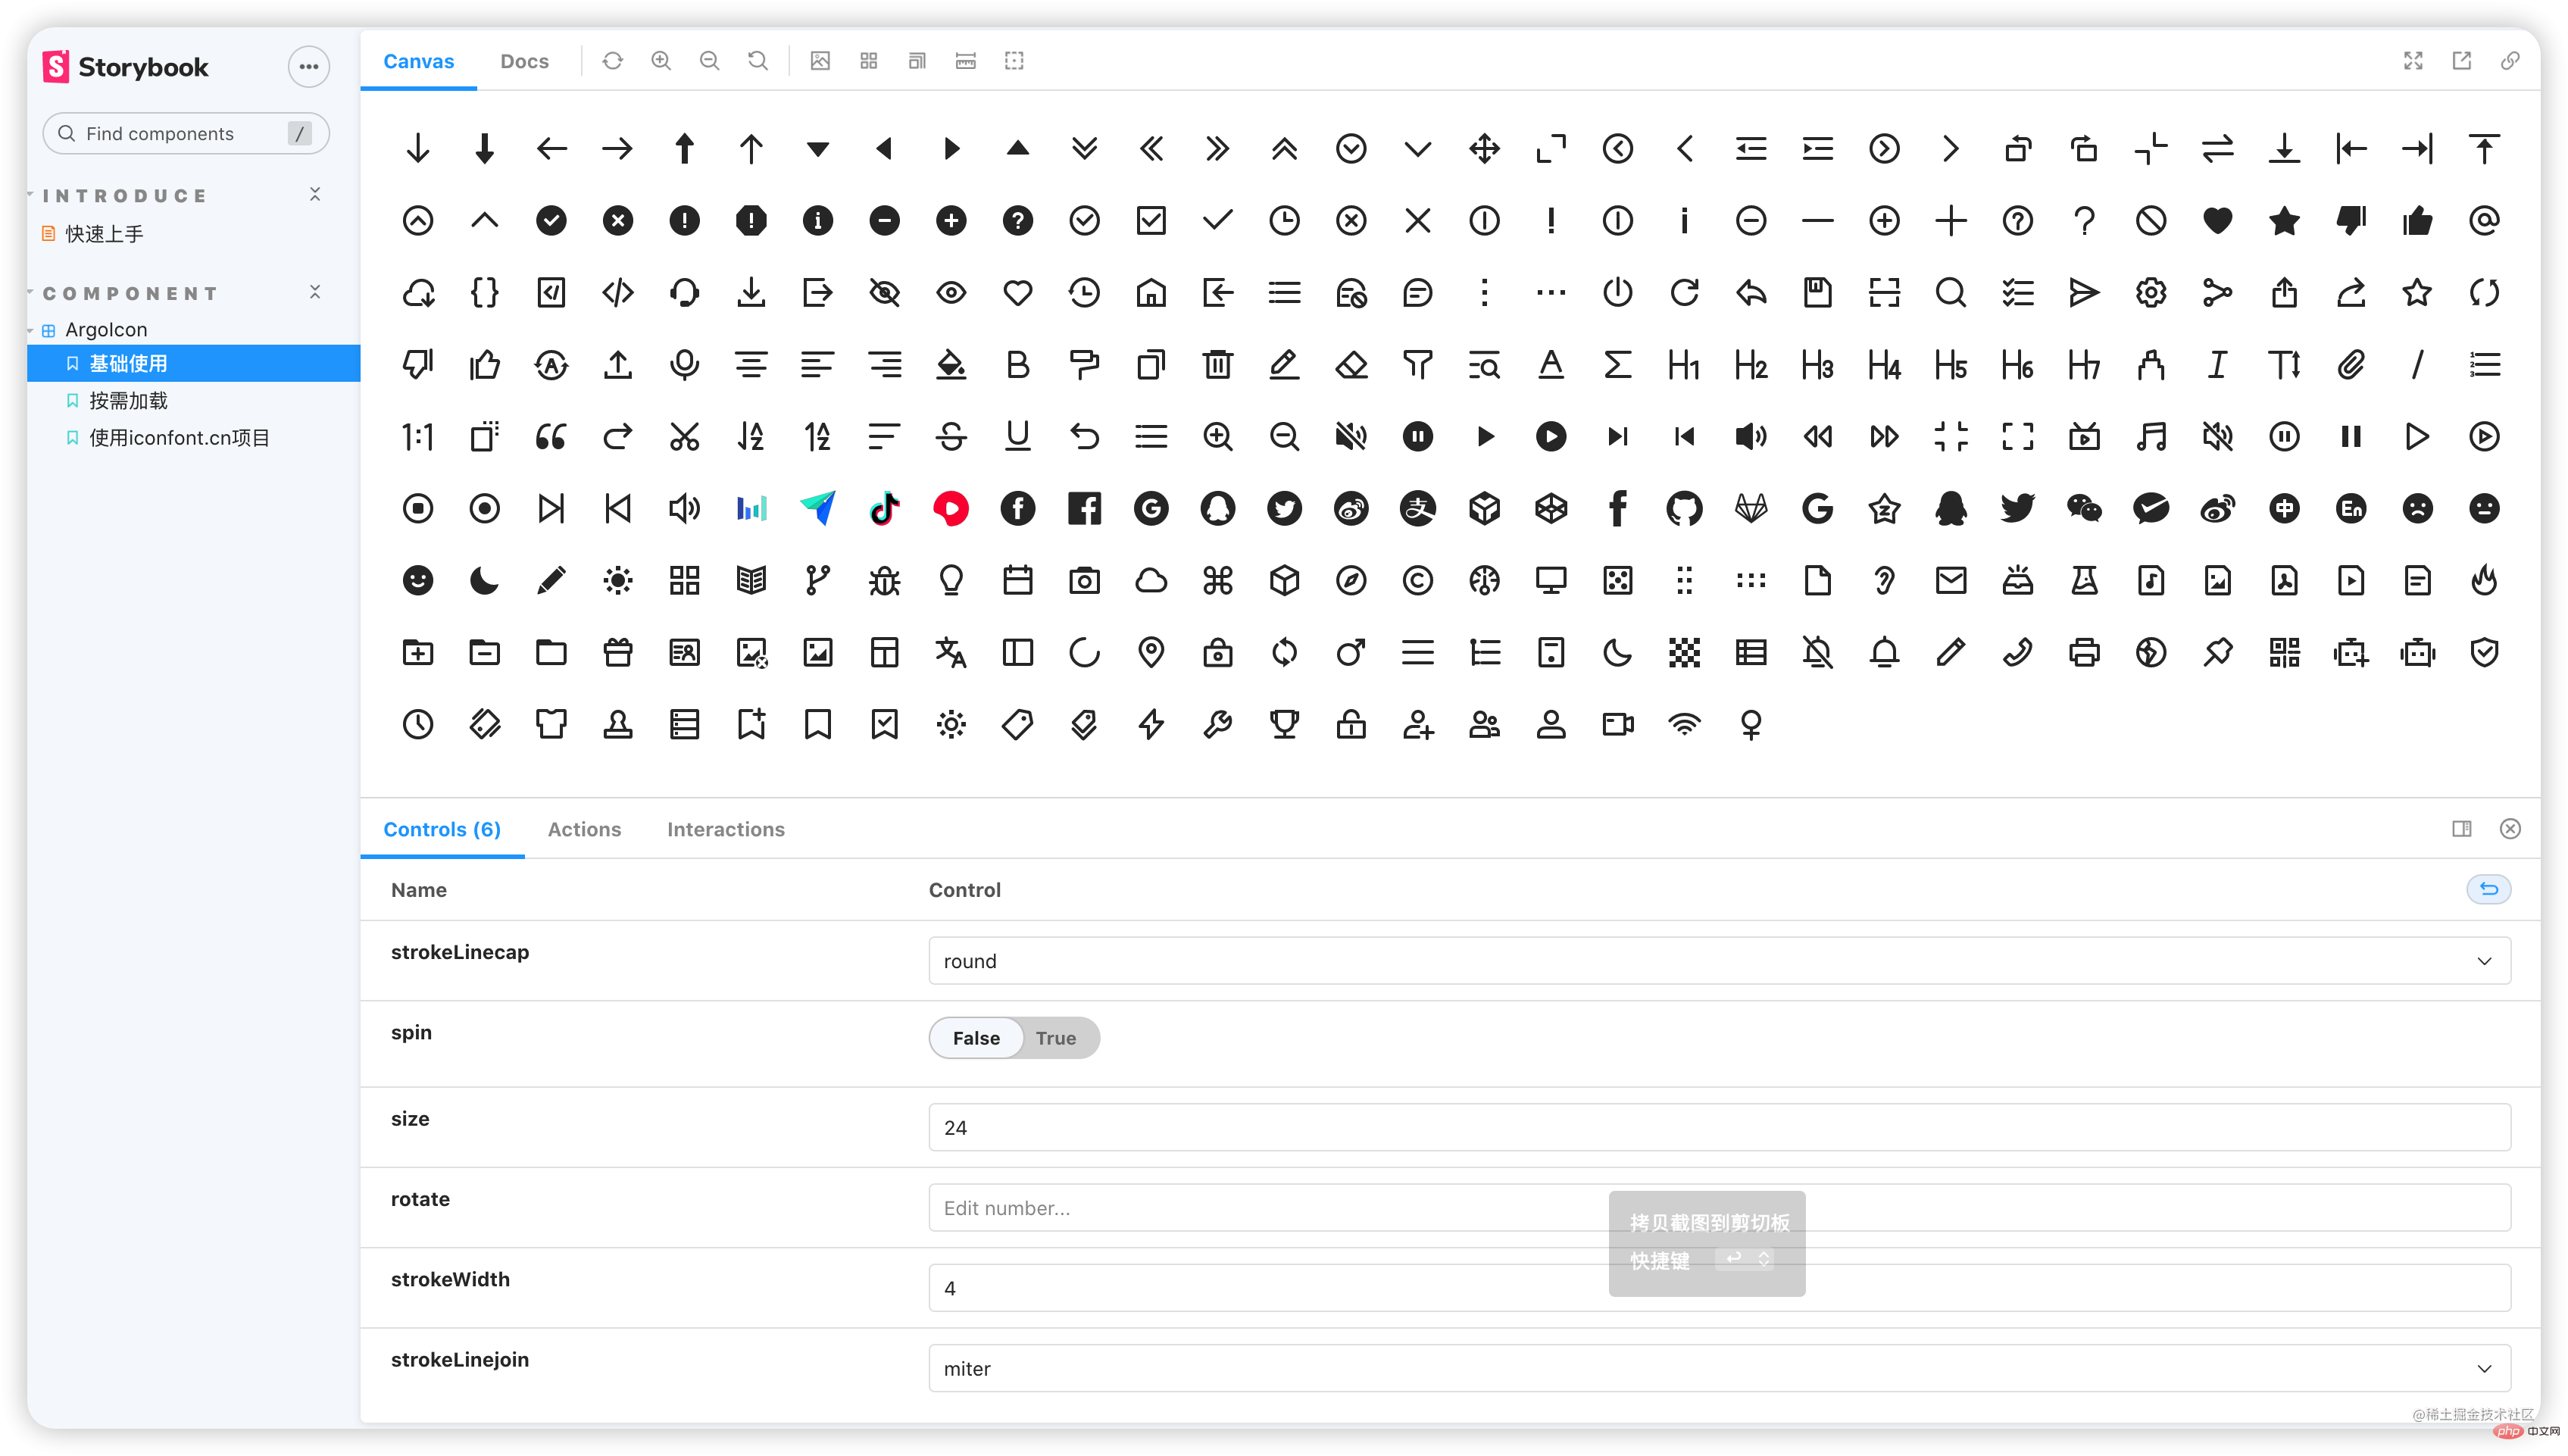
}引入storybook:是时候预览我们的成果了!
顾名思义,storybook就是一本"书",讲了很多个"故事"。在这里,"书"就是argo-icons,我为它讲了3个故事:
基本使用
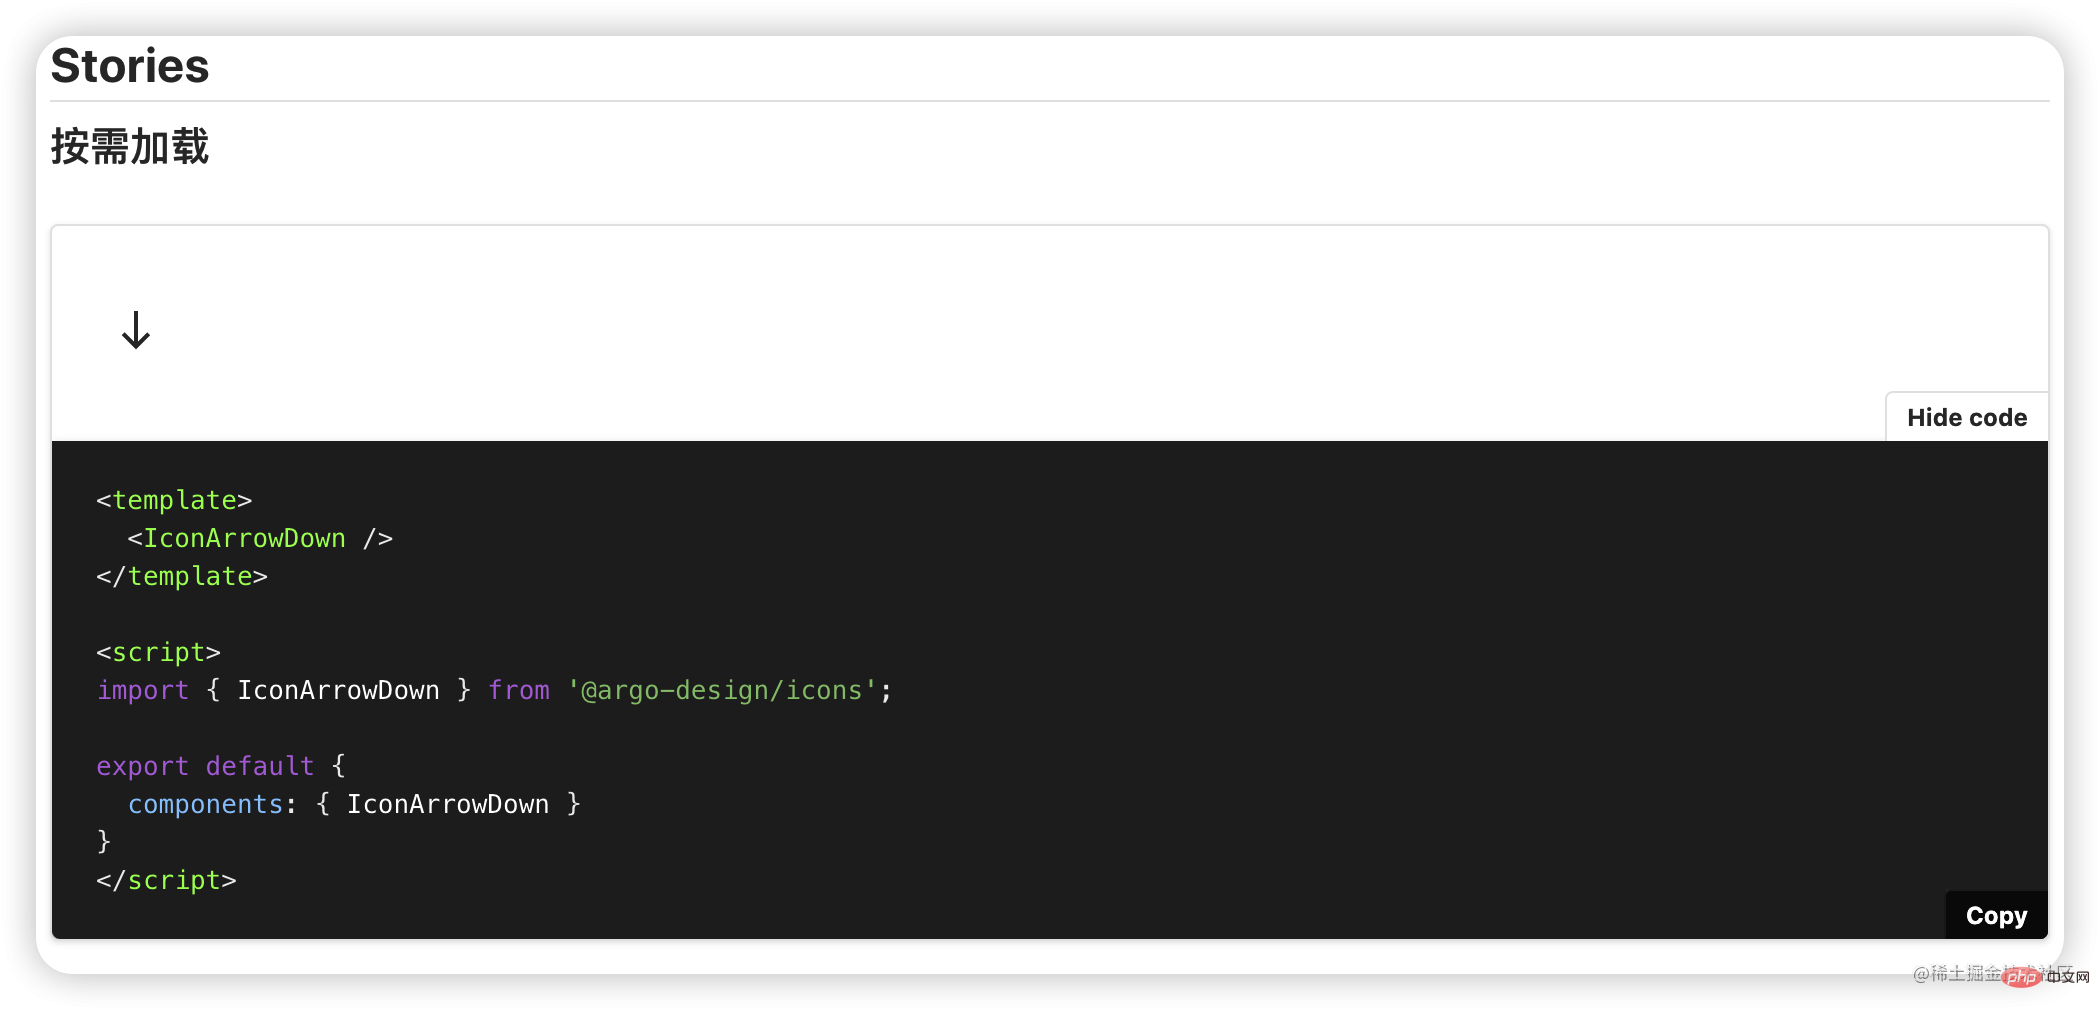
按需引入
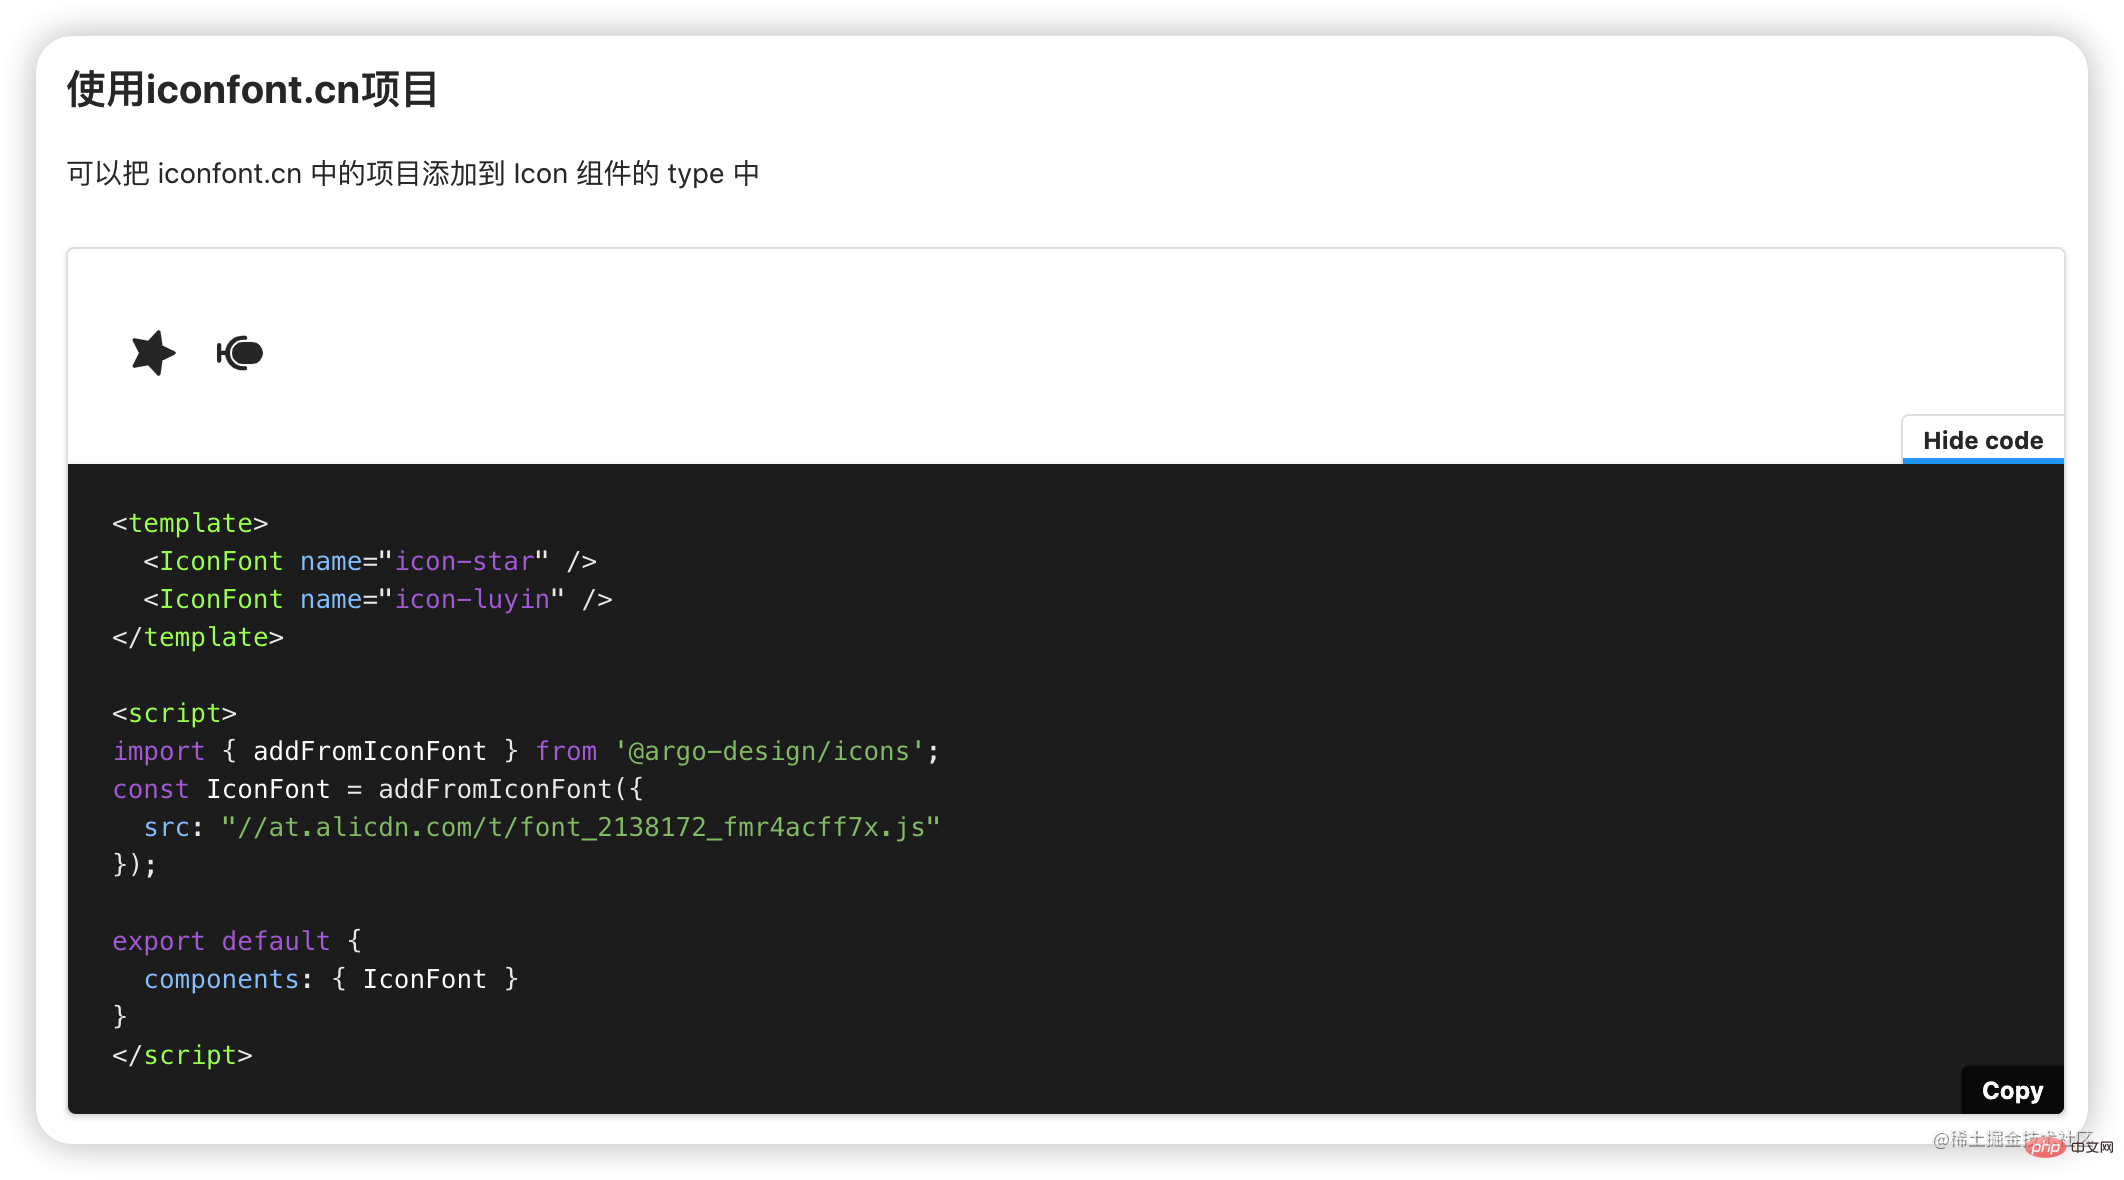
使用iconfont.cn项目
初始化storybook
新建@argo-design/ui-storybookpackage,并在该目录下运行:
npx storybook init -t vue3 -b webpack5
-t (即--type): 指定项目类型,storybook会根据项目依赖及配置文件等推算项目类型,但显然我们仅仅是通过npm init新创建的项目,storybook无法自动判断项目类型,故需要指定type为vue3,然后storybook会帮我们初始化storybook vue3 app。
-b (--builder): 指定构建工具,默认是webpack4,另外支持webpack5, vite。这里指定webpack5,否则后续会有类似报错:cannot read property of undefine(reading 'get')...因为storybook默认以webpack4构建,但是@storybook/vue3依赖webpack5,会冲突导致报错。这里是天坑!!
storybook默认使用yarn安装,如需指定npm请使用--use-npm。
这行命令主要帮我们做以下事情:
注入必要的依赖到packages.json(如若没有指定-s,将帮我们自动安装依赖)。
注入启动,打包项目的脚本。
添加Storybook配置,详见.storybook目录。
添加Story范例文件以帮助我们上手,详见stories目录。
其中1,2步具体代码如下:
{
  "scripts": {
    "storybook": "start-storybook -p 6006",
    "build-storybook": "build-storybook"
  },
  "devDependencies": {
    "@storybook/vue3": "^6.5.13",
    "@storybook/addon-links": "^6.5.13",
    "@storybook/addon-essentials": "^6.5.13",
    "@storybook/addon-actions": "^6.5.13",
    "@storybook/addon-interactions": "^6.5.13",
    "@storybook/testing-library": "^0.0.13",
    "vue-loader": "^16.8.3",
    "@storybook/builder-webpack5": "^6.5.13",
    "@storybook/manager-webpack5": "^6.5.13",
    "@babel/core": "^7.19.6",
    "babel-loader": "^8.2.5"
  }
}
接下来把目光放到.storybook下的main.js与preview.js
preview.js
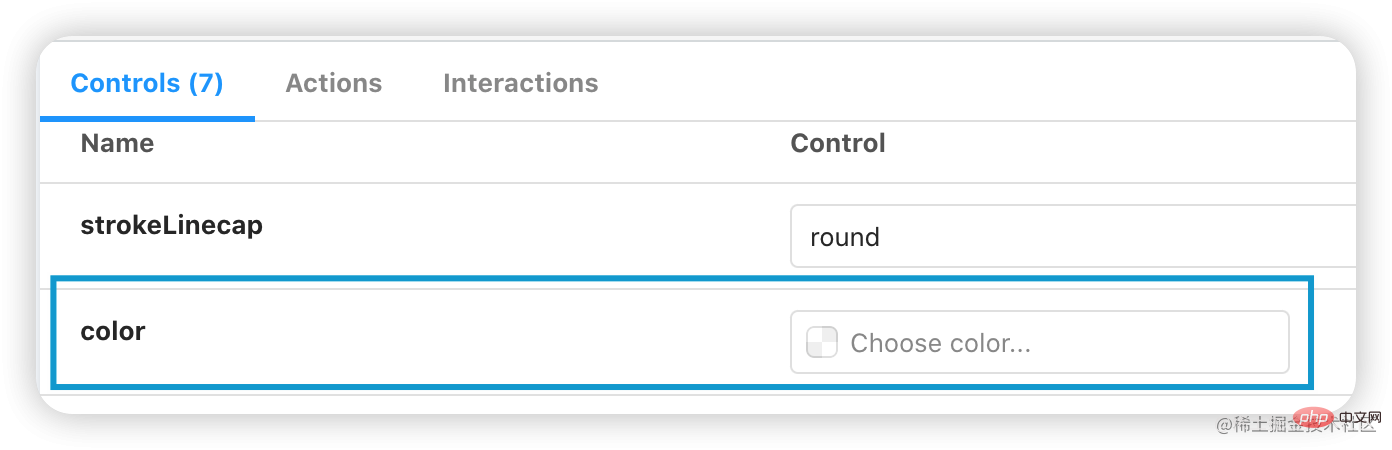
preview.js可以具名导出parameters,decorators,argTypes,用于全局配置UI(stories,界面,控件等)的渲染行为。比如默认配置中的controls.matchers:
export const parameters = {
  controls: {
    matchers: {
      color: /(background|color)$/i,
      date: /Date$/
    }
  }
};
它定义了如果属性值是以background或color结尾,那么将为其启用color控件,我们可以选择或输入颜色值,date同理。
除此之外你可以在这里引入全局样式,注册组件等等。更多详情见官网 Configure story rendering
main.js
最后来看看最重要的项目配置文件。
module.exports = {
  stories: [
    "../stories/**/*.stories.mdx",
    "../stories/**/*.stories.@(js|jsx|ts|tsx)"
  ],
  addons: [
    "@storybook/addon-links",
    "@storybook/addon-essentials",
    "@storybook/addon-interactions"
  ],
  framework: "@storybook/vue3",
  core: {
    builder: "@storybook/builder-webpack5"
  },
}
stories, 即查找stroy文件的Glob。
addons, 配置需要的扩展。庆幸的是,当前一些重要的扩展都已经集成到@storybook/addon-essentials。
framework和core即是我们初识化传递的
-t vue3 -b webpack5。
更多详情见官网 Configure your Storybook project
配置并启动storybook
less配置
由于项目使用到less因此我们需要配置一下less,安装less以及相关loader。来到.storybook/main.js
module.exports = {
  webpackFinal: (config) => {
    config.module.rules.push({
      test: /.less$/,
      use: [
        {
          loader: "style-loader"
        },
        {
          loader: "css-loader"
        },
        {
          loader: "less-loader",
          options: {
            lessOptions: {
              javascriptEnabled: true
            }
          }
        }
      ]
    });

    return config;
  },
}
配置JSX
storybook默认支持解析jsx/tsx,但你如果需要使用jsx书写vue3的stories,仍需要安装相关插件。
在argo-ui-storybook下安装 @vue/babel-plugin-jsx
yarn add @vue/babel-plugin-jsx -D
新建.babelrc
{
  "plugins": ["@vue/babel-plugin-jsx"]
}
关于如何书写story,篇幅受限,请自行查阅范例文件或官网。
配置完后终端执行yarn storybook即可启动我们的项目,辛苦的成果也将跃然纸上。
对于UI,在我们的组件库逐渐丰富之后,将会自建一个独具组件库风格的文档站点,拭目以待。
组件库
组件通信
在Vue2时代,组件跨层级通信方式可谓“百花齐放”,provide/inject就是其中一种。时至今日,在composition,es6,ts加持下,provide/inject可以更加大展身手。
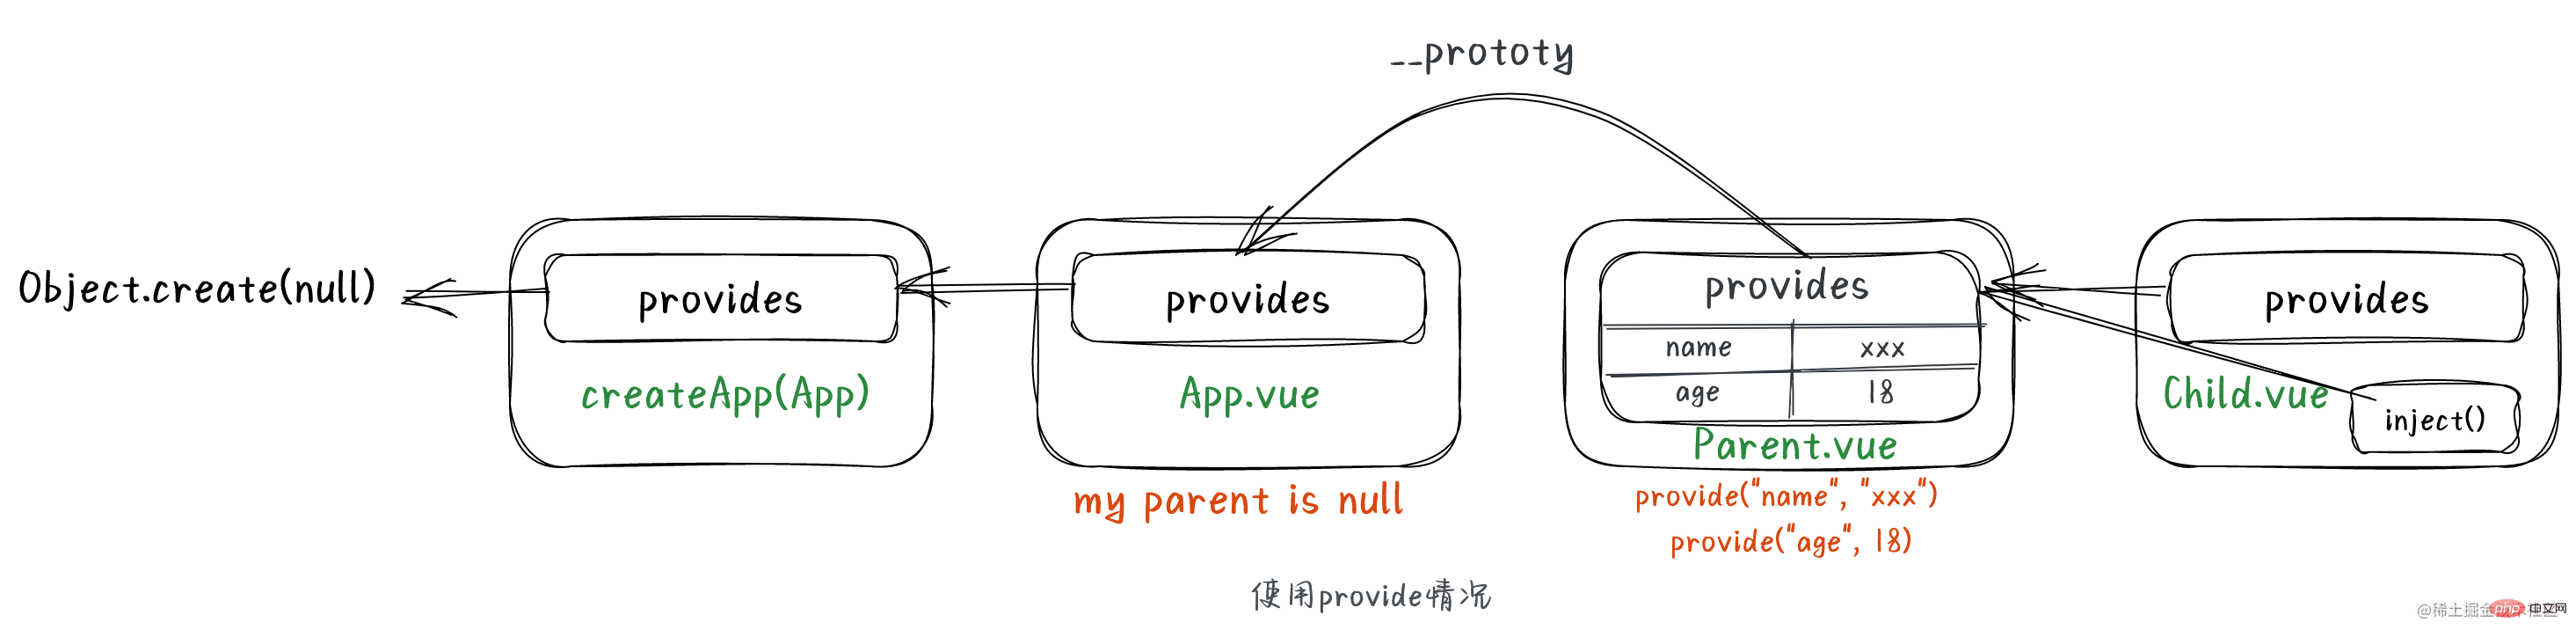
provide/inject原理
在创建组件实例时,会在自身挂载一个provides对象,默认指向父实例的provides。
const instance = {
  provides: parent ? parent.provides : Object.create(appContext.provides)
}
appContext.provides即createApp创建的app的provides属性,默认是null
在自身需要为子组件供数据时,即调用provide()时,会创建一个新对象,该对象的原型指向父实例的provides,同时将provide提供的选项添加到新对象上,这个新对象就是实例新的provides值。代码简化就是
function provide(key, value) {
  const parentProvides = currentInstance.parent && currentInstance.parent.provides;
  const newObj = Object.create(parentProvides);
  currentInstance.provides = newObj;
  newObj[key] = value;
}
而inject的实现原理则时通过key去查找祖先provides对应的值:
function inject(key, defaultValue) {
  const instance = currentInstance;
  const provides = instance.parent == null
    ? instance.vnode.appContent && instance.vnode.appContent.provides
    :	instance.parent.provides;

  if(provides && key in provides) {
    return provides[key]
  }
}
你可能会疑惑,为什么这里是直接去查父组件,而不是先查自身实例的provides呢?前面不是说实例的provides默认指向父实例的provides么。但是请注意,是“默认”。如果当前实例执行了provide()是不是把instance.provides“污染”了呢?这时再执行inject(key),如果provide(key)的key与你inject的key一致,就从当前实例provides取key对应的值了,而不是取父实例的provides!
最后,我画了2张图帮助大家理解

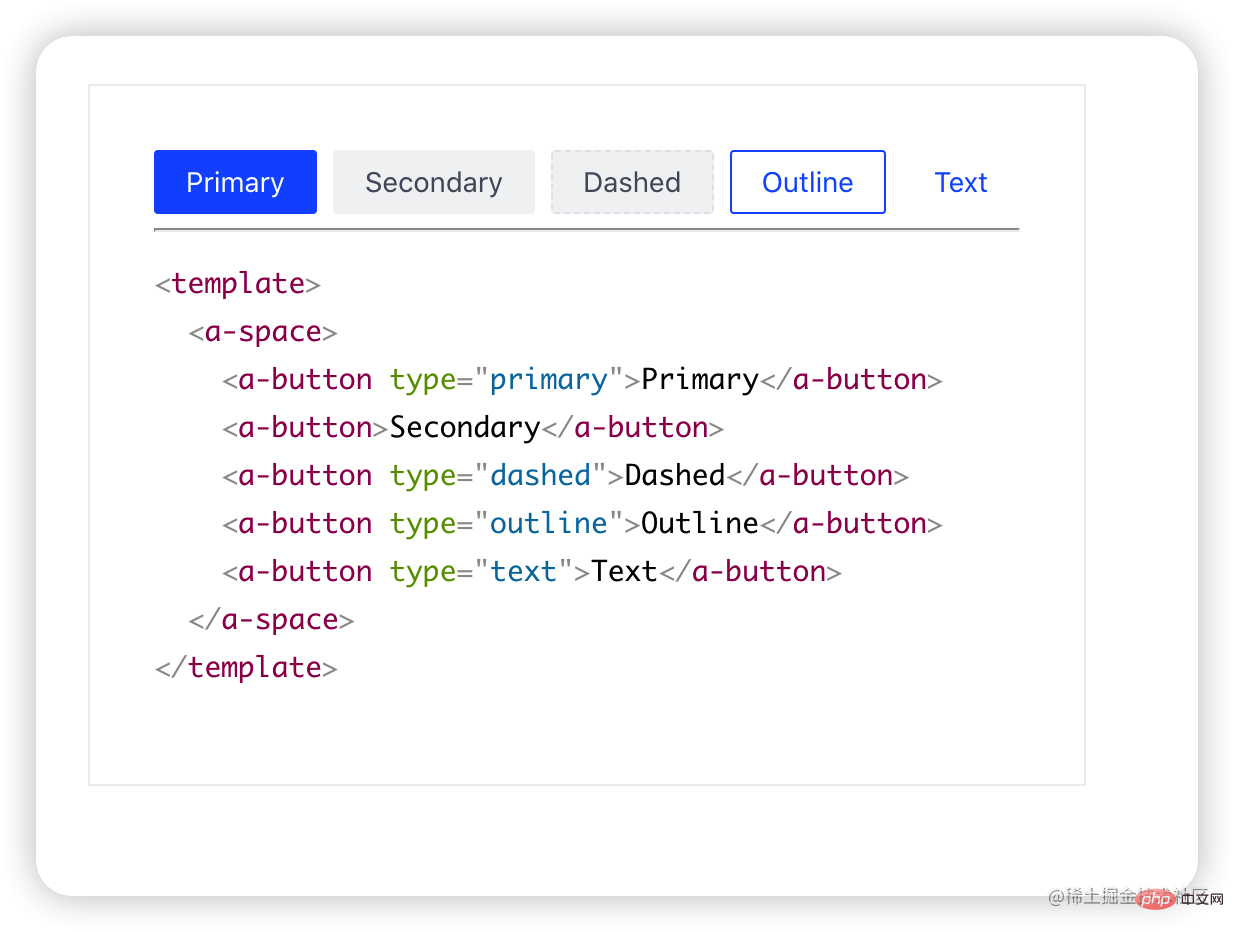
新增button组件并完成打包
篇幅有限,本文不会对组件的具体实现讲解哦,简单介绍下文件
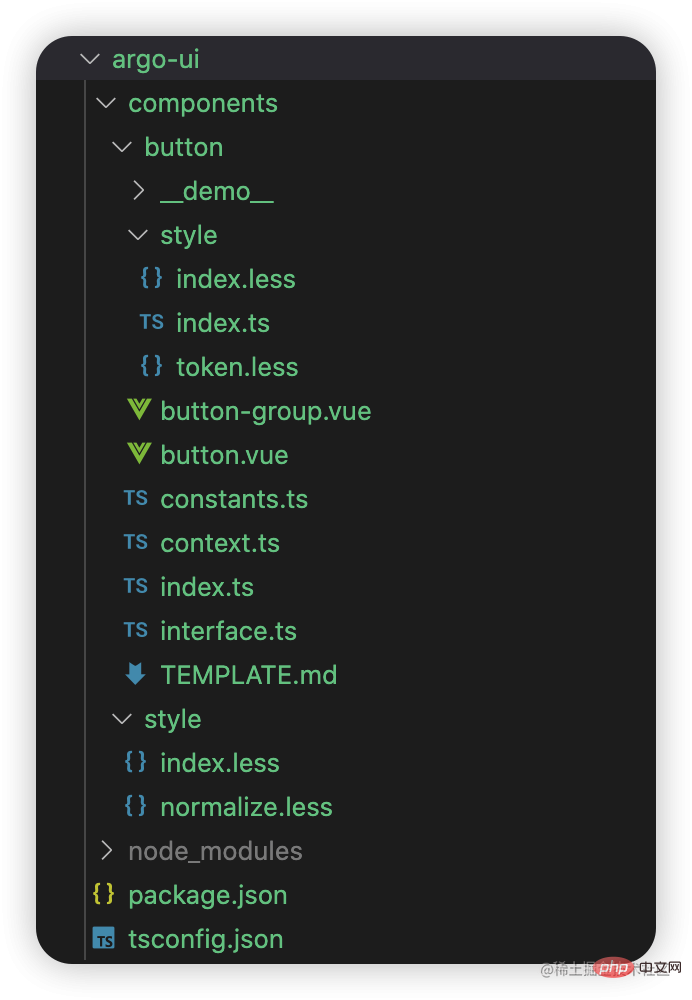
- __demo__组件使用事例
- constants.ts定义的常量
- context.ts上下文相关
- interface.ts组件接口
- TEMPLATE.md用于生成README.md的模版
- button/style下存放组件样式
- style下存放全局样式
打包esm与commonjs模块
关于打包组件的esm与commonjs模块在之前打包图标库章节已经做了介绍,这里不再赘述。
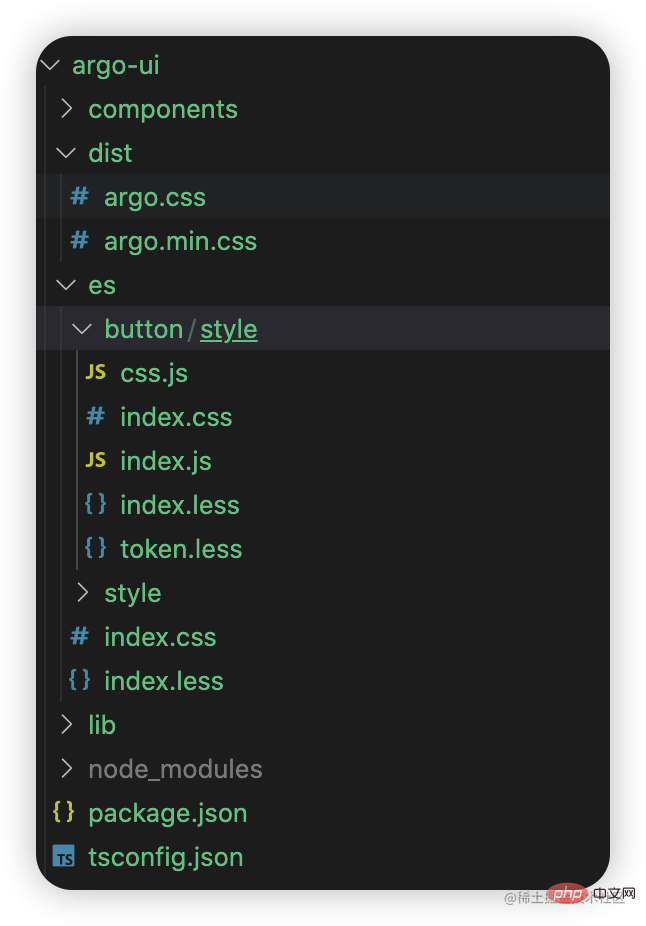
打包样式
相对于图标库,组件库的打包需要额外打包样式文件,大概流程如下:
生成总入口components/index.less并编译成css。
编译组件less。
生成dist下的argo.css与argo.min.css。
构建组件style/index.ts。
1. 生成总入口components/index.less
import path from "path";
import { outputFileSync } from "fs-extra";
import glob from "glob";

export const CWD = process.cwd();
export const C_DIR = path.resolve(CWD, "components");

export const lessgen = async () => {
  let lessContent = `@import "./style/index.less";\n`; // 全局样式文件
  const lessFiles = glob.sync("**/style/index.less", {
    cwd: C_DIR,
    ignore: ["style/index.less"]
  });
  lessFiles.forEach((value) => {
    lessContent += `@import "./${value}";\n`;
  });

  outputFileSync(path.resolve(C_DIR, "index.less"), lessContent);
  log.success("genless", "generate index.less success!");
};代码很简单,值得一提就是为什么不将lessContent初始化为空,glob中将ignore移除,这不是更简洁吗。这是因为style/index.less作为全局样式,我希望它在引用的最顶部。最终将会在components目录下生成index.less内容如下:
@import "./style/index.less";
@import "./button/style/index.less";
/* other less of components */
2. 打包组件样式
import path from "path";
import { readFile, copySync } from "fs-extra"
import { render } from "less";

export const ES_DIR = path.resolve(CWD, "es");
export const LIB_DIR = path.resolve(CWD, "lib");

const less2css = (lessPath: string): string => {
  const source = await readFile(lessPath, "utf-8");
  const { css } = await render(source, { filename: lessPath });
  return css;
}

const files = glob.sync("**/*.{less,js}", {
  cwd: C_DIR
});

for (const filename of files) {
  const lessPath = path.resolve(C_DIR, `${filename}`);
  // less文件拷贝到es和lib相对应目录下
  copySync(lessPath, path.resolve(ES_DIR, `${filename}`));
  copySync(lessPath, path.resolve(LIB_DIR, `${filename}`));

  // 组件样式/总入口文件/全局样式的入口文件编译成css
  if (/index.less$/.test(filename)) {
    const cssFilename = filename.replace(".less", ".css");
    const ES_DEST = path.resolve(ES_DIR, `${cssFilename}`);
    const LIB_DEST = path.resolve(LIB_DIR, `${cssFilename}`);
    const css = await less2css(lessPath);

    writeFileSync(ES_DEST, css, "utf-8");
    writeFileSync(LIB_DEST, css, "utf-8");
  }
}
3. 生成dist下的argo.css与argo.min.css
import path from "path";
import CleanCSS, { Output } from "clean-css";
import { ensureDirSync } from "fs-extra";
export const DIST_DIR = path.resolve(CWD, "dist");

console.log("start build components/index.less to dist/argo(.min).css");
const indexCssPath = path.resolve(ES_DIR, "index.css");
const css = readFileSync(indexCssPath, "utf8");
const minContent: Output = new CleanCSS().minify(css);

ensureDirSync(DIST_DIR);
writeFileSync(path.resolve("dist/argo.css"), css);
writeFileSync(path.resolve("dist/argo.min.css"), minContent.styles);
log.success(`build components/index.less to dist/argo(.min).css`);其中最重要的就是使用clean-css压缩css。
4. 构建组件style/index.ts
如果你使用过babel-plugin-import,那一定熟悉这项配置:
- ["import", { "libraryName": "antd", "style": true }]: import js and css modularly (LESS/Sass source files)
- ["import", { "libraryName": "antd", "style": "css" }]: import js and css modularly (css built files)
通过指定style: true,babel-plugin-import可以帮助我们自动引入组件的less文件,如果你担心less文件定义的变量会被覆盖或冲突,可以指定'css',即可引入组件的css文件样式。
这一步就是要接入这点。但目前不是很必要,且涉及到vite插件开发,暂可略过,后面会讲。
来看看最终实现的样子。
其中button/style/index.js内容也就是导入less:
import "../../style/index.less";
import "./index.less";
button/style/css.js内容也就是导入css:
import "../../style/index.css";
import "./index.css";
最后你可能会好奇,诸如上面提及的compileComponent,compileStyle等函数是如何被调度使用的,这其实都归功于脚手架@argo-design/scripts。当它作为依赖被安装到项目中时,会为我们提供诸多命令如argo-scripts genicon,argo-scripts compileComponent等,这些函数都在执行命令时被调用。
配置sideEffects
"sideEffects": [
  "dist/*",
  "es/**/style/*",
  "lib/**/style/*",
  "*.less"
]
国际化
基本实现
// locale.ts
import { ref, reactive, computed, inject } from "vue";
import { isString } from "../_utils/is";
import zhCN from "./lang/zh-cn";

export interface ArgoLang {
  locale: string;
  button: {
    defaultText: string;
  }
}

type ArgoI18nMessages = Record<string, ArgoLang>;

// 默认使用中文
const LOCALE = ref("zh-CN");
const I18N_MESSAGES = reactive<ArgoI18nMessages>({
  "zh-CN": zhCN
});

// 添加语言包
export const addI18nMessages = (
  messages: ArgoI18nMessages,
  options?: {
    overwrite?: boolean;
  }
) => {
  for (const key of Object.keys(messages)) {
    if (!I18N_MESSAGES[key] || options?.overwrite) {
      I18N_MESSAGES[key] = messages[key];
    }
  }
};

// 切换语言包
export const useLocale = (locale: string) => {
  if (!I18N_MESSAGES[locale]) {
    console.warn(`use ${locale} failed! Please add ${locale} first`);
    return;
  }
  LOCALE.value = locale;
};

// 获取当前语言
export const getLocale = () => {
  return LOCALE.value;
};

export const useI18n = () => {
  const i18nMessage = computed<ArgoLang>(() => I18N_MESSAGES[LOCALE.value]);
  const locale = computed(() => i18nMessage.value.locale);

  const transform = (key: string): string => {
    const keyArray = key.split(".");
    let temp: any = i18nMessage.value;

    for (const keyItem of keyArray) {
      if (!temp[keyItem]) {
        return key;
      }
      temp = temp[keyItem];
    }
    return temp;
  };

  return {
    locale,
    t: transform
  };
};
添加需要支持的语言包,这里默认支持中文和英文。
// lang/zh-CN.ts
const lang: ArgoLang = {
  locale: "zh-CN",
  button: {
    defaultText: "按钮"
  },
}
// lang/en-US.ts
const lang: ArgoLang = {
locale: "en-US",
button: {
defaultText: "Button",
},
}button组件中接入
<template>
  <button>
    <slot> {{ t("button.defaultText") }} </slot>
  </button>
</template>

<script>
import { defineComponent } from "vue";
import { useI18n } from "../locale";

export default defineComponent({
  name: "Button",
  setup(props, { emit }) {
    const { t } = useI18n();

    return {
      t
    };
  }
});
</script>
Button的国际化仅做演示,实际上国际化在日期日历等组件中才有用武之地。
国际化演示
argo-ui-storybook/stories中添加locale.stories.ts
import { computed } from "vue";
import { Meta, StoryFn } from "@storybook/vue3";
import {
  Button,
  addI18nMessages,
  useLocale,
  getLocale
} from "@argo-design/argo-ui/components/index"; // 源文件形式引入方便开发时调试
import enUS from "@argo-design/argo-ui/components/locale/lang/en-us";

interface Args {}

export default {
  title: "Component/locale",
  argTypes: {}
} as Meta<Args>;

const BasicTemplate: StoryFn<Args> = (args) => {
  return {
    components: { Button },
    setup() {
      addI18nMessages({ "en-US": enUS });
      const currentLang = computed(() => getLocale());
      const changeLang = () => {
        const lang = getLocale();
        if (lang === "en-US") {
          useLocale("zh-CN");
        } else {
          useLocale("en-US");
        }
      };
      return { args, changeLang, currentLang };
    },
    template: `
      <h1>内部切换语言,当前语言: {{currentLang}}</h1>
      <p>仅在未提供ConfigProvider时生效</p>
      <Button type="primary" @click="changeLang">点击切换语言</Button>
      <Button long style="marginTop: 20px;"></Button>
    `
  };
};
export const Basic = BasicTemplate.bind({});
Basic.storyName = "基本使用";
Basic.args = {};.preview.js中全局引入组件库样式
import "@argo-design/argo-ui/components/index.less";
终端启动项目就可以看到效果了。
实现config-provider组件
通常组件库都会提供config-provider组件来使用国际化,就像下面这样
<template>
  <a-config-provider :locale="enUS">
    <a-button />
  </a-config-provider>
</template>下面我们来实现一下config-provider组件:
<template>
  <slot />
</template>

<script>
import type { PropType } from "vue";
import {
  defineComponent,
  provide,
  reactive,
  toRefs,
} from "vue";
import { configProviderInjectionKey } from "./context";

export default defineComponent({
  name: "ConfigProvider",
  props: {
    locale: {
      type: Object as PropType<ArgoLang>
    },
  },
  setup(props, { slots }) {
    const { locale } = toRefs(props);
    const config = reactive({
      locale,
    });

    provide(configProviderInjectionKey, config);
  }
});
</script>
export interface ConfigProvider {
locale?: ArgoLang;
}
export const configProviderInjectionKey: InjectionKey<ConfigProvider> =
Symbol("ArgoConfigProvider");修改locale/index.ts中计算属性i18nMessage的获取逻辑
import { configProviderInjectionKey } from "../config-provider/context";

export const useI18n = () => {
  const configProvider = inject(configProviderInjectionKey, undefined);
  const i18nMessage = computed<ArgoLang>(
    () => configProvider?.locale ?? I18N_MESSAGES[LOCALE.value]
  );
  const locale = computed(() => i18nMessage.value.locale);

  const transform = (key: string): string => {
    const keyArray = key.split(".");
    let temp: any = i18nMessage.value;

    for (const keyItem of keyArray) {
      if (!temp[keyItem]) {
        return key;
      }
      temp = temp[keyItem];
    }
    return temp;
  };

  return {
    locale,
    t: transform
  };
};
编写stories验证一下:
const ProviderTemplate: StoryFn<Args> = (args) => {
  return {
    components: { Button, ConfigProvider },
    render() {
      return (
        <ConfigProvider {...args}>
          <Button long={true} />
        </ConfigProvider>
      );
    }
  };
};
export const Provider = ProviderTemplate.bind({});
Provider.storyName = "在config-provider中使用";
Provider.args = {
  // 在这里把enUS传给ConfigProvider的locale
  locale: enUS
};
以上stories使用到了jsx,请确保安装并配置了@vue/babel-plugin-jsx

可以看到,Button默认是英文的,表单控件也接收到enUS语言包了,符合预期。
自动引入组件样式
值得注意的是,上面提到的按需引入只是引入了组件js逻辑代码,但对于样式依然没有引入。
下面我们通过开发vite插件vite-plugin-auto-import-style,让组件库可以自动引入组件样式。
效果演示
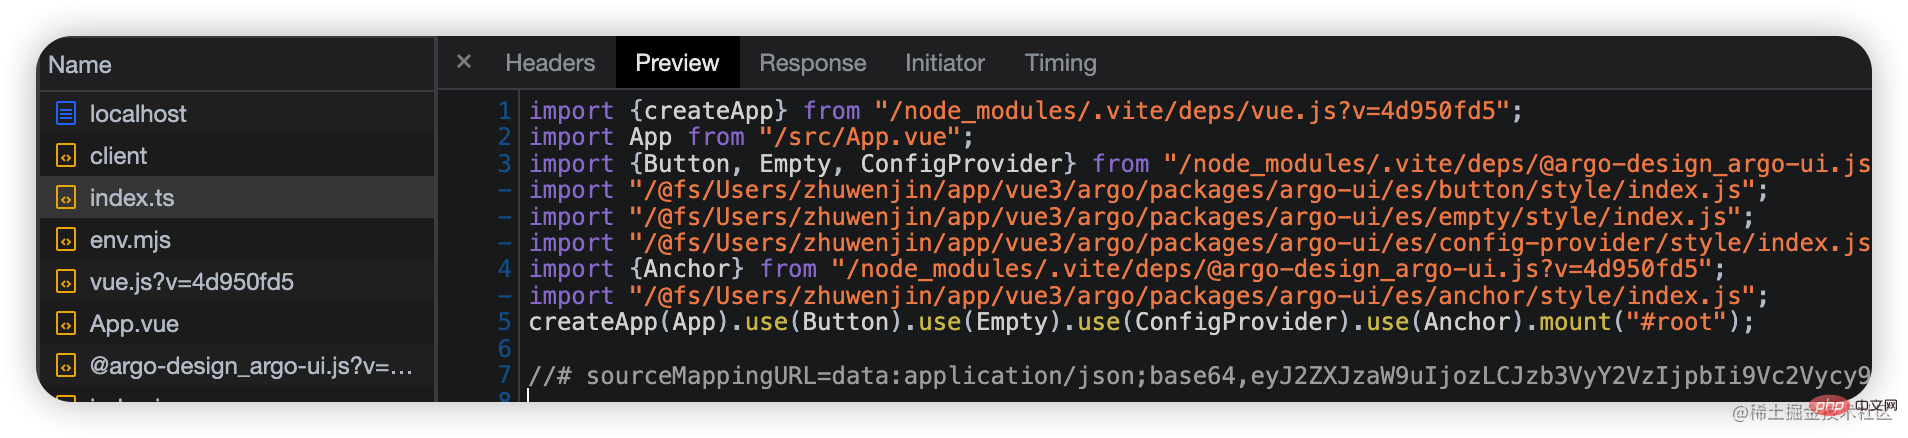
现在我们书写的代码如下,现在我们已经知道了,这样仅仅是加载了组件而已。
import { createApp } from "vue";
import App from "./App.vue";
import { Button, Empty, ConfigProvider } from "@argo-design/argo-ui";
import { Anchor } from "@argo-design/argo-ui";
createApp(App)
  .use(Button)
  .use(Empty)
  .use(ConfigProvider)
  .use(Anchor)
  .mount("#root");
添加插件之前:

添加插件之后:
import { defineConfig } from "vite";
import argoAutoInjectStyle from 'vite-plugin-argo-auto-inject-style';
export default defineConfig({
  plugins: [
      argoAutoInjectStyle({
            libs: [
        {
                  libraryName: "@argo-design/argo-ui",
                  resolveStyle: (name) => {
                              return `@argo-design/argo-ui/es/${name}/style/index.js`;
          }
        }
      ]
    })
  ]
})
插件实现
实践之前浏览一遍官网插件介绍是个不错的选择。插件API
vite插件是一个对象,通常由name和一系列钩子函数组成:
{
  name: "vite-plugin-vue-auto-inject-style",
  configResolved(config) {}
}
常用钩子
config
在vite.config.ts被解析完成后触发。常用于扩展配置。可以直接在config上定义或返回一个对象,该对象会尝试与配置文件vite.config.ts中导出的配置对象深度合并。
configResolved
在解析完所有配置时触发。形参config表示最终确定的配置对象。通常将该配置保存起来在有需要时提供给其它钩子使用。
resolveId
开发阶段每个传入模块请求时被调用,常用于解析模块路径。返回string或对象将终止后续插件的resolveId钩子执行。
load
resolveId之后调用,可自定义模块加载内容
transform
load之后调用,可自定义修改模块内容。这是一个串行钩子,即多个插件实现了这个钩子,下个插件的transform需要等待上个插件的transform钩子执行完毕。上个transform返回的内容将传给下个transform钩子。
为了让插件完成自动引入组件样式,我们需要完成如下工作:
过滤出我们想要的文件。
对文件内容进行AST解析,将符合条件的import语句提取出来。
然后解析出具体import的组件。
最后根据组件查找到样式文件路径,生成导入样式的语句字符串追加到import语句后面即可。
其中过滤我们使用rollup提供的工具函数createFilter;
AST解析借助es-module-lexer,非常出名,千万级周下载量。
import type { Plugin } from "vite";
import { createFilter } from "@rollup/pluginutils";
import { ExportSpecifier, ImportSpecifier, init, parse } from "es-module-lexer";
import MagicString from "magic-string";
import * as changeCase from "change-case";
import { Lib, VitePluginOptions } from "./types";
const asRE = /\s+as\s+\w+,?/g;
// 插件本质是一个对象,但为了接受在配置时传递的参数,我们通常在一个函数中将其返回。
// 插件默认开发和构建阶段都会应用
export default function(options: VitePluginOptions): Plugin {
const {
libs,
include = ["**/*.vue", "**/*.ts", "**/*.tsx"],
exclude = "node_modules/**"
} = options;
const filter = createFilter(include, exclude);
return {
name: "vite:argo-auto-inject-style",
async transform(code: string, id: string) {
if (!filter(id) || !code || !needTransform(code, libs)) {
return null;
}
await init;
let imports: readonly ImportSpecifier[] = [];
imports = parse(code)[0];
if (!imports.length) {
return null;
}
let s: MagicString | undefined;
const str = () => s || (s = new MagicString(code));
for (let index = 0; index < imports.length; index++) {
// ss import语句开始索引
// se import语句介结束索引
const { n: moduleName, se, ss } = imports[index];
if (!moduleName) continue;
const lib = getLib(moduleName, libs);
if (!lib) continue;
// 整条import语句
const importStr = code.slice(ss, se);
// 拿到每条import语句导入的组件集合
const importItems = getImportItems(importStr);
let endIndex = se + 1;
for (const item of importItems) {
const componentName = item.n;
const paramName = changeCase.paramCase(componentName);
const cssImportStr = `\nimport "${lib.resolveStyle(paramName)}";`;
str().appendRight(endIndex, cssImportStr);
}
}
return {
code: str().toString()
};
}
};
}
export type { Lib, VitePluginOptions };
function getLib(libraryName: string, libs: Lib[]) {
return libs.find((item) => item.libraryName === libraryName);
}
function getImportItems(importStr: string) {
if (!importStr) {
return [];
}
const matchItem = importStr.match(/{(.+?)}/gs);
const formItem = importStr.match(/from.+/gs);
if (!matchItem) return [];
const exportStr = `export ${matchItem[0].replace(asRE, ",")} ${formItem}`;
let importItems: readonly ExportSpecifier[] = [];
try {
importItems = parse(exportStr)[1];
} catch (error) {
console.log(error);
}
return importItems;
}
function needTransform(code: string, libs: Lib[]) {
return libs.some(({ libraryName }) => {
return new RegExp(`('${libraryName}')|("${libraryName}")`).test(code);
});
}export interface Lib {
libraryName: string;
resolveStyle: (name: string) => string;
}
export type RegOptions =
| string
| RegExp
| Array<string | RegExp>
| null
| undefined;
export interface VitePluginOptions {
include?: RegOptions;
exclude?: RegOptions;
libs: Lib[];
}换肤与暗黑风格
换肤
在我们的less样式中,会定义一系列如下的颜色梯度变量,其值由color-palette函数完成:
@blue-6: #3491fa;
@blue-1: color-palette(@blue-6, 1);
@blue-2: color-palette(@blue-6, 2);
@blue-3: color-palette(@blue-6, 3);
@blue-4: color-palette(@blue-6, 4);
@blue-5: color-palette(@blue-6, 5);
@blue-7: color-palette(@blue-6, 7);
@blue-8: color-palette(@blue-6, 8);
@blue-9: color-palette(@blue-6, 9);
@blue-10: color-palette(@blue-6, 10);
基于此,我们再演化出具体场景下的颜色梯度变量:
@primary-1: @blue-1;
@primary-2: @blue-2;
@primary-3: @blue-3;
// 以此类推...

@success-1: @green-1;
@success-2: @green-2;
@success-3: @green-3;
// 以此类推...

/* @warn @danger @info等等 */
有了具体场景下的颜色梯度变量,我们就可以设计变量供给组件消费了:
@color-primary-1: @primary-1;
@color-primary-2: @primary-2;
@color-primary-3: @primary-3;
/* ... */
.argo-btn.arco-btn-primary {
  color: #fff;
  background-color: @color-primary-1;
}
在使用组件库的项目中我们通过 Less 的 ·modifyVars 功能修改变量值:
Webpack配置
// webpack.config.js
module.exports = {
  rules: [{
    test: /.less$/,
    use: [{
      loader: 'style-loader',
    }, {
      loader: 'css-loader',
    }, {
      loader: 'less-loader',
     options: {
       lessOptions: {
         modifyVars: {
           'primary-6': '#f85959',
         },
         javascriptEnabled: true,
       },
     },
    }],
  }],
}
vite配置
// vite.config.js
export default {
  css: {
   preprocessorOptions: {
     less: {
       modifyVars: {
         'primary-6': '#f85959',
       },
       javascriptEnabled: true,
     }
   }
  },
}
设计暗黑风格
首先,颜色梯度变量需要增加暗黑风格。也是基于@blue-6计算,只不过这里换成了dark-color-palette函数:
@dark-blue-1: dark-color-palette(@blue-6, 1);
@dark-blue-2: dark-color-palette(@blue-6, 2);
@dark-blue-3: dark-color-palette(@blue-6, 3);
@dark-blue-4: dark-color-palette(@blue-6, 4);
@dark-blue-5: dark-color-palette(@blue-6, 5);
@dark-blue-6: dark-color-palette(@blue-6, 6);
@dark-blue-7: dark-color-palette(@blue-6, 7);
@dark-blue-8: dark-color-palette(@blue-6, 8);
@dark-blue-9: dark-color-palette(@blue-6, 9);
@dark-blue-10: dark-color-palette(@blue-6, 10);
然后,在相应节点下挂载css变量
body {
  --color-bg: #fff;
  --color-text: #000;
  --primary-6: @primary-6;
}
body[argo-theme="dark"] {
  --color-bg: #000;
  --color-text: #fff;
  --primary-6: @dark-primary-6;
}
紧接着,组件消费的less变量更改为css变量:
.argo-btn.argo-btn-primary {
  color: #fff;
  background-color: var(--primary-6);
}
此外,我们还设置了--color-bg,--color-text等用于设置body色调:
body {
  color: var(--color-bg);
  background-color: var(--color-text);
}
最后,在消费组件库的项目中,通过编辑body的argo-theme属性即可切换亮暗模式:
// 设置为暗黑模式
document.body.setAttribute('argo-theme', 'dark')

// 恢复亮色模式
document.body.removeAttribute('argo-theme');
在线动态换肤
前面介绍的是在项目打包时通过less配置修改less变量值达到换肤效果,有了css变量,我们可以实现在线动态换肤。默认的,打包过后样式如下:
body {
  --primary-6: '#3491fa'
}
.argo-btn {
  color: #fff;
  background-color: var(--primary-6);
}
在用户选择相应颜色后,我们只需要更改css变量--primary-6的值即可:
// 可计算selectedColor的10个颜色梯度值列表,并逐一替换
document.body.style.setProperty('--primary-6', colorPalette(selectedColor, 6));
// ....
文档站点
还记得每个组件目录下的TEMPLATE.md文件吗?
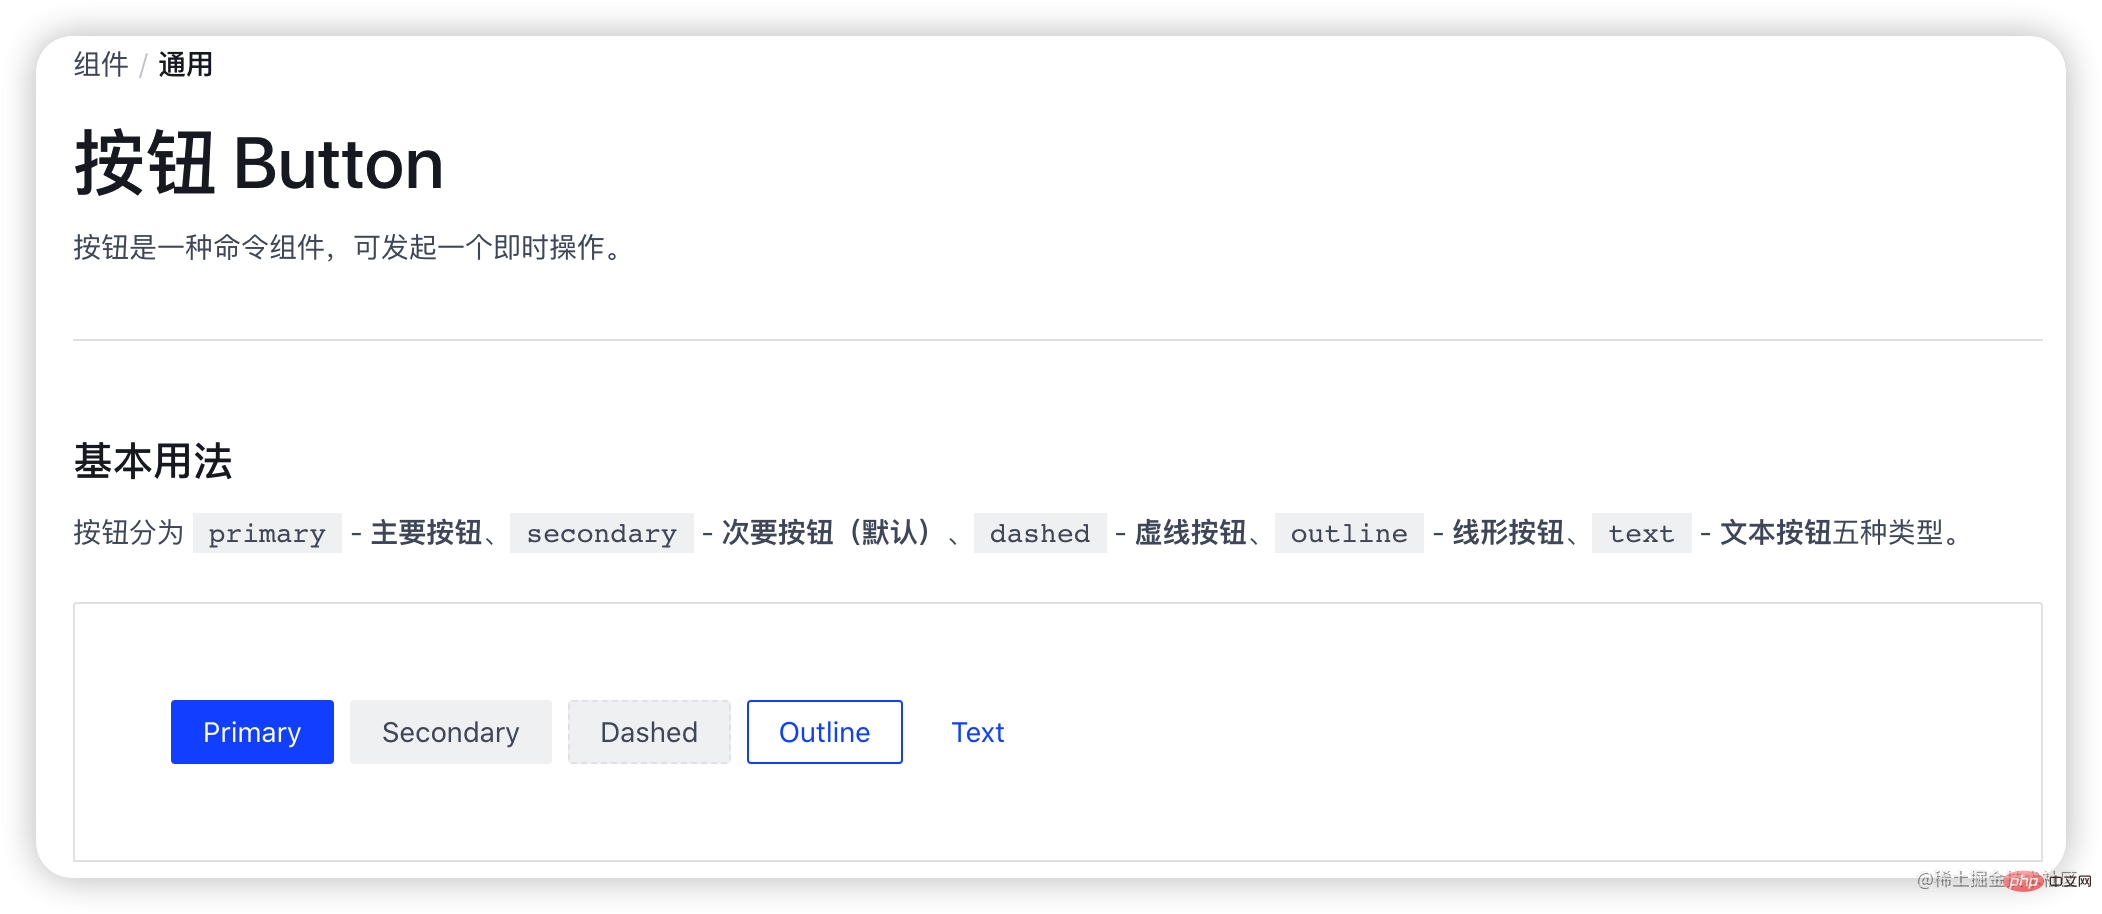
## zh-CN
```yaml
meta:
  type: 组件
  category: 通用
title: 按钮 Button
description: 按钮是一种命令组件,可发起一个即时操作。
```
---
## en-US
```yaml
meta:
  type: Component
  category: Common
title: Button
description: Button is a command component that can initiate an instant operation.
```
---

@import ./__demo__/basic.md
@import ./__demo__/disabled.md

## API
%%API(button.vue)%%

## TS
%%TS(interface.ts)%%
它是如何一步步被渲染出我们想要的界面呢?

TEMPLATE.md的作用
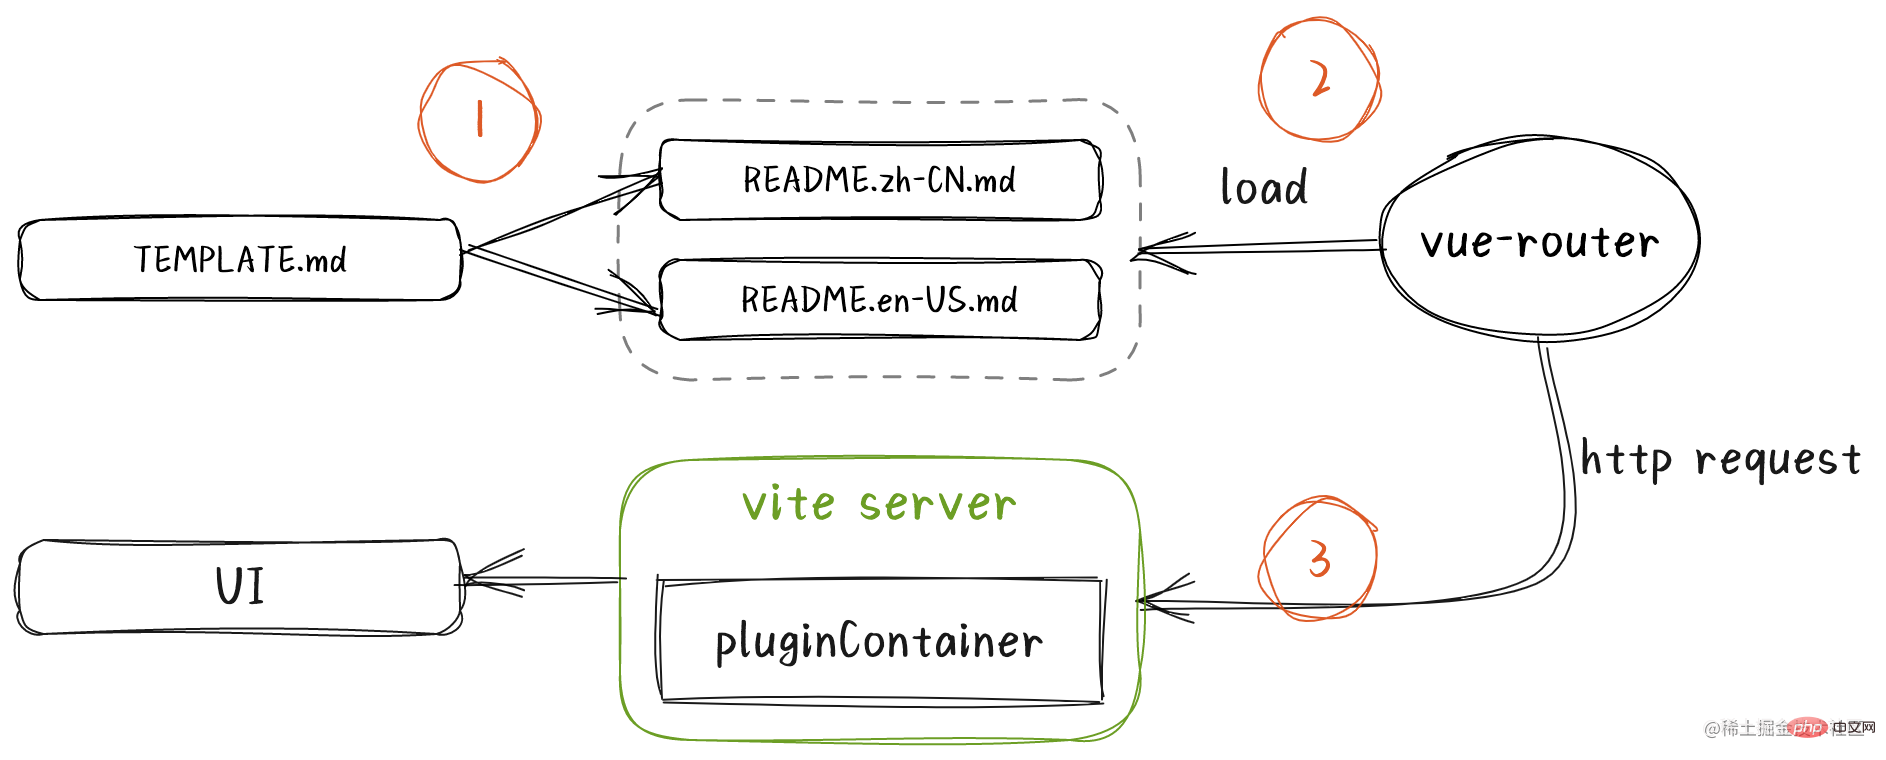
TEMPLATE.md将被解析并生成中英文版READE.md(组件使用文档),之后在vue-router中被加载使用。
这时当我们访问路由/button,vite服务器将接管并调用一系列插件解析成浏览器识别的代码,最后由浏览器渲染出我们的文档界面。
1. 解析TEMPLATE 生成 README
简单起见,我们忽略国际化和使用例子部分。
%%API(button.vue)%%

%%INTERFACE(interface.ts)%%
其中button.vue就是我们的组件,interface.ts就是定义组件的一些接口,比如ButtonProps,ButtonType等。
解析button.vue
大致流程如下:
读取TEMPLATE.md,正则匹配出button.vue;
使用vue-doc-api解析vue文件; let componentDocJson = VueDocApi.parse(path.resolve(__dirname, "button.vue"));
componentDocJson转换成md字符串,md字符串替换掉占位符%%API(button.vue)%%,写入README.md;
关于vue文件与解析出来的conponentDocJson结构见 vue-docgen-api
解析interface.ts
由于VueDocApi.parse无法直接解析.ts文件,因此借助ts-morph解析ts文件并转换成componentDocJson结构的JSON对象,再将componentDocJson转换成md字符串,替换掉占位符后最终写入README.md;
读取TEMPLATE.md,正则匹配出interface.ts;
使用ts-morph解析inerface.ts出interfaces;
interfaces转componentDocJson;
componentDocJson转换成md字符串,md字符串替换掉占位符%%API(button.vue)%%,写入README.md;
import { Project } from "ts-morph";
const project = new Project();
project.addSourceFileAtPath(filepath);
const sourceFile = project.getSourceFile(filepath);
const interfaces = sourceFile.getInterfaces();
const componentDocList = [];
interfaces.forEach((interfaceDeclaration) => {
  const properties = interfaceDeclaration.getProperties();
  const componentDocJson = {
    displayName: interfaceDeclaration.getName(),
    exportName: interfaceDeclaration.getName(),
    props: formatterProps(properties),
    tags: {}
  };

  if (componentDocJson.props.length) {
    componentDocList.push(componentDocJson);
  }
});

// genMd(componentDocList);
最终生成README.zh-CN.md如下
```yaml meta: type: 组件 category: 通用 title: 按钮 Button description: 按钮是一种命令组件,可发起一个即时操作。 ``` @import ./__demo__/basic.md @import ./__demo__/disabled.md ## API ### `<button>` Props |参数名|描述|类型|默认值| |---|---|---|:---:| |type|按钮的类型,分为五种:次要按钮、主要按钮、虚框按钮、线性按钮、文字按钮。|`'secondary' | 'primary' | 'dashed' | 'outline' | 'text'`|`"secondary"`| |shape|按钮的形状|`'square' | 'round' | 'circle'`|`"square"`| |status|按钮的状态|`'normal' | 'warning' | 'success' | 'danger'`|`"normal"`| |size|按钮的尺寸|`'mini' | 'small' | 'medium' | 'large'`|`"medium"`| |long|按钮的宽度是否随容器自适应。|`boolean`|`false`| |loading|按钮是否为加载中状态|`boolean`|`false`| |disabled|按钮是否禁用|`boolean`|`false`| |html-type|设置 `button` 的原生 `type` 属性,可选值参考 [HTML标准](https://developer.mozilla.org/en-US/docs/Web/HTML/Element/button#attr-type "_blank")|`'button' | 'submit' | 'reset'`|`"button"`| |href|设置跳转链接。设置此属性时,按钮渲染为a标签。|`string`|`-`| ### `<button>` Events |事件名|描述|参数| |---|---|---| |click|点击按钮时触发|event: `Event`| ### `<button>` Slots |插槽名|描述|参数| |---|:---:|---| |icon|图标|-| ### `<button-group>` Props |参数名|描述|类型|默认值| |---|---|---|:---:| |disabled|是否禁用|`boolean`|`false`| ## INTERFACE ### ButtonProps |参数名|描述|类型|默认值| |---|---|---|:---:| |type|按钮类型|`ButtonTypes`|`-`|
2. 路由配置
const Button = () => import("@argo-design/argo-ui/components/button/README.zh-CN.md");

const router = createRouter({
  {
    path: "/button",
  	component: Button
  }
});

export default router;
3. README是如何被渲染成UI的
首先我们来看下README.md(为方便直接省略.zh-CN)以及其中的demos.md的样子与它们最终的UI。
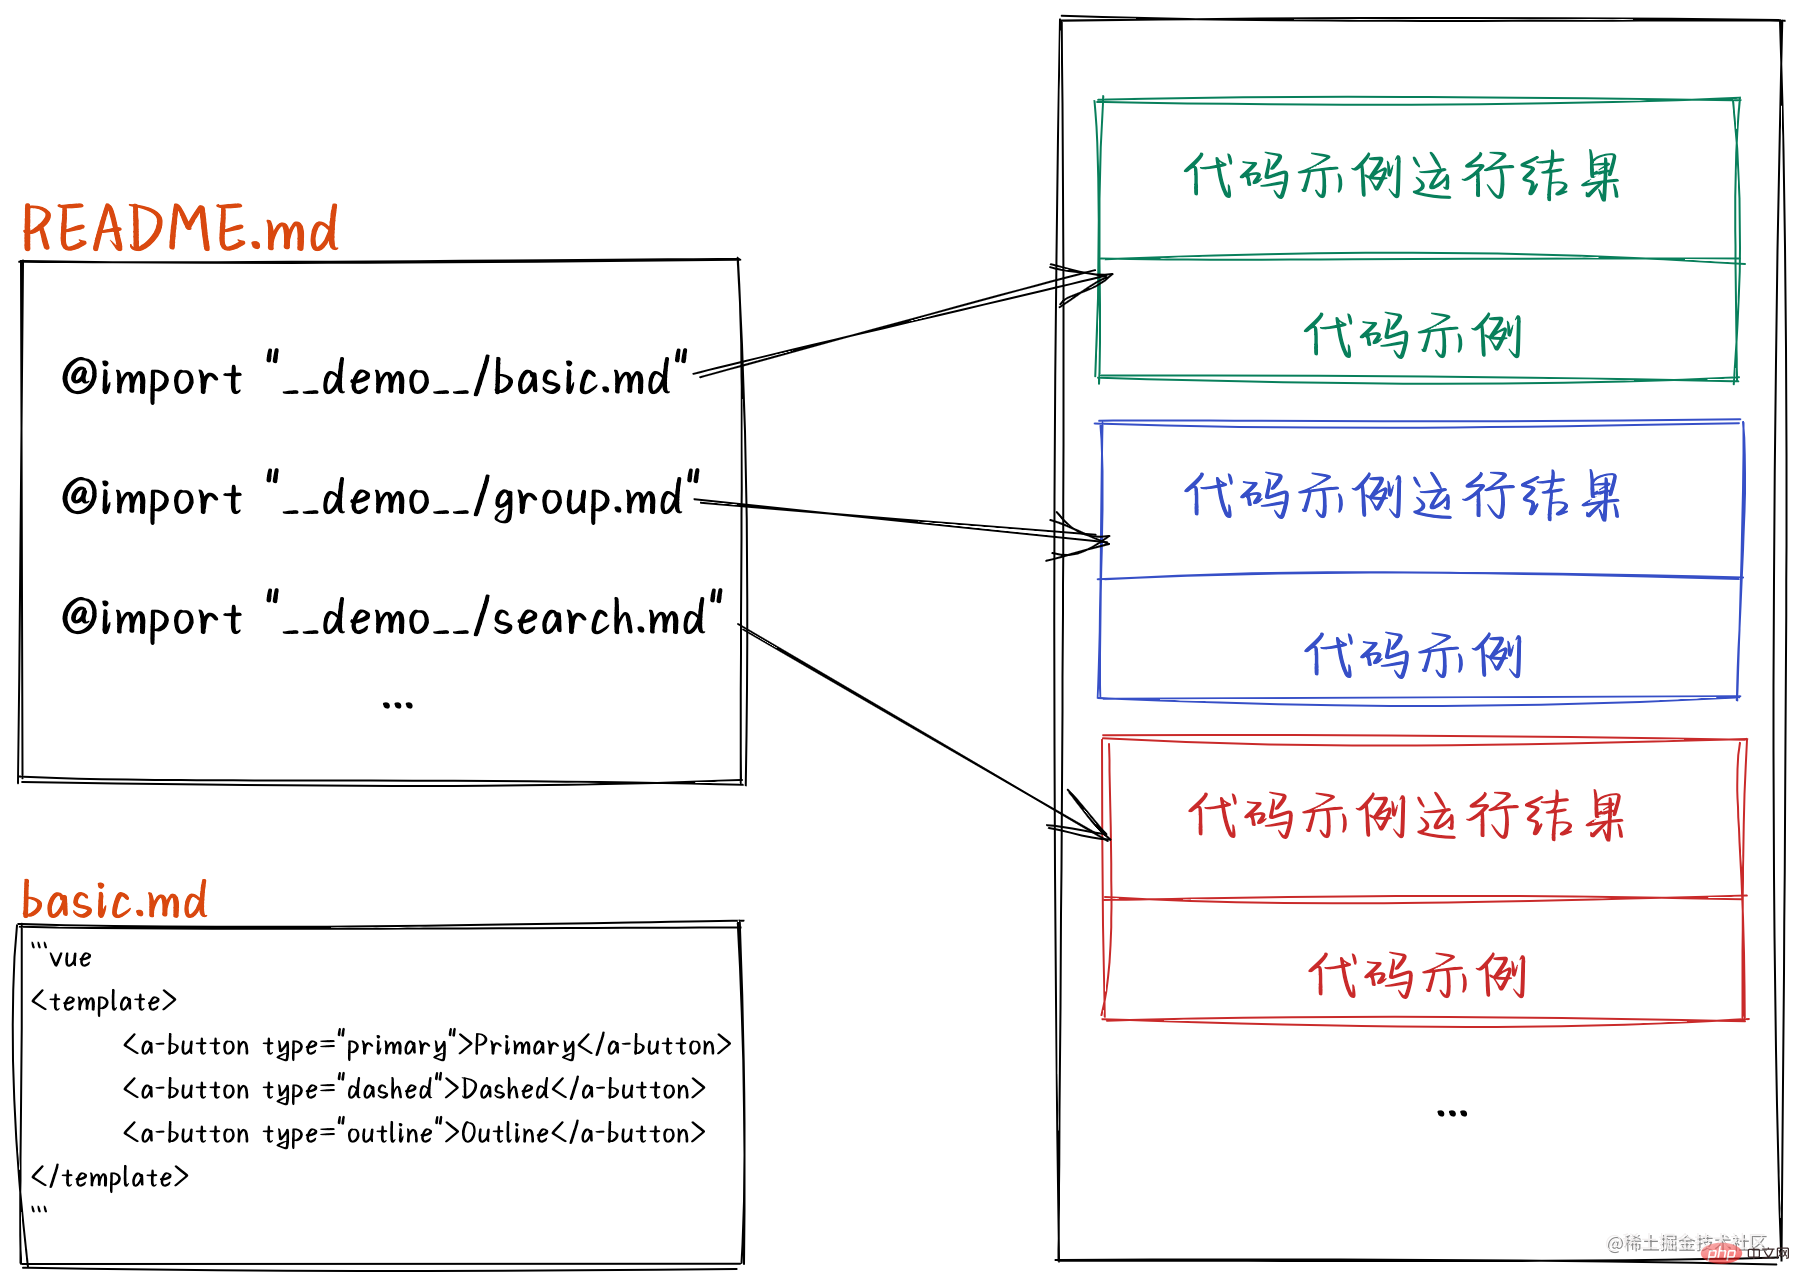
可以看到,README就是一系列demo的集合,而每个demo都会被渲染成一个由代码示例与代码示例运行结果组成的代码块。
开发vite-plugin-vue-docs解析md
yarn create vite快速搭建一个package
// vite.config.ts
import { defineConfig } from "vite";
import vue from "@vitejs/plugin-vue";
import md from "./plugins/vite-plugin-md/index";

export default defineConfig({
  server: {
    port: 8002,
  },
  plugins: [md(), vue()],
});
// App.vue <template> <ReadMe /> </template> <script setup> import ReadMe from "./readme.md"; </script>
// readme.md
@import ./__demo__/basic.md
开发之前我们先看看插件对README.md源码的解析转换流程。
1. 源码转换
首先我们来实现第一步: 源码转换。即将
@import "./__demo__/basic.md"
转换成
<template>
  <basic-demo />
</template>

<script>
import { defineComponent } from "vue";
import BasicDemo from "./__demo__/basic.md";

export default defineComponent({
  name: "ArgoMain",
  components: { BasicDemo },
});
</script>转换过程我们借助第三方markdown解析工具marked完成,一个高速,轻量,无阻塞,多平台的markdown解析器。
众所周知,md2html规范中,文本默认会被解析渲染成p标签。也就是说,README.md里的@import ./__demo__/basic.md会被解析渲染成e388a4556c0f65e1904146cc1a846bee@import ./__demo__/basic.md94b3e26ee717c64999d7867364b1b4a3,这不是我想要的。所以需要对marked进行一下小小的扩展。
// marked.ts
import { marked } from "marked";
import path from "path";

const mdImport = {
  name: "mdImport",
  level: "block",
  tokenizer(src: string) {
    const rule = /^@import\s+(.+)(?:\n|$)/;
    const match = rule.exec(src);
    if (match) {
      const filename = match[1].trim();
      const basename = path.basename(filename, ".md");

      return {
        type: "mdImport",
        raw: match[0],
        filename,
        basename,
      };
    }
    return undefined;
  },
  renderer(token: any) {
    return `<demo-${token.basename} />\n`;
  },
};

marked.use({
  extensions: [mdImport],
});

export default marked;我们新建了一个mdImport的扩展,用来自定义解析我们的md。在tokenizer 中我们定义了解析规则并返回一系列自定义的tokens,其中raw就是@import "./__demo__/basic.md",filename就是./__demo__/basic.md,basename就是basic,我们可以通过marked.lexer(code)拿到这些tokens。在renderer中我们自定义了渲染的html,通过marked.parser(tokens)可以拿到html字符串了。因此,我们开始在插件中完成第一步。
// index.ts
import { Plugin } from "vite";
import marked from "./marked";

export default function vueMdPlugin(): Plugin {
  return {
    name: "vite:argo-vue-docs",
    async transform(code: string, id: string) {
      if (!id.endsWith(".md")) {
        return null;
      }
      const tokens = marked.lexer(code);
      const html = marked.parser(tokens);
      const vueCode = transformMain({ html, tokens });
    },
  };
}
// vue-template.ts
import changeCase from "change-case";
import marked from "./marked";
export const transformMain = ({
html,
tokens,
}: {
html: string;
tokens: any[];
}): string => {
const imports = [];
const components = [];
for (const token of tokens) {
const componentName = changeCase.pascalCase(`demo-${token.basename}`);
imports.push(`import ${componentName} from "${token.filename}";`);
components.push(componentName);
}
return `
<template>
${html}
</template>
<script>
import { defineComponent } from "vue";
${imports.join("\n")};
export default defineComponent({
name: "ArgoMain",
components: { ${components.join(",")} },
});
</script>
`;
};其中change-case是一个名称格式转换的工具,比如basic-demo转BasicDemo等。
transformMain返回的vueCode就是我们的目标vue模版了。但浏览器可不认识vue模版语法,所以我们仍要将其交给官方插件@vitejs/plugin-vue的transform钩子函数转换一下。
import { getVueId } from "./utils";

export default function vueMdPlugin(): Plugin {
  let vuePlugin: Plugin | undefined;
  return {
    name: "vite:argo-vue-docs",
    configResolved(resolvedConfig) {
      vuePlugin = resolvedConfig.plugins.find((p) => p.name === "vite:vue");
    },
    async transform(code: string, id: string) {
      if (!id.endsWith(".md")) {
        return null;
      }
      if (!vuePlugin) {
        return this.error("Not found plugin [vite:vue]");
      }
      const tokens = marked.lexer(code);
      const html = marked.parser(tokens);
      const vueCode = transformMain({ html, tokens });
      return await vuePlugin.transform?.call(this, vueCode, getVueId(id));
    },
  };
}
// utils.ts
export const getVueId = (id: string) => {
return id.replace(".md", ".vue");
};这里使用getVueId修改扩展名为.vue是因为vuePlugin.transform会对非vue文件进行拦截就像我们上面拦截非md文件一样。
在configResolved钩子函数中,形参resolvedConfig是vite最终使用的配置对象。在该钩子中拿到其它插件并将其提供给其它钩子使用,是vite插件开发中的一种“惯用伎俩”了。
2. 处理basic.md
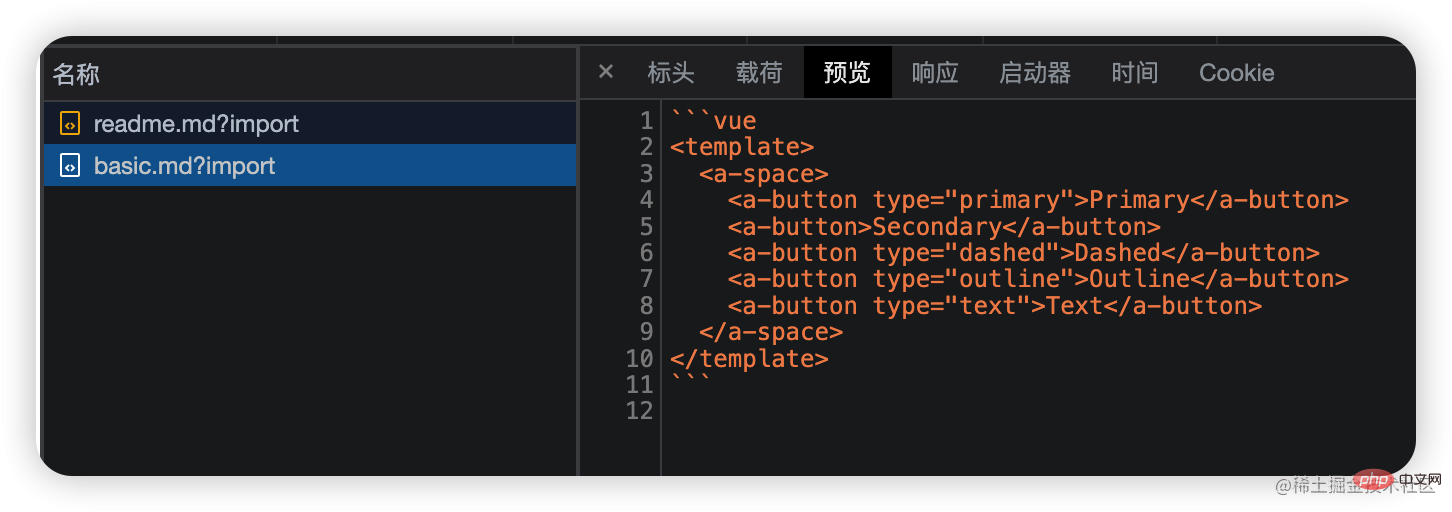
在经过vuePlugin.transform及后续处理过后,最终vite服务器对readme.md响应给浏览器的内容如下
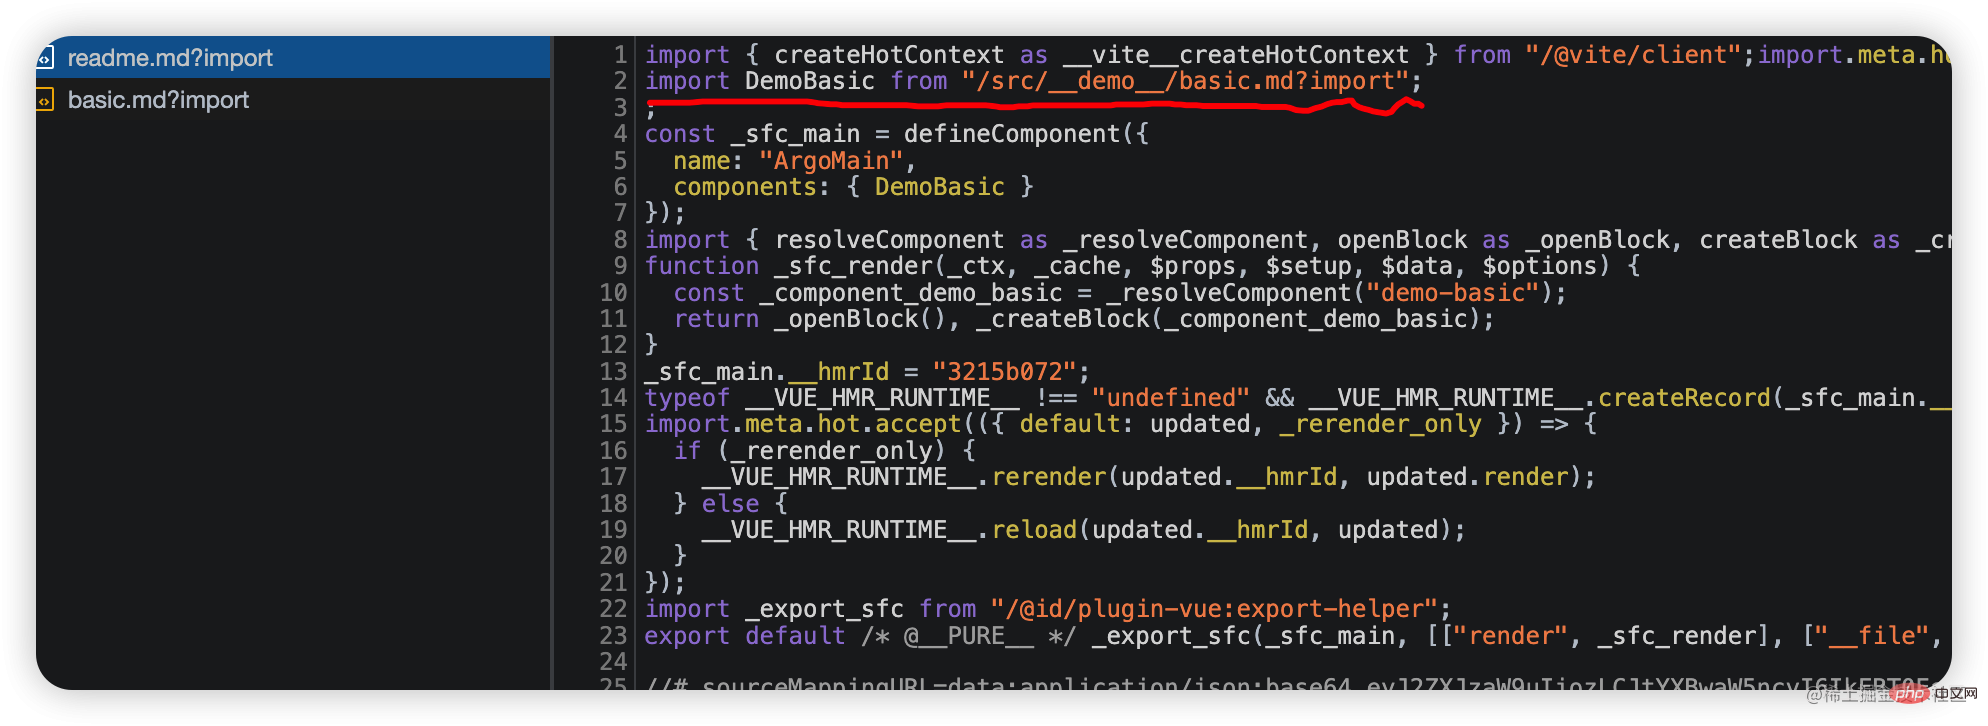
对于basic.md?import响应如下
可以看到,这一坨字符串可没有有效的默认导出语句。因此对于解析语句import DemoBasic from "/src/__demo__/basic.md?import";浏览器会报错
Uncaught SyntaxError: The requested module '/src/__demo__/basic.md?import' does not provide an export named 'default' (at readme.vue:9:8)
在带有module属性的script标签中,每个import语句都会向vite服务器发起请求进而继续走到插件的transform钩子之中。下面我们继续,对/src/__demo__/basic.md?import进行拦截处理。
// index.ts
async transform(code: string, id: string) {
  if (!id.endsWith(".md")) {
    return null;
  }

  // 新增对demo文档的解析分支
  if (isDemoMarkdown(id)) {
    const tokens = marked.lexer(code);
    const vueCode = transformDemo({ tokens, filename: id });
    return await vuePlugin.transform?.call(this, vueCode, getVueId(id));
  } else {
    const tokens = marked.lexer(code);
    const html = marked.parser(tokens);
    const vueCode = transformMain({ html, tokens });
    return await vuePlugin.transform?.call(this, vueCode, getVueId(id));
  }

},
// utils.tsexport
const isDemoMarkdown = (id: string) => {
return //__demo__//.test(id);
};// vue-template.ts
export const transformDemo = ({
tokens,
filename,
}: {
tokens: any[];
filename: string;
}) => {
const data = {
html: "",
};
const vueCodeTokens = tokens.filter(token => {
return token.type === "code" && token.lang === "vue"
});
data.html = marked.parser(vueCodeTokens);
return `
<template>
<hr />
${data.html}
</template>
<script>
import { defineComponent } from "vue";
export default defineComponent({
name: "ArgoDemo",
});
</script>
`;
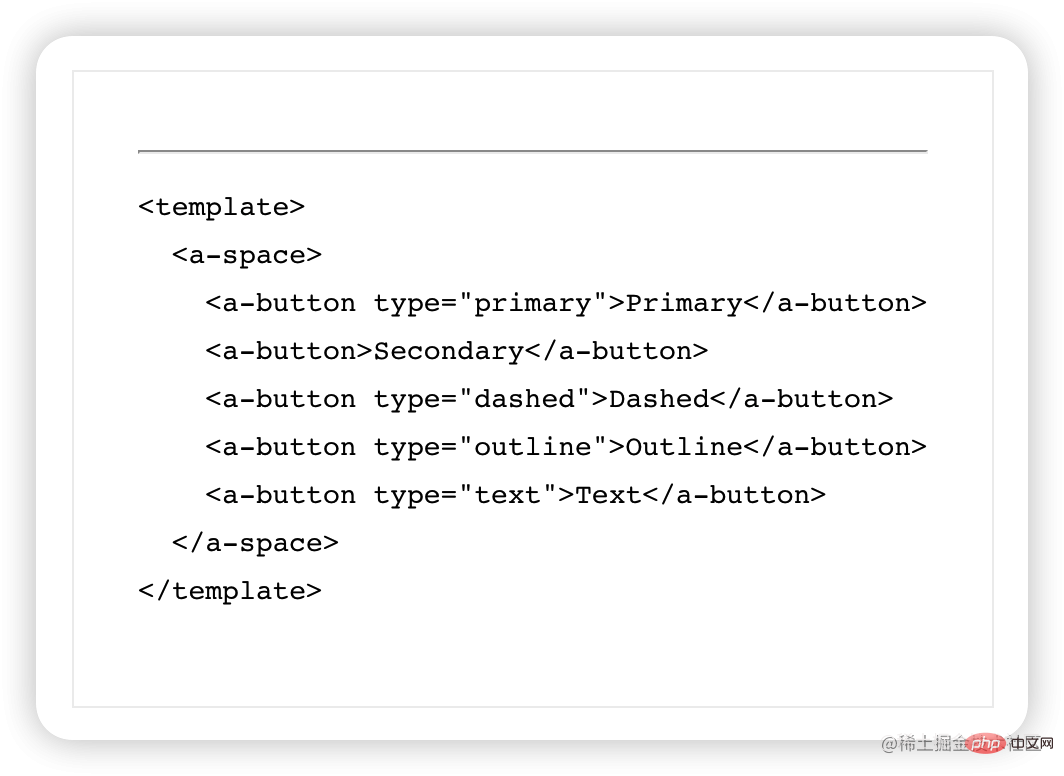
};现在已经可以在浏览器中看到结果了,水平线和示例代码。
3. 虚拟模块
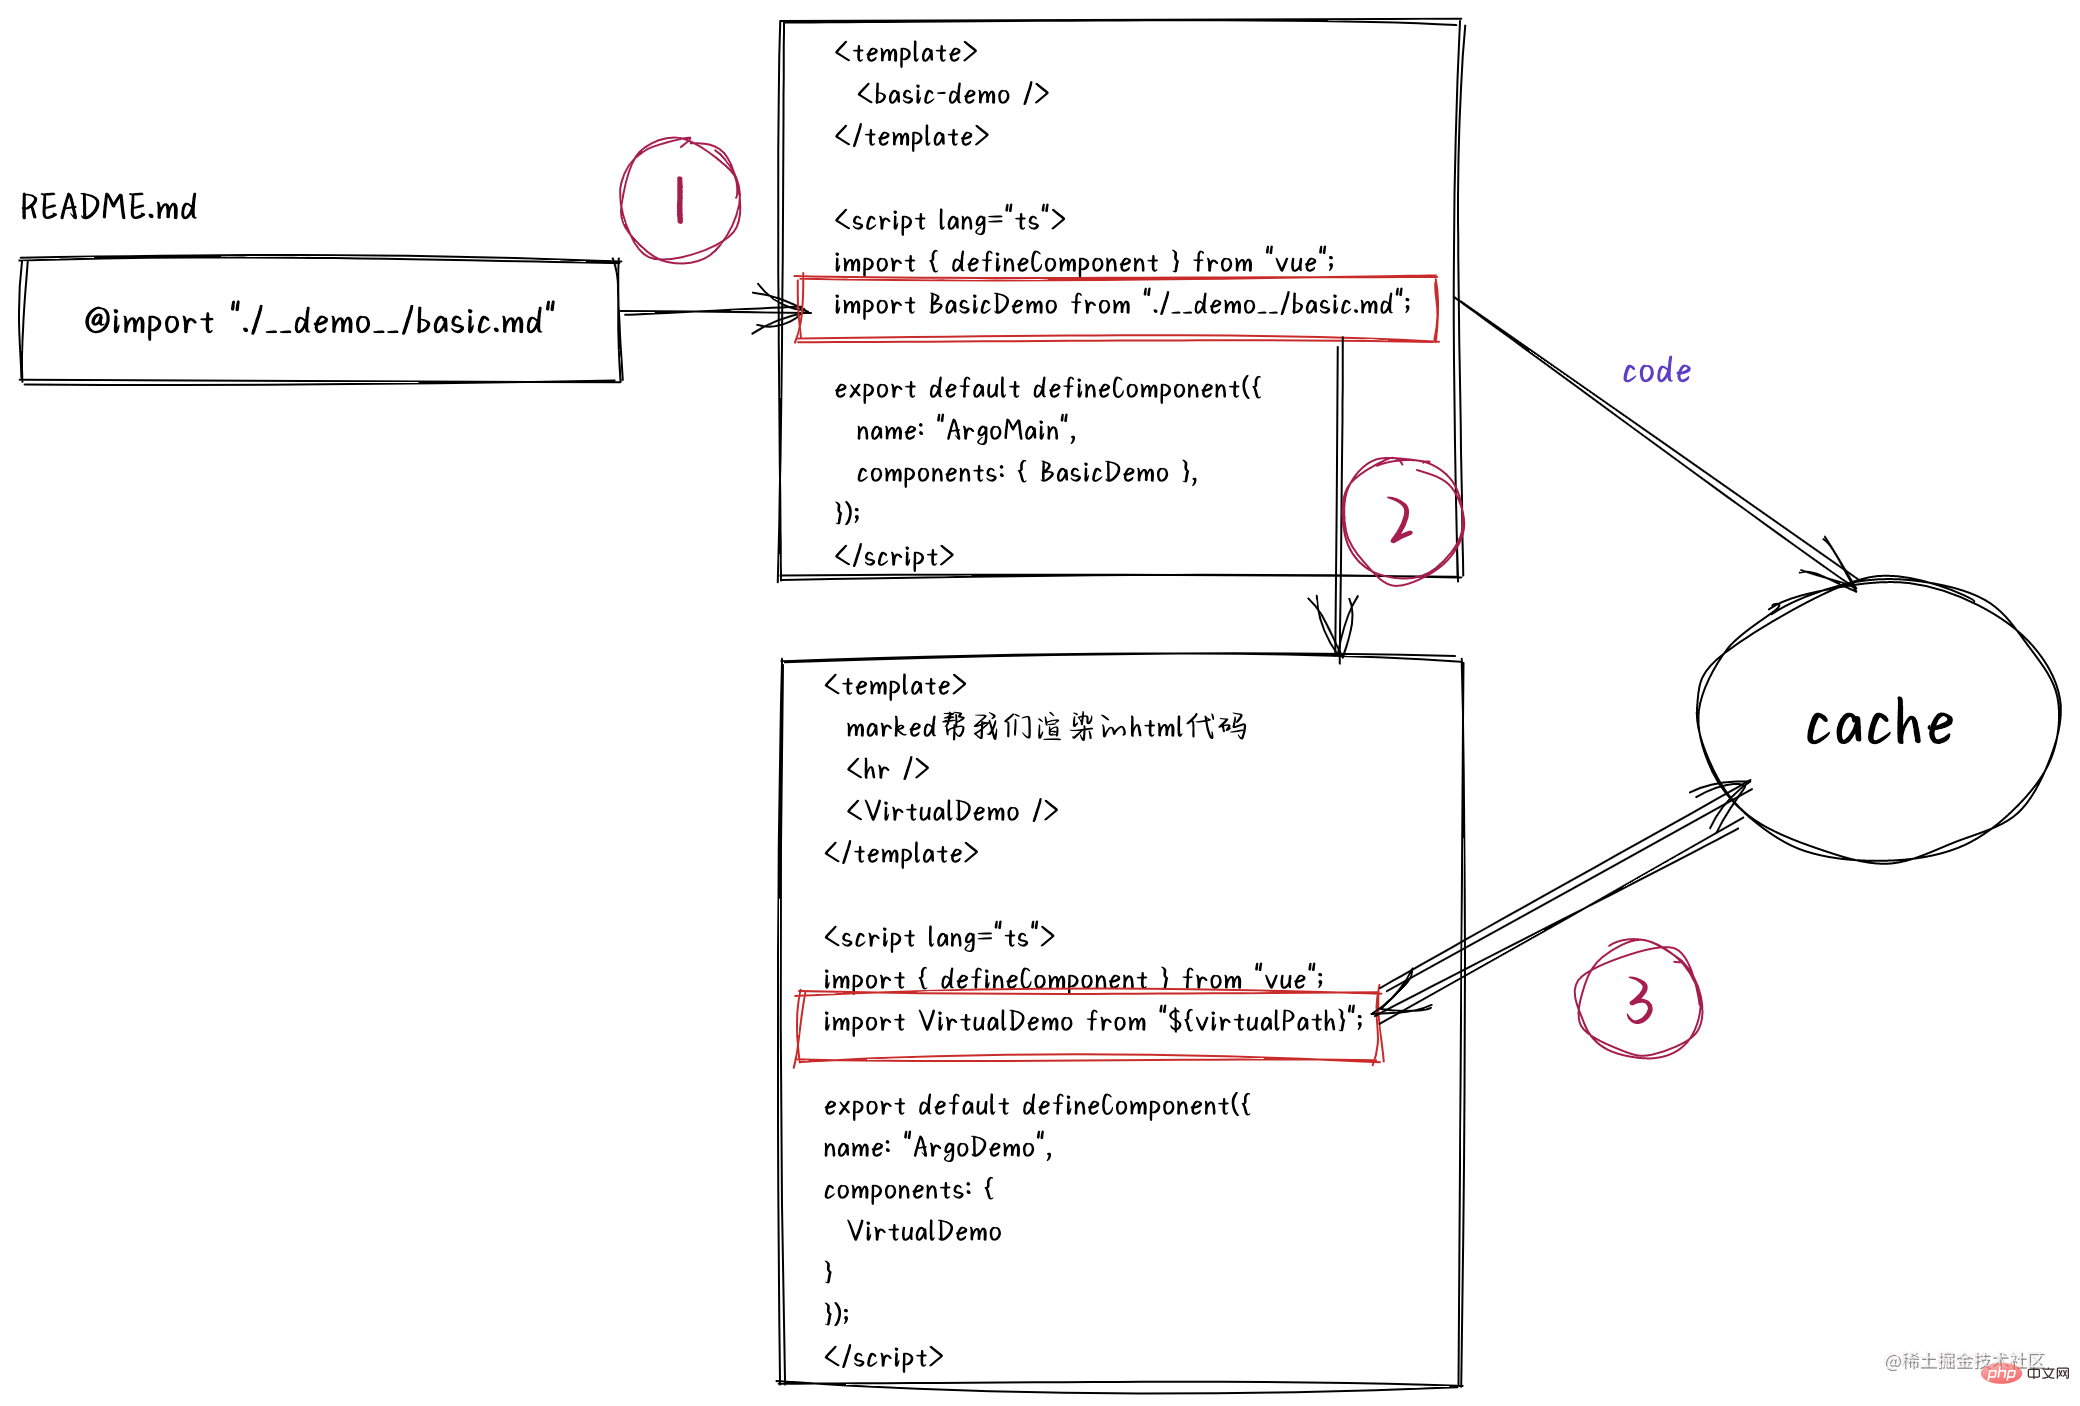
那如何实现示例代码的运行结果呢?其实在对tokens遍历(filter)的时候,我们是可以拿到vue模版字符串的,我们可以将其缓存起来,同时手动构造一个import请求import Result from "${virtualPath}";这个请求用于返回运行结果。
export const transformDemo = ({
  tokens,
  filename,
}: {
  tokens: any[];
  filename: string;
}) => {
  const data = {
    html: "",
  };
  const virtualPath = `/@virtual${filename}`;
  const vueCodeTokens = tokens.filter(token => {
    const isValid = token.type === "code" && token.lang === "vue"
    // 缓存vue模版代码
    isValid && createDescriptor(virtualPath, token.text);
    return isValid;
  });
  data.html = marked.parser(vueCodeTokens);

  return `
  <template>
    <Result />
    <hr />
    ${data.html}
  </template>

  <script>
import { defineComponent } from "vue";
import Result from "${virtualPath}";

export default defineComponent({
  name: "ArgoDemo",
  components: {
    Result
  }
});
</script>
`;
};
// utils.ts
export const isVirtualModule = (id: string) => {
return //@virtual/.test(id);
};export default function docPlugin(): Plugin {
let vuePlugin: Plugin | undefined;
return {
name: "vite:plugin-doc",
resolveId(id) {
if (isVirtualModule(id)) {
return id;
}
return null;
},
load(id) {
// 遇到虚拟md模块,直接返回缓存的内容
if (isVirtualModule(id)) {
return getDescriptor(id);
}
return null;
},
async transform(code, id) {
if (!id.endsWith(".md")) {
return null;
}
if (isVirtualModule(id)) {
return await vuePlugin.transform?.call(this, code, getVueId(id));
}
// 省略其它代码...
}
}
}// cache.ts
const cache = new Map();
export const createDescriptor = (id: string, content: string) => {
cache.set(id, content);
};
export const getDescriptor = (id: string) => {
return cache.get(id);
};
最后为示例代码加上样式。安装prismjs
yarn add prismjs
// marked.ts
import Prism from "prismjs";
import loadLanguages from "prismjs/components/index.js";

const languages = ["shell", "js", "ts", "jsx", "tsx", "less", "diff"];
loadLanguages(languages);

marked.setOptions({
  highlight(
    code: string,
    lang: string,
    callback?: (error: any, code?: string) => void
  ): string | void {
    if (languages.includes(lang)) {
      return Prism.highlight(code, Prism.languages[lang], lang);
    }
    return Prism.highlight(code, Prism.languages.html, "html");
  },
});
项目入口引入css
// main.ts
import "prismjs/themes/prism.css";
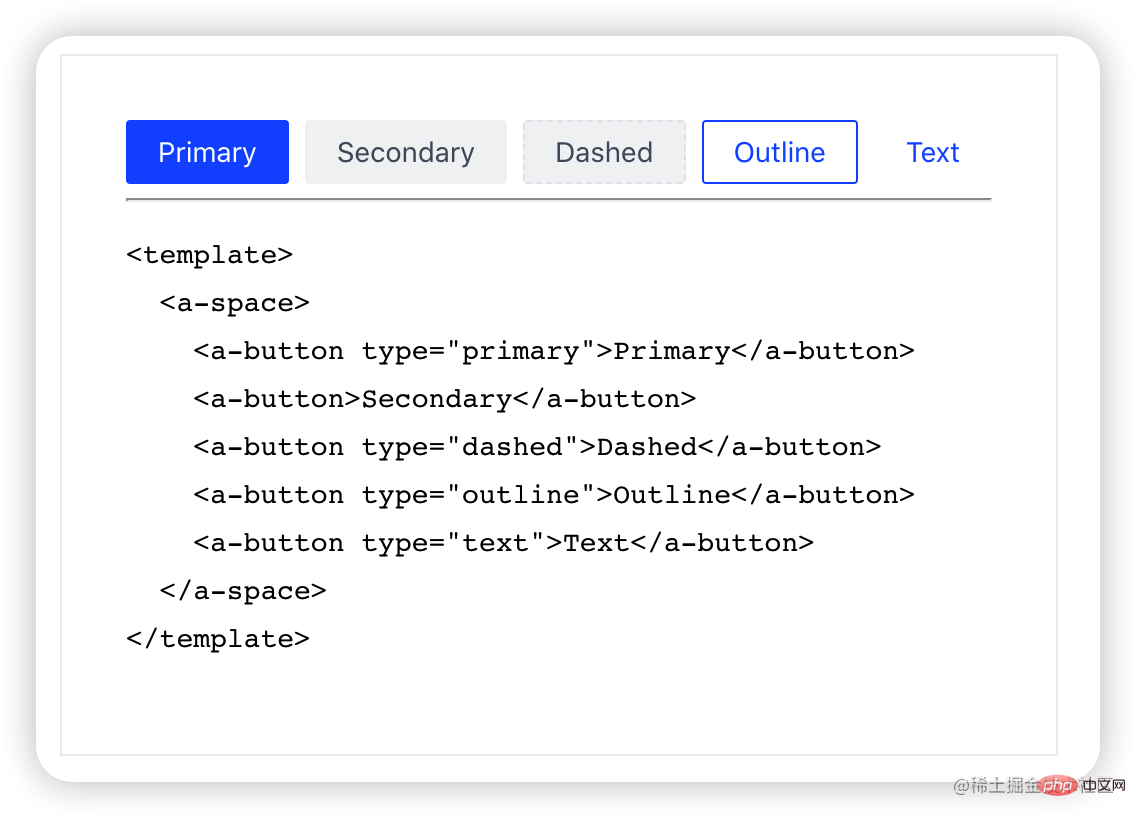
重启预览,以上就是vite-plugin-vue-docs的核心部分了。
遗留问题
最后回到上文构建组件style/index.ts遗留的问题,index.ts的内容很简单,即引入组件样式。
import "../../style/index.less"; // 全局样式
import "./index.less"; // 组件样式复制代码
index.ts在经过vite的lib模式构建后,我们增加css插件,在generateBundle钩子中,我们可以对最终的bundle进行新增,删除或修改。通过调用插件上下文中emitFile方法,为我们额外生成用于引入css样式的css.js。
import type { Plugin } from "vite";
import { OutputChunk } from "rollup";

export default function cssjsPlugin(): Plugin {
  return {
    name: "vite:cssjs",
    async generateBundle(outputOptions, bundle) {
      for (const filename of Object.keys(bundle)) {
        const chunk = bundle[filename] as OutputChunk;
        this.emitFile({
          type: "asset",
          fileName: filename.replace("index.js", "css.js"),
          source: chunk.code.replace(/.less/g, ".css")
        });
      }
    }
  };
}
结语
下篇暂定介绍版本发布,部署站点,集成到在线编辑器,架构复用等,技术涉及linux云服务器,站点服务器nginx,docker,stackblitz等。
Ce qui précède est le contenu détaillé de. pour plus d'informations, suivez d'autres articles connexes sur le site Web de PHP en chinois!
Articles Liés
Voir plus- Qu'est-ce que la modularité en vue
- Comment implémenter une transition échelonnée dans vue
- Quelles sont les méthodes d'initialisation des données dans Vue ?
- Quelles sont les différences entre mvvm et mvc dans vue
- Quelles sont les méthodes d'implémentation de la liaison bidirectionnelle dans Vue ?
- Quel est le suffixe de la page écrite en vue ?