Maison >interface Web >tutoriel CSS >Partagez 12 astuces CSS pratiques (venez les récupérer)
Partagez 12 astuces CSS pratiques (venez les récupérer)
- 青灯夜游avant
- 2022-03-03 10:54:132498parcourir
Cet article partagera avec vous 12 conseils CSS intéressants et pratiques pour faciliter le développement front-end. Venez le récupérer, j'espère qu'il sera utile à tout le monde !

(apprentissage recommandé : tutoriel vidéo CSS)
1 Effet de frappe
Implémentation du code :
<div class="wrapper">
    <div class="typing-demo">
      有趣且实用的 CSS 小技巧
    </div>
</div>
.wrapper {
height: 100vh;
display: flex;
align-items: center;
justify-content: center;
}
.typing-demo {
width: 22ch;
animation: typing 2s steps(22), blink .5s step-end infinite alternate;
white-space: nowrap;
overflow: hidden;
border-right: 3px solid;
font-family: monospace;
font-size: 2em;
}
@keyframes typing {
from {
width: 0
}
}
@keyframes blink {
50% {
border-color: transparent
}
}Effet d'implémentation :

2.
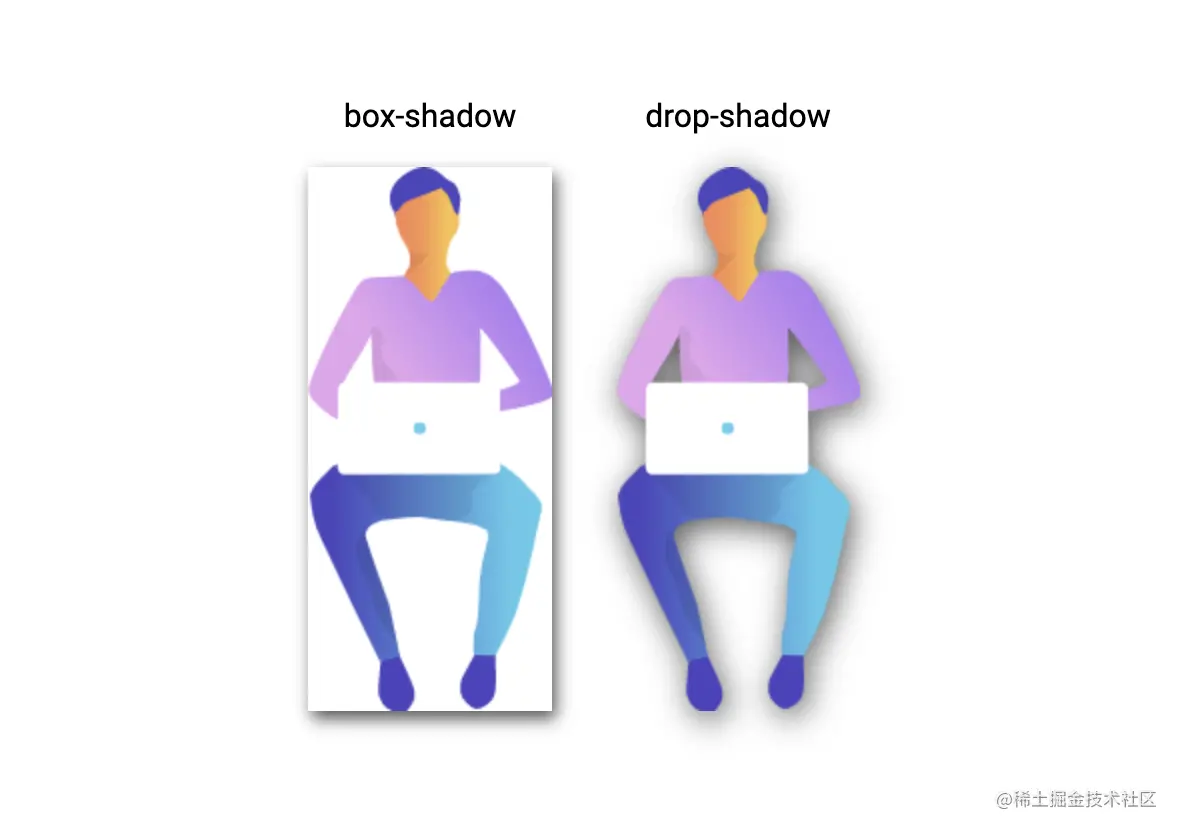
Lorsque vous utilisez des images transparentes, vous pouvez Utilisez la fonction drop-shadow() pour créer une ombre sur l'image au lieu d'utiliser l'attribut box shadow pour créer une ombre rectangulaire derrière toute la boîte de l'élément :<div> <div> <div> box-shadow </div> <img class="box-shadow lazy" src="/static/imghwm/default1.png" data-src="https://markodenic.com/man_working.png" alt="Partagez 12 astuces CSS pratiques (venez les récupérer)" > </div> <div> <div> drop-shadow </div> <img class="drop-shadow lazy" src="/static/imghwm/default1.png" data-src="https://markodenic.com/man_working.png" alt="Partagez 12 astuces CSS pratiques (venez les récupérer)" > </div> </div>
.wrapper {
  height: 100vh;
  display: flex;
  align-items: center;
  justify-content: center;
}

.mr-2 {
  margin-right: 2em;
}

.mb-1 {
  margin-bottom: 1em;
}

.text-center {
  text-align: center;
}

.box-shadow {
  box-shadow: 2px 4px 8px #585858;
}

.drop-shadow {
  filter: drop-shadow(2px 4px 8px #585858);
}
Effet de contraste :

<nav>
  Scroll to:
  <a href="#sectionA" class="link bg-red">A</a>

  <a href="#sectionB" class="link bg-blue">B</a>

  <a href="#sectionC" class="link bg-green">C</a>
</nav>

<div class="wrapper">
  <div id="sectionA" class="section bg-red">A</div>

  <div id="sectionB" class="section bg-blue">B</div>

  <div id="sectionC" class="section bg-green">C</div>
</div>
html {
  scroll-behavior: smooth;
}

nav {
  position: fixed;
  left: calc(50vw - 115px);
  top: 0;
  width: 200px;
  text-align: center;
  padding: 15px;
  background: #fff;
  box-shadow: 0 2px 5px 1px rgba(0, 0, 0, 0.2);
}

nav .link {
  padding: 5px;
  color: white;
}

.section {
  height: 100vh;
  display: flex;
  align-items: center;
  justify-content: center;
  color: #fff;
  font-size: 5em;
  text-shadow:
    0px 2px 0px #b2a98f,
    0px 4px 3px rgba(0,0,0,0.15),
    0px 8px 1px rgba(0,0,0,0.1);
}

.bg-red {
  background: #de5448;
}

.bg-blue {
  background: #4267b2;
}

.bg-green {
  background: #4CAF50;
}
Obtenez l'effet :

<div class="wrapper">
  <div class="tile">
    Default
  </div>

  <div class="tile tile-image-cursor">
    Image
  </div>

  <div class="tile tile-emoji-cursor">
    Emoji
  </div>
</div>
.wrapper {
display: flex;
height: 100vh;
align-items: center;
justify-content: center;
background: #4776e6;
background: linear-gradient(to right, #4776e6, #8e54e9);
padding: 0 10px;
}
.tile {
width: 200px;
height: 200px;display: flex;
align-items: center;
justify-content: center;
background-color: #de5448;
margin-right: 10px;color: #fff;
font-size: 1.4em;
text-align: center;
}
.tile-image-cursor {
background-color: #1da1f2;
cursor: url(https://picsum.photos/20/20), auto;
}
.tile-emoji-cursor {
background-color: #4267b2;
cursor: url("data:image/svg+xml;utf8,<svg xmlns='http://www.w3.org/2000/svg' width='40' height='48' viewport='0 0 100 100' style='fill:black;font-size:24px;'><text y='50%'>?</text></svg>"), auto;
}
Effet de réussite :
5. Texte tronqué 
<div>
	白日依山尽,黄河入海流。欲穷千里目,更上一层楼。
</div>
div {
  width: 200px;
  background-color: #fff;
  padding: 15px;
  white-space: nowrap;
  overflow: hidden;
  text-overflow: ellipsis;
}
Effet de réussite :
Vous pouvez également utiliser le "-webkit-line- attribut "pince" à tronquer le texte à un nombre spécifique de lignes. Le texte affichera des points de suspension à l'endroit tronqué : 
div {
  width: 200px;
  display: -webkit-box;
  -webkit-box-orient: vertical;
  -webkit-line-clamp: 2;
  overflow: hidden;
}
Obtenez l'effet :
6 Personnalisez le style de sélection
<div class="wrapper">
  <div>
    <p>
     默认高亮
    </p>
    <p class="custom-highlighting">
      自定义高亮
    </p>
  </div>
</div>
.wrapper {
height: 100vh;
display: flex;
align-items: center;
justify-content: center;
}
p {
font-size: 2rem;
font-family: sans-serif;
}
.custom-highlighting::selection {
background-color: #8e44ad;
color: #fff;
}
Effet de réussite :

7. Boîte modale CSS
<div class="wrapper">
<a href="#demo-modal">Open Modal</a>
</div>
<div id="demo-modal" class="modal">
<div class="modal__content">
<h1>CSS Modal</h1>
<p>hello world</p>
<a href="#" class="modal__close">×</a>
</div>
</div>.wrapper {
height: 100vh;
display: flex;
align-items: center;
justify-content: center;
background: linear-gradient(to right, #834d9b, #d04ed6);
}
.wrapper a {
display: inline-block;
text-decoration: none;
padding: 15px;
background-color: #fff;
border-radius: 3px;
text-transform: uppercase;
color: #585858;
font-family: 'Roboto', sans-serif;
}
.modal {
visibility: hidden;
opacity: 0;
position: absolute;
top: 0;
right: 0;
bottom: 0;
left: 0;
display: flex;
align-items: center;
justify-content: center;
background: rgba(77, 77, 77, .7);
transition: all .4s;
}
.modal:target {
visibility: visible;
opacity: 1;
}
.modal__content {
border-radius: 4px;
position: relative;
width: 500px;
max-width: 90%;
background: #fff;
padding: 1em 2em;
}
.modal__close {
position: absolute;
top: 10px;
right: 10px;
color: #585858;
text-decoration: none;
}
Effet de réussite :
8. Style d'élément vide 
<div class="wrapper">
  <div class="box"></div>
  <div class="box">白日依山尽,黄河入海流。欲穷千里目,更上一层楼。</div>
</div>
.wrapper {
  height: 100vh;
  display: flex;
  justify-content: center;
  align-items: center;
}

.box {
  display: inline-block;
  background: #999;
  border: 1px solid #585858;
  height: 200px;
  width: 200px;
  margin-right: 15px;
}

.box:empty {
  background: #fff;
}
Effet de réussite :
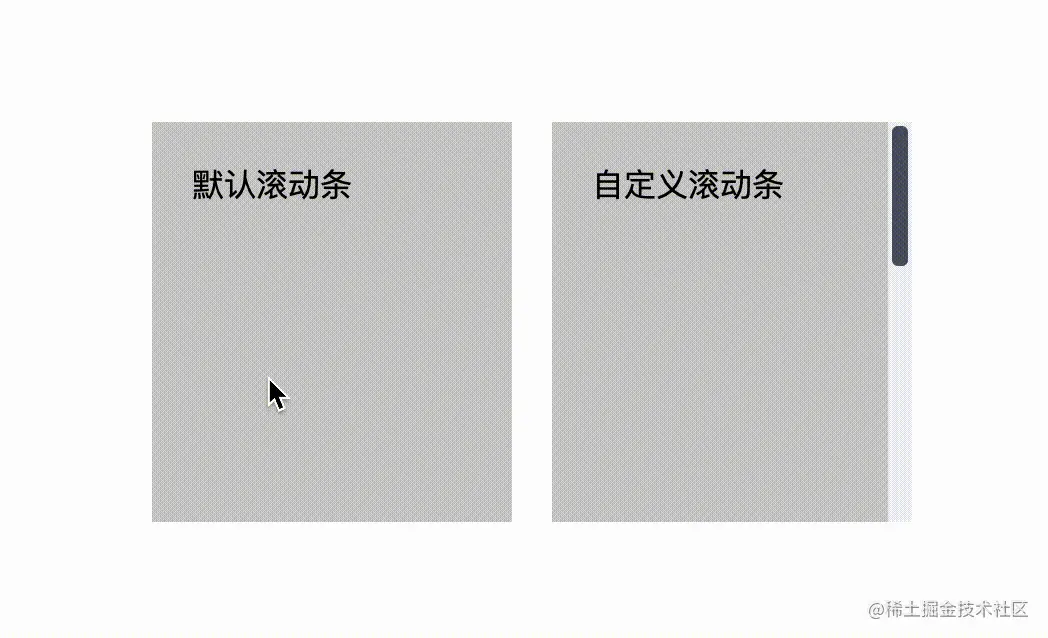
9. Créez une barre de défilement personnalisée
<div class="wrapper">
    <div>
      <div class="tile mr-1">
        <div class="tile-content">
          默认滚动条
        </div>
      </div>

      <div class="tile tile-custom-scrollbar">
        <div class="tile-content">
          自定义滚动条
        </div>
      </div>
    </div>
</div>
.wrapper {
height: 100vh;
display: flex;
align-items: center;
justify-content: center;
}
.mr-1 {
margin-right: 1em;
}
.tile {
overflow: auto;
display: inline-block;
background-color: #ccc;
height: 200px;
width: 180px;
}
.tile-custom-scrollbar::-webkit-scrollbar {
width: 12px;
background-color: #eff1f5;
}
.tile-custom-scrollbar::-webkit-scrollbar-track{
border-radius: 3px;
background-color: transparent;
}
.tile-custom-scrollbar::-webkit-scrollbar-thumb{
border-radius:5px;
background-color:#515769;
border:2px solid #eff1f5
}
.tile-content {
padding: 20px;
height: 500px;
}Obtenez l'effet :
10. Vous pouvez utiliser la fonction CSS attr() pour créer des info-bulles dynamiques en CSS pur. 
<h1>
  HTML/CSS tooltip
</h1>
<p>
  Hover <span class="tooltip" data-tooltip="Tooltip Content">Here</span> to see the tooltip.
</p>
<p>
  You can also hover <span class="tooltip" data-tooltip="This is another Tooltip Content">here</span> to see another example.
</p>
.tooltip {
  position: relative;
  border-bottom: 1px dotted black;
}

.tooltip:before {
  content: attr(data-tooltip);
  position: absolute;
  width: 100px;
  background-color: #062B45;
  color: #fff;
  text-align: center;
  padding: 10px;
  line-height: 1.2;
  border-radius: 6px;
  z-index: 1;
  opacity: 0;
  transition: opacity .6s;
  bottom: 125%;
  left: 50%;
  margin-left: -60px;
  font-size: 0.75em;
  visibility: hidden;
}

.tooltip:after {
  content: "";
  position: absolute;
  bottom: 75%;
  left: 50%;
  margin-left: -5px;
  border-width: 5px;
  border-style: solid;
  opacity: 0;
  transition: opacity .6s;
  border-color: #062B45 transparent transparent transparent;
  visibility: hidden;
}

.tooltip:hover:before,
.tooltip:hover:after {
  opacity: 1;
  visibility: visible;
}
Obtenez l'effet :
)
peuvent être obtenues. utilisé avec la fonction de filtre grayscale() Image d'entrée la transformation est en niveaux de gris.
(Partage de vidéos d'apprentissage :
Tutoriel d'introduction au front-end Web)
Ce qui précède est le contenu détaillé de. pour plus d'informations, suivez d'autres articles connexes sur le site Web de PHP en chinois!
Articles Liés
Voir plus- Réponse détaillée à la différence entre le CSS étendu et le module CSS dans la portée CSS
- CSS3 réalise l'effet d'animation consistant à ramasser des boulettes de riz gluant avec une cuillère (super mignon) !
- Ce que vous devez savoir sur Selenium en utilisant le résumé de positionnement CSS
- Regarder! 10 conseils CSS pratiques qui valent la peine d'être collectés
- Voyons comment réaliser une stylisation de mosaïque d'images à l'aide de CSS ?
- Qu'est-ce qui est utilisé pour définir le moment de l'animation de transition en CSS3


)
)