Maison >interface Web >js tutoriel >Tutoriel : Comment créer une application Web météo en utilisant JS et API (Collection)
Tutoriel : Comment créer une application Web météo en utilisant JS et API (Collection)
- 奋力向前avant
- 2021-09-15 12:12:203081parcourir
Dans l'article précédent "Vous apprendre à utiliser HTML, CSS et JS pour créer un générateur de mot de passe aléatoire (partage)", je vous ai présenté comment utiliser html, css et js pour créer un générateur de mot de passe aléatoire. L'article suivant vous présentera comment utiliser JS et l'API pour créer une application Web météo. Voyons comment le faire ensemble.

Aujourd'hui, je vais créer une application météo géniale où nous pouvons rechercher n'importe quelle ville, région ou pays et obtenir sa météo actuelle en utilisant l'API Météo. De plus, pour y ajouter un peu de peaufinage, j'ai également utilisé l'API Unsplash comme image d'arrière-plan pour le site, qui sera basée sur l'emplacement que vous entrez. J'ai ajouté un effet d'inclinaison et un aspect vitreux à la carte. Les langages de programmation que nous utiliserons dans ce projet sont HTML, CSS et JS. Alors allons-y, allons-y. Weather API获取其当前天气。此外,为了给它添加一些修饰,我还使用了Unsplash API作为网站的背景图片,这将基于您输入的位置。我为卡片添加了倾斜效果和玻璃化外观。我们将在这个项目中使用的编程语言是HTML、CSS和JS。所以让我们咕咕咕。
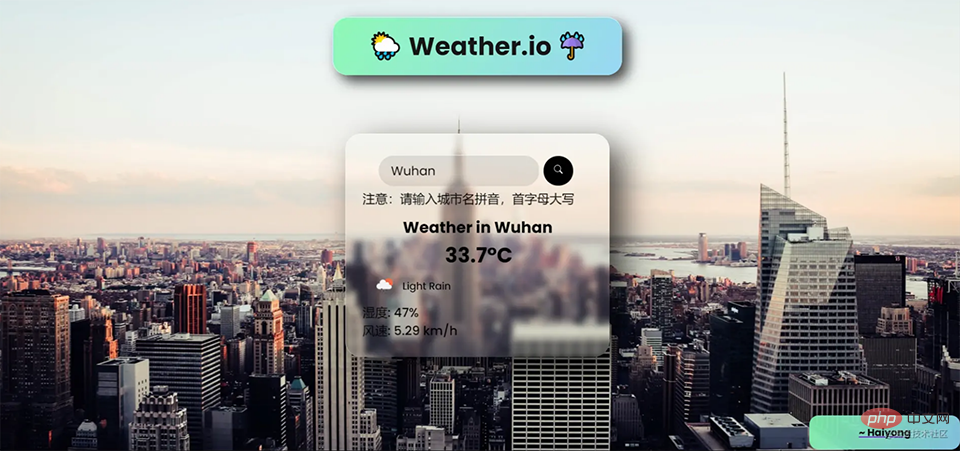
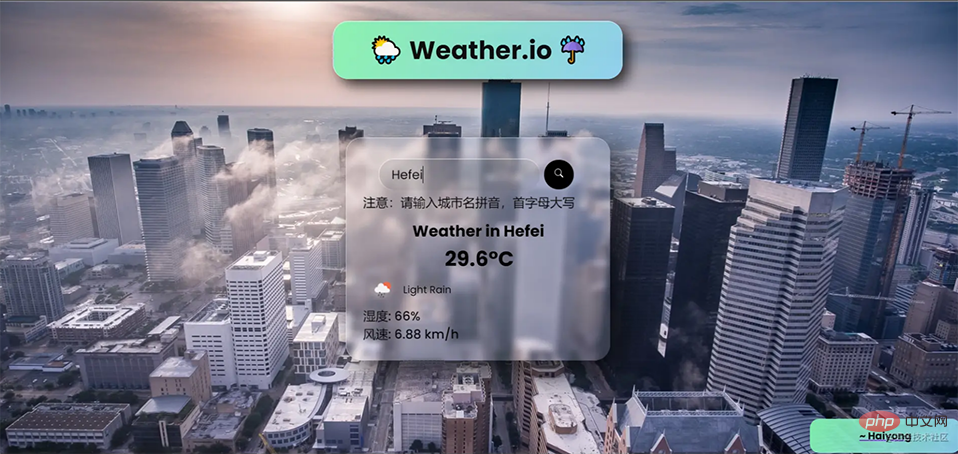
看看我们将要实现的最终样子
演示地址:https://wanghao221.github.io/Weather.io/
bilibili展示视频:https://www.bilibili.com/video/BV1xX4y1c7Z4
注意:我在文中只提到了您应该/可能在代码中使用的几个关键点和步骤。因为,这是一个博客,而不是代码库,所以我想保持简洁。如果您想参考整个代码地址https://github.com/wanghao221/Weather.io 去看看吧!
第 1 步 - 设置环境并收集所有资源
使用您喜欢的代码编辑器,创建一个名为“Weather App”或任何您想要的名字,然后创建这三个文件并将这些资源添加到文件夹中:
index.html
style.css
script.js
我们需要的其他资源:
Favicon
Loading GIF (optional)
Vanilla-Tilt.js file
下载所有这些资源地址:https://download.csdn.net/download/qq_44273429/20463321
第 2 步 - 从 index.html 开始
从HTML 文件的常用模板开始。根据需要添加标题。
在链接style.css和之前script.js,链接您想要的谷歌字体。我使用过Poppins字体,这是我比较喜欢的字体之一。(谷歌字体)
HTML
<link
href="https://fonts.googleapis.com/css2family=Poppins:ital,wght@0,200;0,400;0,500;0,600;0,700;0,800;0,900;1,800&display=swap"
rel="stylesheet">
现在从body开始,如果您希望向您的网站添加加载程序,那么您可以将其添加到正文标签中,然后为其编写脚本。
HTML
<body onload="myFunction()">
制作两个单独的div。一个用于heading title,一个用于卡片。在它下面添加合适的div标签。
这里我使用了一个SVG格式的搜索按钮。您可以将此代码用于卡片div中的按钮。
HTML
<button>
<svg stroke="currentColor" fill="currentColor" stroke-width="0" viewBox="0 0 16 16" height="1em"
width="1.5em" xmlns="http://www.w3.org/2000/svg">
<path fill-rule="evenodd" d="M10.442 10.442a1 1 0 011.415 0l3.85 3.85a1 1 0 01-1.414 1.415l-3.85-3.85a1 1 0 010-1.415z"
clip-rule="evenodd"></path>
<path fill-rule="evenodd" d="M6.5 12a5.5 5.5 0 100-11 5.5 5.5 0 000 11zM13 6.5a6.5 6.5 0 11-13 0 6.5 6.5 0 0113 0z"
clip-rule="evenodd"></path>
</svg>
</button>
为默认图标显示添加天气图标。
HTML
<div class="flex">
  <img class="icon lazy"  src="/static/imghwm/default1.png"  data-src="https://openweathermap.org/img/wn/04d.png"   alt=""  />
  <div class="description">多云</div>
</div>
加载动画和Vanilla-Tilt js的脚本。在正文结束之前添加它。我在上面步骤 1 中提到的资源中添加了Vanilla-Tilt Js文件。
JS
<script>
var preloader = document.getElementById('loading');
function myFunction() {
preloader.style.display = 'none';
}
</script>
<script type="text/javascript" src="js/vanilla-tilt.js"></script>
<script type="text/javascript">
VanillaTilt.init(document.querySelector(".card"), {
max: 15,
glare: true,
reverse: true,
"max-glare": 0.5,
speed: 400
});
VanillaTilt.init(document.querySelectorAll(".card"));
</script>第 3 步 - 设置索引文
从样式body和其他元素开始。
设置加载动画的样式。您可以使用此代码对其进行样式设置。由于加载动画具有白色背景,因此我使用了#fff。我在资源文件夹中添加了SVG图像。
CSS
#loading{
  position: fixed;
  width: 100%;
  height: 100vh;
  background: #fff url('/loading.svg')
  no-repeat center;
  z-index: 99999;
}
请参阅Github存储库以获取 CSS 代码
地址:https://github.com/wanghao221/Weather.io
第 4 步 - 获取 Weather API 和 Unsplash API 密钥
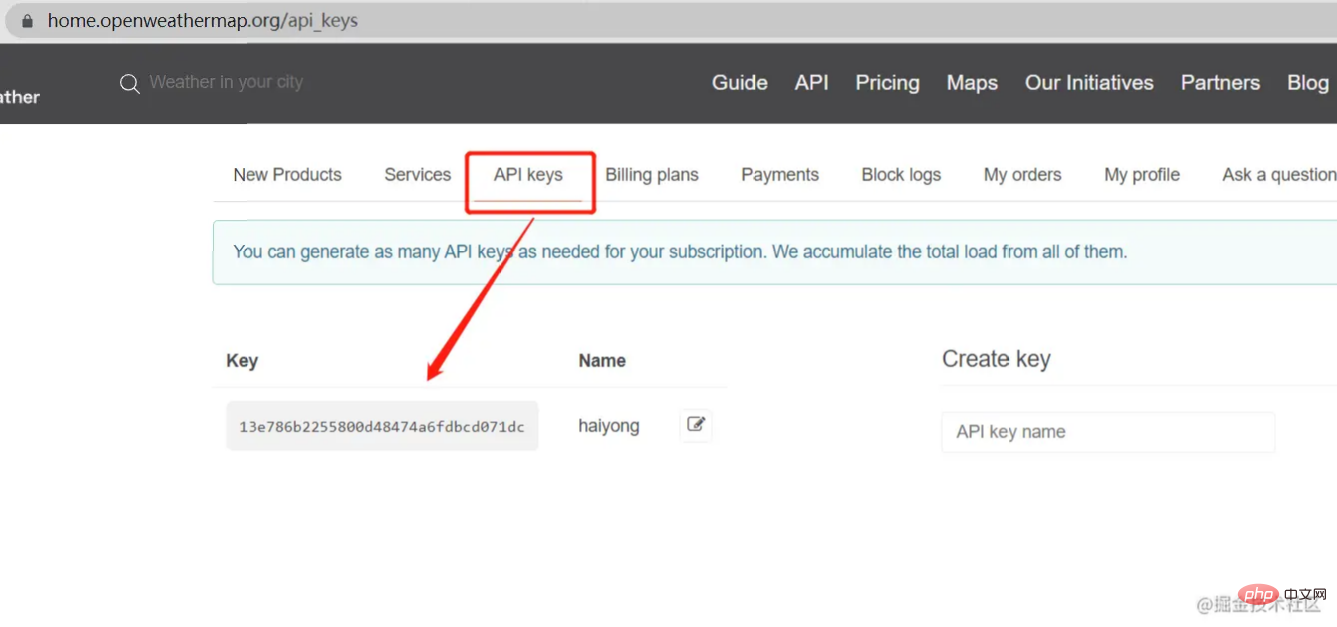
前往OpenWeatherMap并创建一个帐户。登录后单击API Keys选项卡中的 ,您将看到API密钥。复制API Key并粘贴到下面提到的 JavaScript代码的第二行 (apiKey: " <insert api key here>",</insert>)
 前往
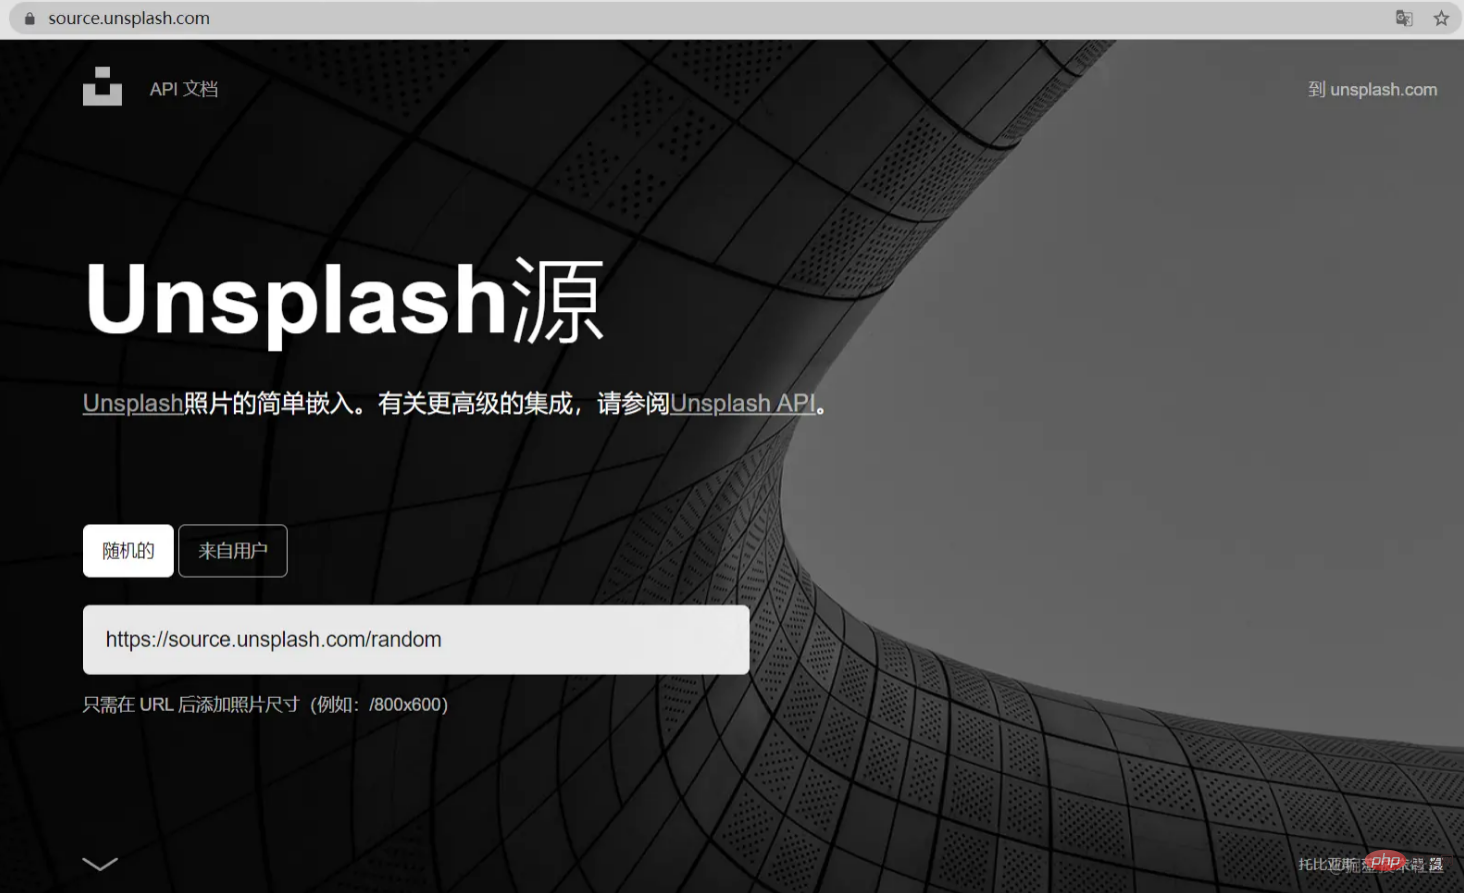
前往Unsplash Source。在这里,您可以看到如何根据大小、文本、用户的喜好、收藏等以不同的方式调用图片。
第 5 步 - 从 JavaScript 编码开始
在JavaScipt中集成API对于学习如何为Web应用程序使用API
Étape 1 : Configurer l'environnement et collecter toutes les ressources
🎜À l'aide de votre éditeur de code préféré, créez une nouvelle application appelée "Weather App" ou ce que vous voulez, puis créez ces trois fichiers et ajoutez ces ressources au dossier : 🎜- 🎜index.html🎜
- 🎜style .css🎜
- 🎜script.js🎜
- 🎜 Favicon🎜 🎜Chargement du GIF (facultatif)🎜
- 🎜Fichier Vanilla-Tilt.js🎜
Étape 2 - Commencez avec index.html
🎜Commencez avec un modèle commun pour les fichiers HTML. Ajoutez un titre si vous le souhaitez. 🎜🎜Avant de lierstyle.css et script.js, liez les polices Google souhaitées. J'ai utilisé la police Poppins, qui est l'une de mes polices préférées. (Google Fonts) 🎜🎜HTML🎜let weather = {
apiKey: "<Insert API Key here>",
fetchWeather: function (city) {
fetch(
"https://api.openweathermap.org/data/2.5/weather?q=" +
city +
"&units=metric&appid=" +
this.apiKey
)
.then((response) => response.json())
.then((data) => this.displayWeather(data));
},
displayWeather: function (data) {
const { name } = data;
const { icon, description } = data.weather[0];
const { temp, humidity } = data.main;
const { speed } = data.wind;
document.querySelector(".city").innerText = "Weather in " + name;
document.querySelector(".icon").src =
"https://openweathermap.org/img/wn/" + icon + ".png";
document.querySelector(".description").innerText = description;
document.querySelector(".temp").innerText = temp + "°C";
document.querySelector(".humidity").innerText =
"湿度: " + humidity + "%";
document.querySelector(".wind").innerText =
"风速: " + speed + " km/h";
document.querySelector(".weather").classList.remove("loading");
document.body.style.backgroundImage =
"url('https://source.unsplash.com/1600x900/?city " + name + "')";
document.body.style.backgroundRepeat = "none";
document.body.style.backgroundSize = "100";
document.body.style.width = "100%";
document.body.style.height = "100%";
document.body.style.backgroundRepeat = "no-repeat";
document.body.style.backgroundSize = "cover";
},
search: function () {
this.fetchWeather(document.querySelector(".search-bar").value);
},
};
document.querySelector(".search button").addEventListener("click", function () {
weather.search();
});
document
.querySelector(".search-bar")
.addEventListener("keyup", function (event) {
if (event.key == "Enter") {
weather.search();
}
});
weather.fetchWeather("Shanghai");🎜 Maintenant, à partir de body, si vous souhaitez ajouter un chargeur à votre site Web, vous pouvez l'ajouter à la balise body puis le scripter. 🎜🎜HTML🎜rrreee🎜Créez deux divs distincts. Un pour le titre du titre et un pour la carte. Ajoutez la balise div appropriée en dessous. 🎜🎜Ici j'utilise un bouton de recherche au format SVG. Vous pouvez utiliser ce code pour les boutons à l'intérieur d'une carte div. 🎜🎜HTML🎜rrreee🎜Ajoutez une icône météo à l'affichage de l'icône par défaut. 🎜🎜HTML🎜rrreee🎜 Chargement d'animations et de scripts pour Vanilla-Tilt js. Ajoutez-le avant la fin du texte. J'ai ajouté le fichier Vanilla-Tilt Js aux ressources mentionnées à l'étape 1 ci-dessus. 🎜🎜JS🎜rrreeeÉtape 3 - Configurer le texte d'index
🎜Commencez par styliserbody et d'autres éléments. 🎜🎜Définissez le style d'animation de chargement. Vous pouvez le styliser en utilisant ce code. Puisque l'animation de chargement a un fond blanc, j'ai utilisé #fff. J'ai ajouté l'image SVG dans le dossier ressources. 🎜🎜CSS🎜rrreee🎜🎜Veuillez vous référer au référentiel Github pour obtenir le code CSS🎜🎜Adresse : https://github.com/wanghao221/Weather.io🎜🎜Étape 4 - Obtenir les clés API Météo et API Unsplash
🎜Allez surOpenWeatherMap et créez un compte. Après vous être connecté, cliquez sur l'onglet Clés API et vous verrez la clé API. Copiez la API Key et collez-la dans la deuxième ligne du code JavaScript mentionné ci-dessous (apiKey : " <insert api key here>",</insert> )🎜🎜 Accédez à
 Source Unsplash. Ici, vous pouvez voir comment les images peuvent être rappelées de différentes manières en fonction de la taille, du texte, des préférences de l'utilisateur, des favoris, etc. 🎜🎜 🎜Étape 5 - Commencez à coder avec JavaScript 🎜Intégrez l'
API dans JavaScipt pour apprendre à coder pour les applications Web en utilisant API est essentiel. J'ai répertorié l'intégralité du code. Vous pouvez le parcourir et comprendre le code. 🎜我已将此调用"url('https://source.unsplash.com/1600x900/?city " + name + "')"用于背景图像。您可以根据需要自定义URL。
我还使用了上海市的默认天气weather.fetchWeather("Shanghai");。您可以在此处添加任何城市的名称。每当您加载网站时,都会弹出这个城市的天气。
JS
let weather = {
apiKey: "<Insert API Key here>",
fetchWeather: function (city) {
fetch(
"https://api.openweathermap.org/data/2.5/weather?q=" +
city +
"&units=metric&appid=" +
this.apiKey
)
.then((response) => response.json())
.then((data) => this.displayWeather(data));
},
displayWeather: function (data) {
const { name } = data;
const { icon, description } = data.weather[0];
const { temp, humidity } = data.main;
const { speed } = data.wind;
document.querySelector(".city").innerText = "Weather in " + name;
document.querySelector(".icon").src =
"https://openweathermap.org/img/wn/" + icon + ".png";
document.querySelector(".description").innerText = description;
document.querySelector(".temp").innerText = temp + "°C";
document.querySelector(".humidity").innerText =
"湿度: " + humidity + "%";
document.querySelector(".wind").innerText =
"风速: " + speed + " km/h";
document.querySelector(".weather").classList.remove("loading");
document.body.style.backgroundImage =
"url('https://source.unsplash.com/1600x900/?city " + name + "')";
document.body.style.backgroundRepeat = "none";
document.body.style.backgroundSize = "100";
document.body.style.width = "100%";
document.body.style.height = "100%";
document.body.style.backgroundRepeat = "no-repeat";
document.body.style.backgroundSize = "cover";
},
search: function () {
this.fetchWeather(document.querySelector(".search-bar").value);
},
};
document.querySelector(".search button").addEventListener("click", function () {
weather.search();
});
document
.querySelector(".search-bar")
.addEventListener("keyup", function (event) {
if (event.key == "Enter") {
weather.search();
}
});
weather.fetchWeather("Shanghai");第 6 步 - 免费托管您的网站!
现在,当您完成编码后,您可以在您的网站上托管您自己的天气应用程序,或者您甚至可以在 Github 上免费托管它!!!
https://github.com/wanghao221/Weather.io
托管是可选的,但我建议将其发布并与您的朋友和家人共享,并将其添加到您的项目列表中。
即将推出的功能
这是我计划添加一些更酷的功能,例如
每当您打开网站时进行位置检测,它将显示其天气特定位置的相关天气新闻使背景图像更准确地显示位置使其对大多数设备(iPad 和平板电脑)的响应速度更快
项目中一些很酷的截图
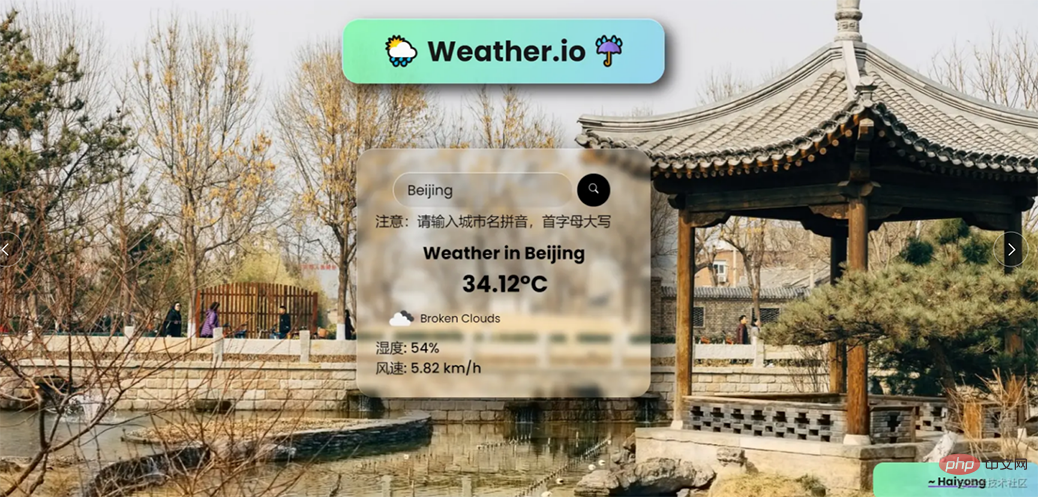
推荐学习:HTML/CSS视频教程、JS视频教程
Ce qui précède est le contenu détaillé de. pour plus d'informations, suivez d'autres articles connexes sur le site Web de PHP en chinois!
Articles Liés
Voir plus- Comment remplacer le texte HTML en PHP
- Vous apprendre à utiliser HTML, CSS et JS pour créer des jeux réactifs filtrables (avec code)
- Une astuce pour vous apprendre à utiliser HTML/CSS et Three.js pour créer un jeu de dragon cracheur de feu (partage de code)
- Article élémentaire : Comment créer une horloge analogique noire sympa en utilisant HTML, CSS et JS (avec code)
- Apprenez à utiliser HTML, CSS et JS pour créer un générateur de mots de passe aléatoires (partage)

