
Passez en revue le passé et apprenez le nouveau (1) Compréhension approfondie des chaînes en Java

- coldplay.xixiavant
- 2020-09-18 17:32:243042parcourir

Recommandations d'apprentissage associées : Tutoriel de base Java
Débutant En Java, nous savons déjà que Java peut être divisé en deux principaux types de données, à savoir les types de données de base et les types de données de référence. Parmi ces deux types de données, il existe un type de données spécial, String, qui est un type de données de référence, mais il est différent des autres types de données de référence. On peut dire que c'est une fleur étrange parmi les types de données. Ainsi, dans cet article, nous aurons une compréhension approfondie des chaînes String en Java.
1. En commençant par l'allocation de mémoire des chaînes String
L'article précédent "Revoir le passé et apprendre de nouvelles choses - L'allocation de mémoire JVM que vous ne connaissez pas" a analysé le modèle de mémoire JVM en détail . Dans la section sur les pools de constantes, nous avons découvert trois types de pools de constantes, à savoir : le pool de constantes de chaîne, le pool de constantes de fichier de classe et le pool de constantes d'exécution. L'allocation de mémoire des chaînes a une excellente relation avec le pool de constantes de chaîne.
Nous savons que l'instanciation d'une chaîne peut être réalisée de deux manières. La première méthode, la plus couramment utilisée, consiste à effectuer une affectation littérale, et l'autre consiste à transmettre des paramètres via le constructeur. Le code est le suivant :
    String str1="abc";
    String str2=new String("abc");复制代码
Quelle est la différence entre ces deux méthodes d'allocation de mémoire ? Je crois que le professeur nous l'a expliqué lorsque nous avons appris Java pour la première fois :
1. Passer la création d’une chaîne via une affectation littérale ne générera qu’un objet String dans le pool de constantes de chaîne. 2. Passer le paramètre String via le constructeur générera un objet String dans la mémoire du tas et le pool de constantes de chaîne, et placera la référence à la chaîne dans la mémoire du tas dans la pile.
Cette réponse est-elle correcte ? Cela ne semble pas tout à fait correct, du moins pour le moment, car cela dépend entièrement de la version Java utilisée. L'article précédent « Passer en revue le passé et apprendre le nouveau - L'allocation de mémoire JVM que vous ne connaissez pas » parlait de l'implémentation par la machine virtuelle HotSpot du pool de constantes de chaîne sur différents JDK. L'extrait est le suivant :
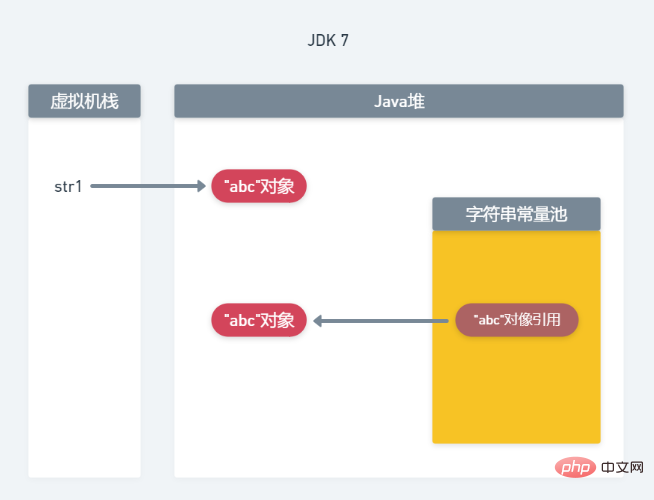
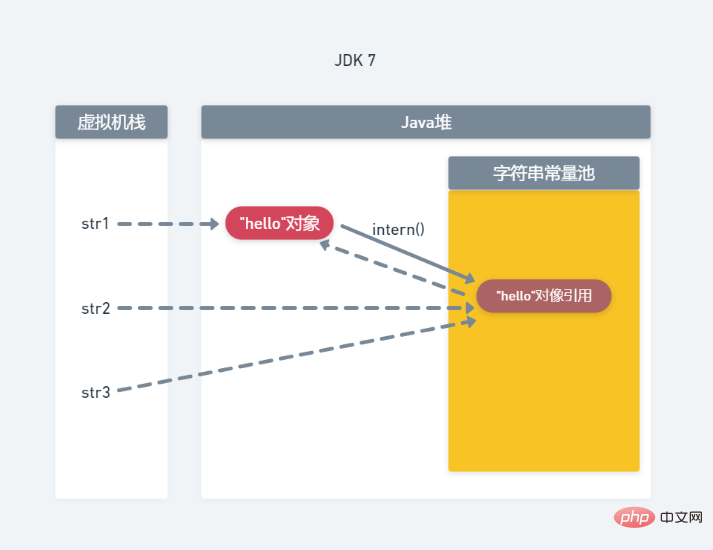
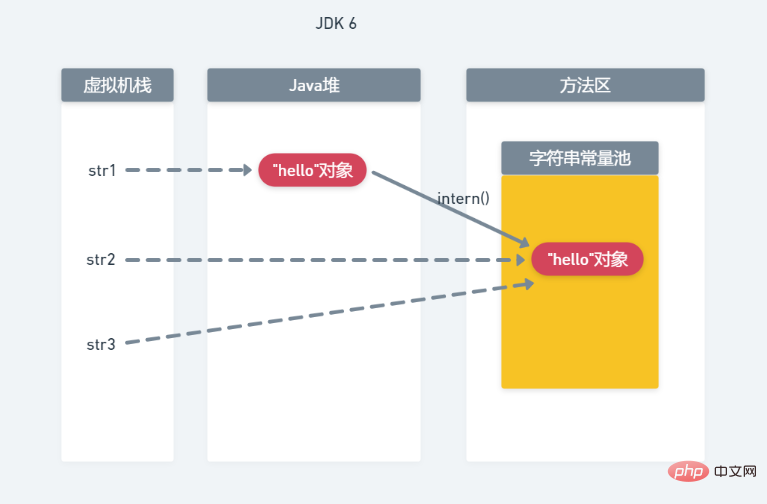
<.> dans Avant JDK7, le pool de constantes de chaîne se trouvait dans la zone de méthode (génération permanente). À cette époque, le pool de constantes stockait les objets de chaîne. Dans JDK7, le pool de constantes de chaîne est déplacé de la zone de méthode vers la mémoire du tas et l'objet chaîne est stocké dans le tas Java. Le pool de constantes de chaîne stocke uniquement les références aux objets chaîne.Comment faut-il comprendre cette phrase ? Prenons String str1=new String("abc") comme exemple pour analyser : 1. Allocation de mémoire dans le JDK6 Analysons d'abord l'allocation de mémoire du JDK6, comme le montre la figure. ci-dessous :
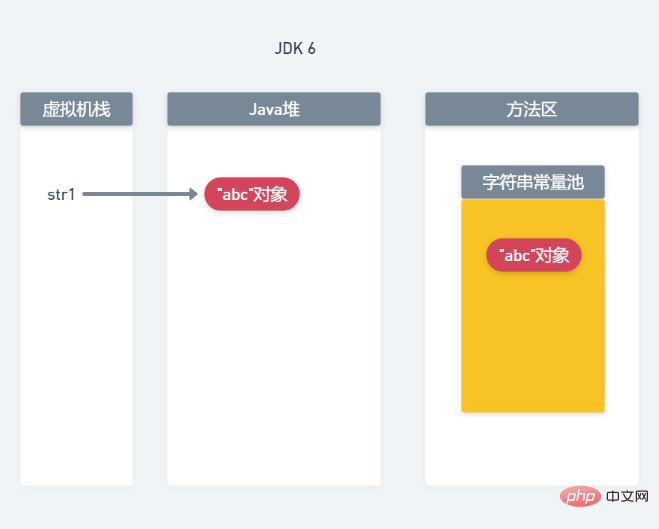
Parce que String est le type de données le plus fréquemment utilisé en Java, afin d'économiser la mémoire du programme et d'améliorer les performances du programme. , Les concepteurs de Java ont ouvert une zone de pool de constantes de chaîne, qui est partagée par toutes les classes. Chaque machine virtuelle n'a qu'un seul pool de constantes de chaîne. Par conséquent, lors de l'utilisation d'une affectation littérale, si la chaîne existe déjà dans le pool de constantes de chaîne, l'objet ne sera pas recréé dans la mémoire tas, mais sera pointé directement vers l'objet dans le pool de constantes de chaîne.
2. Méthode intern() de String Après avoir compris l'allocation de mémoire de String, nous devons connaître une méthode très importante dans String : String.intern() . De nombreux lecteurs ne savent peut-être pas grand chose sur cette méthode, mais cela ne veut pas dire qu'elle n'est pas importante. Jetons d'abord un coup d'œil au code source de la méthode intern() :/**
* Returns a canonical representation for the string object.
* <p>
* A pool of strings, initially empty, is maintained privately by the
* class {@code String}.
* <p>
* When the intern method is invoked, if the pool already contains a
* string equal to this {@code String} object as determined by
* the {@link #equals(Object)} method, then the string from the pool is
* returned. Otherwise, this {@code String} object is added to the
* pool and a reference to this {@code String} object is returned.
* <p>
* It follows that for any two strings {@code s} and {@code t},
* {@code s.intern() == t.intern()} is {@code true}
* if and only if {@code s.equals(t)} is {@code true}.
* <p>
* All literal strings and string-valued constant expressions are
* interned. String literals are defined in section 3.10.5 of the
* <cite>The Java™ Language Specification</cite>.
*
* @return a string that has the same contents as this string, but is
* guaranteed to be from a pool of unique strings.
*/
public native String intern();复制代码emmmmm.... C'est en fait une méthode native, mais cela n'a pas d'importance même si on ne voit pas la source. code, nous pouvons obtenir quelques informations à partir de ses commentaires : Lors de l'appel de la méthode interne, si le pool de constantes de chaîne contient déjà une chaîne égale à l'objet String, la référence à la chaîne dans le pool de constantes de chaîne sera directement renvoyée. Sinon, la chaîne contenue par cet objet chaîne est ajoutée au pool de constantes et une référence à cet objet est renvoyée.
1.一个关于intern()的简单例子
了解了intern方法的用途之后,来看一个简单的列子:
public class Test { public static void main(String[] args) {
String str1 = "hello world";
String str2 = new String("hello world");
String str3=str2.intern();
System.out.println("str1 == str2:"+(str1 == str2));
System.out.println("str1 == str3:"+(str1 == str3));
}
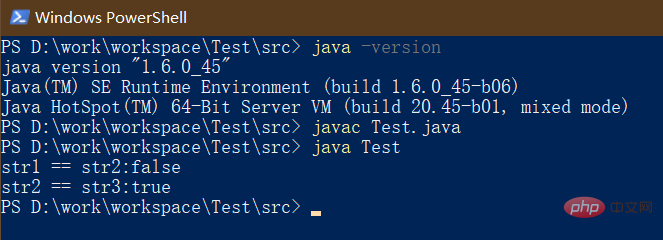
}复制代码上面的一段代码会输出什么?编译运行之后如下:
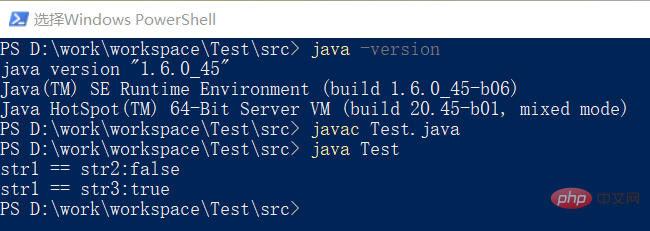
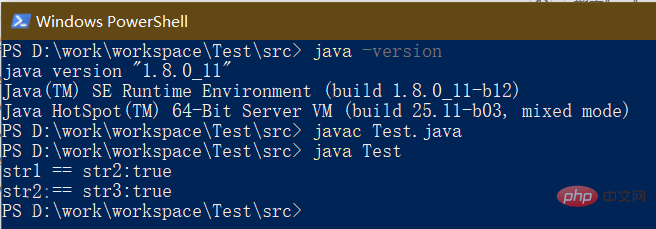
如果理解了intern方法就很容易解释这个结果了,从上面截图中可以看到,我们的运行环境是JDK8。
String str1 = "hello world"; 这行代码会首先在Java堆中创建一个对象,并将该对象的引用放入字符串常量池中,str1指向常量池中的引用。
String str2 = new String("hello world");这行代码会通过new来实例化一个String对象,并将该对象的引用赋值给str2,然后检测字符串常量池中是否已经有了与“hello world”相等的对象,如果没有,则会在堆内存中再生成一个值为"hello world"的对象,并将其引用放入到字符串常量池中,否则,不会再去创建。这里,第一行代码其实已经在字符串常量池中保存了“hello world”字符串对象的引用,因此,第二行代码就不会再次向常量池中添加“hello world"的引用。
String str3=str2.intern(); 这行代码会首先去检测字符串常量池中是否已经包含了”hello world"的String对象,如果有则直接返回其引用。而在这里,str2.intern()其实刚好返回了第一行代码中生成的“hello world"对象。
因此【System.out.println("str1 == str3:"+(str1 == str3));】这行代码会输出true.
如果切到JDK6,其打印结果与上一致,至于原因读者可以自行分析。

2.改造例子,再看intern
上一节中我们通过一个例子认识了intern()方法的作用,接下来,我们对上述例子做一些修改:
public class Test {
    public static void main(String[] args) {
        String str1=new String("he")+new String("llo");
        String str2=str1.intern();
        String str3="hello";
        System.out.println("str1 == str2:"+(str1 == str2));
        System.out.println("str2 == str3:"+(str2 == str3));
    }
}复制代码
先别急着看下方答案,思考一下在JDK7(或JDK7之后)及JDK6上会输出什么结果?
1).JDK8的运行结果分析
我们先来看下我们先来看下JDK8的运行结果:
通过运行程序发现输出的两个结果都是true,这是为什么呢?我们通过一个图来分析:
String str1=new String("he")+new String("llo"); 这行代码中new String("he")和new String("llo")会在堆上生成四个对象,因为与本例无关,所以图上没有画出,new String("he")+new String("llo")通过”+“号拼接后最终会生成一个"hello"对象并赋值给str1。
String str2=str1.intern(); 这行代码会首先检测字符串常量池,发现此时还没有存在与”hello"相等的字符串对象的引用,而在检测堆内存时发现堆中已经有了“hello"对象,遂将堆中的”hello"对象的应用放入字符串常量池中。
String str3="hello"; 这行代码发现字符串常量池中已经存在了“hello"对象的引用,因此将str3指向了字符串常量池中的引用。
此时,我们发现str1、str2、str3指向了堆中的同一个”hello"对象,因此,就有了上边两个均为true的输出结果。
2).JDK6的运行结果分析
我们将运行环境切换到JDK6,来看下其输出结果:
有点意思!相同的代码在不同的JDK版本上输出结果竟然不相等。这是怎么回事呢?我们还通过一张图来分析:
String str1=new String("he")+new String("llo"); 这行代码会通过new String("he")和new String("llo")会分别在Java堆与字符串常量池中各生成两个String对象,由于与本例无关,所以并没有在图中画出。而new String("he")+new String("llo")通过“+”号拼接后最终会在Java堆上生成一个"hello"对象,并将其赋值给了str1。
String str2=str1.intern(); 这行代码检测到字符串常量池中还没有“hello"对象,因此将堆中的”hello“对象复制到了字符串常量池,并将其赋值给str2。
String str3="hello"; 这行代码检测到字符串常量池中已经有了”hello“对象,因此直接将str3指向了字符串常量池中的”hello“对象。 此时str1指向的是Java堆中的”hello“对象,而str2和str3均指向了字符串常量池中的对象。因此,有了上面的输出结果。
通过这两个例子,相信大家因该对String的intern()方法有了较深的认识。那么intern()方法具体在开发中有什么用呢?推荐大家可以看下美团技术团队的一篇文章《深入解析String#intern》中举的两个例子。限于篇幅,本文不再举例分析。
三、String类的结构及特性分析
前两节我们认识了String的内存分配以及它的intern()方法,这两节内容其实都是对String内存的分析。到目前为止,我们还并未认识String类的结构以及它的一些特性。那么本节内容我们就此来分析。先通过一段代码来大致了解一下String类的结构(代码取自jdk8):
public final class String
    implements java.io.Serializable, Comparable<String>, CharSequence {        /** The value is used for character storage. */
        private final char value[];        /** Cache the hash code for the string */
         private int hash; // Default to 0
        //  ...}复制代码
可以看到String类实现了Serializable接口、Comparable接口以及CharSequence接口,意味着它可以被序列化,同时方便我们排序。另外,String类还被声明为了final类型,这意味着String类是不能被继承的。而在其内部维护了一个char数组,说明String是通过char数组来实现的,同时我们注意到这个char数组也被声明为了final,这也是我们常说的String是不可变的原因。
1.不同JDK版本之间String的差异
Java的设计团队一直在对String类进行优化,这就导致了不同jdk版本上String类的实现有些许差异,只是我们使用上并无感知。下图列出了jdk6-jdk9中String源码的一些变化。
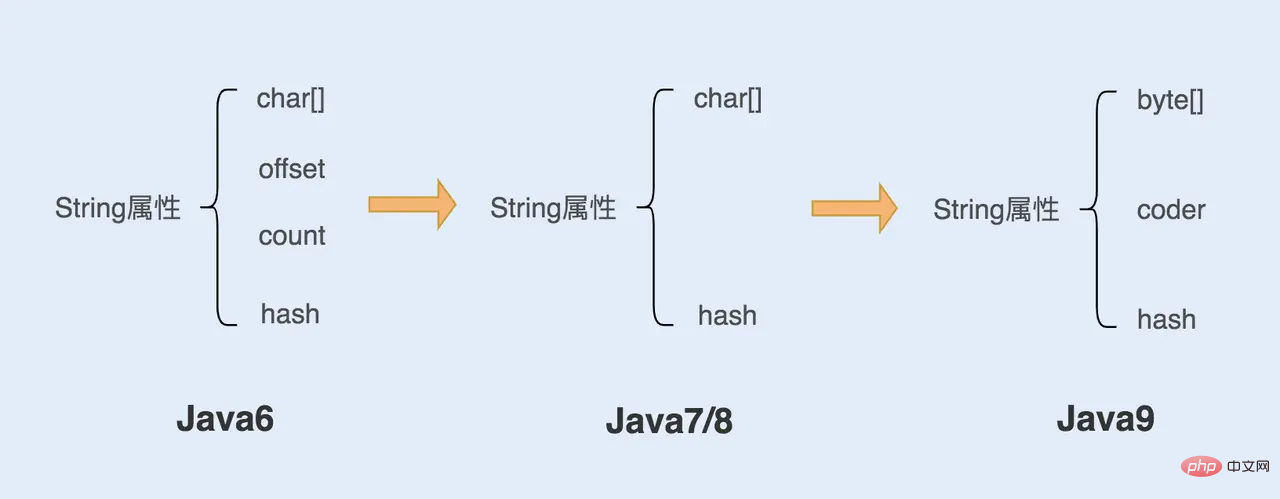
可以看到在Java6之前String中维护了一个char 数组、一个偏移量 offset、一个字符数量 count以及一个哈希值 hash。 String对象是通过 offset 和 count 两个属性来定位 char[] 数组,获取字符串。这么做可以高效、快速地共享数组对象,同时节省内存空间,但这种方式很有可能会导致内存泄漏。
在Java7和Java8的版本中移除了 offset 和 count 两个变量了。这样的好处是String对象占用的内存稍微少了些,同时 String.substring 方法也不再共享 char[],从而解决了使用该方法可能导致的内存泄漏问题。
从Java9开始,String中的char数组被byte[]数组所替代。我们知道一个char类型占用两个字节,而byte占用一个字节。因此在存储单字节的String时,使用char数组会比byte数组少一个字节,但本质上并无任何差别。 另外,注意到在Java9的版本中多了一个coder,它是编码格式的标识,在计算字符串长度或者调用 indexOf() 函数时,需要根据这个字段,判断如何计算字符串长度。coder 属性默认有 0 和 1 两个值, 0 代表Latin-1(单字节编码),1 代表 UTF-16 编码。如果 String判断字符串只包含了 Latin-1,则 coder 属性值为 0 ,反之则为 1。
2.String字符串的裁剪、拼接等操作分析
在本节内容的开头我们已经知道了字符串的不可变性。那么为什么我们还可以使用String的substring方法进行裁剪,甚至可以直接使用”+“连接符进行字符串的拼接呢?
(1)String的substring实现
关于substring的实现,其实我们直接深入String的源码查看即可,源码如下:
    public String substring(int beginIndex) {            if (beginIndex < 0) {                throw new StringIndexOutOfBoundsException(beginIndex);
            }            int subLen = value.length - beginIndex;            if (subLen < 0) {                throw new StringIndexOutOfBoundsException(subLen);
            }            return (beginIndex == 0) ? this : new String(value, beginIndex, subLen);
        }复制代码
从这段代码中可以看出,其实字符串的裁剪是通过实例化了一个新的String对象来实现的。所以,如果在项目中存在大量的字符串裁剪的代码应尽量避免使用String,而是使用性能更好的StringBuilder或StringBuffer来处理。
(2)String的字符串拼接实现
1)字符串拼接方案性能对比
关于字符串的拼接有很多实现方法,在这里我们举三个例子来进行一个性能对比,分别如下:
使用”+“操作符拼接字符串
    public class Test {        private static final int COUNT=50000;        public static void main(String[] args) {
            String str="";            for(int i=0;i<COUNT;i++) {
                str=str+"abc";
            }
    }复制代码
使用String的concat()方法拼接
    public class Test {        private static final int COUNT=50000;        public static void main(String[] args) {
            String str="";            for(int i=0;i<COUNT;i++) {
                str=str+"abc";
            }
    }复制代码
使用StringBuilder的append方法拼接
    public class Test {        private static final int COUNT=50000;        public static void main(String[] args) {
            StringBuilder str=new StringBuilder();            for(int i=0;i<COUNT;i++) {
                str.append("abc");
            }
    }复制代码
如上代码,通过三种方法分别进行了50000次字符串拼接,每种方法分别运行了20次。统计耗时,得到以下表格:
| 拼接方法 | 最小用时(ms) | 最大用时(ms) | 平均用时(ms) |
|---|---|---|---|
| "+"操作符 | 4868 | 5146 | 4924 |
| String的concat方法 | 2227 | 2456 | 2296 |
| StringBuilder的append方法 | 4 | 12 | 6.6 |
从以上数据中可以很直观的看到”+“操作符的性能是最差的,平均用时达到了4924ms。其次是String的concat方法,平均用时也在2296ms。而表现最为优秀的是StringBuilder的append方法,它的平均用时竟然只有6.6ms。这也是为什么在开发中不建议使用”+“操作符进行字符串拼接的原因。
2)三种字符串拼接方案原理分析
”+“操作符的实现原理由于”+“操作符是由JVM来完成的,我么无法直接看到代码实现。不过Java为我们提供了一个javap的工具,可以帮助我们将Class文件进行一个反汇编,通过汇编指令,大致可以看出”+“操作符的实现原理。
    public class Test {        private static final int COUNT=50000;        public static void main(String[] args) {            for(int i=0;i<COUNT;i++) {
                str=str+"abc";
            }
    }复制代码
把上边这段代码编译后,执行javap,得到如下结果:
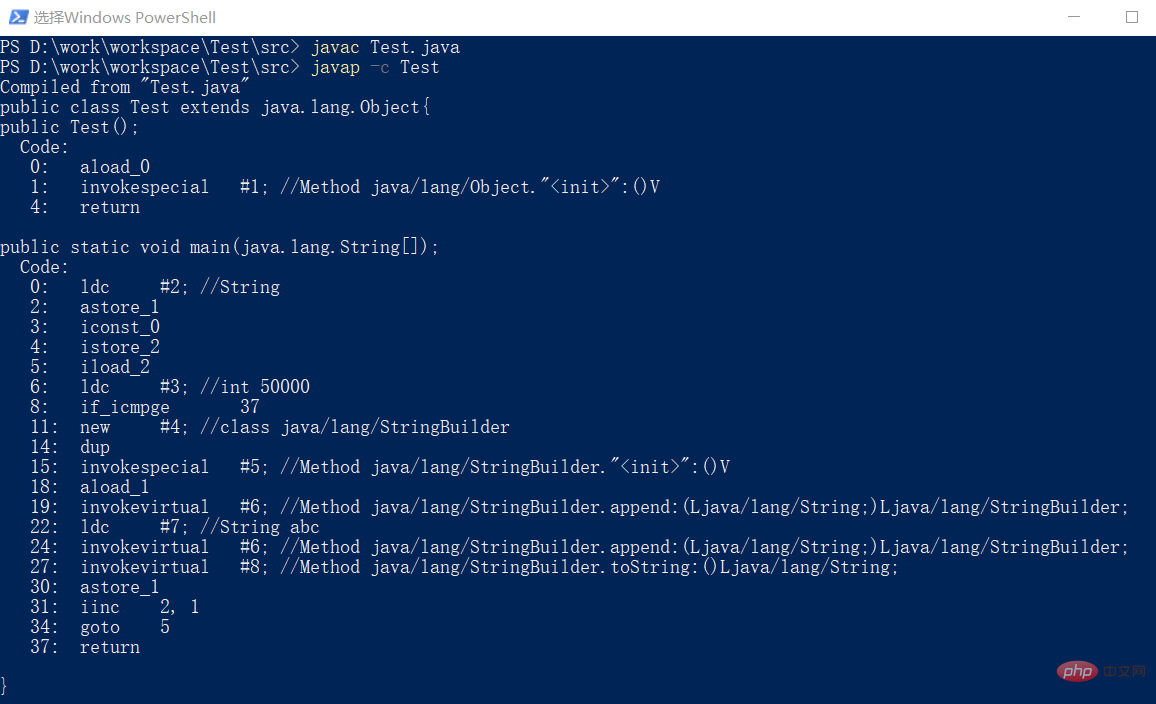
注意图中的”11:“行指令处实例化了一个StringBuilder,在"19:"行处调用了StringBuilder的append方法,并在第”27:"行处调用了String的toString()方法。可见,JVM在进行”+“字符串拼接时也是用了StringBuilder来实现的,但为什么与直接使用StringBuilder的差距那么大呢?其实,只要我们将上边代码转换成虚拟机优化后的代码一看便知:
    public class Test {        private static final int COUNT=50000;        public static void main(String[] args) {
            String str="";            for(int i=0;i<COUNT;i++) {
                str=new StringBuilder(str).append("abc").toString();
            }
    }复制代码
可见,优化后的代码虽然也是用的StringBuilder,但是StringBuilder却是在循环中实例化的,这就意味着循环了50000次,创建了50000个StringBuilder对象,并且调用了50000次toString()方法。怪不得用了这么长时间!!!
String的concat方法的实现原理关于concat方法可以直接到String内部查看其源码,如下:
public String concat(String str) {        int otherLen = str.length();        if (otherLen == 0) {            return this;
        }        int len = value.length;        char buf[] = Arrays.copyOf(value, len + otherLen);
        str.getChars(buf, len);        return new String(buf, true);
    }复制代码
可以看到,在concat方法中使用Arrays的copyOf进行了一次数组拷贝,接下来又通过getChars方法再次进行了数组拷贝,最后通过new实例化了String对象并返回。这也意味着每调用一次concat都会生成一个String对象,但相比”+“操作符却省去了toString方法。因此,其性能要比”+“操作符好上不少。
至于StringBuilder其实也没必要再去分析了,毕竟”+“操作符也是基于StringBuilder实现的,只不过拼接过程中”+“操作符创建了大量的对象。而StringBuilder拼接时仅仅创建了一个StringBuilder对象。
四、总结
本篇文章我们深入分析了String字符串的内存分配、intern()方法,以及String类的结构及特性。关于这块知识,网上的文章鱼龙混杂,甚至众说纷纭。笔者也是参考了大量的文章并结合自己的理解来做的分析。但是,避免不了的可能会出现理解偏差的问题,如果有,希望大家多多讨论给予指正。 同时,文章中多次提到StringBuilder,但限于文章篇幅,没能给出关于其详细分析。不过不用担心,我会在下一篇文章中再做探讨。 不管怎样,相信大家看完这篇文章后一定 对String有了更加深入的认识,尤其是了解String类的一些裁剪及拼接中可能造成的性能问题,在今后的开发中应该尽量避免。
Ce qui précède est le contenu détaillé de. pour plus d'informations, suivez d'autres articles connexes sur le site Web de PHP en chinois!