Maison >outils de développement >phpstorm >Vous apprendre à configurer le test unitaire phpstorm hyperf
Vous apprendre à configurer le test unitaire phpstorm hyperf
- 藏色散人avant
- 2020-07-23 13:26:165655parcourir
Ce qui suit est une introduction à la configuration du test unitaire phpstorm hyperf de la colonne du tutoriel phpstorm, j'espère que cela sera utile aux amis dans le besoin !

1. Créez une classe de base testCase héritée de PHPUnitFrameworkTestCase
conseils : placez le jeton après une connexion réussie dans le cache, ensuite Les requêtes d'interface secondaire peuvent être récupérées directement à partir du cache.
<?php
declare(strict_types=1);
/**
* This file is part of Hyperf.
*
* @link https://www.hyperf.io
* @document https://doc.hyperf.io
* @contact group@hyperf.io
* @license https://github.com/hyperf-cloud/hyperf/blob/master/LICENSE
*/
namespace HyperfTest;
use App\Model\SysUser;
use App\Service\Instance\JwtInstance;
use Hyperf\Testing\Client;
use PHPUnit\Framework\TestCase;
/**
* Class HttpTestCase.
* @method get($uri, $data = [], $headers = [])
* @method post($uri, $data = [], $headers = [])
* @method json($uri, $data = [], $headers = [])
* @method file($uri, $data = [], $headers = [])
*/
abstract class AdminTestCase extends TestCase
{
/**
* @var Client
*/
protected $client;
// token缓存key
protected $cacheKey = 'test_admin_token';
// token
protected $header = [];
public function __construct($name = null, array $data = [], $dataName = '')
{
parent::__construct($name, $data, $dataName);
$this->client = di(Client::class);
$this->login();
}
public function __call($name, $arguments)
{
return $this->client->{$name}(...$arguments);
}
/**
* @return mixed|string
* @throws \Psr\SimpleCache\InvalidArgumentException
*/
public function login()
{
$token = cache()->get($this->cacheKey);
$this->header['token'] = $token;
if (!$token) {
$userId = 1;
$user = SysUser::query()->where(['user_id' => $userId])->first();
$token = JwtInstance::instance()->encode($user);
$this->header['token'] = $token;
// 设置到缓存
cache()->set($this->cacheKey, $token, 43200);
}
return $token;
}
/**
* @param array $result
* @return false|string
*/
public function pretty(array $result)
{
// 表示成功
$this->assertSame(0, 0);
echo json_encode($result, JSON_PRETTY_PRINT | JSON_UNESCAPED_SLASHES | JSON_UNESCAPED_UNICODE) . PHP_EOL;
}
}2. Écrivez un contrôleur de test qui hérite de AdminTestCase, puis écrivez un scénario de test
<?php
/**
* Created by PhpStorm.
* User: phpstorm
* Date: 2020/6/9 14:36
* Description:
*/
namespace HyperfTest\Cases\Admin;
use App\Service\SysUserService;
use HyperfTest\AdminTestCase;
use Swoole\Coroutine\Channel;
use Hyperf\Utils\Context;
class SysUserControllerTest extends AdminTestCase
{
// 测试
public function testGet()
{
// $this->assertTrue(true);
$res = $this->client->get('/');
// $this->assertSame(0, $res['code']);
$this->pretty($res);
}
/**
* 后台用户列表
* 执行命令:composer test -- --filter testGetSysUserList --group adminUser
*
* @group adminUser
*/
public function testGetSysUserList()
{
$params = [
'username' => '',
'page' => 1,
'limit' => 20
];
$result = $this->get('/admin/sys/user/list', $params, $this->header);
$this->pretty($result);
}
}-
Cliquez sur le triangle vert à gauche de la méthode testGetSysUserList :

-
Ou vous pouvez utiliser la commande directement dans le répertoire du projet :
composer test -- --filter testGetSysUserList --group adminUser
-
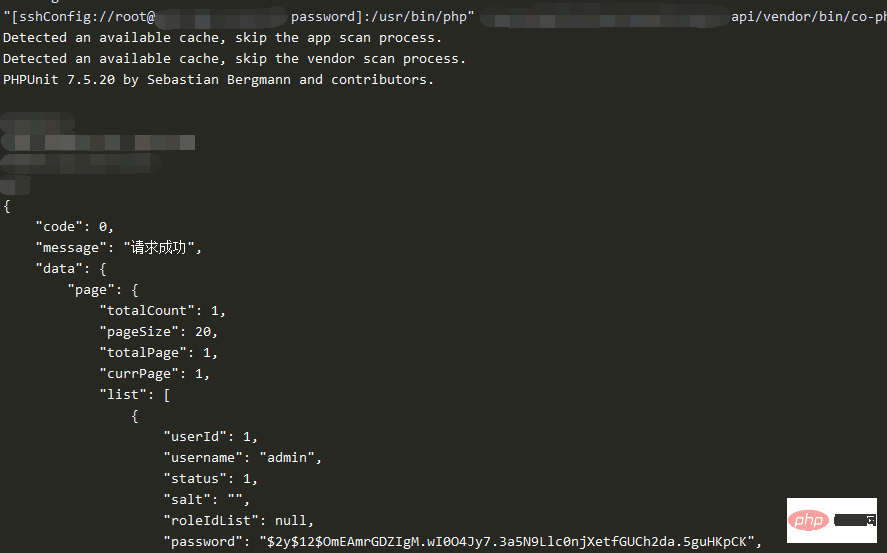
Résultat de l'exécution :

3. Si hyperf active les coroutines, phpunit ne peut pas être utilisé. Vous devez utiliser la co-phpunit fournie avec hyperf. framework, vous devez donc modifier la configuration de phpstorm
Première étape : ouvrez phpstorm->settings->langages & Frameworks->PHP->CLI Interpreter

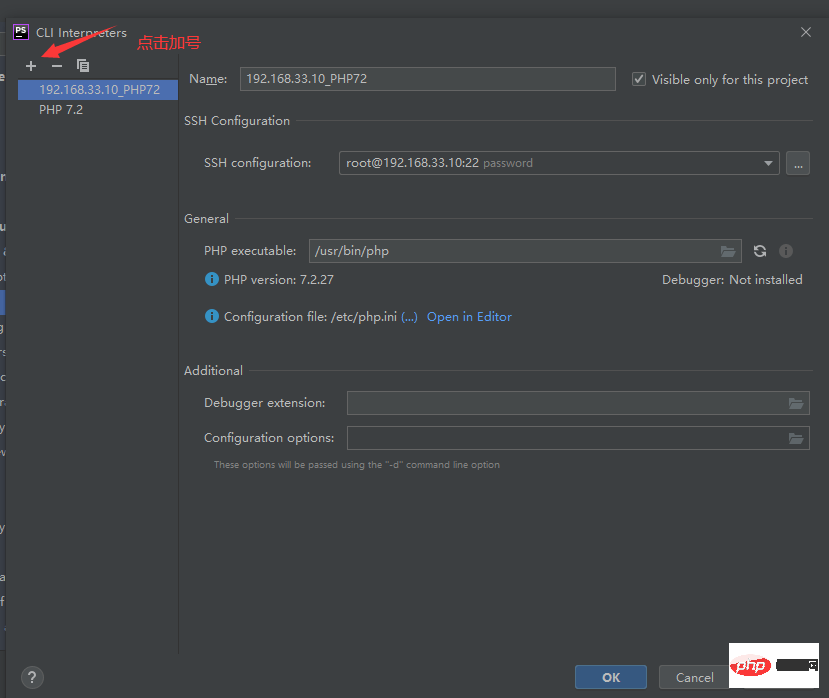

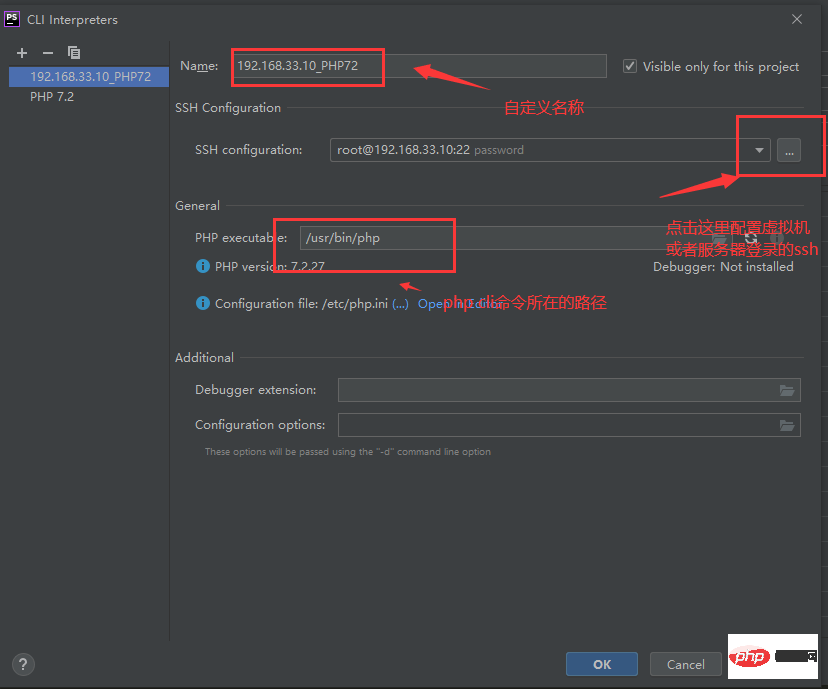
Après la configuration, cliquez sur [OK] ou [Appliquer]
Étape 2 : Mappez le répertoire du projet
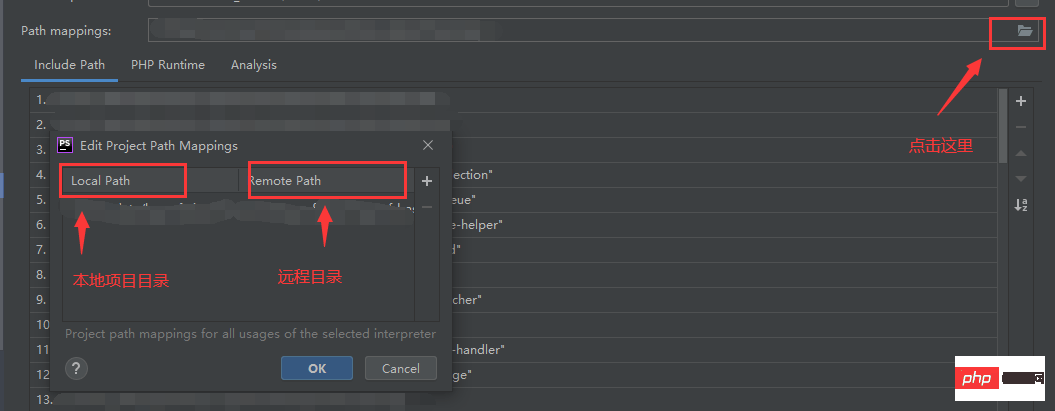
Cliquez sur [OK]
Étape 3 : Configurez le commande co-phpunit
Ouvrir phpstorm-> ;settings->langues & Frameworks->PHP->Test Frameworks
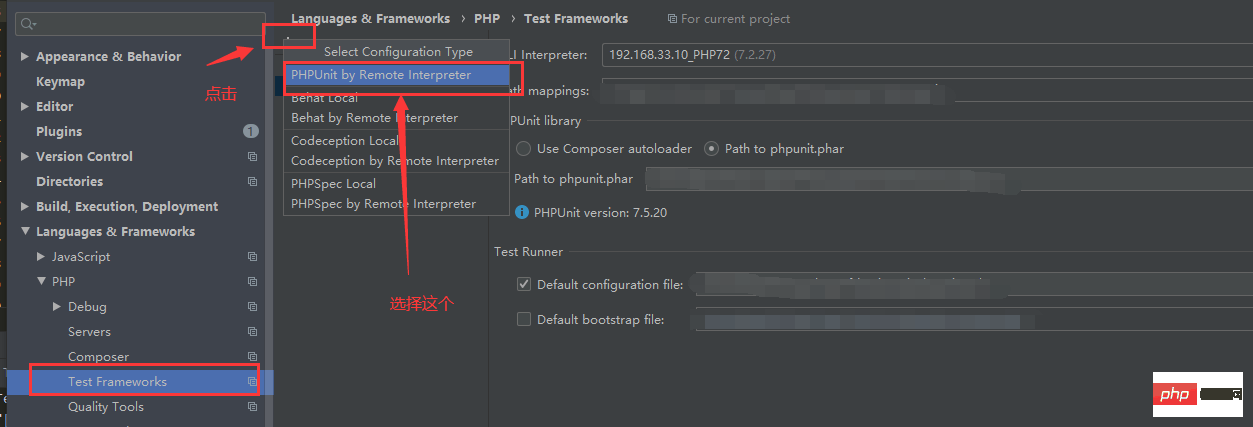
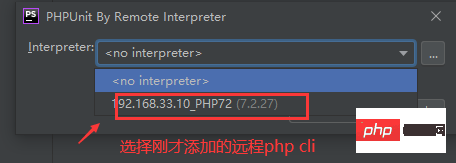
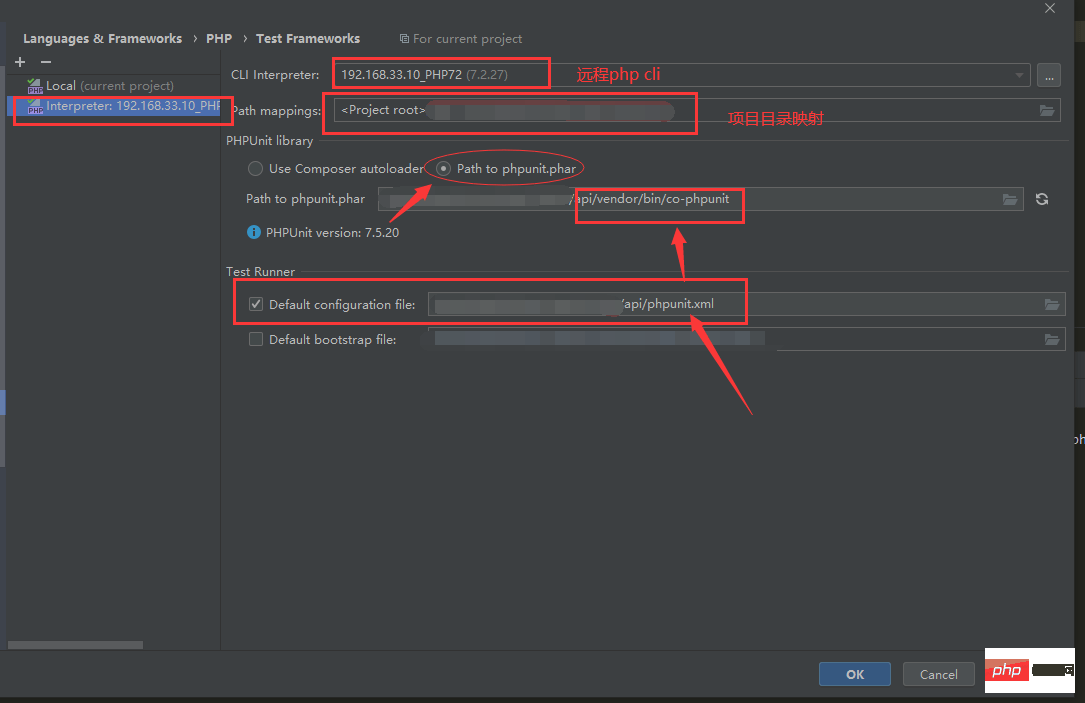
comme indiqué sur l'image. Affichez la configuration, cliquez sur [OK] ou [Appliquer] pour enregistrer
et vous pourrez ensuite déboguer l'unité hyperf.
Ce qui précède est le contenu détaillé de. pour plus d'informations, suivez d'autres articles connexes sur le site Web de PHP en chinois!


