");
if (l) {
m.insertBefore(l);
l.remove()
} else {
i.insertElement(m)
}
},3. Créez ensuite un nouveau dossier d'images pour stocker un fichier image syntaxhighlight.gif. Le fichier image est affiché dans la barre d'outils de l'éditeur. Vous pouvez en utiliser 16. *16 pixels Image
4. Créez un nouveau dossier de langue, qui est un pack de langue. Il contient deux fichiers, l'un est en chinois cn.js et l'autre en anglais en.js. comme suit :
en.js Le code est le suivant :
Le code est le suivant :
CKEDITOR.plugins.setLang('syntaxhighlight', 'en',
{
syntaxhighlight:
{
title: 'Add or update a code snippet',
sourceTab: 'Source code',
langLbl: 'Select language',
advancedTab: 'Advanced',
hideGutter: 'Hide gutter',
hideGutterLbl: 'Hide gutter & line numbers.',
hideControls: 'Hide controls',
hideControlsLbl: 'Hide code controls at the top of the code block.',
collapse: 'Collapse',
collapseLbl: 'Collapse the code block by default. (controls need to be turned on)',
showColumns: 'Show columns',
showColumnsLbl: 'Show row columns in the first line.',
lineWrap: 'Disable line wrapping',
lineWrapLbl: 'Switch off line wrapping.',
lineCount: 'Default line count',
highlight: 'Highlight lines',
highlightLbl: 'Enter a comma seperated lines of lines you want to highlight, eg <em>3,10,15</em>.'
}
});le code cn.js est le suivant :
Le code est le suivant :
CKEDITOR.plugins.setLang('syntaxhighlight', 'cn',
{
syntaxhighlight:
{
title: '添加或更新代码',
sourceTab: '代码',
langLbl: '选择语言',
advancedTab: '高级',
hideGutter: '隐藏分割线',
hideGutterLbl: '隐藏分割线和行号',
hideControls: '隐藏工具栏',
hideControlsLbl: '隐藏浮动工具栏',
collapse: '代码折叠',
collapseLbl: '默认折叠代码块 (需要启用工具栏)',
lineWrap: '自动换行',
lineWrapLbl: '关闭自动换行',
autoLinks: '自动链接',
autoLinksLbl: '不自动转换超链接',
lineCount: '起始行号',
highlight: '高亮行号',
highlightLbl: '输入以逗号分隔的行号, 如 <em>3,10,15</em>.'
}
});5. Créez un nouveau fichier plugin.js. Le fichier est un fichier requis pour le plug-in ckeditor, qui contient certaines configurations pour le plug-in. comme suit :
Le code est le suivant :
CKEDITOR.plugins.add("syntaxhighlight", {
requires : [ "dialog" ],
lang : [ "cn" ],
init : function(a) {
var b = "syntaxhighlight";
var c = a.addCommand(b, new CKEDITOR.dialogCommand(b));
c.modes = {
wysiwyg : 1,
source : 1
};
c.canUndo = false;
a.ui.addButton("Code", {
label : a.lang.syntaxhighlight.title,
command : b,
icon : this.path + "images/syntaxhighlight.gif"
});
CKEDITOR.dialog.add(b, this.path + "dialogs/syntaxhighlight.js")
}
});
6. Puisque dedecms 5.7 intègre un plug-in de dedepage, il est utilisé pour ajouter le plug-in personnalisé ckeditor dans le /include/. ckeditor/dedepage, ouvrez le fichier plugin.js et ajoutez à la fin :
requires : ['syntaxhighlight'], où syntaxhighlight est le fichier du nom du dossier de mise en évidence du code, le code après. l'ajout est le suivant :
[code]
// Register a plugin named "dedepage".
(function()
{
CKEDITOR.plugins.add( 'dedepage',
{
init : function( editor )
{
// Register the command.
editor.addCommand( 'dedepage',{
exec : function( editor )
{
// Create the element that represents a print break.
// alert('dedepageCmd!');
editor.insertHtml("
");
}
});
// alert('dedepage!');
// Register the toolbar button.
editor.ui.addButton( 'MyPage',
{
label : '插入分页符',
command : 'dedepage',
icon: 'images/dedepage.gif'
});
// alert(editor.name);
},
requires : [ 'fakeobjects' ],
requires : ['syntaxhighlight']
});
})();
[/code]
7. Modifiez le fichier /include/ckeditor/ckeditor.inc.php, ajoutez l'élément Code dans la dernière ligne du tableau $toolbar['Basic'], après modification Le le code est le suivant :
Le code est le suivant :
$toolbar['Basic'] = array(
array( 'Source','-','Templates'),
array( 'Cut','Copy','Paste','PasteText','PasteFromWord','-','Print'),
array( 'Undo','Redo','-','Find','Replace','-','SelectAll','RemoveFormat'),
array( 'ShowBlocks'),array('Image','Flash'),array('Maximize'),'/',
array( 'Bold','Italic','Underline','Strike','-'),
array( 'NumberedList','BulletedList','-','Outdent','Indent','Blockquote'),
array( 'JustifyLeft','JustifyCenter','JustifyRight','JustifyBlock'),
array( 'Table','HorizontalRule','Smiley','SpecialChar'),
array( 'Link','Unlink','Anchor'),'/',
array( 'Styles','Format','Font','FontSize'),
array( 'TextColor', 'BGColor', 'MyPage','Code')
);
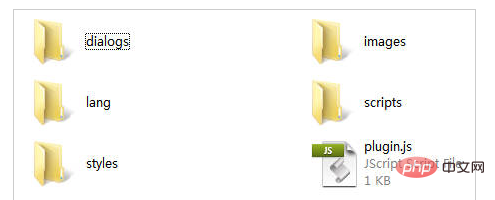
À ce stade, la modification de l'éditeur est terminée. La structure modifiée du répertoire des fichiers du dossier syntaxhighlight est la suivante :
Téléchargez le dossier syntaxhighlight dans le dossier /include/ckeditor/plugins/, ouvrez le backend, ajoutez un article pour essayer et voyez si le bouton comme indiqué dans l'image apparaît sur la dernière ligne de l'éditeur : 
Cliquez sur le bouton pour faire apparaître la boîte de dialogue ci-dessous pour saisir le code, et vous pouvez passer aux options avancées pour configurer le code mise en évidence : 
8. Mais ceux-ci ne suffisent pas à eux seuls. Vous devez également introduire les fichiers JS et CSS du pinceau mis en surbrillance dans le fichier de modèle d'article /templets/default/article_article. htm, car beaucoup de JS doivent être introduits. , il est donc recommandé de placer le code importé avant la balise


