Maison >interface Web >js tutoriel >Laissez-vous bien comprendre les principes de l'héritage Javascript !
Laissez-vous bien comprendre les principes de l'héritage Javascript !
- 不言avant
- 2018-09-28 17:21:412618parcourir
Le contenu de cet article est de vous aider à bien comprendre les principes de l'héritage Javascript ! Il a une certaine valeur de référence. Les amis dans le besoin peuvent s'y référer. J'espère qu'il vous sera utile.
Avant de comprendre l'héritage, vous devez savoir trois choses sur js :
Qu'est-ce que la chaîne de prototypes JS
c'est Quelle est la valeur
Que fait le nouveau dans JS ?
1. Qu'est-ce que la chaîne de prototypes JS ?
Nous savons que JS a des objets, tels que
var obj = { name: 'obj' }
Nous imprimons obj via la console :
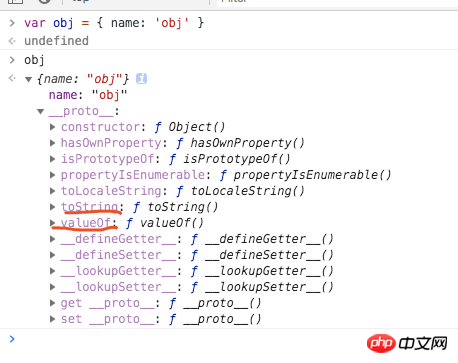
Nous constaterons que obj possède déjà plusieurs attributs (méthodes). Alors la question est : d'où vient valueOf / toString / constructor ? Nous n'avons pas attribué de valeur à obj.valueOf.
L'image ci-dessus est un peu difficile à comprendre. J'ai dessiné un schéma à la main :
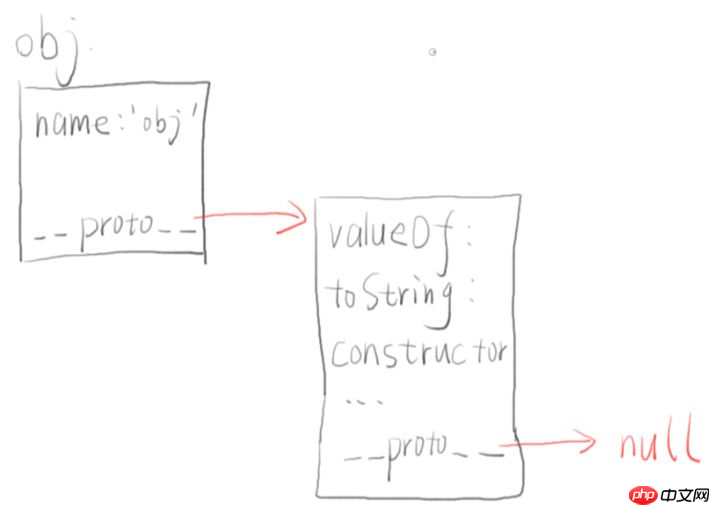
Nous avons trouvé. que la console l'a tapé Le résultat est :
obj lui-même a un nom d'attribut (c'est ce que nous y avons ajouté)
obj a également un attribut appelé __proto__ (C'est un objet)
obj a également un attribut, y compris valueOf, toString, constructeur, etc.
obj.__proto__ en a en fait aussi un L'attribut appelé __proto__ (console.log n'est pas affiché), la valeur est nulle
Revenons maintenant à notre question : Pourquoi obj a-t-il ces attributs valueOf / toString / constructeur ?
Réponse : Ceci est lié à __proto__.
Lorsque nous "lisons" obj.toString, le moteur JS fera ce qui suit :
Vérifier si l'objet obj lui-même a un attribut toString. Sinon, passez à l'étape suivante.
Regardez si l'objet obj.__proto__ a un attribut toString et constatez que obj.__proto__ a un attribut toString, donc je l'ai trouvé, donc obj.toString est en fait l'obj. __proto__ trouvé à l'étape 2. .toString.
Si obj.__proto__ n'existe pas, le navigateur continuera à afficher obj.__proto__.__proto__
Si obj.__proto__.__proto__ également Sinon, le navigateur continuera à vérifier obj.__proto__.__proto__.__proto__
5 jusqu'à ce que toString soit trouvé ou que proto soit nul.
Le processus ci-dessus est le « processus de recherche » des attributs de « lecture ». Et ce « processus de recherche » est connecté à la chaîne composée de proto. Cette chaîne est appelée « chaîne prototype ».
Chaîne de prototypes partagés
Nous avons maintenant un autre objet
var obj2 = { name: 'obj2' }
comme indiqué :
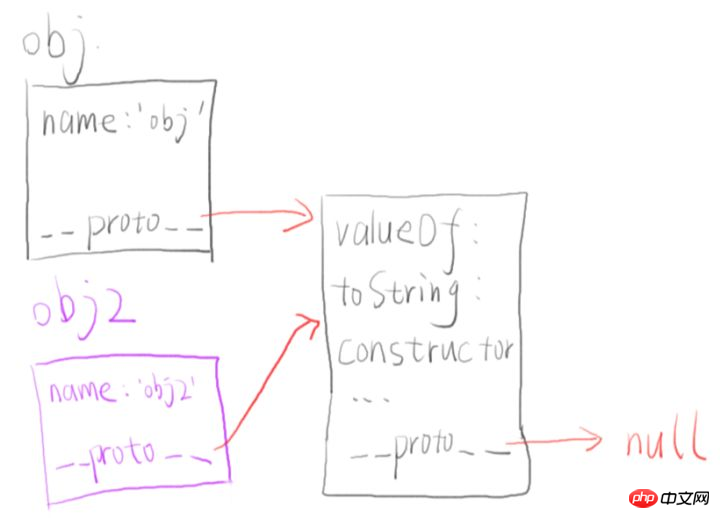
Alors obj.toString et obj2.toString sont en fait la même chose, c'est-à-dire obj2.__proto__.toString.
Pour parler franchement, si nous changeons l'un d'eux __proto__.toString, alors l'autre changera réellement !
Différenciation
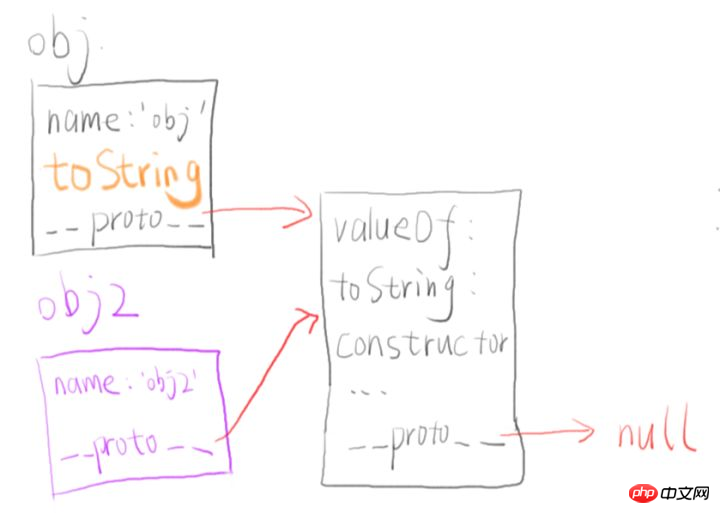
Si nous voulons obj.toString et obj2.toString Quoi faire si votre comportement est différent ?
Attribuez simplement la valeur directement :
obj.toString = function(){ return '新的 toString 方法' }
Résumé
[Lire] Les attributs seront recherchés tout au long de la chaîne de prototypes
[Nouveau] Les attributs ne seront pas recherchés dans la chaîne de prototypes
2 , Quelle est la valeur de ceci
Vous avez peut-être rencontré cette question d'entretien JS :
var obj = {
  foo: function(){
    console.log(this)
  }
}

var bar = obj.foo
obj.foo() // 打印出的 this 是 obj
bar() // 打印出的 this 是 window
Veuillez expliquer pourquoi les valeurs des fonctions dans les deux dernières lignes sont différentes.
Appel de fonction
Il existe trois formes d'appel de fonction dans JS (ES5) :
func(p1, p2)
obj.child.method(p1, p2)
func.call(context, p1, p2) // 先不讲 apply
Généralement, les débutants connaissent les deux premières formes et y pensent. "meilleur" que la troisième forme.
Notre professeur Fang Fang a dit que vous devez vous rappeler que la troisième forme d'appel est la forme d'appel normale :
func.call(context, p1, p2)
Les deux autres sont du sucre de syntaxe et peuvent être équivalentes. Changé en forme d'appel :
func(p1, p2) est équivalent à func.call(undefined, p1, p2);
obj.child.method(p1, p2) est équivalent dans obj.child.method.call( obj.child, p1, p2);
Jusqu'à présent, notre appel de fonction n'a qu'une seule forme :
func.call(context, p1, p2)
De cette façon, c'est facile à expliquer Ceci est le contexte ci-dessus.
C'est le contexte transmis lorsque vous appelez une fonction. Puisque vous n'utilisez jamais la forme d'appel de fonction, vous ne le savez jamais.
Voyons d'abord comment déterminer cela dans func(p1, p2) :
当你写下面代码时

function func(){
  console.log(this)
}

func()
等价于

function func(){
  console.log(this)
}

func.call(undefined) // 可以简写为 func.call()
Logiquement parlant, l'imprimé this devrait être indéfini, mais il y a une règle dans le navigateur :
如果你传的 context 就 null 或者 undefined,那么 window 对象就是默认的 context(严格模式下默认 context 是 undefined)因此上面的打印结果是 window。如果你希望这里的 this 不是 window,很简单:
func.call(obj) // 那么里面的 this 就是 obj 对象了
回到题目:
var obj = {
  foo: function(){
    console.log(this)
  }
}

var bar = obj.foo
obj.foo() // 转换为 obj.foo.call(obj),this 就是 obj
bar()
// 转换为 bar.call()
// 由于没有传 context
// 所以 this 就是 undefined
// 最后浏览器给你一个默认的 this —— window 对象
[ ] 语法
function fn (){ console.log(this) }
var arr = [fn, fn2]
arr[0]() // 这里面的 this 又是什么呢?
我们可以把 arr0 想象为arr.0( ),虽然后者的语法错了,但是形式与转换代码里的 obj.child.method(p1, p2) 对应上了,于是就可以愉快的转换了:
arr[0]()
假想为 arr.0()
然后转换为 arr.0.call(arr)
那么里面的 this 就是 arr 了 :)
小结:
this 就是你 call 一个函数时,传入的第一个参数。
如果你的函数调用不是 call 形式, 请将其转换为 call 形式
三、JS 的 new 到底是干什么的?
我们声明一个士兵,具有如下属性:
var 士兵 = {
  ID: 1, // 用于区分每个士兵
  兵种:"美国大兵",
  攻击力:5,
  生命值:42,
  行走:function(){ /*走俩步的代码*/},
  奔跑:function(){ /*狂奔的代码*/  },
  死亡:function(){ /*Go die*/    },
  攻击:function(){ /*糊他熊脸*/   },
  防御:function(){ /*护脸*/       }
}
我们制造一个士兵, 只需要这样:
兵营.制造(士兵)
如果需要制造 100 个士兵怎么办呢?
循环 100 次吧:

var 士兵们 = []
var 士兵
for(var i=0; i<p>哎呀,看起来好简单</p><h4>质疑</h4><p>上面的代码存在一个问题:浪费了很多内存</p><ol class=" list-paddingleft-2">
<li><p>行走、奔跑、死亡、攻击、防御这五个动作对于每个士兵其实是一样的,只需要各自引用同一个函数就可以了,没必要重复创建 100 个行走、100个奔跑……</p></li>
<li><p>这些士兵的兵种和攻击力都是一样的,没必要创建 100 次。</p></li>
<li><p>只有 ID 和生命值需要创建 100 次,因为每个士兵有自己的 ID 和生命值。</p></li>
</ol><h4>改进</h4><p>通过第一节可以知道 ,我们可以通过原型链来解决重复创建的问题:我们先创建一个「士兵原型」,然后让「士兵」的 <strong>proto</strong> 指向「士兵原型」。</p><pre class="brush:php;toolbar:false">var 士兵原型 = {
  兵种:"美国大兵",
  攻击力:5,
  行走:function(){ /*走俩步的代码*/},
  奔跑:function(){ /*狂奔的代码*/  },
  死亡:function(){ /*Go die*/    },
  攻击:function(){ /*糊他熊脸*/   },
  防御:function(){ /*护脸*/       }
}

var 士兵们 = []
var 士兵
for(var i=0; i<h4>优雅?</h4><p>有人指出创建一个士兵的代码分散在两个地方很不优雅,于是我们用一个函数把这两部分联系起来:</p><pre class="brush:php;toolbar:false">function 士兵(ID){
  var 临时对象 = {};
  临时对象.__proto__ = 士兵.原型;
  临时对象.ID = ID;
  临时对象.生命值 = 42;

  return 临时对象;
}

士兵.原型 = {
  兵种:"美国大兵",
  攻击力:5,
  行走:function(){ /*走俩步的代码*/},
  奔跑:function(){ /*狂奔的代码*/  },
  死亡:function(){ /*Go die*/    },
  攻击:function(){ /*糊他熊脸*/   },
  防御:function(){ /*护脸*/       }
}

// 保存为文件:士兵.js

 然后就可以愉快地引用「士兵」来创建士兵了:

var 士兵们 = []
for(var i=0; i<p>JS 之父看到大家都这么搞,觉得何必呢,我给你们个糖吃,于是 JS 之父创建了 new 关键字,可以让我们少写几行代码:</p><p style="text-align: center;"><span class="img-wrap"><img src="/static/imghwm/default1.png" data-src="https://img.php.cn//upload/image/223/671/797/1538126235427481.png" class="lazy" title="1538126235427481.png" alt="Laissez-vous bien comprendre les principes de lhéritage Javascript !"></span></p><p><strong>只要你在士兵前面使用 new 关键字,那么可以少做四件事情:</strong></p><ol class=" list-paddingleft-2">
<li><p>不用创建临时对象,因为 new 会帮你做(你使用「this」就可以访问到临时对象);</p></li>
<li><p>不用绑定原型,因为new 会帮你做(new 为了知道原型在哪,所以指定原型的名字 prototype);</p></li>
<li><p>不用 return 临时对象,因为 new 会帮你做;</p></li>
<li><p>不要给原型想名字了,因为 new 指定名字为 prototype。</p></li>
</ol><h4>这一次用 new 来写</h4><pre class="brush:php;toolbar:false">function 士兵(ID){
  this.ID = ID
  this.生命值 = 42
}

士兵.prototype = {
  兵种:"美国大兵",
  攻击力:5,
  行走:function(){ /*走俩步的代码*/},
  奔跑:function(){ /*狂奔的代码*/  },
  死亡:function(){ /*Go die*/    },
  攻击:function(){ /*糊他熊脸*/   },
  防御:function(){ /*护脸*/       }
}

// 保存为文件:士兵.js
然后是创建士兵(加了一个 new 关键字):

var 士兵们 = []
for(var i=0; i<p><strong>new 的作用,就是省那么几行代码。(也就是所谓的语法糖)</strong></p><h4>注意 constructor 属性</h4><p>new 操作为了记录「临时对象是由哪个函数创建的」,所以预先给「士兵.prototype」加了一个 constructor 属性:</p><pre class="brush:php;toolbar:false">士兵.prototype = {
  constructor: 士兵
}
如果你重新对「士兵.prototype」赋值,那么这个 constructor 属性就没了,所以你应该这么写:
士兵.prototype.兵种 = "美国大兵"
士兵.prototype.攻击力 = 5
士兵.prototype.行走 = function(){ /*走俩步的代码*/}
士兵.prototype.奔跑 = function(){ /*狂奔的代码*/  }
士兵.prototype.死亡 = function(){ /*Go die*/    }
士兵.prototype.攻击 = function(){ /*糊他熊脸*/   }
士兵.prototype.防御 = function(){ /*护脸*/       }
或者你也可以自己给 constructor 重新赋值:
士兵.prototype = {
  constructor: 士兵,
  兵种:"美国大兵",
  攻击力:5,
  行走:function(){ /*走俩步的代码*/},
  奔跑:function(){ /*狂奔的代码*/  },
  死亡:function(){ /*Go die*/    },
  攻击:function(){ /*糊他熊脸*/   },
  防御:function(){ /*护脸*/       }
}
四、继承
继承的本质就是上面的讲的原型链
1)借助构造函数实现继承
 function Parent1() {
   this.name = 'parent1';
 }

 Parent1.prototype.say = function () {}

 function Child1() {
   Parent1.call(this);
   this.type = 'child';
 }

 console.log(new Child1);
打印结果:
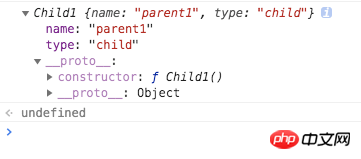
这个主要是借用call 来改变this的指向,通过 call 调用 Parent ,此时 Parent 中的 this 是指 Child1。有个缺点,从打印结果看出 Child1并没有say方法,所以这种只能继承父类的实例属性和方法,不能继承原型属性/方法。
2)借助原型链实现继承
/**
 * 借助原型链实现继承
 */
function Parent2() {
  this.name = 'parent2';
  this.play = [1, 2, 3];
}

function Child2() {
  this.type = 'child2';
}
Child2.prototype = new Parent2();

console.log(new Child2);

var s1 = new Child2();
var s2 = new Child2();
打印:
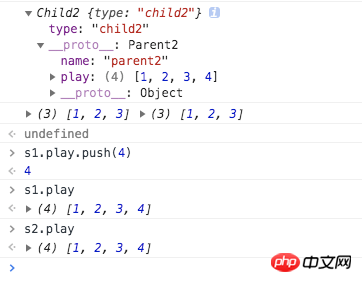
通过一讲的,我们知道要共享莫些属性,需要 对象.__proto__ = 父亲对象的.prototype,但实际上我们是不能直接 操作__proto__,这时我们可以借用 new 来做,所以
Child2.prototype = new Parent2(); Child2.prototype.__proto__ = Parent2.prototype; 这样我们借助 new 这个语法糖,就可以实现原型链继承。但这里有个总是,如打印结果,我们给 s1.play新增一个值 ,s2 也跟着改了。所以这个是原型链继承的缺点,原因是 s1.__pro__ 和 s2.__pro__指向同一个地址即 父类的prototype。
3)组合方式实现继承
/**
 * 组合方式
 */

function Parent3() {
  this.name = 'parent3';
  this.play = [1, 2, 3];
}

Parent3.prototype.say = function () { }

function Child3 () {
  Parent3.call(this);
  this.type = 'child3';
}

Child3.prototype = new Parent3();

var s3 = new Child3();
var s4 = new Child3();
s3.play.push(4);
console.log(new Child3);
console.log(s3.play, s4.play)
打印:
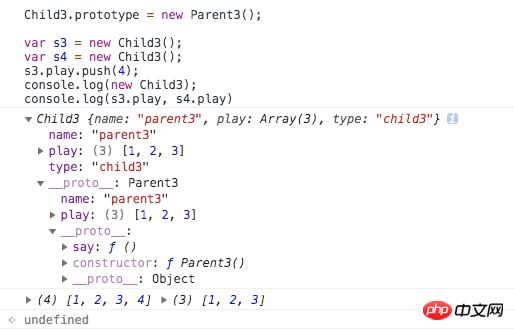
将 1 和 2 两种方式组合起来,就可以解决1和2存在问题,这种方式为组合继承。这种方式有点缺点就是我实例一个对象的时, 父类 new 了两次,一次是var s3 = new Child3()对应 Child3.prototype = new Parent3()还要new 一次。
4)组合继承的优化1
function Parent4() {
  this.name = 'parent4';
  this.play = [1, 2, 3];
}

Parent4.prototype.say = function () { }

function Child4() {
  Parent4.call(this);
  this.type = 'child4';
}

Child4.prototype = Parent4.prototype;

var s5 = new Child4();
var s6 = new Child4();
这边主要为 Child4.prototype = Parent4.prototype, 因为我们通过构造函数就可以拿到所有属性和实例的方法,那么现在我想继承父类的原型对象,所以你直接赋值给我就行,不用在去 new 一次父类。其实这种方法还是有问题的,如果我在控制台打印以下两句:
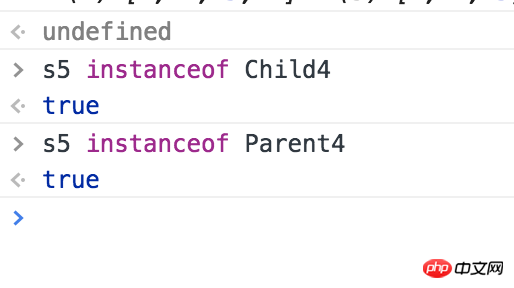
从打印可以看出,此时我是没有办法区分一个对象 是直接 由它的子类实例化还是父类呢?我们还有一个方法判断来判断对象是否是类的实例,那就是用 constructor,我在控制台打印以下内容:
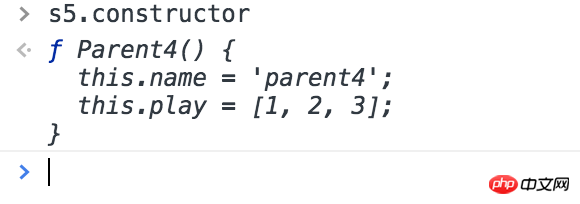
咦,你会发现它指向的是父类 ,这显然不是我们想要的结果, 上面讲过我们 prototype里面有一个 constructor, 而我们此时子类的 prototype 指向是 父类的 prototye ,而父类prototype里面的contructor当然是父类自己的,这个就是产生该问题的原因。
组合继承的优化2
/**
 * 组合继承的优化2
 */

function Parent5() {
  this.name = 'parent4';
  this.play = [1, 2, 3];
}

Parent5.prototype.say = function () { }

function Child5() {
  Parent5.call(this);
  this.type = 'child4';
}

Child5.prototype = Object.create(Parent5.prototype);这里主要使用Object.create(),它的作用是将对象继承到__proto__属性上。举个例子:
var test = Object.create({x:123,y:345});
console.log(test);//{}
console.log(test.x);//123
console.log(test.__proto__.x);//3
console.log(test.__proto__.x === test.x);//true
那大家可能说这样解决了吗,其实没有解决,因为这时 Child5.prototype 还是没有自己的 constructor,它要找的话还是向自己的原型对象上找最后还是找到 Parent5.prototype, constructor还是 Parent5 ,所以要给 Child5.prototype 写自己的 constructor:
Child5.prototype = Object.create(Parent5.prototype);
Child5.prototype.constructor = Child5;
Ce qui précède est le contenu détaillé de. pour plus d'informations, suivez d'autres articles connexes sur le site Web de PHP en chinois!
Articles Liés
Voir plus- Une analyse approfondie du composant de groupe de liste Bootstrap
- Explication détaillée du currying de la fonction JavaScript
- Exemple complet de génération de mot de passe JS et de détection de force (avec téléchargement du code source de démonstration)
- Angularjs intègre l'interface utilisateur WeChat (weui)
- Comment basculer rapidement entre le chinois traditionnel et le chinois simplifié avec JavaScript et l'astuce permettant aux sites Web de prendre en charge le basculement entre les compétences en chinois simplifié et traditionnel_javascript

