Maison >interface Web >js tutoriel >Introduction de base à React-Reflux
Introduction de base à React-Reflux
- 不言original
- 2018-07-07 09:45:262674parcourir
Cet article présente principalement l'introduction de base de React-Reflux, qui a une certaine valeur de référence. Maintenant, je le partage avec tout le monde. Les amis dans le besoin peuvent s'y référer
. Parce que j'ai besoin d'utiliser React + Reflux pour le développement au travail, j'ai étudié dur ces derniers jours, en particulier Reflux. Beaucoup de documents que j'ai trouvés en ligne et les documents sur github sont un peu anciens. JavaScript est mis à jour trop rapidement et est ancien. Une partie de la syntaxe du document n'a pas suivi la mise à jour, et il y a effectivement beaucoup de confusion pour les débutants. Cet article ne convient qu'aux débutants ou aux amis intéressés par React Masters, faites un détour ! ! !
Sans plus attendre, entrons dans le vif du sujet~
Citant le dicton commun : « Pour apprendre une langue, utilisez bonjour tout le monde, pour apprenez un framework, utilisez todolist. » Aujourd’hui, nous utilisons simplement todolist pour illustrer.
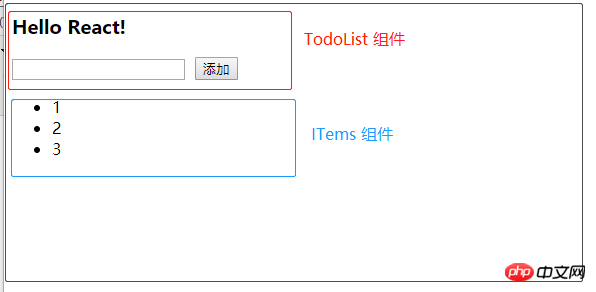
À titre de comparaison, todolist-raw n'utilise pas Reflux pour ajouter et supprimer des todolists. React-reflux utilise Reflux pour ajouter et supprimer des todolists. divisé en association de base et association simple Composant.
Jetons un coup d'œil aux rendus des composants :
L'ordinateur doit préparer l'environnement. J'utilise create-react-app et yarn Veuillez installer vous-même ces deux outils sur Baidu. comme suit :
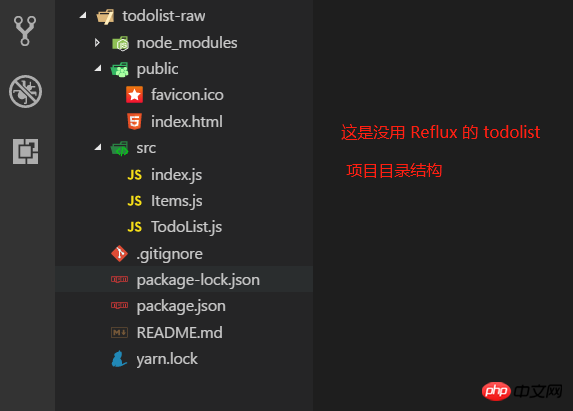
1. les codes à l’intérieur sont assez similaires. C’est simple, je pense que tous les autres taoïstes le comprendront d’un coup d’œil.
package.json est configuré comme suit :
{
  "name": "todolist-raw",
  "version": "0.1.0",
  "private": true,
  "dependencies": {
    "react": "^16.4.1",
    "react-dom": "^16.4.1",
    "react-scripts": "1.1.4"
  },
  "scripts": {
    "start": "react-scripts start",
    "build": "react-scripts build",
    "test": "react-scripts test --env=jsdom",
    "eject": "react-scripts eject"
  }
}
Faites attention à la version ici. Je ne sais pas quel genre de problèmes surviendront si la version ne correspond pas. Par exemple, j'utilise yarn Après avoir installé Rflux, il vous demande <.> "react-scripts" n'est pas une commande interne. yarn start ne peut pas être démarré. Les essais répétés ont échoué, puis j'ai déduit Yarn -h puis . fil -autoclean et c'était bien. Cela dit, en fait, le problème que j'ai rencontré n'est pas un problème d'asymétrie de version, je vous suggère de trier le fil si des bugs inexplicables apparaissent. démanger? Grattez-le si ça démange ! ! !
index.html est le suivant :Il n'y a aucun changement par rapport à celui généré automatiquement, sauf que certains commentaires ont été supprimés !
<!DOCTYPE html>
<html>
  <head>
    <meta charset="utf-8">
    <meta name="viewport" content="width=device-width, initial-scale=1, shrink-to-fit=no">
    <link rel="shortcut icon" href="%PUBLIC_URL%/favicon.ico">
    <title>TodoList-raw</title>
  </head>
  <body>
    <noscript>
      You need to enable JavaScript to run this app.
    </noscript>

    <div id="root"></div>

  </body>
</html>
index.js est le suivant : 1 import React from 'react'; 2 import ReactDOM from 'react-dom'; 3 import TodoList from './TodoList'; 4 5 ReactDOM.render(<TodoList />, document.getElementById('root'));Afficher le code
TodoList. js est le suivant :
Expliquez quelques points :
import React, { Component, Fragment } from 'react';
import Items from './Items';

class TodoList extends Component {

  constructor(props) {
    super(props);
    this.state = {
      items: [1, 2, 3],
      isC: false
    };

    this.handlerClick = this.handlerClick.bind(this);
  }
  // 添加一个 item 项
  handlerClick() {
    const val = this.refs.inputEl.value;
    this.refs.inputEl.value = '';
    const items = [...this.state.items, val]; // 最好不要直接操作 state
    this.setState({items}); // es6 语法,等价于 {items: items}
    }

  // 删除某一个 item 项,点击就删除
  handlerDelete(index) {
    const items = [...this.state.items];
    items.splice(index, 1);
    this.setState({items});
  }

  render() {
    return (
      <Fragment>
        <h3>Hello React!</h3>
        <input
          ref="inputEl"
          style={{marginRight: "10px"}}
        />
        <button onClick={this.handlerClick}>添加</button>
        <Items
          msg={this.state.items}
          func={this.handlerDelete.bind(this)} />
      </Fragment>
    );
  }
}

export default TodoList;
a. this.handlerClick = this .handlerClick.bind( this); est utilisé pour lier cela. React utilise le sucre de syntaxe jsx. Vous ne pouvez pas utiliser de parenthèses lors de la liaison d'événements comme le HTML traditionnel. Lier l'événement de cette manière ne fonctionnera pas, car cette balise se trouve dans le fichier js et l'événement de liaison HTML traditionnel sera appelé directement ! Ainsi, l'événement de liaison de balise dans jsx est lié à une référence. Et il doit être lié à ce fichier js (composant). Donc, l'événement de la balise dans jsx est 42bcb6dc2ac4c6c9f7395522895d546d65281c5ac262bf6d81768915a4a77ac0.Ceci est juste mon Comprenant, je ne sais pas si c'est correct ou non. Si c'est incorrect, corrigez-moi ! b. 代码很少阅读起来应该没难度,而且上面也有一些注释了。不过还是要啰嗦一下。React 是用数据(data)基于状态(state)来驱动视图(view),也就是搞来搞去都是在搞数据,用数据改变状态来达到渲染视图的目的,大多是在虚拟内存处理,通过什么 diff 比较算法,层层计较然后达到提高性能,加快视图渲染的目的。额,我只能用“非常快”来形容 React 的性能,当然,性能的事还是跟实际代码复杂度相关,我只想说 React 确实出众!扯远了...,既然是基于状态(state),所以要有 state,在 constructor 中定义了,而且处理业务时改变 state,比如 handlerClick,deleteClick 中都是先用变量保存下来,通过 this.setState() 方法在设置回去! c. 父子关系的组件,父组件可通过属性来给子组件传参,就像这样:c8ebc3b7373f8da02c2beebd4b1ea917,子组件可通过 this.props.msg 拿到 items。
Items.js 代码如下:
import React, { Component } from 'react';

class Items extends Component {

  constructor(props) {
    super(props);
    this.func = this.props.func;
  }

  render() {
    return (
      <ul>
        {this.props.msg.map((item, index) => <li
            key={index}
            onClick={this.func.bind(this, index)}
          >{item}</li>
        )}
      </ul>
    );
  }
}

export default Items;
注意,父组件传递方法给子组件时,this 指向的是子组件,所以通过属性传递时,需要用函数绑定 bind() 绑定父组件的 this。
最后,通过 cmd 命令行,yarn start 运行任务即可实现一个简单的 TodoList 功能。
2. react-reflux: 通过 Reflux 来实现简单的 TodoList (基本法关联 Component)。
2.1 简单地说明下为什么要 Reflux 架构,如图(自己画的组件树结构!),不存在父子关系的组件(如 B 和 E)通讯势必会很困难而且麻烦,需要一个中间件(Store)来存储数据,类似于订阅者和发布者(中间人模式)一样,大家都往 Store 中存取数据就好,不需要层层走关系了,避免了层层传递数据的灾难!
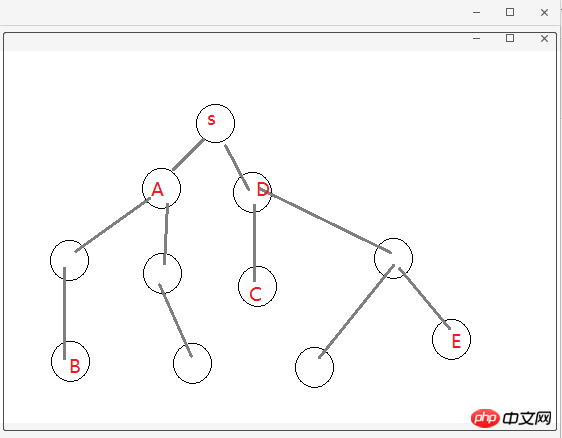
2.2 关于 Actions、Store 和 Component 的关系,可以这么理解:Store 作为一个中间人有订阅和发布的功能,Actions 就是 Component 触发的动作,Actions 被 Store 监听着,组件有新动作了, Store 就会做出相应的处理(回调函数)更改 Store 中的数据通过 this.trigger(this.items) 发布消息[就相当于更新 items], Component 监听着 Store,用一些手段(mixin 或回调函数)关联起 Component 中的状态信息(state.items)和 Store 中的信息(items),这就是所谓的单向数据流,单向表示一个方向流动,不能反向。
2.3 目录结构和前面的 todolist-raw 没多大区别,就是多了 TodoActions.js 和 TodoStore.js 两个文件。如图:
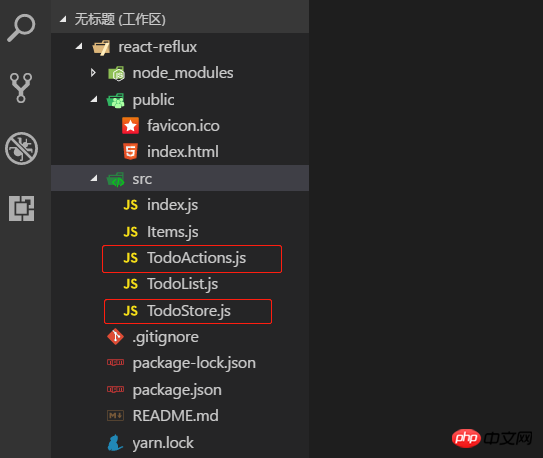
2.4 一言不合就贴代码。首先 index.js 代码没变化,就不贴了,TodoActions.js 代码如下:
import Reflux from 'reflux';

const TodoActions = Reflux.createActions([
    'getAll',
    'addItem',
    'deleteItem'
]);
export default TodoActions;
TodoStore.js 代码如下:
import Reflux from 'reflux';
import Actions from './TodoActions';
const TodoStore = Reflux.createStore({
    // items: [1, 2, 3],
    // listenables: Actions,
    init() {
        console.log('TodoStore init method~');
        this.items = [1, 2, 3]; // 给个初始值
        this.listenables = Actions; // 监听 TodoActions.js
        // this.listenTo(addItem, 'addItem');
    },
    onGetAll() {
        console.log('onGetAll');
        this.trigger(this.items);
    },
    onAddItem(model) {
        console.log('onAddItem---', model);
        this.items.unshift(model);
        this.trigger(this.items);
    },
    onDeleteItem(index) {
        console.log('onDeleteItem---', index);
        this.items.splice(index, 1);
        this.trigger(this.items);
    }
})
export default TodoStore;
说明:多个监听用 listenables,单个监听 this.listenTo(addItem, 'addItem'); 多个监听的时候定义处理函数是 on + ActionName 驼峰式命名。定义初始值和监听可以写在 init 方法外面,就像上面那样(已注释)。
2.5 Actions 和 Store 都写好了,就差最后一步,整合到组件 Component 中,才算有点意义了!TodoList.js 代码如下:
import React, { Component, Fragment } from 'react';
import Actions from './TodoActions';
import TodoStore from './TodoStore';
import Items from './Items';

class TodoList extends Component {

    constructor(props) {
        super(props);
        this.state = {
            items: [],
            isC: false
        };

        this.handlerClick = this.handlerClick.bind(this);
    }
    // 组件挂载
    componentDidMount() {
        this.unsubscribe = TodoStore.listen(this.onStatusChange, this);
        Actions.getAll();
    }
    // 组件移除
    componentWillUnmount() {
        console.log('componentWillUnmount');
        this.unsubscribe(); // 解除监听
    }
    // callback
    onStatusChange(items) {
        this.setState({items});
    }
    // 添加一个 item 项
    handlerClick() {
        const val = this.refs.inputEl.value;
        this.refs.inputEl.value = '';
        Actions.addItem(val);
    }

    render() {
        return (
            <Fragment>
                <h3>Hello React-Reflux!</h3>
                <input
                    ref="inputEl"
                    style={{marginRight: "10px"}}
                />
                <button onClick={this.handlerClick}>添加</button>
                <Items msg={this.state.items} />
            </Fragment>
        );
    }
}

export default TodoList;说明:这是基本的添加关联,需要在组件挂载时监听 Store,需要定义一个回调函数 onStatusChange(),组件卸载时解除监听 this.unsubscribe(),Store 源码如下:
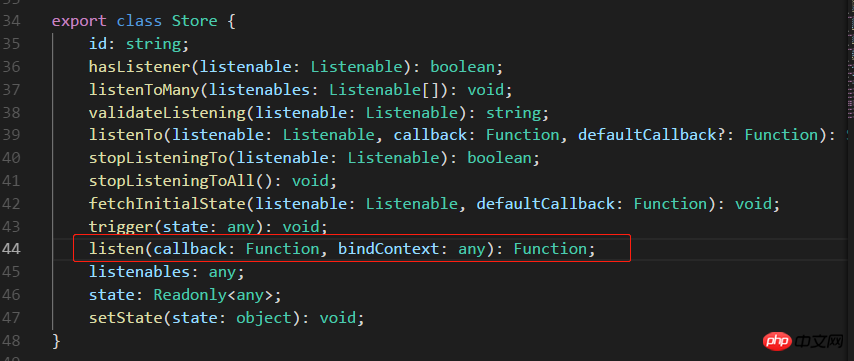
不传 bindContext 更新不了状态,回调函数 onStatusChange 中报异常,传入 this 就好了。如图:

Items.js 代码如下:
import React, { Component } from 'react';
import Actions from './TodoActions';

class Items extends Component {
    render() {
        return (
            <ul>
                {this.props.msg.map((item, index) => <li
                        key={index}
                        onClick={this.handlerDelete.bind(this, index)}
                    >{item}</li>
                )}
            </ul>
        );
    }
    handlerDelete(index) {
        Actions.deleteItem(index);
    }
}

export default Items;
3. react-reflux: 通过 Reflux 来实现简单的 TodoList (简便法关联 Component)。
3.1 先安装 react-mixin 和 axios: npm install react-mixin,npm install axios。结合异步操作实现简便 Store 关联 Component。
安装两个依赖之后,修改 TodoStore.js 和 TodoList.js 代码如下:
我贴:TodoStore.js:
import Reflux from 'reflux';
import Actions from './TodoActions';
import Axios from 'axios';

const TodoStore = Reflux.createStore({

    // items: [3, 2, 1],
    // listenables: Actions,

    init() {
        console.log('TodoStore init method~');
        this.items = [3, 2, 1]; // 初始值,此处不是 state, mark-1 -2 -3 都可以直接操作
        this.listenables = Actions;
    },
    onGetAll() {
        console.log('onGetAll');
        Axios.get('https://api.github.com/')
        .then(res => {
            const keys = Object.keys(res.data);
            console.log('axios-response-keys: ', keys);
            this.items = keys; // mark-1
            this.trigger(this.items);
        })
        .catch(err => console.log('axios-error: ', err));
    },
    onAddItem(model) {
        console.log('onAddItem---', model);
        this.items.unshift(model); // mark-2
        console.log('TodoStore-items: ', this.items);
        this.trigger(this.items);
    },
    onDeleteItem(index) {
        console.log('onDeleteItem---', index);
        this.items.splice(index, 1); // mark-3
        this.trigger(this.items);
    }
})

export default TodoStore;我再贴:TodoList.js:
import React, { Component, Fragment } from 'react';
import ReactMixin from 'react-mixin';
import Reflux from 'reflux';
import Actions from './TodoActions';
import TodoStore from './TodoStore';
import Items from './Items';
class TodoList extends Component {
constructor(props) {
super(props);
this.state = {
items: [],
isC: false
};
this.handlerClick = this.handlerClick.bind(this);
}
// 组件挂载
componentDidMount() {
Actions.getAll();
}
// 添加一个 item 项
handlerClick() {
const val = this.refs.inputEl.value;
this.refs.inputEl.value = '';
if (!val) {
alert('Please enter the data which type of number or string');
return false;
}
Actions.addItem(val);
}
render() {
return (
<Fragment>
<h3>Hello React-Reflux!</h3>
<input
ref="inputEl"
style={{marginRight: "10px"}}
/>
<button onClick={this.handlerClick}>添加</button>
<Items msg={this.state.items} />
</Fragment>
);
}
}
// 用 Reflux.connect 将 Store 和 Component 组合在一起
ReactMixin.onClass(TodoList, Reflux.connect(TodoStore, 'items'));
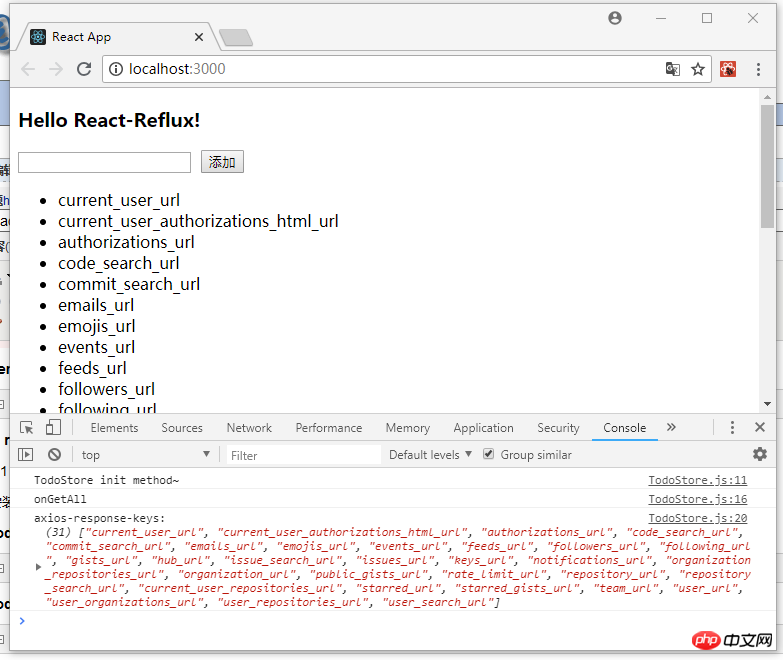
export default TodoList;修改之后 yarn start 启动项目,截图如下:
4. 说在后面的话:本篇文章只是关于 React-Reflux 基础入门的一些知识,没有涉及实战应用,读者自酌。对于 React 我也是初学者,难免有许多不准确的地方,有待提高,欢迎各位道友留言指正。
4.1 好了,简单地分享就到此结束了,谢谢阅读~~~
以上就是本文的全部内容,希望对大家的学习有所帮助,更多相关内容请关注PHP中文网!
相关推荐:
Ce qui précède est le contenu détaillé de. pour plus d'informations, suivez d'autres articles connexes sur le site Web de PHP en chinois!
Articles Liés
Voir plus- Une analyse approfondie du composant de groupe de liste Bootstrap
- Explication détaillée du currying de la fonction JavaScript
- Exemple complet de génération de mot de passe JS et de détection de force (avec téléchargement du code source de démonstration)
- Angularjs intègre l'interface utilisateur WeChat (weui)
- Comment basculer rapidement entre le chinois traditionnel et le chinois simplifié avec JavaScript et l'astuce permettant aux sites Web de prendre en charge le basculement entre les compétences en chinois simplifié et traditionnel_javascript

