Maison >interface Web >js tutoriel >Comment utiliser ListView natif de React pour ajouter une actualisation déroulante supérieure et une actualisation par clic inférieur
Comment utiliser ListView natif de React pour ajouter une actualisation déroulante supérieure et une actualisation par clic inférieur
- php中世界最好的语言original
- 2018-06-01 17:29:231637parcourir
Cette fois, je vais vous montrer comment utiliser ListView natif de React pour ajouter une actualisation déroulante en haut et un clic en bas pour actualiser. Utilisez ListView natif de React pour ajouter une actualisation déroulante en haut et un clic en bas pour actualiser Que sont-ils. les choses à noter ? . Voici le combat proprement dit.
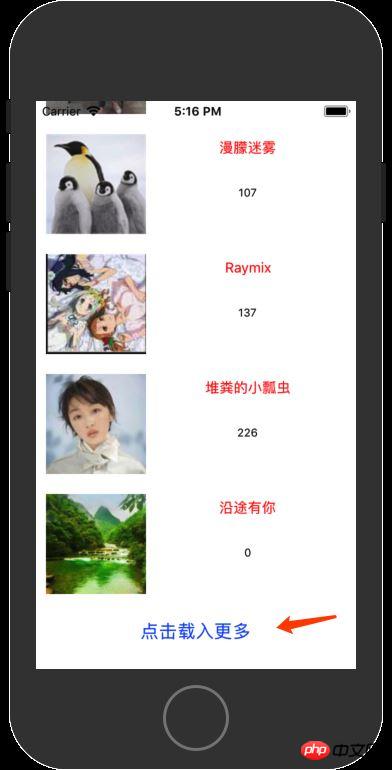
1. Cliquez sur Actualiser en bas

render() {
  if(!this.state.data){
   return(
     <Text>Loading... </Text>
   )
  }else{
   return(
     <ListView
      refreshControl={
       <RefreshControl
         refreshing = {false}
         onRefresh = {this.reloadWordData.bind(this)}
       />
      }
      dataSource={this.state.data}
      renderRow={(rowData)=>this.renderRow(rowData)}
      renderFooter={this.renderFooter.bind(this)}
     >
      </ListView>

   );
  }
 }

renderFooter(){
   return (
   <View style={{marginVertical: 10, marginBottom:20}} >
      <Button
       onPress={this.addMoreOnFoot.bind(this)}
       title="点击载入更多"
      />
    </View>
   )
 }
Ajoutez une méthode renderFooter à ListView pour dessiner l'élément du bas. Affichez un bouton à l’intérieur.
Logique de traitement des boutons :
addMoreOnFoot(){
 // alert('addMoreOnFoot')
 // console.log('addMoreOnFoot')
 const url = 'http://127.0.0.1/getFootContent?lastid=' + this.state.footLastId + '&count=20&isTop=0'
 fetch(url)
 .then((response)=>response.json())
 .then((jsondata)=>{
   if (jsondata.data && jsondata.data.length > 0){
   const rowData = this.state.jsondata.concat(jsondata.data);
   this.setState({
    footLastId:jsondata.data[jsondata.data.length - 1]['id'],
    jsondata:rowData,
    data:new ListView.DataSource({rowHasChanged:(r1, r2) => r1 != r2}).cloneWithRows(rowData),
   })
   }
 })
 .catch((error)=>{
  alert(error);
 });
}
Effectuez le traitement réseau après avoir cliqué, transmettez le dernier identifiant au serveur, et laissez le serveur renvoyer les 20 enregistrements après cet identifiant. Puis réinitialisezState.
2. Actualisation du menu déroulant Head
Ajouter RefeshControl dans ListView
render() {
  if(!this.state.data){
   return(
     <Text>Loading... </Text>
   )
  }else{
   return(

     <ListView
      refreshControl={
       <RefreshControl
         refreshing = {false}
         onRefresh = {this.reloadWordData.bind(this)}
       />
      }
      dataSource={this.state.data}
      renderRow={(rowData)=>this.renderRow(rowData)}
      renderFooter={this.renderFooter.bind(this)}
     >
      </ListView>

   );
  }
 }
Chargez les dernières données d'en-tête et ajoutez-les à this.State
reloadWordData(){
  // alert(this.state.topLastId)
  const url = 'http://127.0.0.1/getFootContent?lastid=' + this.state.topLastId + '&count=20&isTop=1'
  fetch(url)
  .then((response)=>response.json())
  .then((jsondata)=>{
    if (jsondata.data && jsondata.data.length > 0){
    const rowData = jsondata.data.concat(this.state.jsondata);
    this.setState({
     topLastId:jsondata.data[0]['id'],
     jsondata:rowData,
     data:new ListView.DataSource({rowHasChanged:(r1, r2) => r1 != r2}).cloneWithRows(rowData),
    })
    }
  })
  .catch((error)=>{
   alert(error);
  });
 }
Je pense que vous maîtrisez la méthode après avoir lu le cas dans cet article. Pour des informations plus intéressantes, veuillez prêter attention aux autres articles connexes sur le site Web chinois de php !
Lecture recommandée :
Comment utiliser vue.extend pour implémenter le composant contextuel de boîte modale d'alerte
Ce qui précède est le contenu détaillé de. pour plus d'informations, suivez d'autres articles connexes sur le site Web de PHP en chinois!
Articles Liés
Voir plus- Une analyse approfondie du composant de groupe de liste Bootstrap
- Explication détaillée du currying de la fonction JavaScript
- Exemple complet de génération de mot de passe JS et de détection de force (avec téléchargement du code source de démonstration)
- Angularjs intègre l'interface utilisateur WeChat (weui)
- Comment basculer rapidement entre le chinois traditionnel et le chinois simplifié avec JavaScript et l'astuce permettant aux sites Web de prendre en charge le basculement entre les compétences en chinois simplifié et traditionnel_javascript

