Maison >développement back-end >tutoriel php >Tutoriel PHP : Créer un avatar d'utilisateur rond
Tutoriel PHP : Créer un avatar d'utilisateur rond
- 小云云original
- 2017-11-13 10:43:212109parcourir
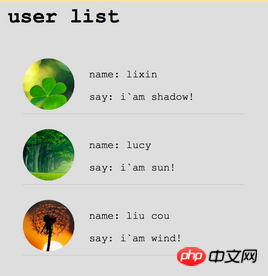
Dans le développement PHP actuel, la plupart des programmeurs développeront certaines fonctions telles que l'enregistrement des utilisateurs. Parfois, pour des raisons d'esthétique, les avatars des utilisateurs auront également des exigences correspondantes. Nous vous expliquerons donc ci-dessous comment utiliser PHP pour créer des cercles. .
En utilisant la méthode des calques pour concevoir, un total de 3 calques d'image doivent être créés
1 Couche inférieure : l'image finale générée
2. avatar de l'utilisateur : comme couche intermédiaire, la véritable image de l'avatar téléchargée par l'utilisateur
3. Masque circulaire : comme couche supérieure, dessinez un cercle dans le masque et réglez-le sur transparent

Le code est le suivant :
<?php
class avatar
{
private $fileName; //文件的绝对路径(或基于最终调用文件的相对路径)
private $rgb; //颜色索引(数组 array(255,255,0) 或 16进制值 ffff00/#ffff00/ff0/#ff0)
private $size; //图像大小
private $imgInfo; //图像信息
/**
* 初始化
* Enter deion here ...
* @param string $fileName 文件的绝对路径(或基于最终调用文件的相对路径)
* @param mixed $rgb 颜色索引(数组 array(255,255,0) 或 16进制值 ffff00/#ffff00/ff0/#ff0)
* @param int $size 图像大小
*/
public function __construct($fileName, $rgb, $size)
{
$this->fileName = $fileName;
if(is_array($rgb)){
$this->rgb = $rgb; //rgb颜色数组 array(255,255,0)
}else{
//有的人喜欢带#号
$rgb = trim($rgb, '#');
//处理缩写形式
if (strlen($rgb)==3){
$_tmp = $rgb[0].$rgb[0].$rgb[1].$rgb[1].$rgb[2].$rgb[2];
$rgb = $_tmp;
}
$this->rgb = $this->createRGB($rgb); //16进制值 ffff00
}
$this->size = $size;
$this->imgInfo = getimagesize($this->fileName);
if(!$this->imgInfo){
throw Exception("无法读取图像文件");
}
if(!in_array($this->imgInfo[2], array(2,3))){
//仅允许jpg和png
throw Exception("图像格式不支持");
}
}
/**
* 显示图像
* Enter deion here ...
*/
public function show()
{
header("content-type:image/png");
$shadow = $this->createshadow(); //遮罩图片
//创建一个方形图片
$imgbk = imagecreatetruecolor($this->size, $this->size); //目标图片
switch ($this->imgInfo[2]){
case 2:
$imgfk = imagecreatefromjpeg($this->fileName); //原素材图片
break;
case 3:
$imgfk = imagecreatefrompng($this->fileName); //原素材图片
default:
return ;
break;
}
$realSize = $this->imgInfo[0]<$this->imgInfo[1]? $this->imgInfo[0] : $this->imgInfo[1];
imagecopyresized($imgbk, $imgfk, 0, 0, 0, 0, $this->size, $this->size, $realSize, $realSize);
imagecopymerge($imgbk, $shadow, 0, 0, 0, 0, $this->size, $this->size, 100);
//创建图像
imagepng($imgbk);
//销毁资源
imagedestroy($imgbk);
imagedestroy($imgfk);
imagedestroy($shadow);
}
/**
* 创建一个圆形遮罩
* Enter deion here ...
* @param array 10进制颜色数组
*/
private function createshadow()
{
$img = imagecreatetruecolor($this->size, $this->size);
imageantialias($img, true); //开启抗锯齿
$color_bg = imagecolorallocate($img, $this->rgb[0], $this->rgb[1], $this->rgb[2]); //背景色
$color_fg = imagecolorallocate($img, 0, 0, 0); //前景色,主要用来创建圆形
imagefilledrectangle($img, 0, 0, 200, 200, $color_bg);
imagefilledarc($img, 100, 100, 200, 200, 0, 0, $color_fg, IMG_ARC_PIE);
imagecolortransparent($img, $color_fg); //将前景色转换为透明
return $img;
}
/**
* 将字符形式16进制串转为10进制
* Enter deion here ...
* @param $str
*/
private function getIntFromHexStr($str)
{
$format = '0123456789abcdef';
$sum = 0;
for($i=strlen($str)-1, $c=0, $j=0; $i>=$c; $i--,$j++){
$index = strpos($format, $str[$i]);//strpos从0计算
$sum+=$index * pow(16,$j);
}
return $sum;
}
/**
* 将16进制颜色转为10进制颜色值数组(RGB)
* Enter deion here ...
* @param $str 16进制串(如:ff9900)
*/
private function createRGB($str)
{
$rgb = array();
if(strlen($str) != 6){
$rgb[] = 0xff;
$rgb[] = 0xff;
$rgb[] = 0xff;
return $rgb; //默认白色
}
$rgb[] = $this->getIntFromHexStr(substr($str, 0, 2));
$rgb[] = $this->getIntFromHexStr(substr($str, 2, 2));
$rgb[] = $this->getIntFromHexStr(substr($str, 4, 2));
return $rgb;
}
}C'est tout pour le tutoriel PHP Quand on termine un développement en utilisant PHP, on ressent vraiment un vide. sentiment d'accomplissement. Alors amis qui ne savent pas comment faire maintenant, dépêchez-vous et suivez le tutoriel pour en fabriquer un vous-même.
Recommandations associées :
Le compte public WeChat implémente la fonction de gestion des utilisateurs
Utilisez jquery pour créer une interface de connexion utilisateur
Ce qui précède est le contenu détaillé de. pour plus d'informations, suivez d'autres articles connexes sur le site Web de PHP en chinois!
Articles Liés
Voir plus- Comment utiliser cURL pour implémenter les requêtes Get et Post en PHP
- Comment utiliser cURL pour implémenter les requêtes Get et Post en PHP
- Comment utiliser cURL pour implémenter les requêtes Get et Post en PHP
- Comment utiliser cURL pour implémenter les requêtes Get et Post en PHP
- Tous les symboles d'expression dans les expressions régulières (résumé)

