Maison >Java >javaDidacticiel >Une brève introduction à Spring MVC
Une brève introduction à Spring MVC
- 巴扎黑original
- 2017-09-08 09:46:002672parcourir
Spring MVC est un produit de suivi de SpringFrameWork et a été intégré à Spring Web Flow. Aujourd'hui, nous allons commencer par écrire un Spring MVC HelloWorld. Voyons comment configurer un environnement Spring MVC et exécuter le programme. Les amis intéressés peuvent apprendre ensemble
Qu'est-ce que Spring MVC.
Spring MVC est un produit de suivi de SpringFrameWork et a été intégré à Spring Web Flow. Le framework Spring fournit des modules MVC complets pour créer des applications Web. Grâce à l'architecture MVC enfichable de Spring, lorsque vous utilisez Spring pour le développement WEB, vous pouvez choisir d'utiliser le framework SpringMVC de Spring ou d'intégrer d'autres frameworks de développement MVC, tels que Struts1, Struts2, etc.
Aujourd'hui, nous allons commencer par écrire un Spring MVC HelloWorld. Voyons comment configurer un environnement Spring mvc et exécuter le programme.
Paramètres logiciels
Eclipse : version Mars.1 (4.5.1)
Tomcat : 8.0.36
JDK : 1.8.0_60
Spring-framework : 4.0.4.RELEASE
Nouveau projet
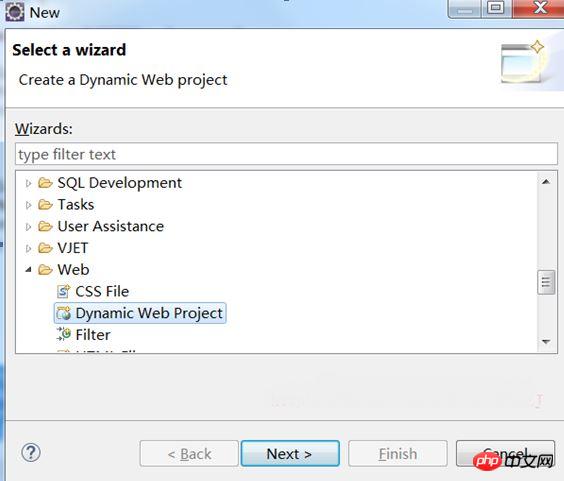
Fichier-Nouveau -Autre, sélectionnez Projet web dynamique

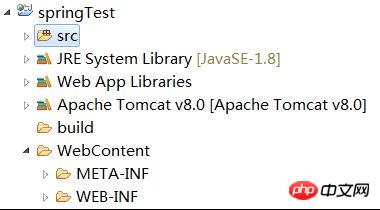
Une fois le projet construit, la structure des répertoires est la suivante :

Importer le package jar
Nous développons sur la base du framework Spring mvc et devons nous appuyer sur le package Spring Jar suivant :
spring-aop-4.0.4.RELEASE.jar spring-beans-4.0.4.RELEASE.jar spring-context-4.0.4.RELEASE.jar spring-core-4.0.4.RELEASE.jar spring-expression-4.0.4.RELEASE.jar spring-web-4.0.4.RELEASE.jar spring-webmvc-4.0.4.RELEASE.jar commons-logging-1.1.1.jar(用来打印log)
Créez un nouveau dossier lib dans le répertoire WEB-INF et placez-y le package jar ci-dessus.
Fichiers de configuration et écriture de code
web.xml(WEB-INF下)
 <?xml version="1.0" encoding="UTF-8"?>
 <web-app xmlns:xsi="http://www.w3.org/2001/XMLSchema-instance"
  xmlns="http://java.sun.com/xml/ns/javaee"
  xsi:schemaLocation="http://java.sun.com/xml/ns/javaee http://java.sun.com/xml/ns/javaee/web-app_2_5.xsd"
  id="WebApp_ID" version="2.5">
  <!-- 配置DispatchcerServlet -->
  <servlet>
   <servlet-name>springDispatcherServlet</servlet-name>
   <servlet-class>org.springframework.web.servlet.DispatcherServlet</servlet-class>
   <!-- 配置Spring mvc下的配置文件的位置和名称 -->
   <init-param>
    <param-name>contextConfigLocation</param-name>
    <param-value>classpath:springmvc.xml</param-value>
   </init-param>
   <load-on-startup>1</load-on-startup>
  </servlet>
  <servlet-mapping>
   <servlet-name>springDispatcherServlet</servlet-name>
   <url-pattern>/</url-pattern>
  </servlet-mapping>
 </web-app>
Remarque : 1. ligne12- 15. L'emplacement et le nom du fichier de configuration utilisé pour configurer spring mvc. Ici, un nouveau fichier de configuration de springmvc.xml sera créé
2. Nous ne pouvons pas non plus créer un nouveau springmvc.xml, mais utiliser celui par défaut. Le format du fichier de configuration est /WEB-INF/[servlet-name]-servlet.xml, qui correspond à springDispatcherServlet-servlet.xml
3. Le mappage de servlet représente ici le mode d'interception, voici "/", indiquant l'interception de toutes les requêtes, y compris les ressources statiques telles que html, js, jpg, etc. À ce stade, une erreur 404 sera signalée lors de l’accès aux ressources statiques. Comment le résoudre sera présenté plus tard
Springmvc.xml (sous scr)
Créez un nouveau springmvc.xml dans le répertoire src
 <?xml version="1.0" encoding="UTF-8"?>
 <beans xmlns="http://www.springframework.org/schema/beans"
  xmlns:xsi="http://www.w3.org/2001/XMLSchema-instance"
  xmlns:context="http://www.springframework.org/schema/context"
  xmlns:mvc="http://www.springframework.org/schema/mvc"
  xsi:schemaLocation="http://www.springframework.org/schema/beans http://www.springframework.org/schema/beans/spring-beans.xsd
   http://www.springframework.org/schema/context http://www.springframework.org/schema/context/spring-context-4.0.xsd
   http://www.springframework.org/schema/mvc http://www.springframework.org/schema/mvc/spring-mvc-4.0.xsd">
   <!-- 配置自动扫描的包 -->
   <context:component-scan base-package="com.jackie.springmvc"></context:component-scan>
   <!-- 配置视图解析器 如何把handler 方法返回值解析为实际的物理视图 -->
   <bean class="org.springframework.web.servlet.view.InternalResourceViewResolver">
    <property name = "prefix" value="/WEB-INF/views/"></property>
    <property name = "suffix" value = ".jsp"></property>
   </bean>
 </beans>
Remarque : 1. line12 représente la portée de la surveillance du printemps, qui se trouve sous com.jackie.springmvc
2. line15-18, ajoute un analyseur de vue à placer dans le contrôleur. La structure du gestionnaire est analysée dans la vue physique réelle. Celle-ci doit être analysée avec la classe du contrôleur. Voir ci-dessous pour plus de détails.
HelloWorld.java(com.jackie.springmvc.handlers下)
 package com.jackie.springmvc.handlers;
 import org.springframework.stereotype.Controller;
 import org.springframework.web.bind.annotation.RequestMapping;
 @Controller
 public class HelloWorld {
  /**
  * 1. 使用RequestMapping注解来映射请求的URL
  * 2. 返回值会通过视图解析器解析为实际的物理视图, 对于InternalResourceViewResolver视图解析器,会做如下解析
  * 通过prefix+returnVal+suffix 这样的方式得到实际的物理视图,然后会转发操作
  * "/WEB-INF/views/success.jsp"
  * @return
  */
  @RequestMapping("/helloworld")
  public String hello(){
   System.out.println("hello world");
   return "result";
  }
 }
Remarque :
1. Ajoutez d'abord devant la classe L'annotation "Controller" indique qu'il s'agit d'un contrôleur spring. Une méthode hello()
sera écrite ici 2. Il y a un @RequestMapping au-dessus de la méthode hello, qui est utilisée pour correspondre au chemin du. requête, comme le chemin de requête correspondant ici. Il s'agit de "http://localhost:8080/springTest/springmvc/helloworld", c'est-à-dire lorsque le service Tomcat est démarré et que cette URL est saisie dans le navigateur, s'il existe un point d'arrêt dans cette méthode, il passera à cette méthode.
3. Le résultat de ce retour n'est pas une écriture aléatoire. La chaîne renvoyée correspond à la ligne 15-18 dans springmvc.xml ci-dessus. Le préfixe et le suffixe sont déclarés dans springmvc.xml, et ils sont pris en sandwich ici. entre les deux se trouve la chaîne renvoyée ici, donc après avoir exécuté cette méthode, nous pouvons obtenir le chemin de ressource de la requête "/WEB-INF/views/success.jsp". Ce success.jsp doit être créé par nous
 <%@ page language="java" contentType="text/html; charset=ISO-8859-1"
  pageEncoding="ISO-8859-1"%>
 <!DOCTYPE html PUBLIC "-//W3C//DTD HTML 4.01 Transitional//EN" "http://www.w3.org/TR/html4/loose.dtd">
 <html>
 <head>
 <meta http-equiv="Content-Type" content="text/html; charset=ISO-8859-1">
 <title>Insert title here</title>
 </head>
 <body>
 <a href="helloworld" rel="external nofollow" >hello world</a>
 </body>
 </html>
Lors de l'accès à index.jsp, un lien hypertexte sera affiché sur la page. Après avoir cliqué sur le lien hypertexte, l'adresse dans l'URL passera à "http://localhost:8080/springTest" /index.jsp. " passe à "http://localhost:8080/springTest/helloworld", et cette demande d'URL entrera dans la méthode hello dans HelloWorld car elle correspond à "/helloworld" sur cette méthode.
<%@ page language="java" contentType="text/html; charset=ISO-8859-1"
  pageEncoding="ISO-8859-1"%>
 <!DOCTYPE html PUBLIC "-//W3C//DTD HTML 4.01 Transitional//EN" "http://www.w3.org/TR/html4/loose.dtd">
 <html>
 <head>
 <meta http-equiv="Content-Type" content="text/html; charset=ISO-8859-1">
 <title>Insert title here</title>
 </head>
 <body>
 <h4>Success Page</h4>
 </body>
 </html>
À ce stade, nous avons terminé le développement du programme HelloWorld basé sur le framework Spring mvc, y compris les packages jar dépendants, les fichiers de configuration, l'écriture du code du contrôleur et l'écriture de la page d'affichage, etc.
除此以外,再介绍下整个配置过程中遇到的一些小问题:
1. tomcat服务器的添加
从前面的介绍可以看出,我们的程序是通过浏览器发请求来获取想要的页面,那么这里就免不了要有一个web服务器,这里就是tomcat。
首先你需要下载个tomcat,然后在eclipse->windows->preference->servers中绑定这个tomcat服务器;
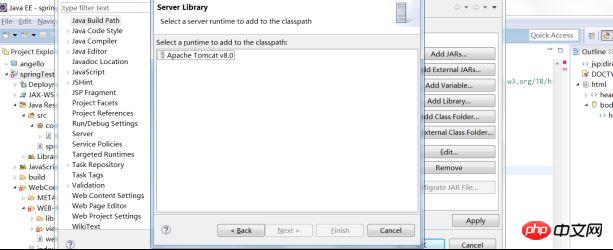
其次你需要在你新建的spring mvc项目中添加tomcat的支持,否则在新建的jsp文件中会提示报错“The superclass javax.servlet.http.HttpServlet was not found on the Java Build Path”
右键项目->build path->configure build path->add library->server runtime, 选择你的tomcat即可

有了tomcat服务器,你就可以在index.jsp上右键run on server,选择你的tomcat服务器,这样就可以启动tomcat服务,帮助你完成网页的请求和响应操作。
2. spring mvc如何访问静态资源
关于使用spring mvc处理静态资源,比如html(发现之前的springmvc.xml中16244cc5c17ada7705a50328620bea5adde4123f2ed5a21d0bae333af89830f9定义为jsp结尾就可以成功跳转,但是如果改为html并在web-inf下面新建了html文件后,并将suffix这里的".jsp"改为".html",无法跳转到想要的html页面,并且给出404错误,同时console给出错误信息为:No mapping found for HTTP request with URI [/springTest/WEB-INF/views/result.html] in DispatcherServlet)
最后发现是需要让spring明确要处理静态资源,原来的web.xml中只有
<servlet-mapping>
  <servlet-name>springDispatcherServlet</servlet-name>
  <url-pattern>/</url-pattern>
 </servlet-mapping>
其匹配的都是controller中类似@RequestMapping("/springmvc/helloworld")这样的注解配置的请求,而对于类似html/css/jpg等资源的访问就会得不到,所以需要在web.xml中加入以下类型的支持
<servlet-mapping>
  <servlet-name>default</servlet-name>
  <url-pattern>*.css</url-pattern>
 </servlet-mapping>
 <servlet-mapping>
  <servlet-name>default</servlet-name>
  <url-pattern>*.gif</url-pattern>
 </servlet-mapping>
 <servlet-mapping>
  <servlet-name>default</servlet-name>
  <url-pattern>*.jpg</url-pattern>
 </servlet-mapping>
 <servlet-mapping>
  <servlet-name>default</servlet-name>
  <url-pattern>*.js</url-pattern>
 </servlet-mapping>
 <servlet-mapping>
  <servlet-name>default</servlet-name>
  <url-pattern>*.html</url-pattern>
 </servlet-mapping>
这样就可以保证spring 能够拦截并处理静态资源
这里将HelloWorld.java中的hello方法改为:
@RequestMapping("/helloworld")
 public String hello(){
  System.out.println("hello world");
  return "Jackie";
}
Springmvc.xml改为:
class="org.springframework.web.servlet.view.InternalResourceViewResolver">
   <property name = "prefix" value="/WEB-INF/views/"></property>
   <property name = "suffix" value = ".jpg"></property>
</bean>
Ce qui précède est le contenu détaillé de. pour plus d'informations, suivez d'autres articles connexes sur le site Web de PHP en chinois!

