Maison >développement back-end >Tutoriel Python >Collection Python – stockage de données
Collection Python – stockage de données
- 巴扎黑original
- 2017-07-17 09:59:552703parcourir
Collecte de données réseau Python 3-Enregistrez les données au format CSV et MySql
Échauffez-vous d'abord et téléchargez toutes les images d'une page.
import requestsfrom bs4 import BeautifulSoup

headers = {'User-Agent': 'Mozilla/5.0 (Windows NT 10.0; Win64; x64) AppleWebKit/537.36 (KHTML, like Gecko)'  ' Chrome/52.0.2743.116 Safari/537.36 Edge/15.16193'}

start_url = 'https://www.pythonscraping.com'r = requests.get(start_url, headers=headers)
soup = BeautifulSoup(r.text, 'lxml')# 获取所有img标签img_tags = soup.find_all('img')for tag in img_tags:print(tag['src'])
http://pythonscraping.com/img/lrg%20(1).jpg
Stockage des tables Web dans des fichiers CSV
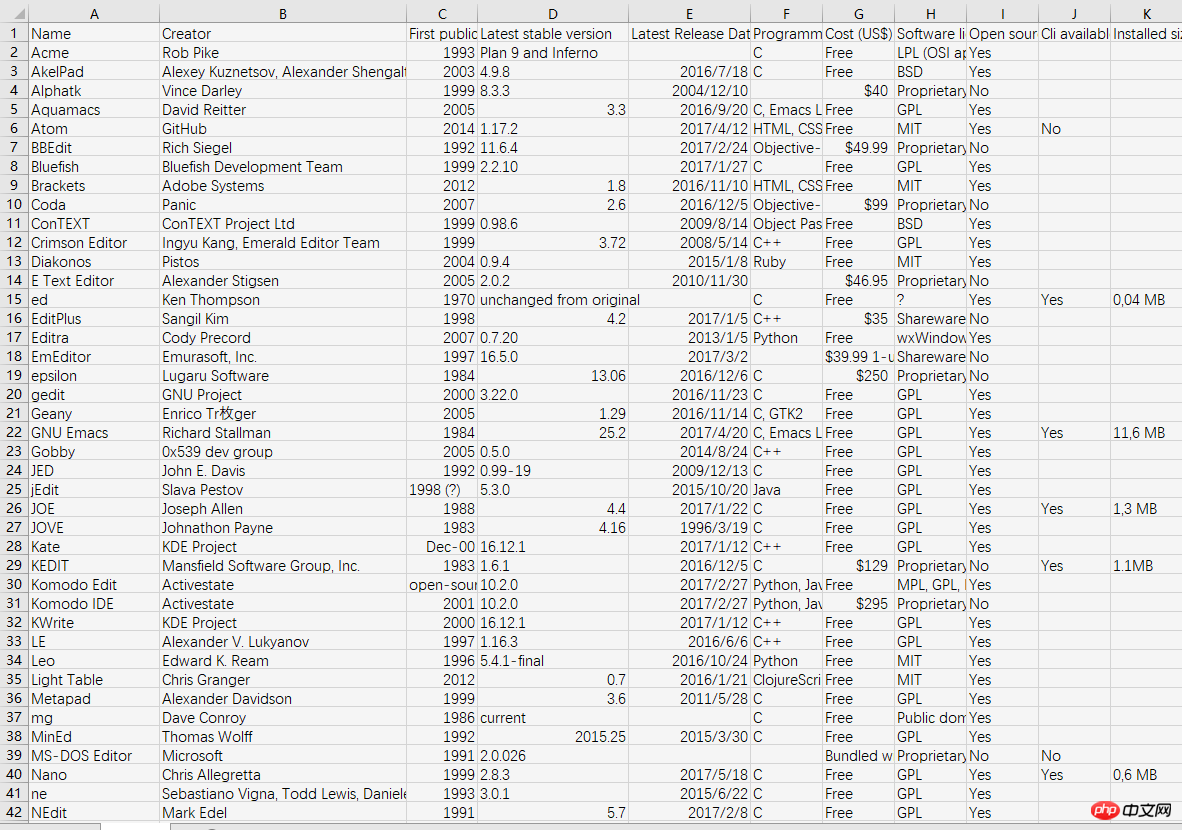
Prenons cette URL comme exemple. Il existe plusieurs tables. Faisons cela pour la première exploration des tables. . Wiki - Comparaison de différents éditeurs
import csvimport requestsfrom bs4 import BeautifulSoup

headers = {'User-Agent': 'Mozilla/5.0 (Windows NT 10.0; Win64; x64) AppleWebKit/537.36 (KHTML, like Gecko)'  ' Chrome/52.0.2743.116 Safari/537.36 Edge/15.16193'}

url = 'https://en.wikipedia.org/wiki/Comparison_of_text_editors'r = requests.get(url, headers=headers)
soup = BeautifulSoup(r.text, 'lxml')# 只要第一个表格rows = soup.find('table', class_='wikitable').find_all('tr')# csv写入时候每写一行会有一空行被写入,所以设置newline为空with open('editors.csv', 'w', newline='', encoding='utf-8') as f:
    writer = csv.writer(f)for row in rows:
        csv_row = []for cell in row.find_all(['th', 'td']):
            csv_row.append(cell.text)

        writer.writerow(csv_row)
Une chose à noter est qu'il faut préciser newline='' lors de l'ouverture du fichier, car lors de l'écriture d'un fichier csv, chaque ligne est écrite Une ligne vierge sera écrite.

Lecture de fichiers CSV à partir du réseau
Ce qui précède décrit l'enregistrement du contenu d'une page Web dans des fichiers CSV. Et si le fichier CSV avait été obtenu sur Internet ? Nous ne voulons pas télécharger puis lire en local. Mais pour les requêtes réseau, la chaîne est renvoyée à la place de l'objet fichier. csv.reader()Un objet fichier doit être transmis. Par conséquent, la chaîne obtenue doit être convertie en un objet fichier. Les bibliothèques intégrées de Python, StringIO et BytesIO, peuvent gérer les chaînes/octets sous forme de fichiers. Pour le module csv, l'itérateur du lecteur doit renvoyer un type de chaîne, donc StringIO est utilisé si des données binaires sont traitées, BytesIO est utilisé. Converti en objet fichier, il peut être traité à l'aide du module CSV.
La chose la plus critique à propos du code ci-dessous est de data_file = StringIO(csv_data.text)convertir la chaîne en un objet de type fichier.
from io import StringIOimport csvimport requests

csv_data = requests.get('http://pythonscraping.com/files/MontyPythonAlbums.csv')
data_file = StringIO(csv_data.text)
reader = csv.reader(data_file)for row in reader:print(row)
['Name', 'Year']
["Monty Python's Flying Circus", '1970']
['Another Monty Python Record', '1971']
["Monty Python's Previous Record", '1972']
['The Monty Python Matching Tie and Handkerchief', '1973']
['Monty Python Live at Drury Lane', '1974']
['An Album of the Soundtrack of the Trailer of the Film of Monty Python and the Holy Grail', '1975']
['Monty Python Live at City Center', '1977']
['The Monty Python Instant Record Collection', '1977']
["Monty Python's Life of Brian", '1979']
["Monty Python's Cotractual Obligation Album", '1980']
["Monty Python's The Meaning of Life", '1983']
['The Final Rip Off', '1987']
['Monty Python Sings', '1989']
['The Ultimate Monty Python Rip Off', '1994']
['Monty Python Sings Again', '2014']
DictReader peut obtenir des données comme un dictionnaire, en utilisant la première ligne du tableau (généralement l'en-tête) comme clé. Vous pouvez accéder aux données correspondant à une certaine clé dans chaque ligne.
Chaque ligne de données est OrderDict et est accessible à l'aide de Key. Regardez la première ligne des informations imprimées ci-dessus, qui montre qu'il y a deux clés : Name et Year. Vous pouvez également utiliser reader.fieldnames pour visualiser.
from io import StringIOimport csvimport requests

csv_data = requests.get('http://pythonscraping.com/files/MontyPythonAlbums.csv')
data_file = StringIO(csv_data.text)
reader = csv.DictReader(data_file)# 查看Keyprint(reader.fieldnames)for row in reader:print(row['Year'], row['Name'], sep=': ')
['Name', 'Year']
1970: Monty Python's Flying Circus
1971: Another Monty Python Record
1972: Monty Python's Previous Record
1973: The Monty Python Matching Tie and Handkerchief
1974: Monty Python Live at Drury Lane
1975: An Album of the Soundtrack of the Trailer of the Film of Monty Python and the Holy Grail
1977: Monty Python Live at City Center
1977: The Monty Python Instant Record Collection
1979: Monty Python's Life of Brian
1980: Monty Python's Cotractual Obligation Album
1983: Monty Python's The Meaning of Life
1987: The Final Rip Off
1989: Monty Python Sings
1994: The Ultimate Monty Python Rip Off
2014: Monty Python Sings Again
存储数据
大数据存储与数据交互能力, 在新式的程序开发中已经是重中之重了.
存储媒体文件的2种主要方式: 只获取url链接, 或直接将源文件下载下来
直接引用url链接的优点:
爬虫运行得更快,耗费的流量更少,因为只要链接,不需要下载文件。
可以节省很多存储空间,因为只需要存储 URL 链接就可以。
存储 URL 的代码更容易写,也不需要实现文件下载代码。
不下载文件能够降低目标主机服务器的负载。
直接引用url链接的缺点:
这些内嵌在网站或应用中的外站 URL 链接被称为盗链(hotlinking), 每个网站都会实施防盗链措施。
因为链接文件在别人的服务器上,所以应用就要跟着别人的节奏运行了。
盗链是很容易改变的。如果盗链图片放在博客上,要是被对方服务器发现,很可能被恶搞。如果 URL 链接存起来准备以后再用,可能用的时候链接已经失效了,或者是变成了完全无关的内容。
python3的urllib.request.urlretrieve可以根据文件的url下载文件:
from urllib.request import urlretrievefrom urllib.request import urlopenfrom bs4 import BeautifulSouphtml = urlopen("http://www.pythonscraping.com")bsObj = BeautifulSoup(html)imageLocation = bsObj.find("a", {"id": "logo"}).find("img")["src"]urlretrieve (imageLocation, "logo.jpg")
csv(comma-separated values, 逗号分隔值)是存储表格数据的常用文件格式
网络数据采集的一个常用功能就是获取html表格并写入csv
除了用户定义的变量名,mysql是不区分大小写的, 习惯上mysql关键字用大写表示
连接与游标(connection/cursor)是数据库编程的2种模式:
连接模式除了要连接数据库之外, 还要发送数据库信息, 处理回滚操作, 创建游标对象等
一个连接可以创建多个游标, 一个游标跟踪一种状态信息, 比如数据库的使用状态. 游标还会包含最后一次查询执行的结果. 通过调用游标函数, 如fetchall获取查询结果
游标与连接使用完毕之后,务必要关闭, 否则会导致连接泄漏, 会一直消耗数据库资源
使用try ... finally语句保证数据库连接与游标的关闭
让数据库更高效的几种方法:
给每张表都增加id字段. 通常数据库很难智能地选择主键
用智能索引, CREATE INDEX definition ON dictionary (id, definition(16));
选择合适的范式
发送Email, 通过爬虫或api获取信息, 设置条件自动发送Email! 那些订阅邮件, 肯定就是这么来的!

保存链接之间的联系
比如链接A,能够在这个页面里找到链接B。则可以表示为A -> B。我们就是要保存这种联系到数据库。先建表:
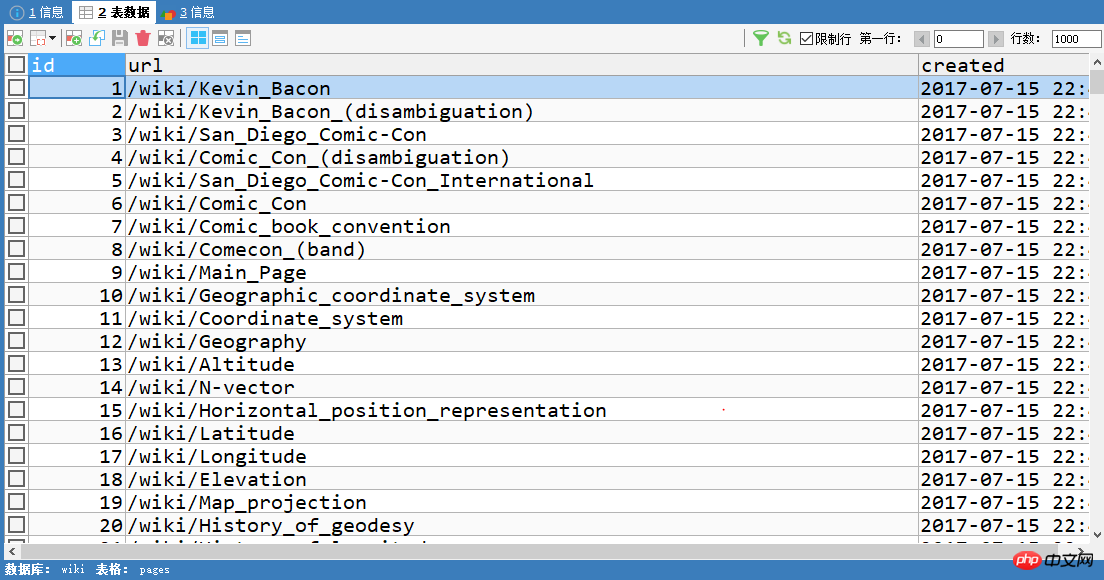
pages表只保存链接url。
CREATE TABLE `pages` (
  `id` int(11) NOT NULL AUTO_INCREMENT,
  `url` varchar(255) DEFAULT NULL,
  `created` timestamp NOT NULL DEFAULT CURRENT_TIMESTAMP,
  PRIMARY KEY (`id`)
)
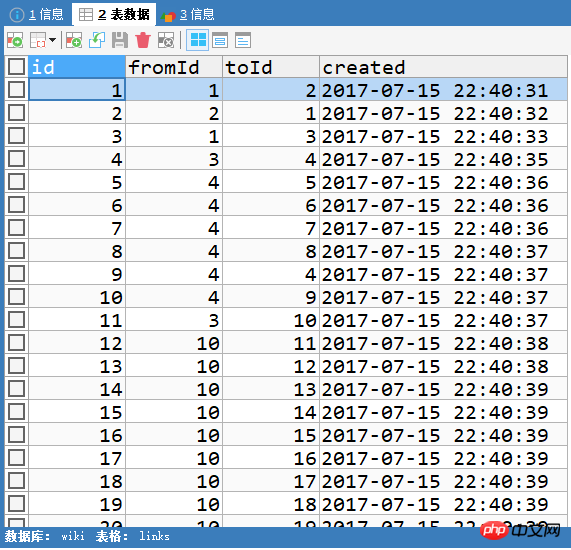
links表保存链接的fromId和toId,这两个id和pages里面的id是一致的。如1 -> 2就是pages里id为1的url页面里可以访问到id为2的url的意思。
CREATE TABLE `links` (
  `id` int(11) NOT NULL AUTO_INCREMENT,
  `fromId` int(11) DEFAULT NULL,
  `toId` int(11) DEFAULT NULL,
  `created` timestamp NOT NULL DEFAULT CURRENT_TIMESTAMP,
  PRIMARY KEY (`id`)
上面的建表语句看起来有点臃肿,我是先用可视化工具建表后,再用show create table pages这样的语句查看的。
import reimport pymysqlimport requestsfrom bs4 import BeautifulSoup

headers = {'User-Agent': 'Mozilla/5.0 (Windows NT 10.0; Win64; x64) AppleWebKit/537.36 (KHTML, like Gecko)'  ' Chrome/52.0.2743.116 Safari/537.36 Edge/15.16193'}

conn = pymysql.connect(host='localhost', user='root', password='admin', db='wiki', charset='utf8')
cur = conn.cursor()def insert_page_if_not_exists(url):
    cur.execute(f"SELECT * FROM pages WHERE url='{url}';")# 这条url没有插入的话if cur.rowcount == 0:# 那就插入cur.execute(f"INSERT INTO pages(url) VALUES('{url}');")
        conn.commit()# 刚插入数据的idreturn cur.lastrowid# 否则已经存在这条数据,因为url一般是唯一的,所以获取一个就行,取脚标0是获得idelse:return cur.fetchone()[0]def insert_link(from_page, to_page):print(from_page, ' -> ', to_page)
    cur.execute(f"SELECT * FROM links WHERE fromId={from_page} AND toId={to_page};")# 如果查询不到数据,则插入,插入需要两个pages的id,即两个urlif cur.rowcount == 0:
        cur.execute(f"INSERT INTO links(fromId, toId) VALUES({from_page}, {to_page});")
        conn.commit()# 链接去重pages = set()# 得到所有链接def get_links(page_url, recursion_level):global pagesif recursion_level == 0:return# 这是刚插入的链接page_id = insert_page_if_not_exists(page_url)
    r = requests.get('https://en.wikipedia.org' + page_url, headers=headers)
    soup = BeautifulSoup(r.text, 'lxml')
    link_tags = soup.find_all('a', href=re.compile('^/wiki/[^:/]*$'))for link_tag in link_tags:# page_id是刚插入的url,参数里再次调用了insert_page...方法,获得了刚插入的url里能去往的url列表# 由此形成联系,比如刚插入的id为1,id为1的url里能去往的id有2、3、4...,则形成1 -> 2, 1 -> 3这样的联系insert_link(page_id, insert_page_if_not_exists(link_tag['href']))if link_tag['href'] not in pages:
            new_page = link_tag['href']
            pages.add(new_page)# 递归查找, 只能递归recursion_level次get_links(new_page, recursion_level - 1)if __name__ == '__main__':try:
        get_links('/wiki/Kevin_Bacon', 5)except Exception as e:print(e)finally:
        cur.close()
        conn.close()
1 -> 2 2 -> 1 1 -> 2 1 -> 3 3 -> 4 4 -> 5 4 -> 6 4 -> 7 4 -> 8 4 -> 4 4 -> 4 4 -> 9 4 -> 9 3 -> 10 10 -> 11 10 -> 12 10 -> 13 10 -> 14 10 -> 15 10 -> 16 10 -> 17 10 -> 18 10 -> 19 10 -> 20 10 -> 21 ...
看打印的信息,一目了然。看前两行打印,pages表里id为1的url可以访问id为2的url,同时pages表里id为2的url可以访问id为1的url...依次类推。
首先需要使用insert_page_if_not_exists(page_url)获得链接的id,然后使用insert_link(fromId, toId)形成联系。fromId是当前页面的url,toId则是从当前页面能够去往的url的id,这些能去往的url用bs4找到以列表形式返回。当前所处的url即page_id,所以需要在insert_link的第二个参数中,再次调用insert_page_if_not_exists(link)以获得列表中每个url的id。由此形成了联系。比如刚插入的id为1,id为1的url里能去往的id有2、3、4...,则形成1 -> 2, 1 -> 3这样的联系。
看下数据库。下面是pages表,每一个id都对应一个url。

然后下面是links表,fromId和toId就是pages中的id。当然和打印的数据是一样的咯,不过打印了看看就过去了,存下来的话哪天需要分析这些数据就大有用处了。

Ce qui précède est le contenu détaillé de. pour plus d'informations, suivez d'autres articles connexes sur le site Web de PHP en chinois!

