Maison >Java >javaDidacticiel >Explication détaillée de l'introduction de Spring Boot à JAVA (web+freemarker)
Explication détaillée de l'introduction de Spring Boot à JAVA (web+freemarker)
- 怪我咯original
- 2017-06-30 10:49:481224parcourir
Cet article présente principalement les informations pertinentes pour démarrer avec Spring Boot (web+freemarker) Les amis qui en ont besoin peuvent s'y référer
1 Configurez le fichier maven pom.xml
<?xml version="1.0" encoding="UTF-8"?>
<project xmlns="http://maven.apache.org/POM/4.0.0"
     xmlns:xsi="http://www.w3.org/2001/XMLSchema-instance"
     xsi:schemaLocation="http://maven.apache.org/POM/4.0.0 http://maven.apache.org/xsd/maven-4.0.0.xsd">
  <modelVersion>4.0.0</modelVersion>
  <groupId>com.hdwang</groupId>
  <artifactId>spring-boot-test</artifactId>
  <version>1.0-SNAPSHOT</version>
  <name>spring-boot-test</name>
  <description>project for test Spring Boot</description>
  <properties>
    <project.build.sourceEncoding>UTF-8</project.build.sourceEncoding>
    <java.version>1.8</java.version>
  </properties>
  <!-- Inherit defaults from Spring Boot -->
  <parent>
    <groupId>org.springframework.boot</groupId>
    <artifactId>spring-boot-starter-parent</artifactId>
    <version>1.5.4.RELEASE</version>
    <relativePath/>
  </parent>
  <dependencies>
    <!-- Add typical dependencies for a web application -->
    <dependency>
      <groupId>org.springframework.boot</groupId>
      <artifactId>spring-boot-starter-web</artifactId>
    </dependency>
    <dependency>
      <groupId>org.springframework.boot</groupId>
      <artifactId>spring-boot-starter-freemarker</artifactId>
    </dependency>
    <!-- auto redeploy -->
    <dependency>
      <groupId>org.springframework.boot</groupId>
      <artifactId>spring-boot-devtools</artifactId>
      <optional>true</optional>
    </dependency>
  <!-- Package as an executable jar -->
  <build>
    <plugins>
      <plugin>
        <groupId>org.springframework.boot</groupId>
        <artifactId>spring-boot-maven-plugin</artifactId>
      </plugin>
    </plugins>
  </build>
</project>
@SpringBootApplication
public class Application {
  /**
   * main function
   * @param args params
   */
  public static void main(String[] args){
    SpringApplication.run(Application.class,args);
  }
}
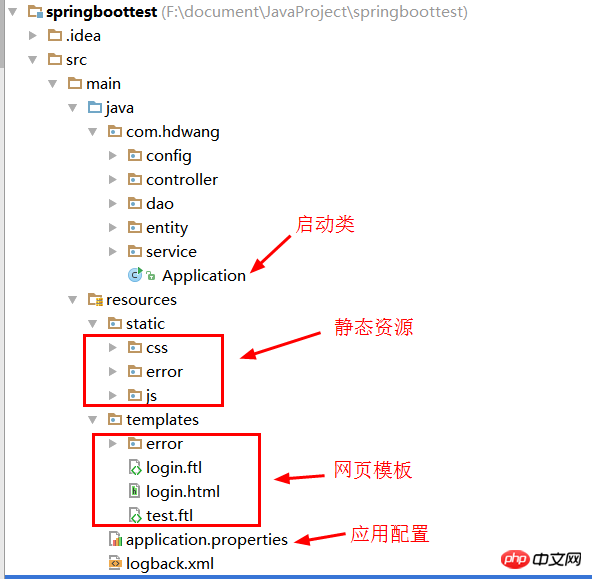
4. Créez un contrôleur (dans le répertoire inférieur de la classe Application) @Controller
@RequestMapping("/common")
public class Common {
@Value("${msg:Welcome!}")
private String msg;
/**
* get a page
* @return a page with name called return value
*/
@RequestMapping("login")
public String getLoginPage(ModelMap map){
map.put("welcomeMsg",this.msg);
return "login";
}
}5. un modèle de page Web login.ftl (Freemarker doit utiliser le suffixe ftl, et cela fait longtemps que je me laisse berner ! js/css et ainsi de suite sont placés dans les dossiers correspondants. Notez que /static n'est pas inclus dans l'accès chemin. J'ai aussi été dupé par ça depuis longtemps !) <!DOCTYPE html>
<html>
<head>
<meta charset="UTF-8" />
<title>login</title>
<link href="/css/home.css" rel="external nofollow" rel="stylesheet" type="text/css" />
<script type="text/javascript" src="/js/jquery-2.0.3.min.js"></script>
<script type="text/javascript" src="/js/home.js"></script>
</head>
<body>
<h1>login page</h1>
<h2>${welcomeMsg}</h2>
<form>
<p>
<label>用户名:<input type="text" id="username"/></label>
</p>
<p>
<label>密码:<input type="password"/></label>
</p>
<p>
<input type="submit" value="提交"/>
<input type="reset" value="重置" />
</p>
</form>
</body>
</html>6. Appliquez le fichier de configuration écrivez
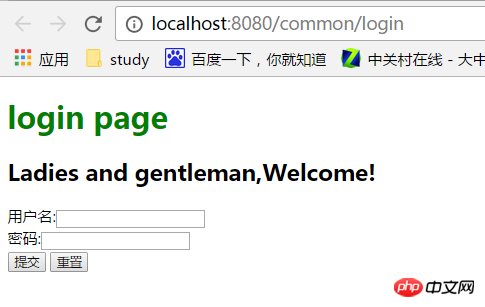
créez un nouveau fichier application.properties. et ajoutez le contenu suivantmsg=Ladies and gentleman,Welcome!7. Démarrez et exécutez le navigateur Visitez : http://localhost:8080/common/login

Ce qui précède est le contenu détaillé de. pour plus d'informations, suivez d'autres articles connexes sur le site Web de PHP en chinois!
Déclaration:
Le contenu de cet article est volontairement contribué par les internautes et les droits d'auteur appartiennent à l'auteur original. Ce site n'assume aucune responsabilité légale correspondante. Si vous trouvez un contenu suspecté de plagiat ou de contrefaçon, veuillez contacter admin@php.cn

