Maison >interface Web >js tutoriel >Exemple de code pour utiliser JS pour implémenter un carrousel d'images en HTML
Exemple de code pour utiliser JS pour implémenter un carrousel d'images en HTML
- 零下一度original
- 2017-06-28 09:38:574907parcourir
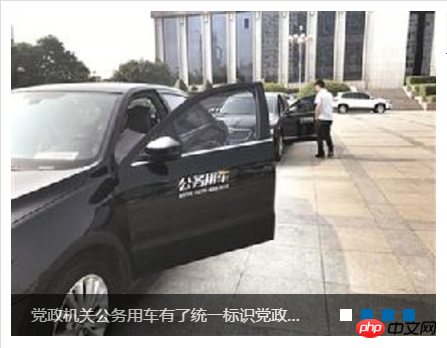
1. Le premier est le rendu. Pour obtenir l'effet carrousel de l'image suivante sur la page Web, il y a quatre images, chaque image a son propre titre, puis il y a une petite case dans le coin inférieur droit. Passez la souris sur la petite case sur le cadre, elle passera à l'image correspondante.

2. Le premier est le contenu en HTML. La couche la plus externe est le conteneur entier de l'image carrousel "slideShowContainer", et l'intérieur est "picUl". utilisé pour contenir les images. Et "dotUl" est utilisé pour afficher la petite boîte, et "titleDiv" est utilisé pour contenir le titre.
<em><div id="slideShowContainer"><br> <ul id="picUl"><br> <li><a href="#"><img src="img/lunbo1.jpg" alt=""/></a></li><br> <li><a href="#"><img src="img/lunbo2.jpg" alt=""/></a></li><br> <li><a href="#"><img src="img/lunbo3.jpg" alt=""/></a></li><br> <li><a href="#"><img src="img/lunbo4.jpg" alt=""/></a></li><br> </ul><br> <ul id="dotUl"><br> <li class="selected">1</li><br> <li class="unselected">2</li><br> <li class="unselected">3</li><br> <li class="unselected">4</li><br> </ul><br> <div id="titleDiv"><br> <span class="show"><a href="#">党政机关公务用车有了统一标识</a></span><br> <span class="hide"><a href="#">“洛阳创新”亮相第52届巴黎航展</a></span><br> <span class="hide"><a href="#">中国河洛乡愁摄影主题公园揭牌</a></span><br> <span class="hide"><a href="#">洛阳机场建成生态停车场</a></span><br> </div><br></div><br><br>3.然后是css中的样式<br></em>
#slideShowContainer{
    width: 425px;
    height: 325px;
    margin-top: 10px;
    margin-left: 10px;
    overflow: hidden;
    position: relative;
}
#slideShowContainer img{
    width: 425px;
    height: 325px;
    transition: all 0.6s;
}
#slideShowContainer img:hover{
    transform: scale(1.07);
}
#picUl{
    list-style: none;
}
#dotUl{
    list-style: none;
    display: flex;
    flex-direction: row;
    position: absolute;  //使用绝对布局,固定于左下角
    right: 21px;
    bottom: 15px;
    z-index: 2;  //通过设置z-index的值大于#titleDiv中z-index的值,使其浮在标题栏的上方
}
#titleDiv{
    position: absolute;
    width: 100%;
    height: 42px;
    bottom: 0px;
    left: 0px;
    background-color: #000000;
    opacity:0.6;  //设置透明度,实现标题栏半透明效果
    z-index: 1;
}
#titleDiv>span{
    line-height: 42px;
    color: #FFFFFF;
    margin-left: 20px;
    width: 270px;
    overflow: hidden;
    text-overflow: ellipsis;
    white-space: nowrap;
}
#titleDiv>span>a{
    color: #FFFFFF;
}
.selected{
    width: 12px;
    height: 12px;
    background-color: #FFFFFF;
    color: transparent;
    margin-left: 9px;
}
.unselected{
    width: 12px;
    height: 12px;
    background-color: #0069AD;
    color: transparent;
    margin-left: 9px;
}
.hide{
    display: none;
}
.show{
    display: block;
}
<em>4.通过js控制,动态修改相应的样式,达到图片轮播的效果<br></em>
/*图片轮播*/
var slideShowContainer = document.getElementById("slideShowContainer");
var pic = document.getElementById("picUl").getElementsByTagName("li");
var dot = document.getElementById("dotUl").getElementsByTagName("li");
var title = document.getElementById("titleDiv").getElementsByTagName("span");
var index = 0;
var timer = null;
/*定义图片切换函数*/
function changePic (curIndex) {
    for(var i = 0;i < pic.length;++i){
        pic[i].style.display = "none";
        dot[i].className = "unselected";
        title[i].className = "hide"
    }
    pic[curIndex].style.display = "block";
    dot[curIndex].className = "selected";
    title[curIndex].className = "show";
}
/*index超出图片总量时归零*/
function autoPlay(){
    if(+index >= pic.length){
        index = 0;
    }
    changePic(index);
    index++;
}
/*定义并调用自动播放函数*/
timer = setInterval(autoPlay,1500);
/*鼠标划过整个容器时停止自动播放*/
slideShowContainer.onmouseover = function(){
    clearInterval(timer);
}
/*鼠标离开整个容器时继续播放下一张*/
slideShowContainer.onmouseout = function(){
    timer = setInterval(autoPlay,1500);
}
/*遍历所有数字导航实现划过切换至对应的图片*/
for(var i = 0;i < dot.length;i++){
    dot[i].onmouseover = function(){
        clearInterval(timer);
        index = this.innerText-1;
        changePic(index)
    }
}
Ce qui précède est le contenu détaillé de. pour plus d'informations, suivez d'autres articles connexes sur le site Web de PHP en chinois!
Articles Liés
Voir plus- Une analyse approfondie du composant de groupe de liste Bootstrap
- Explication détaillée du currying de la fonction JavaScript
- Exemple complet de génération de mot de passe JS et de détection de force (avec téléchargement du code source de démonstration)
- Angularjs intègre l'interface utilisateur WeChat (weui)
- Comment basculer rapidement entre le chinois traditionnel et le chinois simplifié avec JavaScript et l'astuce permettant aux sites Web de prendre en charge le basculement entre les compétences en chinois simplifié et traditionnel_javascript

