Maison >Java >javaDidacticiel >JAVA : pratique des expressions OGNL
JAVA : pratique des expressions OGNL
- 怪我咯original
- 2017-06-26 11:23:124629parcourir
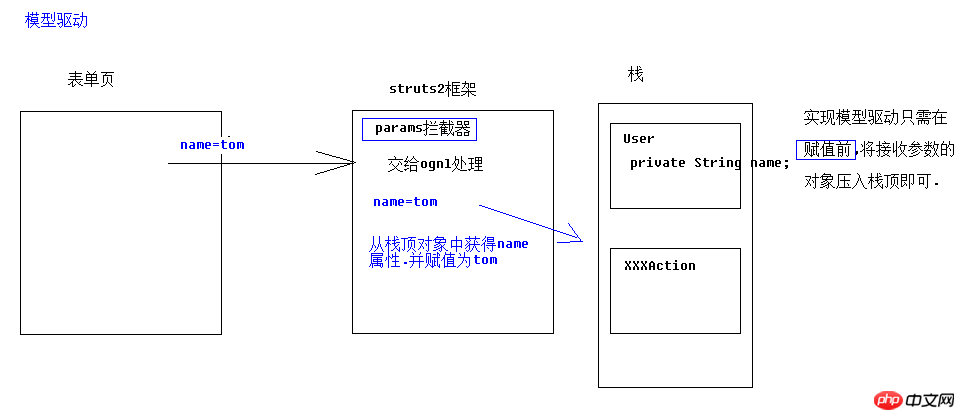
1. Expression OGNL
1. Introduction
OGNL : langage de navigation dans la vue objet ${user.addr.name} Cette façon d'écrire est appelée un. objet Afficher la navigation.
OGNL peut non seulement afficher la navigation, mais prend également en charge des fonctions plus riches que les expressions EL.
2. Utiliser la préparation OGNL
2.1 Importer le package
Le package struts2 est déjà inclus, il n'est donc pas nécessaire d'importer des packages jar supplémentaires
2.2 Préparation du code


    @Test//准备工作public void fun1() throws Exception{//准备OGNLContext//准备RootUser rootUser = new User("tom",18);//准备ContextMap<String,User> context = new HashMap<String,User>();
            context.put("user1", new User("jack",18));
            context.put("user2", new User("rose",22));
        OgnlContext oc = new OgnlContext();//将rootUser作为root部分        oc.setRoot(rootUser);//将context这个Map作为Context部分        oc.setValues(context);//书写OGNLOgnl.getValue("", oc, oc.getRoot());
}3. Démonstration de la syntaxe de base


        //取出root中user对象的name属性String name = (String) Ognl.getValue("name", oc, oc.getRoot());
        Integer age = (Integer) Ognl.getValue("age", oc, oc.getRoot());
        System.out.println(name);
        System.out.println(age);

        //取出context中键为user1对象的name属性String name = (String) Ognl.getValue("#user1.name", oc, oc.getRoot());
        String name2 = (String) Ognl.getValue("#user2.name", oc, oc.getRoot());
        Integer age = (Integer) Ognl.getValue("#user2.age", oc, oc.getRoot());
        System.out.println(name);
        System.out.println(name2);
        System.out.println(age);

        //将root中的user对象的name属性赋值Ognl.getValue("name='jerry'", oc, oc.getRoot());
        String name = (String) Ognl.getValue("name", oc, oc.getRoot());

        String name2 = (String) Ognl.getValue("#user1.name='郝强勇',#user1.name", oc, oc.getRoot());
        System.out.println(name);
        System.out.println(name2);

        //调用root中user对象的setName方法Ognl.getValue("setName('lilei')", oc, oc.getRoot());
        String name = (String) Ognl.getValue("getName()", oc, oc.getRoot());
        String name2 = (String) Ognl.getValue("#user1.setName('lucy'),#user1.getName()", oc, oc.getRoot());

        System.out.println(name);
        System.out.println(name2);

        String name = (String) Ognl.getValue("@cn.itheima.a_ognl.HahaUtils@echo('hello 强勇!')", oc, oc.getRoot());//Double pi = (Double) Ognl.getValue("@java.lang.Math@PI", oc, oc.getRoot());Double pi = (Double) Ognl.getValue("@@PI", oc, oc.getRoot());
        System.out.println(name);
        System.out.println(pi);

        //创建list对象Integer size = (Integer) Ognl.getValue("{'tom','jerry','jack','rose'}.size()", oc, oc.getRoot());
        String name = (String) Ognl.getValue("{'tom','jerry','jack','rose'}[0]", oc, oc.getRoot());
        String name2 = (String) Ognl.getValue("{'tom','jerry','jack','rose'}.get(1)", oc, oc.getRoot());    /*System.out.println(size);
        System.out.println(name);
        System.out.println(name2);*///创建Map对象Integer size2 = (Integer) Ognl.getValue("#{'name':'tom','age':18}.size()", oc, oc.getRoot());
        String name3  = (String) Ognl.getValue("#{'name':'tom','age':18}['name']", oc, oc.getRoot());
        Integer age  = (Integer) Ognl.getValue("#{'name':'tom','age':18}.get('age')", oc, oc.getRoot());
        System.out.println(size2);
        System.out.println(name3);
        System.out.println(age);
二、OGNL与Struts2的结合
1.结合原理

ValueStack中的两部分

2.栈原理

栈是由ArrayList模拟的

栈中的两个方法的实现

访问栈中属性的特点.由上到下

3.查看值栈中两部分内容(使用DEBUG标签)
3.1Root
默认情况下,栈中放置当前访问的Action对象

3.2Context


Context部分就是ActionContext数据中心
4.struts2与ognl结合体现
4.1参数接收


如何获得值栈对象,值栈对象与ActionContext对象是互相引用的
//压入栈顶//1获得值栈ValueStack vs = ActionContext.getContext().getValueStack();//2将u压入栈顶vs.push(u);
4.2配置文件中


<action name="Demo3Action" class="cn.itheima.d_config.Demo3Action" method="execute" ><result name="success" type="redirectAction" ><param name="actionName">Demo1Action</param><param name="namespace">/</param><!-- 如果添加的参数struts"看不懂".就会作为参数附加重定向的路径之后.
如果参数是动态的.可以使用${}包裹ognl表达式.动态取值 --><param name="name">${name}</param></result></action>5.扩展:request对象的getAttribute方法
查找顺序:

三、练习:客户列表


    public String list() throws Exception {//1 接受参数String cust_name = ServletActionContext.getRequest().getParameter("cust_name");//2 创建离线查询对象DetachedCriteria dc =DetachedCriteria.forClass(Customer.class);//3 判断参数拼装条件if(StringUtils.isNotBlank(cust_name)){
            dc.add(Restrictions.like("cust_name", "%"+cust_name+"%"));
        }//4 调用Service将离线对象传递List<Customer> list = cs.getAll(dc);//5 将返回的list放入request域.转发到list.jsp显示        //ServletActionContext.getRequest().setAttribute("list", list);// 放到ActionContextActionContext.getContext().put("list", list);        return "list";
    }

<s:iterator value="#list" var="cust" >
    <TR
        style="FONT-WEIGHT: normal; FONT-STYLE: normal; BACKGROUND-COLOR: white; TEXT-DECORATION: none">
        <TD>
            <s:property value="#cust.cust_name" />
        </TD>
        <TD>
        <s:property value="#cust.cust_level" />
        </TD>
        <TD>
        <s:property value="#cust.cust_source" />
        </TD>
        <TD>
        <s:property value="#cust.cust_linkman" />
        </TD>
        <TD>
        <s:property value="#cust.cust_phone" />
        </TD>
        <TD>
        <s:property value="#cust.cust_mobile" />
        </TD>
        <TD>
        <a href="${pageContext.request.contextPath }/customerServlet?method=edit&custId=${customer.cust_id}">修改</a>
          <a href="${pageContext.request.contextPath }/customerServlet?method=delete&custId=${customer.cust_id}">删除</a>
        </TD>
    </TR>
    </s:iterator>
    <%-- <s:iterator value="#list"  >
    <TR
        style="FONT-WEIGHT: normal; FONT-STYLE: normal; BACKGROUND-COLOR: white; TEXT-DECORATION: none">
        <TD>
            <s:property value="cust_name" />
        </TD>
        <TD>
        <s:property value="cust_level" />
        </TD>
        <TD>
        <s:property value="cust_source" />
        </TD>
        <TD>
        <s:property value="cust_linkman" />
        </TD>
        <TD>
        <s:property value="cust_phone" />
        </TD>
        <TD>
        <s:property value="cust_mobile" />
        </TD>
        <TD>
        <a href="${pageContext.request.contextPath }/customerServlet?method=edit&custId=${customer.cust_id}">修改</a>
          <a href="${pageContext.request.contextPath }/customerServlet?method=delete&custId=${customer.cust_id}">删除</a>
        </TD>
    </TR>
</s:iterator> --%> 注意:

Ce qui précède est le contenu détaillé de. pour plus d'informations, suivez d'autres articles connexes sur le site Web de PHP en chinois!

