Maison >développement back-end >Tutoriel C#.Net >Utiliser Shape pour créer un exemple de code d'animation
Utiliser Shape pour créer un exemple de code d'animation
- 零下一度original
- 2018-05-11 17:33:432938parcourir
Par rapport à WPF/Silverlight, on peut dire que le système d'animation d'UWP a été grandement amélioré. Cependant, cet article n'a pas l'intention de discuter en profondeur de ces API d'animation. Cet article présentera l'utilisation de Shape pour faire des progrès. et des animations d'attente. De plus, il introduira également certaines compétences connexes.
1. Utilisez StrokeDashOffset pour créer l'animation de l'invite d'attente
L'animation circulaire de l'invite d'attente est très simple à réaliser, il suffit de la laisser tourner :
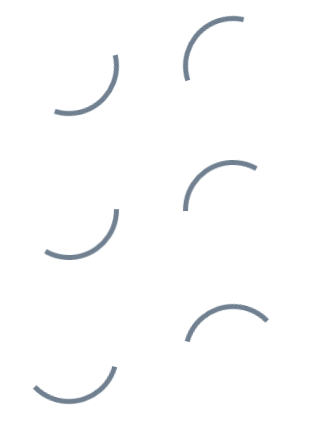
Mais les formes autres que les cercles ne sont pas faciles à réaliser, comme les triangles. Vous ne pouvez pas simplement le laisser tourner :
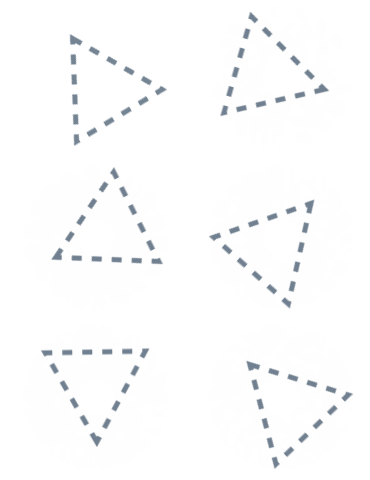
Pour résoudre ce problème, vous pouvez utiliser. StrokeDashOffset. StrokeDashOffset est utilisé pour contrôler le déplacement de la première ligne courte de la bordure en pointillé par rapport au point de départ de la forme. L'utilisation d'une animation pour contrôler cette valeur peut créer un effet de défilement de bordure :
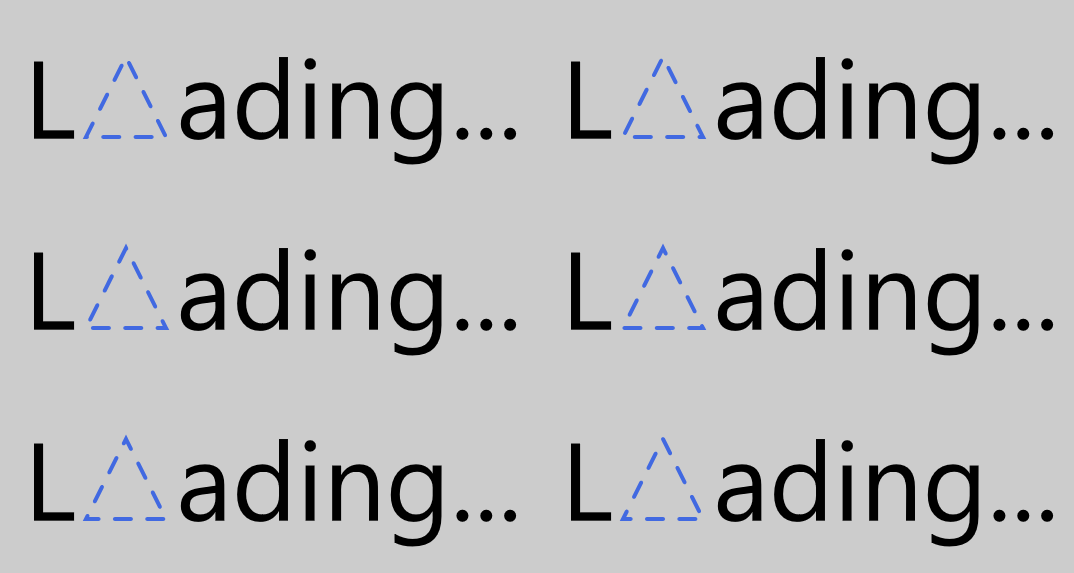
<Page.Resources><Storyboard x:Name="ProgressStoryboard"><DoubleAnimationUsingKeyFrames EnableDependentAnimation="True"
Storyboard.TargetProperty="(Shape.StrokeDashOffset)"
Storyboard.TargetName="triangle"><EasingDoubleKeyFrame KeyTime="0:1:0"
Value="-500" /></DoubleAnimationUsingKeyFrames></Storyboard></Page.Resources><Grid Background="#FFCCCCCC"><Grid Height="100"
HorizontalAlignment="Center"><StackPanel Orientation="Horizontal"
VerticalAlignment="Center"><TextBlock Text="L"
FontSize="55"
Margin="0,0,5,4" /><local:Triangle x:Name="triangle"
Height="40"
Width="40"
StrokeThickness="2"
Stroke="RoyalBlue"
StrokeDashArray="4.045 4.045"
StrokeDashOffset="0.05"
StrokeDashCap="Round" /><TextBlock Text="ading..."
FontSize="55"
Margin="5,0,0,4" /></StackPanel></Grid></Grid>
Il convient de noter que la longueur du côté de la Shape doit être exactement divisible par la somme des lignes courtes et des espaces dans le StrokeDashArray, c'est-à-dire qu'elle satisfait 边长 / StrokeThickness % Sum( StrokeDashArray ) = 0. être coupé là où StrokeDashOffset=0, comme le montre la figure suivante :
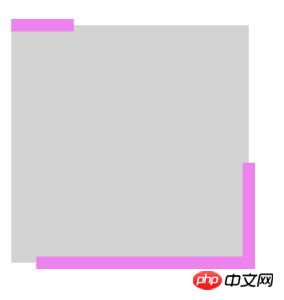
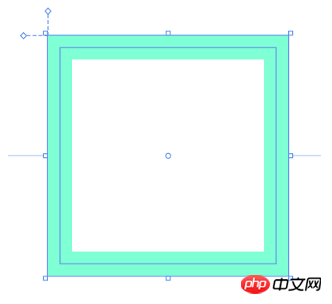
Une autre chose à noter est le calcul de la longueur du côté. Par exemple, dans Rectangle, le côté. la longueur n'est pas (Height + Width) * 2, mais (Height - StrokeThickness) * 2 + (Width- StrokeThickness) * 2 Comme le montre la figure ci-dessous, la longueur du côté doit être calculée à partir du milieu de la bordure :
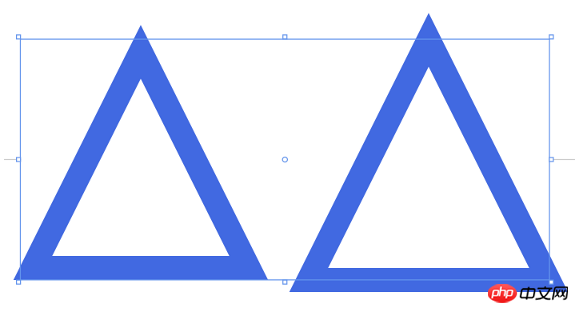
La. le calcul de la longueur des côtés de certaines formes sera également affecté par l'étirement, comme le Triangle personnalisé dans l'article précédent :
<StackPanel Orientation="Horizontal" HorizontalAlignment="Center"><Grid Height="50"
Width="50"><local:Triangle Stretch="Fill"
StrokeThickness="5"
Stroke="RoyalBlue" /></Grid><Grid Height="50"
Width="50"
Margin="10,0,0,0"><local:Triangle Stretch="None"
StrokeThickness="5"
Stroke="RoyalBlue" /></Grid></StackPanel>
2. Utilisez StrokeDashArray pour l'animation de l'invite de progression
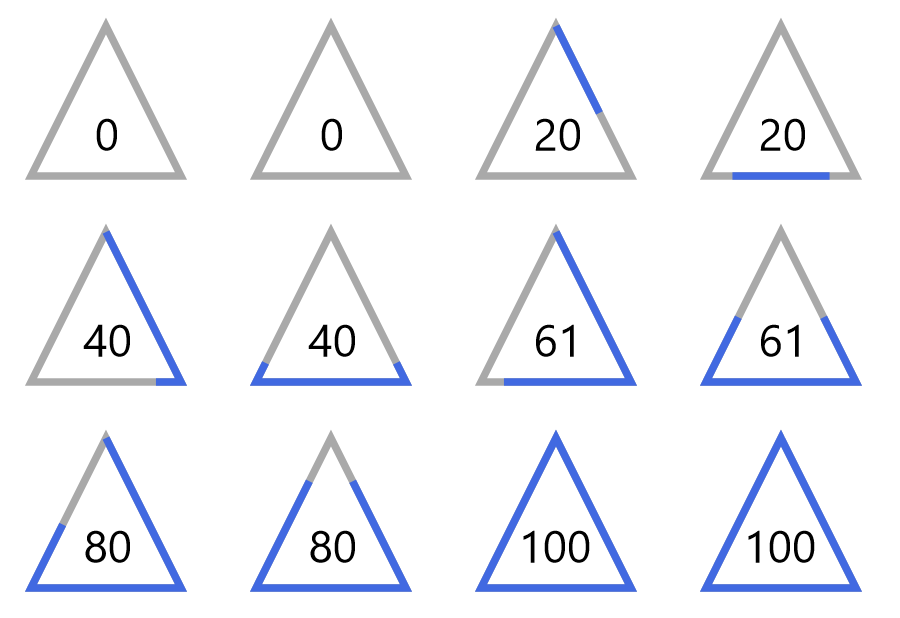
StrokeDashArray est utilisé pour changer la bordure de Shape en ligne pointillée. La valeur de StrokeDashArray est un type double ordonné. Une collection dont les valeurs spécifient la longueur de chaque segment. dans la ligne pointillée en unités de StrokeThickness. La méthode de base pour utiliser StrokeDashArray comme rappel de progression consiste à convertir la progression en un StrokeDashArray divisé en deux segments via un convertisseur. Le premier segment est une ligne continue, indiquant la progression actuelle, et le deuxième segment est vide. Supposons que la longueur du côté d'une forme est de 100 et que la progression actuelle est de 50, puis définissez StrokeDashArray sur deux segments {50, double.MaxValue}.
est animé comme indiqué ci-dessous :
<Page.Resources><Style TargetType="TextBlock"><Setter Property="FontSize"
Value="12" /></Style><local:ProgressToStrokeDashArrayConverter x:Key="ProgressToStrokeDashArrayConverter"
TargetPath="{Binding ElementName=Triangle}" /><local:ProgressToStrokeDashArrayConverter2 x:Key="ProgressToStrokeDashArrayConverter2"
TargetPath="{Binding ElementName=Triangle}" />
<toolkit:StringFormatConverter x:Key="StringFormatConverter" /><local:ProgressWrapper x:Name="ProgressWrapper" /><Storyboard x:Name="Storyboard1"><DoubleAnimation Duration="0:0:5"
To="100"
Storyboard.TargetProperty="Progress"
Storyboard.TargetName="ProgressWrapper"
EnableDependentAnimation="True" /></Storyboard></Page.Resources><Grid Background="{ThemeResource ApplicationPageBackgroundThemeBrush}"><Viewbox Height="150"><StackPanel Orientation="Horizontal"><Grid><local:Triangle Height="40"
Width="40"
StrokeThickness="2"
Stroke="DarkGray" /><local:Triangle x:Name="Triangle"
Height="40"
Width="40"
StrokeThickness="2"
Stroke="RoyalBlue"
StrokeDashArray="{Binding Progress,Source={StaticResource ProgressWrapper},Converter={StaticResource ProgressToStrokeDashArrayConverter}}" /><TextBlock Text="{Binding Progress,Source={StaticResource ProgressWrapper},Converter={StaticResource StringFormatConverter},ConverterParameter='{}{0:0}'}"
HorizontalAlignment="Center"
VerticalAlignment="Center"
Margin="0,15,0,0" /></Grid><Grid Margin="20,0,0,0"><local:Triangle Height="40"
Width="40"
StrokeThickness="2"
Stroke="DarkGray" /><local:Triangle x:Name="Triangle2"
Height="40"
Width="40"
StrokeThickness="2"
Stroke="RoyalBlue"
StrokeDashArray="{Binding Progress,Source={StaticResource ProgressWrapper},Converter={StaticResource ProgressToStrokeDashArrayConverter2}}" /><TextBlock Text="{Binding Progress,Source={StaticResource ProgressWrapper},Converter={StaticResource StringFormatConverter},ConverterParameter='{}{0:0}'}"
HorizontalAlignment="Center"
VerticalAlignment="Center"
Margin="0,15,0,0" /></Grid></StackPanel></Viewbox></Grid>Les codes de ProgressToStrokeDashArrayConverter et ProgressToStrokeDashArrayConverter2 sont les suivants :
public class ProgressToStrokeDashArrayConverter : DependencyObject, IValueConverter
{/// <summary>/// 获取或设置TargetPath的值/// </summary>  public Path TargetPath
    {
    get { return (Path)GetValue(TargetPathProperty);
     }
    set {
     SetValue(TargetPathProperty, value);
    }
    }/// <summary>/// 标识 TargetPath 依赖属性。///
    </summary>public static readonly DependencyProperty TargetPathProperty =
        DependencyProperty.Register("TargetPath", typeof(Path), typeof(ProgressToStrokeDashArrayConverter), new PropertyMetadata(null));public virtual object Convert(object value, Type targetType, object parameter, string language)
    {
    if (value is double == false)return null;

        var progress = (double)value;if (TargetPath == null)return null;var totalLength = GetTotalLength();
        var firstSection = progress * totalLength / 100 / TargetPath.StrokeThickness;if (progress == 100)
            firstSection = Math.Ceiling(firstSection);var result = new DoubleCollection {
            firstSection, double.MaxValue };return result;
    }public object ConvertBack(object value, Type targetType, object parameter, string language)
    {throw new NotImplementedException();
    }protected double GetTotalLength()
    {var geometry = TargetPath.Data as PathGeometry;
    if (geometry == null)
    return 0;
    if (geometry.Figures.Any() == false)return 0;
    var figure = geometry.Figures.FirstOrDefault();
    if (figure == null)
    return 0;
    var totalLength = 0d;
    var point = figure.StartPoint;
    foreach (var item in figure.Segments)
        {
        var segment = item as LineSegment;
        if (segment == null)
        return 0;

            totalLength += Math.Sqrt(Math.Pow(point.X - segment.Point.X, 2) + Math.Pow(point.Y - segment.Point.Y, 2));
            point = segment.Point;
        }

        totalLength += Math.Sqrt(Math.Pow(point.X - figure.StartPoint.X, 2) + Math.Pow(point.Y - figure.StartPoint.Y, 2));
        return totalLength;
    }
}
public class ProgressToStrokeDashArrayConverter2 : ProgressToStrokeDashArrayConverter
{
public override object Convert(object value, Type targetType, object parameter, string language)
    {
    if (value is double == false)return null;

        var progress = (double)value;
        if (TargetPath == null)
        return null;
        var totalLength = GetTotalLength();
        totalLength = totalLength / TargetPath.StrokeThickness;
        var thirdSection = progress * totalLength / 100;
        if (progress == 100)
            thirdSection = Math.Ceiling(thirdSection);

        var secondSection = (totalLength - thirdSection) / 2;
        var result = new DoubleCollection { 0, secondSection, thirdSection, double.MaxValue };
        return result;
    }
}
Dû to Le code est juste à titre de démonstration, protected double GetTotalLength() est écrit de manière relativement décontractée. Vous pouvez voir que ces deux convertisseurs héritent de DependencyObject car TargetPath doit se voir attribuer une valeur via la liaison.
Il existe une autre classe ProgressWrapper ici :
public class ProgressWrapper : DependencyObject
{/// <summary>/// 获取或设置Progress的值/// </summary>  public double Progress
    {get { return (double)GetValue(ProgressProperty); }set { SetValue(ProgressProperty, value); }
    }/// <summary>/// 标识 Progress 依赖属性。///
    </summary>public static readonly DependencyProperty ProgressProperty =
        DependencyProperty.Register("Progress", typeof(double), typeof(ProgressWrapper), new PropertyMetadata(0d));
}
Comme il n'y a pas de double attribut pour le fonctionnement du Storyboard, cette classe est utilisée comme pont entre Storyboard et StrokeDashArray. Il existe également une classe BindableValueHolder dans UWPCommunityToolkit avec une utilisation similaire. Cette classe est relativement polyvalente, vous pouvez vous référer à son utilisation.
3. Utilisez Behaviour pour améliorer le code d'animation de l'invite de progression
C'est juste une animation, c'est un convertisseur, un wrapper et une liaison, cela semble très compliqué. sur la Shape C'est beaucoup plus pratique. À ce stade, des attributs supplémentaires seront d'abord pris en compte. L'utilisation en XAML est la suivante :
<UserControl.Resources>
  <Storyboard x:Name="Storyboard1"><DoubleAnimation Duration="0:0:5"
  To="100"
  Storyboard.TargetProperty="(local:PathExtention.Progress)"
  Storyboard.TargetName="Triangle" />
  </Storyboard></UserControl.Resources><Grid x:Name="LayoutRoot"
  Background="White"><local:Triangle x:Name="Triangle"
  Height="40"
  local:PathExtention.Progress="0"
  Width="40"
  StrokeThickness="2"
  Stroke="RoyalBlue" ></local:Triangle></Grid>
Mais en fait, cela n'est pas réalisable. XAML a une limitation qui existe depuis longtemps : Cependant, une limitation existante de l’implémentation XAML de Windows Runtime est que vous ne pouvez pas animer une propriété attachée personnalisée. Cette limitation détermine que XAML ne peut pas animer les propriétés attachées personnalisées. Cependant, cette restriction limite uniquement la possibilité d'animer les attributs personnalisés attachés eux-mêmes, mais peut animer les attributs des classes dans les attributs attachés. Par exemple, la méthode d'écriture suivante devrait être réalisable :
<UserControl.Resources>
  <Storyboard x:Name="Storyboard1"><DoubleAnimation Duration="0:0:5"
  To="100"
  Storyboard.TargetProperty="(local:PathExtention.Progress)"
  Storyboard.TargetName="TrianglePathExtention" />
  </Storyboard></UserControl.Resources><Grid x:Name="LayoutRoot"
  Background="White"><local:Triangle x:Name="Triangle"
  Height="40"
  Width="40"
  StrokeThickness="2"
  Stroke="RoyalBlue" >  <local:PathHelper><local:PathExtention x:Name="TrianglePathExtention"
  Progress="0" />  </local:PathHelper></local:Triangle></Grid>
A. Une manière d'écrire plus élégante consiste à utiliser XamlBehaviors. Cet article explique très bien le rôle de XamlBehaviors :
XAML Behaviors非常重要,因为它们提供了一种方法,让开发人员能够以一种简洁、可重复的方式轻松地向UI对象添加功能。
他们无需创建控件的子类或重复编写逻辑代码,只要简单地增加一个XAML代码片段。
Pour utiliser Behaviour pour améliorer le code existant, implémentez simplement un PathProgressBehavior :
public class PathProgressBehavior : Behavior<UIElement>
{protected override void OnAttached()
    {base.OnAttached();UpdateStrokeDashArray();
    }/// <summary>/// 获取或设置Progress的值/// </summary>  public double Progress
    {get { return (double)GetValue(ProgressProperty); }set { SetValue(ProgressProperty, value); }
    }/*Progress DependencyProperty*/protected virtual void OnProgressChanged(double oldValue, double newValue)
    {UpdateStrokeDashArray();
    }protected virtual double GetTotalLength(Path path)
    {/*some code*/}private void UpdateStrokeDashArray()
    {
    var target = AssociatedObject as Path;if (target == null)return;double progress = Progress;
    //if (target.ActualHeight == 0 || target.ActualWidth == 0)//
    return;
    if (target.StrokeThickness == 0)
    return;
    var totalLength = GetTotalLength(target);
    var firstSection = progress * totalLength / 100 / target.StrokeThickness;
    if (progress == 100)
            firstSection = Math.Ceiling(firstSection);
            var result = new DoubleCollection {
             firstSection, double.MaxValue
             };
        target.StrokeDashArray = result;
    }
}
Utilisez comme suit en XAML :
<UserControl.Resources>
  <Storyboard x:Name="Storyboard1"><DoubleAnimation Duration="0:0:5"
  To="100"
  Storyboard.TargetProperty="Progress"
  Storyboard.TargetName="PathProgressBehavior"
  EnableDependentAnimation="True"/>
  </Storyboard></UserControl.Resources><Grid x:Name="LayoutRoot"
  Background="White">
  <local:Triangle x:Name="Triangle"
  Height="40"
  local:PathExtention.Progress="0"
  Width="40"
  StrokeThickness="2"
  Stroke="RoyalBlue" ><interactivity:Interaction.Behaviors>
  <local:PathProgressBehavior x:Name="PathProgressBehavior" /></interactivity:Interaction.Behaviors>
  </local:Triangle></Grid>
Cela aura l'air beaucoup plus propre.
4. Imitez l'animation de remplissage d'arrière-plan
Jetons d'abord un coup d'œil à l'effet :
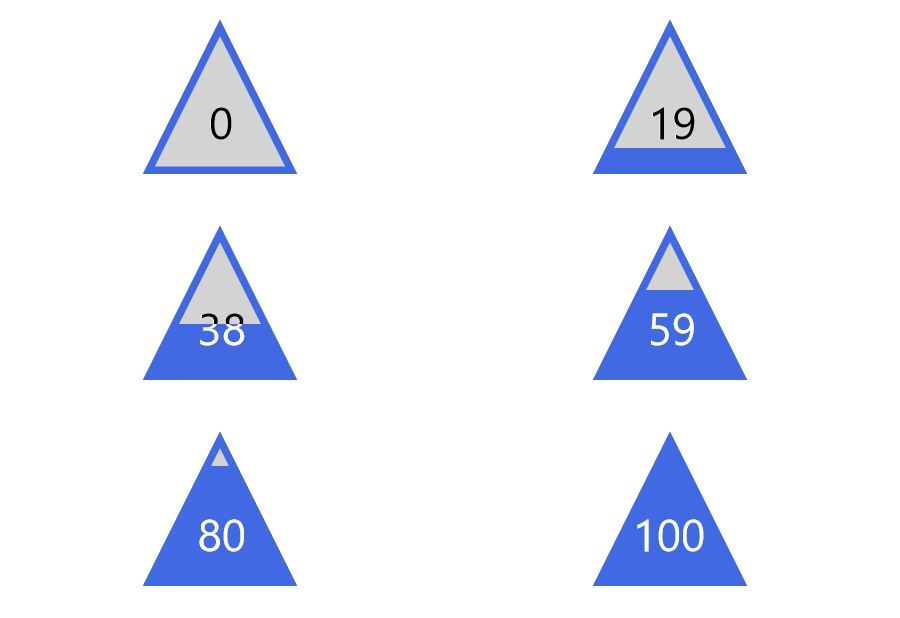
其实这篇文章里并不会讨论填充动画,不过首先声明做填充动画会更方便快捷,这一段只是深入学习过程中的产物,实用价值不高。
上图三角形的填充的效果只需要叠加两个同样大小的Shape,前面那个设置Stretch="Uniform",再通过DoubleAnimation改变它的高度就可以了。文字也是相同的原理,叠加两个相同的TextBlock,将前面那个放在一个无边框的ScrollViewer里再去改变ScrollViewer的高度。
<Page.Resources><Style TargetType="TextBlock"><Setter Property="FontSize"
Value="12" /></Style><local:ProgressToHeightConverter x:Key="ProgressToHeightConverter"
TargetContentControl="{Binding ElementName=ContentControl}" /><local:ReverseProgressToHeightConverter x:Key="ReverseProgressToHeightConverter"
TargetContentControl="{Binding ElementName=ContentControl2}" /><toolkit:StringFormatConverter x:Key="StringFormatConverter" /><local:ProgressWrapper x:Name="ProgressWrapper" /><Storyboard x:Name="Storyboard1"><DoubleAnimation Duration="0:0:5"
To="100"
Storyboard.TargetProperty="Progress"
Storyboard.TargetName="ProgressWrapper"
EnableDependentAnimation="True" /></Storyboard></Page.Resources><Grid Background="{ThemeResource ApplicationPageBackgroundThemeBrush}"><Grid><local:Triangle Height="40"
Width="40"
StrokeThickness="2"
Fill="LightGray" /><local:Triangle Height="40"
Width="40"
Stretch="Fill"
StrokeThickness="2"
Stroke="RoyalBlue" /><ContentControl x:Name="ContentControl"
VerticalAlignment="Bottom"
HorizontalAlignment="Center"
Height="{Binding Progress,Source={StaticResource ProgressWrapper},Converter={StaticResource ProgressToHeightConverter}}"><local:Triangle x:Name="Triangle3" Height="40"
Width="40"
StrokeThickness="2"
Fill="RoyalBlue"
Stretch="Uniform"
VerticalAlignment="Bottom" /></ContentControl><TextBlock Text="{Binding Progress,Source={StaticResource ProgressWrapper},Converter={StaticResource StringFormatConverter},ConverterParameter='{}{0:0}'}"
HorizontalAlignment="Center"
VerticalAlignment="Center"
Margin="0,12,0,0"
Foreground="White" /><ContentControl x:Name="ContentControl2"
Height="{Binding Progress,Source={StaticResource ProgressWrapper},Converter={StaticResource ReverseProgressToHeightConverter}}"
VerticalAlignment="Top"
HorizontalAlignment="Center"><ScrollViewer BorderThickness="0"
Padding="0,0,0,0"
VerticalScrollBarVisibility="Disabled"
HorizontalScrollBarVisibility="Disabled"
VerticalAlignment="Top"
Height="40"><Grid Height="40"><TextBlock Text="{Binding Progress,Source={StaticResource ProgressWrapper},Converter={StaticResource StringFormatConverter},ConverterParameter='{}{0:0}'}"
HorizontalAlignment="Center"
VerticalAlignment="Center"
Margin="0,12,0,0" /></Grid></ScrollViewer></ContentControl></Grid></Grid>ProgressToHeightConverter和ReverseProgressToHeightConverter的代码如下:
public class ProgressToHeightConverter : DependencyObject, IValueConverter
{/// <summary>/// 获取或设置TargetContentControl的值/// </summary>  public ContentControl TargetContentControl
    {
    get {
    return (ContentControl)GetValue(TargetContentControlProperty);
    }
    set {
    SetValue(TargetContentControlProperty, value);
    }
    }/// <summary>/// 标识 TargetContentControl 依赖属性。///
     </summary>public static readonly DependencyProperty TargetContentControlProperty =
        DependencyProperty.Register("TargetContentControl", typeof(ContentControl), typeof(ProgressToHeightConverter), new PropertyMetadata(null));
        public object Convert(object value, Type targetType, object parameter, string language)
    {
    if (value is double == false)
    return 0d;

        var progress = (double)value;
        if (TargetContentControl == null)
        return 0d;
        var element = TargetContentControl.Content as FrameworkElement;
        if (element == null)
        return 0d;return element.Height * progress / 100;
    }public object ConvertBack(object value, Type targetType, object parameter, string language)
    {throw new NotImplementedException();
    }


}public class ReverseProgressToHeightConverter : DependencyObject, IValueConverter
{/// <summary>/// 获取或设置TargetContentControl的值/// </summary>
public ContentControl TargetContentControl
    {
    get {
    return (ContentControl)GetValue(TargetContentControlProperty);
     }
    set {
    SetValue(TargetContentControlProperty, value);
    }
    }/// <summary>/// 标识 TargetContentControl 依赖属性。///
    </summary>public static readonly DependencyProperty TargetContentControlProperty =
        DependencyProperty.Register("TargetContentControl", typeof(ContentControl), typeof(ReverseProgressToHeightConverter), new PropertyMetadata(null));
        public object Convert(object value, Type targetType, object parameter, string language)
    {
    if (value is double == false)
    return double.NaN;

        var progress = (double)value;if (TargetContentControl == null)return double.NaN;
        var element = TargetContentControl.Content as FrameworkElement;
        if (element == null)return double.NaN;
        return element.Height * (100 - progress) / 100;
    }
    public object ConvertBack(object value, Type targetType, object parameter, string language)
    {
    throw new NotImplementedException();
    }
}
再提醒一次,实际上老老实实做填充动画好像更方便些。
5. 将动画应用到Button的ControlTemplate
同样的技术,配合ControlTemplate可以制作很有趣的按钮:
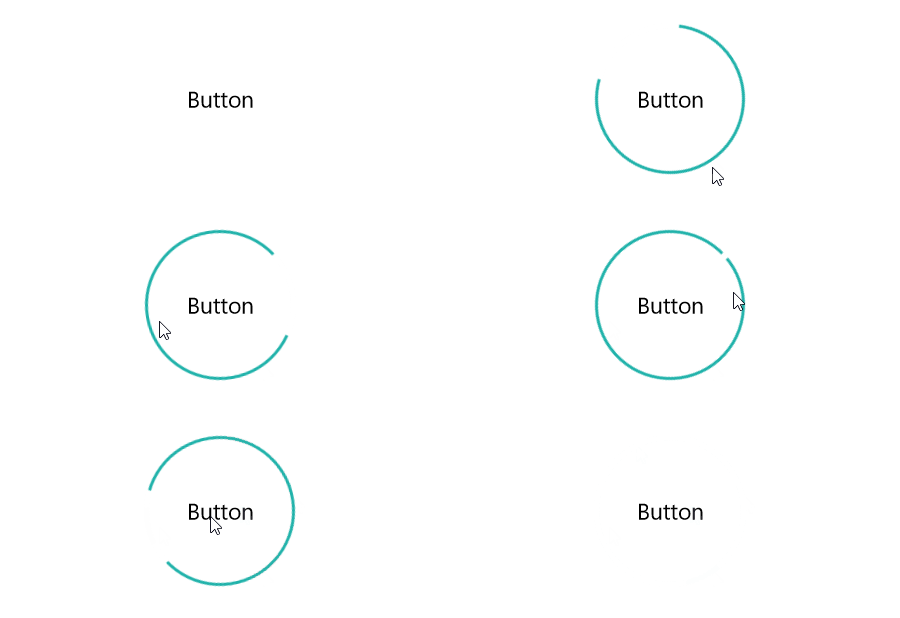
PointerEntered时,按钮的边框从进入点向反方向延伸。PointerExited时,边框从反方向向移出点消退。要做到这点需要在PointerEntered时改变边框的方向,使用了ChangeAngleToEnterPointerBehavior:
public class ChangeAngleToEnterPointerBehavior : Behavior<Ellipse>
{protected override void OnAttached()
    {base.OnAttached();
        AssociatedObject.PointerEntered += OnAssociatedObjectPointerEntered;
        AssociatedObject.PointerExited += OnAssociatedObjectPointerExited;
    }protected override void OnDetaching()
    {base.OnDetaching();
        AssociatedObject.PointerEntered -= OnAssociatedObjectPointerEntered;
        AssociatedObject.PointerExited -= OnAssociatedObjectPointerExited;
    }private void OnAssociatedObjectPointerExited(object sender, PointerRoutedEventArgs e)
    {UpdateAngle(e);
    }private void OnAssociatedObjectPointerEntered(object sender, PointerRoutedEventArgs e)
    {UpdateAngle(e);
    }private void UpdateAngle(PointerRoutedEventArgs e)
    {if (AssociatedObject == null || AssociatedObject.StrokeThickness == 0)return;

        AssociatedObject.RenderTransformOrigin = new Point(0.5, 0.5);var rotateTransform = AssociatedObject.RenderTransform as RotateTransform;if (rotateTransform == null)
        {
            rotateTransform = new RotateTransform();
            AssociatedObject.RenderTransform = rotateTransform;
        }var point = e.GetCurrentPoint(AssociatedObject.Parent as UIElement).Position;var centerPoint = new Point(AssociatedObject.ActualWidth / 2, AssociatedObject.ActualHeight / 2);var angleOfLine = Math.Atan2(point.Y - centerPoint.Y, point.X - centerPoint.X) * 180 / Math.PI;
        rotateTransform.Angle = angleOfLine + 180;
    }
}
这个类命名不是很好,不过将就一下吧。
为了做出边框延伸的效果,另外需要一个类EllipseProgressBehavior:
public class EllipseProgressBehavior : Behavior<Ellipse>
{/// <summary>/// 获取或设置Progress的值/// </summary>
public double Progress
    {
    get {
    return (double)GetValue(ProgressProperty);
    }
    set {
    SetValue(ProgressProperty, value);
    }
    }/// <summary>/// 标识 Progress 依赖属性。/// </summary>
    public static readonly DependencyProperty ProgressProperty =
        DependencyProperty.Register("Progress", typeof(double), typeof(EllipseProgressBehavior), new PropertyMetadata(0d, OnProgressChanged));
        private static void OnProgressChanged(DependencyObject obj, DependencyPropertyChangedEventArgs args)
    {
    var target = obj as EllipseProgressBehavior;
    double oldValue = (double)args.OldValue;
    double newValue = (double)args.NewValue;if (oldValue != newValue)
            target.OnProgressChanged(oldValue, newValue);
    }
    protected virtual void OnProgressChanged(double oldValue, double newValue)
    {UpdateStrokeDashArray();
    }protected virtual double GetTotalLength()
    {if (AssociatedObject == null)return 0;
    return (AssociatedObject.ActualHeight - AssociatedObject.StrokeThickness) * Math.PI;
    }private void UpdateStrokeDashArray()
    {if (AssociatedObject == null || AssociatedObject.StrokeThickness == 0)
    return;
    //if (target.ActualHeight == 0 || target.ActualWidth == 0)//
    return;var totalLength = GetTotalLength();
        totalLength = totalLength / AssociatedObject.StrokeThickness;
        var thirdSection = Progress * totalLength / 100;
        var secondSection = (totalLength - thirdSection) / 2;
        var result = new DoubleCollection { 0, secondSection, thirdSection, double.MaxValue };
        AssociatedObject.StrokeDashArray = result;
    }

}
套用到ControlTemplate如下:
<ControlTemplate TargetType="Button"><Grid x:Name="RootGrid"><VisualStateManager.VisualStateGroups><VisualStateGroup x:Name="CommonStates"><VisualStateGroup.Transitions><VisualTransition GeneratedDuration="0:0:1"
To="Normal"><Storyboard><DoubleAnimationUsingKeyFrames EnableDependentAnimation="True"
Storyboard.TargetProperty="(local:EllipseProgressBehavior.Progress)"
Storyboard.TargetName="EllipseProgressBehavior"><EasingDoubleKeyFrame KeyTime="0:0:1"
Value="0"><EasingDoubleKeyFrame.EasingFunction><QuinticEase EasingMode="EaseOut" /></EasingDoubleKeyFrame.EasingFunction></EasingDoubleKeyFrame></DoubleAnimationUsingKeyFrames></Storyboard></VisualTransition><VisualTransition GeneratedDuration="0:0:1"
To="PointerOver"><Storyboard><DoubleAnimationUsingKeyFrames EnableDependentAnimation="True"
Storyboard.TargetProperty="(local:EllipseProgressBehavior.Progress)"
Storyboard.TargetName="EllipseProgressBehavior"><EasingDoubleKeyFrame KeyTime="0:0:1"
Value="100"><EasingDoubleKeyFrame.EasingFunction><QuinticEase EasingMode="EaseOut" /></EasingDoubleKeyFrame.EasingFunction></EasingDoubleKeyFrame></DoubleAnimationUsingKeyFrames></Storyboard></VisualTransition></VisualStateGroup.Transitions><VisualState x:Name="Normal"><Storyboard><PointerUpThemeAnimation Storyboard.TargetName="RootGrid" /></Storyboard></VisualState><VisualState x:Name="PointerOver"><Storyboard><PointerUpThemeAnimation Storyboard.TargetName="RootGrid" /></Storyboard><VisualState.Setters><Setter Target="EllipseProgressBehavior.(local:EllipseProgressBehavior.Progress)"
 Value="100" /></VisualState.Setters></VisualState><VisualState x:Name="Pressed"><Storyboard><PointerDownThemeAnimation Storyboard.TargetName="RootGrid" /></Storyboard></VisualState><VisualState x:Name="Disabled" /></VisualStateGroup></VisualStateManager.VisualStateGroups><ContentPresenter x:Name="ContentPresenter"
AutomationProperties.AccessibilityView="Raw"
ContentTemplate="{TemplateBinding ContentTemplate}"
ContentTransitions="{TemplateBinding ContentTransitions}"
Content="{TemplateBinding Content}"
HorizontalContentAlignment="{TemplateBinding HorizontalContentAlignment}"
Padding="{TemplateBinding Padding}"
 VerticalContentAlignment="{TemplateBinding VerticalContentAlignment}" /><Ellipse Fill="Transparent"                 Stroke="{TemplateBinding BorderBrush}"                 StrokeThickness="2"><interactivity:Interaction.Behaviors><local:ChangeAngleToEnterPointerBehavior /><local:EllipseProgressBehavior x:Name="EllipseProgressBehavior" /></interactivity:Interaction.Behaviors></Ellipse></Grid></ControlTemplate>
注意:我没有鼓励任何人自定义按钮外观的意思,能用系统自带的动画或样式就尽量用系统自带的,没有设计师的情况下 又想UI做得与众不同通常会做得很难看。想要UI好看,合理的布局、合理的颜色、合理的图片就足够了。
6. 结语
在学习Shape的过程中觉得好玩就做了很多尝试,因为以前工作中做过不少等待、进度的动画,所以这次就试着做出本文的动画。
XAML的传统动画并没有提供太多功能,主要是ColorAnimation、DoubleAnimation、PointAnimation三种,不过靠Binding和Converter可以弥补这方面的不足,实现很多需要的功能。
本文的一些动画效果参考了SVG的动画。话说回来,Windows 10 1703新增了SvgImageSource,不过看起来只是简单地将SVG翻译成对应的Shape,然后用Shape呈现,不少高级特性都不支持(如下图阴影的滤镜),用法如下:
<Image><Image.Source><SvgImageSource UriSource="feoffset_1.svg" /></Image.Source></Image>
SvgImageSource:
原本的Svg:
Ce qui précède est le contenu détaillé de. pour plus d'informations, suivez d'autres articles connexes sur le site Web de PHP en chinois!

