Maison >développement back-end >Tutoriel Python >Introduction aux types de données de base dans les bases de l'apprentissage Python
Introduction aux types de données de base dans les bases de l'apprentissage Python
- 高洛峰original
- 2017-03-21 10:28:351580parcourir
1. Opérateurs
1.
ps: Exemple 1:
Exemple 2.7
#!/usr/bin/env python
# -*- coding:utf-8 -*-
#Author: nulige

#算数运算符
from future import division   #python2.x必须引入division模块。python3.x不需要。

val = 9 / 2
print(val)
1 4.5Exemple python3.x
#!/usr/bin/env python
# -*- coding:utf-8 -*-
#Author: nulige

#算数运算符
val = 9 / 2
print(val)
1 4.52. Opérations de comparaison :
ps : 
1 a = 1 > 5
3. Opération d'affectation :
ps;
1 a = a + 1 a+=1ps :
#!/usr/bin/env python
# -*- coding:utf-8 -*-
#Author: nulige

start = 1
start = start + 1  #加 减乘 除 一样
print(start)
1 2
Opération logique :
ps:
1 a = 1>6 or 1==1Exemple
5. Fonctionnement des membres
>>> a = 0
>>> if a:print('a')
...

>>> a = 1
>>> if a:print('a')
...
a

>>> False
False
或
>>> True
True
ps : Exemple de  dans :
fait référence à Est-ce SB dans la
chaîneci-dessus ? Si tel est le cas, il renverra True
Résultat de l'exécution :#!/usr/bin/env python
# -*- coding:utf-8 -*-
#Author: nulige
name = "郑建文"
if "建文" in name:
print('ok')
else:
print('Error')Méthode deux :
1 okRésultat de l'exécution :
#!/usr/bin/env python
# -*- coding:utf-8 -*-
#Author: nulige

#成员运算符
s = "ALex SB"
ret = "SB" in s    #指的是这个SB是不是在上面那个字符串中,在就返回True
print(ret)
Exemple trois :
1 TrueRésultat de l'exécution :
#!/usr/bin/env python
# -*- coding:utf-8 -*-
#Author: nulige

#成员运算符
s = "ALex SB"
ret = "RSB" in s   #指的是这个RSB是不是在上面那个字符串中,如果不在就返回False
print(ret)
1 Falsepas dans l'exemple
Exemple 1 :
#!/usr/bin/env python
# -*- coding:utf-8 -*-
#Author: nulige

name = "郑建文"
if "文1" not in name:
    print('1')
else:
    print ('2')
1 1Exemple 2 :
#!/usr/bin/env python
# -*- coding:utf-8 -*-
#Author: nulige

#粒度大
li = ['alex','eric','rain']
ret = "alex" not in li    #在里面就是False,不在里面就是Ture
print(ret)
1 False
Opération ternaire
Si la condition est vraie : résultat = valeur 1
Si la condition est fausse : sesult = valeur 21 result =值1 if 条件 else 值2
Exemple
7. Opération d'identité
>>> a,b,c = 1,3,5
>>> d =a if a >b else c
>>> d
5
>>> d = a if a <b else c
>>> d
1
>>> if a >b:d=a
... else:d=c
...

Opération de bit
 9.
9.
#!/usr/bin/python

a = 60            # 60 = 0011 1100
b = 13            # 13 = 0000 1101
c = 0

c = a & b;        # 12 = 0000 1100
print "Line 1 - Value of c is ", c

c = a | b;        # 61 = 0011 1101
print "Line 2 - Value of c is ", c

c = a ^ b;        # 49 = 0011 0001
print "Line 3 - Value of c is ", c

c = ~a;           # -61 = 1100 0011
print "Line 4 - Value of c is ", c

c = a << 2;       # 240 = 1111 0000
print "Line 5 - Value of c is ", c

c = a >> 2;       # 15 = 0000 1111
print "Line 6 - Value of c is ", c

Utilisation des types intégrés bytes et str dans Python3 et diverses conversions d'encodage entre octet et chaîne
La nouvelle fonctionnalité la plus importante de Python 3 est probablement la distinction plus claire entre le texte et les données binaires. Le texte est toujours Unicode et est représenté par le type str, et les données binaires sont représentées par le type bytes. Python 3 ne mélange pas str et bytes de manière implicite, ce qui rend la distinction entre les deux particulièrement claire. Vous ne pouvez pas concaténer des chaînes et des paquets d'octets, ni rechercher des chaînes dans des paquets d'octets (et vice versa), ni transmettre des chaînes dans desfonctions qui prennent des paquets d'octets comme paramètres (et vice versa).
octets en caractère de chaîne conversion de type

说明:字符串转(string)转成bytes类型,再转成string。
示例
#!/usr/bin/env python
# -*- coding:utf-8 -*-
#Author: huzhihua

#import login
msg = "我爱北京天安门"
print(msg)
print(msg.encode(encoding="utf-8"))
print(msg.encode(encoding="utf-8").decode(encoding="utf-8"))
执行结果:
我爱北京天安门
b'\xe6\x88\x91\xe7\x88\xb1\xe5\x8c\x97\xe4\xba\xac\xe5\xa4\xa9\xe5\xae\x89\xe9\x97\xa8'
我爱北京天安门
十一、进制
16位数表示方法

16进制与二进制对应关系

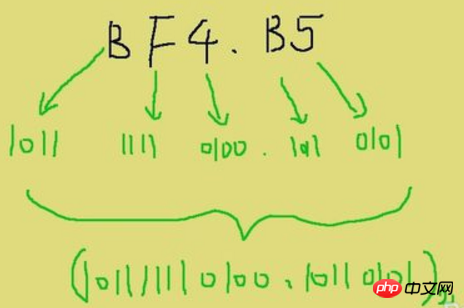
二进制转换成十六进制的方法:取四合一法,即从二进制的小数点为分界点,向左(或向右)每四位取成一位

图1
组分好以后,对照二进制与十六进制数的对应表(如图1中所示),将四位二进制按权相加,得到的数就是一位十六进制数,然后按顺序排列,小数点的位置不变哦,最后得到的就是十六进制数哦,如图2所示。

图2
注意16进制的表示法,用字母H后缀表示,比如BH就表示16进制数11;也可以用0X前缀表示,比如0X23就是16进制的23.直观表示法如图3所示。

图3
这里需要注意的是,在向左(或向右)取四位时,取到最高位(最低位)如果无法凑足四位,就可以在小数点的最左边(或最右边)补0,进行换算,如图4所示。

图4
下面看看将16进制转为二进制,反过来啦,方法就是一分四,即一个十六进制数分成四个二进制数,用四位二进制按权相加,最后得到二进制,小数点依旧就可以啦。如图5所示。

图5
十一、一切皆对象
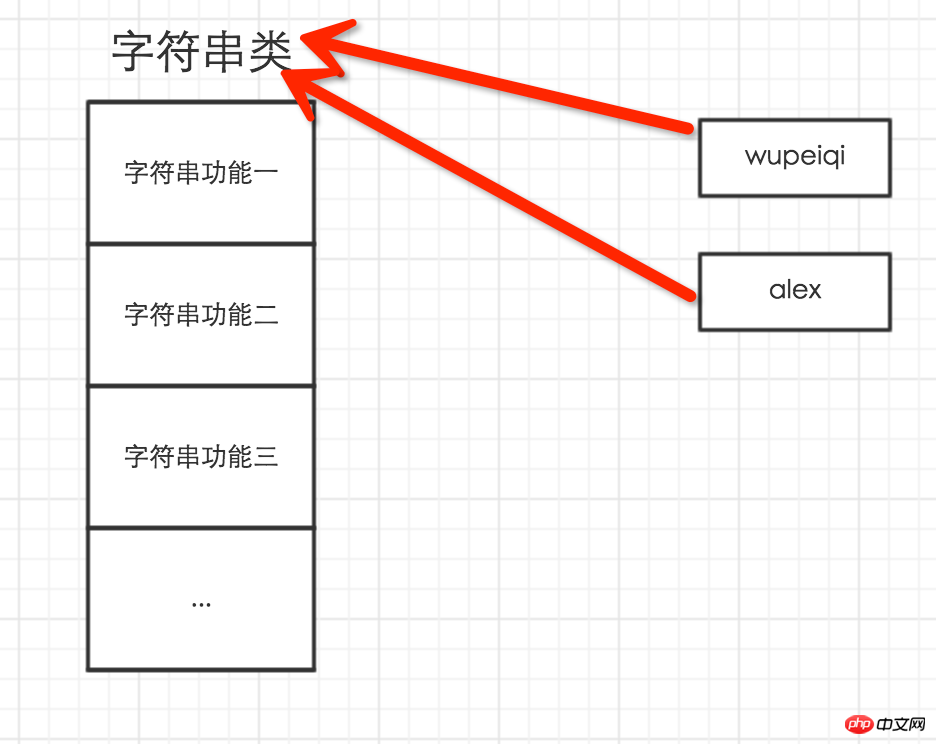
对于Python,一切事物都是对象,对象基于类创建

所以,以下这些值都是对象: "wupeiqi"、38、['北京', '上海', '深圳'],并且是根据不同的类生成的对象。

二、基本数据类型
1、数字:1231
ps:
age = 18
2、int(整型)
在32位机器上,整数的位数为32位,取值范围为-2**31~2**31-1,即-2147483648~2147483647,而.在64位系统上,整数的位数为64位,取值范围为-2**63~2**63-1,即-9223372036854775808~9223372036854775807
ps:
数字  int ,所有的功能,都放在int里
a1 = 123
a1 = 456
1、将字符串转换为数字
#!/usr/bin/env python
# -*- coding:utf-8 -*-
#Author: nulige

a = "123"
print(type(a),a)  #输出他是什么类型,并转换为数字

b = int(a)
print(type(b),b)  #输出他是什么类型,并转换为数字
执行结果:
(<type>, '123')
(<type>, 123)</type></type>
2、把这个字符串以16进制的方式转成10进制
#!/usr/bin/env python
# -*- coding:utf-8 -*-
#Author: nulige

#二进制表示方法:
#00   10    11    #二进制
#1     2     3    #十进制
#把这个字符串以16进制的方式,转成10进制
num = "0011"   #字符串
int(num)
v = int(num, base=2)    #base=2  以二进制的方式进行
v = int(num, base=16)   #base=16 就是转成16进制
print(v)
执行结果:
1 17
3、将16进制转成10进制
#!/usr/bin/env python
# -*- coding:utf-8 -*-
#Author: nulige

#把b以16进制的方式转成10进制
num = "b"
v = int(num,base=16)
print(v)
执行结果:
1 11
常识:
1个字节=8位
1个汉字=3个字节
gb2312=2汉字
utf-8=3汉字(表示:最少3个汉字)
4、当前数字的二进制,至少用n位表示
#当前数字的二进制,至少用n位表示
age = 5
# 1  1     #表示二进制,用几位表示
# 2  10
# 3  11
# 4  100
# 5  101
r = age.bit_length()
print(r)
执行结果:
1 3 #表示位数
2、字符串:
表示方法:
a1 = "asdf" #第一种 “”
a1 = ‘ffa’ #第二种‘’
a1 ="""assdfafdsafdas""" #第三种“““ ”””
1、首字母大写:capitalize()
#!/usr/bin/env python
# -*- coding:utf-8 -*-
#Author: nulige

#首字母大写
test = "aLex"
v = test.capitalize()   #首字母大写
print(v)
执行结果:
1 Alex
2、功能:所有变小写
二者对比:casefold更牛逼,很多未知的对相应变小写
#!/usr/bin/env python
# -*- coding:utf-8 -*-
#Author: nulige

#所有变小写,casefold更牛逼,很多未知的对相应变小写
test = "aLex"
v1 = test.casefold()
print(v1)
v2 = test.lower()
print(v2)
执行结果:
1 alex2 alex
3、设置宽度并将内容居中
#!/usr/bin/env python
# -*- coding:utf-8 -*-
#Author: nulige

# 3、设置宽度并将内容居中
# 20代指总长度
# * 代表空白未知填充 ,一个字符,可有可无
a1 = "alex"
ret = a1.center(20, '*')
print(ret)
执行结果:
1 ********alex********
4、去字符串中寻找,寻找子序列出现的次数
#!/usr/bin/env python
# -*- coding:utf-8 -*-
#Author: nulige

# 去字符串中寻找,寻找子序列出现的次数
a1 = "alex is alph"
ret = a1.count("a")
ret = a1.count("al",0,10)
print(ret)
执行结果:
1 2
5、查看是否已什么结尾
#!/usr/bin/env python
# -*- coding:utf-8 -*-
#Author: nulige

# 查看是否已什么结尾
# 查看是否已什么开始
name = "xiaoMing"
v = name.endswith('g')
v1 = name.startswith('e')
print(v)
print(v1)
执行结果:
1 True2 False
6、从开始往后面找,找到第一个之后,获取其位置,未找到返回一个-1
#!/usr/bin/env python
# -*- coding:utf-8 -*-
#Author: nulige

# 6、从开始往后面找,找到第一个之后,获取其位置,未找到返回一个-1
name = "xiaoming"
v = name.find('ao',2,6)#从那个位置开始找  前面的是大于等于 后面是小于
# print(v)
name = "xiaoming"   #index 用法同find 但是如果index找不大值直接报错
v = name.index("ming")
print(v)
执行结果:
1 4
7、格式化输出,将一个字符串中的占位符替换为指定的值
#!/usr/bin/env python
# -*- coding:utf-8 -*-
#Author: nulige

#格式化输出,将一个字符串中的占位符替换为指定的值
test = 'i am  {name},age {a}'
print(test)
v = test.format(name = 'xiaoming',a = 24)
print(v)
test = 'i am  {0},age {1}'
print(test)
v = test.format('xiaoming',24)
print(v)
执行结果:
i am  {name},age {a}
i am  xiaoming,age 24
i am  {0},age {1}
i am  xiaoming,age 24
9、test.format_map的方法类似format 区别如下图
#!/usr/bin/env python
# -*- coding:utf-8 -*-
#Author: nulige

#test.format_map的方法类似format 区别如下图
test = 'i am  {name},age {a}'
print(test)
v = test.format(name = 'xiaoming',a = 24)
v1 = test.format_map({"name":"xiaoming","a":19})
print(v)
print(v1)
执行结果:
i am  {name},age {a}
i am  xiaoming,age 24
i am  {0},age {1}
i am  xiaoming,age 24
9、判段字符串中是否只包含字母和数字
name = "uuuuaa888"
v = name.isalnum()
print(v)
执行结果:
1 True
10、expandtabs,断句20,\t表示六个字符,不够的空格补齐6个。
#!/usr/bin/env python
# -*- coding:utf-8 -*-
#Author: nulige

#expandtabs,断句20,\t表示六个字符,不够的空格补齐6个。
test = "username\temail\tpassword\nlaiying\tying@q.com\t123\nlaiying\tying@q.com\t123\nlaiying\tying@q.com\t123"
v = test.expandtabs(20)
print(v)
执行结果:
username            email               password
laiying             ying@q.com          123
laiying             ying@q.com          123
laiying             ying@q.com          123
3、long(长整型)
为什么会有这个概念呢?
因为在Python2.2起,如果放置在内存里的数特别大发生溢出,Python就会自动将整型数据转换为长整型,但是现在,在Python3里就不存在长整型这么一说了,同意都是整型。
简单理解就是带有小数的数字
5、complex(复数)
复数是由实数部分和虚数部分组成,一般形式为x+yj,其中的x是复数的实数部分,y呢是复数的虚数部分,这里的x和y都是实数。
5、布尔值(0或1)
就是真和假。
True/False
a4 = True #真
a5 = False #假
7、查看数据类型(type)
>>> type(1)
<class 'int'>
>>> type(1.2)
<class 'float'>
>>> type(jixuege)
Traceback (most recent call last):
File "<stdin>", line 1, in <module>
NameError: name 'jixuege' is not defined
上面报错原因就是没有用双引号引起来,他就不是字符串,而是认为是一个变量。
>>> type("jixuege")
<class 'str'>三、for和while循环
如何理解呢?
break: 只能跳出当前循环,当前这一套循环就结束了。
continue: 跳出当次循环,然后呢还会去继续下一次别的循环。
for循环示例1:
#!/usr/bin/env python
# -*- coding:utf-8 -*-
#Author: nulige

for i in range(10):
    print("loop",i)
执行结果:
loop 0
loop 1
loop 2
loop 3
loop 4
loop 5
loop 6
loop 7
loop 8
loop 9
原理图:

for循环示例2:
#!/usr/bin/env python
# -*- coding:utf-8 -*-
#Author: nulige

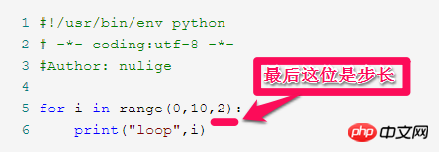
for i in range(0,10,2):
    print("loop",i)
执行结果:
loop 0
loop 2
loop 4
loop 6
loop 8
原理图:

for循环示例3:
#!/usr/bin/env python
# -*- coding:utf-8 -*-
#Author: nulige

for i in range(0,10,3):
    print("loop",i)
执行结果:
loop 0
loop 3
loop 6
loop 9
for循环示例4:
#!/usr/bin/env python
# -*- coding:utf-8 -*-
#Author: nulige
age_of_oldboy = 56
count = 0
while count <3:
guess_age = int(input("guess age:"))
if guess_age == age_of_oldboy :
print("yes, you got it. ")
break
elif guess_age > age_of_oldboy:
print("think smaller... ")
else:
print("think bigger!")
count +=1
if count == 3:
countine_confirm = input("do you want to keep guessing..?")
if countine_confirm != 'n':
count = 0
else:
print("you have tried too many times..fuck off")执行结果:
输入三次数字,按回车就继续,按n 就退出。
guess age:1
think bigger!
guess age:23
think bigger!
guess age:3
think bigger!
do you want to keep guessing..?
guess age:1
think bigger!
guess age:2
think bigger!
guess age:3
think bigger!
do you want to keep guessing..?n
you have tried too many times..fuck off
原理:

for循环示例5:
#!/usr/bin/env python
# -*- coding:utf-8 -*-
#Author: nulige

age_of_oldboy = 56
for i in range(3):
    guess_age = int(input("guess age:"))
    if guess_age == age_of_oldboy :
        print("yes, you got it. ")
        break
    elif guess_age > age_of_oldboy:
        print("think smaller... ")
    else:
        print("think bigger!")
else:
    print("you have tried too many times..fuck off")
执行结果:
guess age:23
think bigger!
guess age:58
think smaller...
guess age:56
yes, you got it.
原理图:

for循环示例6:
说明:打印五次hehe...
#!/usr/bin/env python
# -*- coding:utf-8 -*-
#Author: nulige

for i in range(0,10):
    if i <5:
        print("loop ",i)
    else:
        continue
    print("hehe...")
执行结果:
loop  0
hehe...
loop  1
hehe...
loop  2
hehe...
loop  3
hehe...
loop  4
hehe...
for循环示例7:
#!/usr/bin/env python
# -*- coding:utf-8 -*-
#Author: nulige

for i in range(10):
    print('-------------',i)
    for j in range(10):
        print(j)
执行结果:
------------- 0
0
1
2
3
4
5
6
7
8
9
------------- 1
0
1
2
3
4
5
6
7
8
9
------------- 2
0
1
2
3
4
5
6
7
8
9
------------- 3
0
1
2
3
4
5
6
7
8
9
------------- 4
0
1
2
3
4
5
6
7
8
9
------------- 5
0
1
2
3
4
5
6
7
8
9
------------- 6
0
1
2
3
4
5
6
7
8
9
------------- 7
0
1
2
3
4
5
6
7
8
9
------------- 8
0
1
2
3
4
5
6
7
8
9
------------- 9
0
1
2
3
4
5
6
7
8
9

Process finished with exit code 0
PyCharm代码调试

break和continue的区别
示例1:
#!/usr/bin/env python
# -*- coding:utf-8 -*-
#Author: nulige

for i in range(10):
    print('-------------',i)
    for j in range(10):
        print(j)
        if j>5:
            break
执行结果:
------------- 0
0
1
2
3
4
5
6
------------- 1
0
1
2
3
4
5
6
------------- 2
0
1
2
3
4
5
6
------------- 3
0
1
2
3
4
5
6
------------- 4
0
1
2
3
4
5
6
------------- 5
0
1
2
3
4
5
6
------------- 6
0
1
2
3
4
5
6
------------- 7
0
1
2
3
4
5
6
------------- 8
0
1
2
3
4
5
6
------------- 9
0
1
2
3
4
5
6
示例2:
#!/usr/bin/env python
# -*- coding: utf-8 -*-
#Author: nulige


for n in range(4):
    print(n)
    for j in range(3):
        if  j <2:
        #如果j小于2就跳出当次循环,继续一下次循环
            continue
        print(n,j)
执行结果:
0 2
1 2
2 2
3 2
说明:
在第二次的if判断中,我执行条件,如果j小于2就跳出当次循环,继续一下次循环
下面我们就看看break的使用
同样的代码,咋们接着看
#!/usr/bin/env python
# -*- coding: utf-8 -*-
#Author: nulige


for n in range(4):
    print(n)
    break
    for j in range(3):
        if  j <2:
        #如果j小于2就跳出当次循环,继续一下次循环
            continue
        print(n,j)
0
小结:二者的区别,continue用于有很多次循环,然后呢,我不希望哪次循环执行下面的动作,就可以了使用continue ,而break呢就是我这次循环了以后我想跳出去不在循环,或者我写了一段代码,我想跳出去看看代码是否能执行,就可以用break。
输入用户名密码
认证成功后显示欢迎信息
输错三次后锁定
流程图

实现代码
#!/usr/bin/env python
# -*- coding:utf-8 -*-
#Author: nulige
count = 0
while count < 3:
login = '''
Hello welcome to login Cnlogs!
'''
login2 = '''
Try again
'''
if count == 0:
print(login)
else:
print(login2)
user = input("please input your name:")
password = input("please input your password:")
accept = str(user + password)
for line in open("C:\\Users\\Administrator\\Desktop\\file.txt"):
line = line.strip("\n")
if accept == line:
print("Welcome to login Cnlogs",user)
exit()
break
else:
continue
print("Your password or username is wrong")
count +=1
if count == 3:
print("fuck off")file文件路径
file文件路径:C:\\Users\\Administrator\\Desktop\\file.txt"
file文件内容
nulige123456
alex123456

#说明(把输入的用户名和密码,拼接为一个字符串。)
#username:nulige
#password:123456
执行结果:
说明:输入正确用户名和密码。比对正确,显示欢迎信息。
Hello welcome to login Cnlogs!

please input your name:nulige
please input your password:123456
Welcome to login Cnlogs nulige
说明:输入三次错误的用户名和密码,第三次还错误就锁定。
Hello welcome to login Cnlogs!

please input your name:huzhihua
please input your password:11111
Your password or username is wrong

Try again

please input your name:skfjdskfjdsk
please input your password:321321
Your password or username is wrong

Try again

please input your name:fdskfjsk
please input your password:3333
Your password or username is wrong
fuck off
三、思路和遇到的坑。
1、把正确的用户名密码,存放在一个文本文件中。
2、用户名与密码,是两个独立的字符串,存放的时候把它俩加在一起,变成了“用户名密码”。
3、获取输入的用户名密码后,同样把用户名与密码拼接为“用户名密码”,来与文件中记录的用户名密码进行逐行对比。
4、坑!记录的文件中有换行符\n,也就是说“用户名密码\n”,但是输入的却没有“用户名密码”,导致字符串效验总是失败。
5、通过strip("\n")来去掉换行符。
python strip()函数 去空格\n\r\t函数的用法
在Python中字符串处理函数里有三个去空格(包括'\n', '\r', '\t', ' ')的函数:
strip 同时去掉左右两边的空格
lstrip 去掉左边的空格
rstrip 去掉右边的空格
具体示例如下:
>>>a=" gho stwwl "
>>>a.lstrip() 'gho stwwl '
>>>a.rstrip() ' gho stwwl'
>>>a.strip() 'gho stwwl'
声明:s为字符串,rm为要删除的字符序列
s.strip(rm) 删除s字符串中开头、结尾处,位于 rm删除序列的字符
s.lstrip(rm) 删除s字符串中开头处,位于 rm删除序列的字符
s.rstrip(rm) 删除s字符串中结尾处,位于 rm删除序列的字符
注意:
1. 当rm为空时,默认删除空白符(包括'\n', '\r', '\t', ' ')
>>> a = ' 123'
>>> a.strip()
'123'
>>> a='\t\tabc'
'abc'
>>> a = 'sdff\r\n'
>>> a.strip()
'sdff'
2.这里的rm删除序列是只要边(开头或结尾)上的字符在删除序列内,就删除掉。
>>> a = '123abc'
>>> a.strip('21')
'3abc' 结果是一样的
>>> a.strip('12')
'3abc'
作业二:多级菜单
三级菜单
可依次选择进入各子菜单
所需新知识点:列表,字典
menu = {
    '北京':{
        '海淀':{
            '五道口':{
                'soho':{},
                '网易':{},
                'google':{}
            },
            '中关村':{
                '爱奇艺':{},
                '汽车之家':{},
                'youku':{},
            },
            '上地':{
                '百度':{},
            },
        },
        '昌平':{
            '沙河':{
                '老男孩':{},
                '北航':{},
            },
            '天通苑':{},
            '回龙观':{},
        },
        '朝阳':{},
        '东城':{},
    },
    '上海':{
        '闵行':{
            "人民广场":{
                '炸鸡店':{}
            }
        },
        '闸北':{
            '火车战':{
                '携程':{}
            }
        },
        '浦东':{},
    },
    '山东':{},
}


exit_flag = False
current_layer = menu

layers = [menu]

while not  exit_flag:
    for k in current_layer:
        print(k)
    choice = input(">>:").strip()
    if choice == "b":
        current_layer = layers[-1]
        #print("change to laster", current_layer)
        layers.pop()
    elif choice not  in current_layer:continue
    else:
        layers.append(current_layer)
        current_layer = current_layer[choice]
Ce qui précède est le contenu détaillé de. pour plus d'informations, suivez d'autres articles connexes sur le site Web de PHP en chinois!

