Maison >développement back-end >Tutoriel C#.Net >Introduction détaillée à l'analyse complète de C# exploitant IIS (image et texte)
Introduction détaillée à l'analyse complète de C# exploitant IIS (image et texte)
- 黄舟original
- 2017-03-15 10:40:441775parcourir
最近在为公司实施做了一个工具,Silverlight部署早已是轻车熟路, 但对于非技术人员来说却很是头疼的一件事,当到现场实施碰到客户情况也各不相同, 急需一个类似系统备份的"一键工具"快速实现应用程序部署和数据库进行关联. 网上关于这方面资源也比较混乱,其中对于IIS的编程影响因素很多,操作技巧上加以细化小结.
A:版本问题
这是你在进行编程前必须要要考虑的一个实际问题.因为IIS版本不同对应编程上基本上完全不同方式来进行的.先了解一下Iss版本在操作系统个具体要求.

ISS6.0时代主要以using System.DirectoryServices空间下的DirectoryEntry 对象作为编程访问一个主要载体.但随着ISS7.0发布.NET的Web程序由ISS6.0开始逐渐过渡到 7.0版本.而且在编程控制ISS上新添加的Microsoft.Web.Administration名称空间, 提出多个用于管理 操作 和访问ISS的对象, 使操作ISS的编程更加简洁 高效.
B:我们要做什么
实际用户操作环境中主要以Windows XP/2000/2003操作系统为主, 这就导致了ISS版本主要在5.0/5.1/6.0之间,所以本次演示的代码编程实例都是ISS7.0版本以下(不包含Iss7.0).
为了达到演示目的,我们现在需求是这样的: 把硬盘上Silverlight应用程序成功部署到本地机器ISS上. 并支持通过局域网访问. 需求很简单吧就是一句话, 其实当进入实际编程时因为客户的局域网环境是不可预知的, 这也就导致影响部署Silverlight程序到ISS上诸多未知因素. 所以要在编程中使Silverlight应用程序部署成功,我们必须利用编程除了控制ISS外还要控制其他主要影响ISS因素.
C:进入编程
既然提出需求我们大概确定一下解决思路:
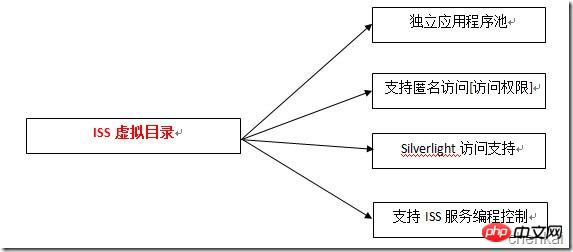
在默认站点下创建一个虚拟目录承载Silverlight 应用程序, 新建的虚拟目录运行在独立应用程序池中, 支持本地局域网匿名访问其实就是对访问权限控制, 为了直接使更改的应用生效需要多次重新启动ISS的服务, 这就需要对ISS服务进行编程控制.
ISS版本的获取
在进入客户环境前我们先检测下是否存在安装了ISS,以及ISS版本获取提示,目前获取ISS版本的方式主要有两种,第一种方法是通过遍历DirectoryEntry实体目录 第二种方式是通过获取注册表的ISS修改版本值[经测试这种方式获取版本不稳定].
 public static void GetIssVersionByDri(string domainname)
   2:      {
   3:           try
   4:            {
   5:                if (string.IsNullOrEmpty(domainname))
   6:                {
   7:                  //如果为空 则默认为本地机器
   8:                    domainname = "LOCALHOST";
   9:                }
  10:                DirectoryEntry getEntity=new DirectoryEntry("IIS://" + domainname + "/W3SVC/INFO");
  11:                string Version=getEntity.Properties["MajorIISVersionNumber"].Value.ToString();
  12:                MessageBox.Show(Version);
  13:            }
  14:            catch (Exception se)
  15:            {
  16:                //说明一点:IIS5.0中没有(int)entry.Properties["MajorIISVersionNumber"].Value;属性,将抛出异常 证明版本为 5.0
  17:                MessageBox.Show("获取ISS的版本是发生异常信息:"+se.Message);
  18:            }
  19:      }
通过系统注册表获取ISS版本的值:[测试发现不稳定]
 1:  public static string GetIssVersion()
   2:  {
   3:    //RegistryKey表示 Windows 注册表中的项级节点.此类是注册表封装
   4:    string issversion = string.Empty;
   5:    RegistryKey getkey = Registry.LocalMachine.OpenSubKey("software\\microsoft\\inetstp");
   6:    if (getkey != null)
   7:     {
   8:       issversion= Convert.ToInt32(getkey.GetValue("majorversion", -1)).ToString();
   9:       MessageBox.Show(issversion.ToString());
  10:     }
  11:    return issversion;
  12:  }
<2>创建虚拟目录
每个Internet服务可以从多个目录中发布,通过以通用命名约定 (UNC) 名、用户名及用于访问权限的密码指定目录,可将每个目录定位在本地驱动器或网络上,虚拟目录可以一个宿主程序,这可发布的操作目录即为虚拟目录.再来看看在ISS6.0中创建的虚拟目录的步骤和控制的属性.
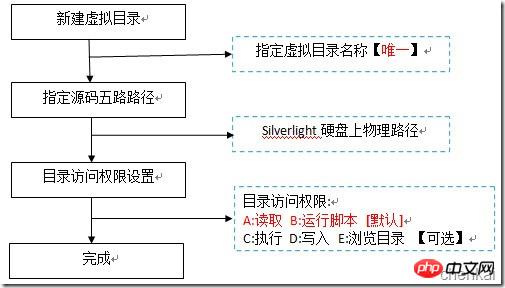
新建虚拟目录:
  1:        /// <summary>
   2:        /// 添加一个虚拟目录
   3:        /// </summary>
   4:        public void CreateVirtualDir(string virtualdirname, string logicDir)
   5:        {
   6:            //如果存在重复 就直接删除虚拟目录
   7:            if (IsExitesVirtualDir(virtualdirname))
   8:                DeleteVirtualDir(virtualdirname);
   9:
  10:            DirectoryEntry rootEntry;
  11:            rootEntry = new DirectoryEntry("IIS://localhost/W3SVC/1/root");
  12:
  13:            DirectoryEntry newVirDir;
  14:            newVirDir = rootEntry.Children.Add(virtualdirname, "IIsWebVirtualDir");
  15:            newVirDir.Invoke("AppCreate", true);
  16:
  17:            newVirDir.CommitChanges();
  18:            rootEntry.CommitChanges();
  19:
  20:            newVirDir.Properties["AnonymousPasswordSync"][0] = true;
  21:            newVirDir.Properties["Path"][0] = logicDir;//+ @"virtualdirentry\virtualname\";
  22:
  23:            //设置的端口绑定数据
  24:            //_newVirDir.Properties["ServerBindings"].Value =AppEntitys.WebAppInfor.HostIp+AppEntitys.WebAppInfor.HostProt+AppEntitys.WebAppInfor.AppDesc;
  25:
  26:            //设置起始默认页:
  27:            newVirDir.Properties["EnableDefaultDoc"][0] = true;
  28:            newVirDir.Properties["DefaultDoc"][0] = "Default.aspx";
  29:
  30:            //_newVirDir
  31:            newVirDir.CommitChanges();
  32:        }
这个方法在创建时主要有两个参数 一个是新建虚拟目录名称 另外一个要部署Silverlight应用程序物理路径.在获取根节目录时需要制定ISS的路径. ISS的路径格式如:IIS://ComputerName/Service/Website/Directory
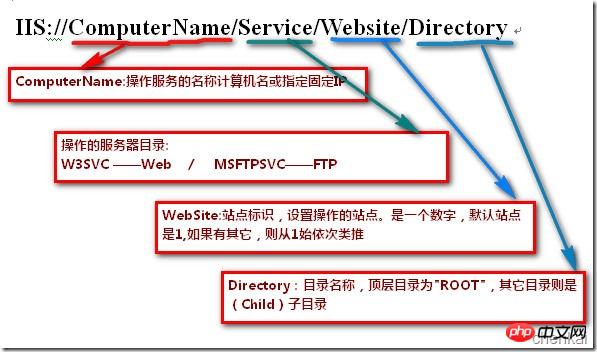
找到根目录后添加新建虚拟目录. 制定参数为Schema-指每个结点的类型:IIsVirtualDir:——虚拟目录 IIsWebDir :——普通目录, 添加完成后调用ADSI中的"AppCreate"方法将目录真正创建.创建完成后通过根目录和新目录提交保存.
目录属性设置
在DirectoryEntity虚拟目录属性可以说是非常多的,当时在编程时我为了区分属性间区别做了一个方法去遍历整个属性集合PropertyCollection. 然后把常用重要的属性跳出来进入赋值设置. 因为关于虚拟目录的属性在MSDN上的API中并没有直接提到, 特别是对虚拟目录访问权限控制非常重要属性等 .先说明局部的常用的属性:
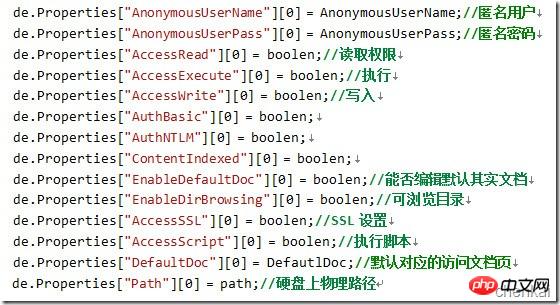
例如修改程序起始页:
 1:    //设置起始默认页:
   2:      newVirDir.Properties["EnableDefaultDoc"][0] = true;
   3:      newVirDir.Properties["DefaultDoc"][0] = "Default.aspx,Index.Html,index.asp";
   4:      newVirDir.CommitChanges();
DefaultDoc选项可以支持多个但注意选择性排序.一般修改目录属性后都选通过CommitChanges()方法提交保存, 但有时你会发现我明明修改属性 却没有保存生效. 这是因为ISS中部分属性设置需要重新启动ISS服务才能生效.这个时候我们需要对ISS服务进行控制.
ISS服务控制
关于ISS服务控制微软提供一个命名空间System.ServiceProcess 提供能够快速操作本地系统服务API.对于ISS服务控制我们最常用的是重新启动使当前设置生效. 在设置服务时我先找到服务名称,打开计算机管理 在服务和应用程序目录下打开服务.

我们能看到ISS服务命名是:ISSAdmin 我们通过编码来控制:启动ISS.
  1:  //获取IIS Serivcer控制声明 . 参数为Server在系统标识该服务的简称,.
   2:  ServiceController getservicecon = new ServiceController("IISADMIN");
   3:  getservicecon.Start();
重启/暂停/停止ISS服务:
 1:   if (getservicecon.Status == ServiceControllerStatus.Running)
   2:       {
   3:            //停止服务
   4:            getservicecon.Stop();
   5:            //暂停服务
   6:            getservicecon.Pause();
   7:            //重启服务
   8:            //Process提供对本地和远程进程的访问并使您能够启动和停止本地系统进程
   9:            //利用Start方法调用:启动(或重用)此 Process 组件的 StartInfo 属性指定的进程资源,并将其与该组件关联
  10:            //如果启动了进程资源,则为 true;如果没有启动新的进程资源(例如,如果重用了现有进程),则为 false
  11:            //通过指定文档或应用程序文件的名称来启动进程资源,并将资源与新的 Process 组件关联
  12:            Process.Start("iisreset");
13: }如上就是简单利用编程有效控制ISS服务运行状态.
应用程序池创建与控制
ISS应用程序池是将一个或多个应用程序链接到一个或多个工作进程集合的配置。因为应用程序池中的应用程序与其他应用程序被工作进程边界分隔,所以某个应用程序池中的应用程序不会受到其他应用程序池中应用程序所产生的问题的影响, 当我们新建一个应用程序时 有时客户端环境我们无法清除预知, 为了尽量减少影响ISS设置外在因素, 我们把新建虚拟目录放到一个独立应用程序池中.
当创建一个虚拟目录后,也同时创建一个程序池 把虚拟目录放到其中:
1:        /// <summary>
   2:        /// 建立程序池后关联相应应用程序及虚拟目录
   3:        /// </summary>
   4:        public static void SetAppToPool(string appname)
   5:        {
   6:            //获取目录
   7:            DirectoryEntry getdir = new DirectoryEntry("IIS://localhost/W3SVC");
   8:            foreach (DirectoryEntry getentity in getdir.Children)
   9:            {
  10:                if (getentity.SchemaClassName.Equals("IIsWebServer"))
  11:                {
  12:                     //设置应用程序程序池 先获得应用程序 在设定应用程序程序池
  13:                     //第一次测试根目录
  14:                    foreach (DirectoryEntry getchild in getentity.Children)
  15:                    {
  16:                        if (getchild.SchemaClassName.Equals("IIsWebVirtualDir"))
  17:                        {
  18:                            //找到指定的虚拟目录.
  19:                            foreach (DirectoryEntry getsite in getchild.Children)
  20:                            {
  21:                                if (getsite.Name.Equals(appname))
  22:                                {
  23:                                    //【测试成功通过】
  24:                                    getsite.Properties["AppPoolId"].Value = appname;
  25:                                    getsite.CommitChanges();
  26:                                }
  27:                            }
  28:                        }
  29:                    }
  30:                }
  31:            }
  32:        }
思路如下: 首先获得ISS的根目录即ISS://localhost/W3SVC. 获取成功后通过SchemaClassName获取节点类型.ISSWebServer普通目录 ISSWebVirturalDir虚拟目录. 通过虚拟目录的Name唯一名称获取指定虚拟目录, 在通过属性参数AppPoolId设置附属的应用程序池的名称. 然后提交保存.
其实通过应用我们可以清晰看到ISS中各个目录之间的关联关系.上面是修改一个已经存储在应用程序池,如何创建:
1:        public static bool CreateAppPool(string metabasePath, string appPoolName, string Username, string Password)
   2:        {
   3:            bool issucess = false;
   4:            try
   5:            {
   6:                if (metabasePath.EndsWith("/W3SVC/AppPools"))
   7:                {
   8:                    if (MyIISHelper.AppPoolExist(appPoolName))
   9:                    {
  10:                        //已经存在 先删除这个AppPool 在创建
  11:                        //MessageBox.Show("当前以站点名称命名的程序池已经存在!");
  12:                        DeleteRepPool(appPoolName);
  13:                    }
  14:
  15:                        //创建一个新程序池
  16:                        DirectoryEntry newpool;
  17:                        DirectoryEntry apppools = new DirectoryEntry(metabasePath);
  18:                        newpool = apppools.Children.Add(appPoolName, "IIsApplicationPool");
  19:
  20:                        //设置属性 访问用户名和密码 一般采取默认方式
  21:                        newpool.Properties["WAMUserName"][0] = Username;
  22:                        newpool.Properties["WAMUserPass"][0] = Password;
  23:                        newpool.Properties["AppPoolIdentityType"][0] = "3";
  24:                        newpool.CommitChanges();
  25:                }
  26:                return issucess;
  27:            }
  28:            catch// (Exception ex)
  29:            {
  30:                return false;
  31:            }
  32:        }
基本上和创建一个DirectoryEntity雷同但注意指定的Schome类型是IIsApplicationPool用来标识创建的是一个应用程序池.当然创建可以删除 删除方式如下:
   1:  DirectoryEntry appPool = new DirectoryEntry("IIS://localhost/W3SVC/AppPools");
   2:   foreach (DirectoryEntry getdir in appPool.Children)
   3:     {
   4:         if (getdir.Name.Equals(appname))
   5:            {
   6:              getdir.DeleteTree();//删除
   7:            }
   8:     }
关于应用程序池如果不做任何设置则在ISS中会被DefaultPool中添加, 但有时默认程序池设置环境不一定能够满足当前程序需求,例如最常见的关于.NET版本的控制. 其中对3.0和3.5版本应用设置需要重新注册3.5 .NET FrameWork.部分组件这就涉及到一个.NET版本问题.
.NET版本问题
在进行ISS控制中当然也是遇到各种各样的问题, 一方面因为测试XP 2003系统环境不同, 需要控制因素过多,当然其中值得一提就是关于整个应用程序池的.NET版本问题.我们先来看看多版本下ISS中设置:
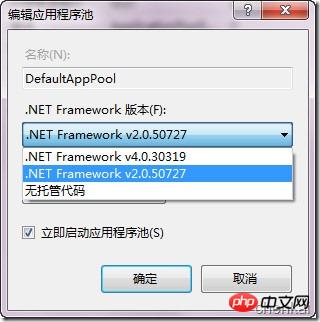
如果我们的应用程序使用3.0或3.5版本 则在应用程序池的没有对应的.NET版本.这时应用程序运行会提示一个Http错误404.17 notFound:
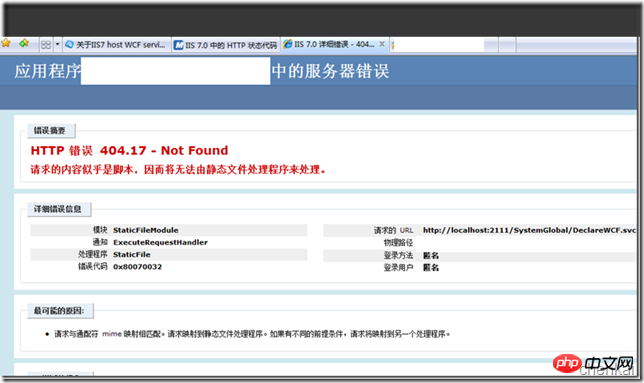
En fait, lorsque ISS gère le mappage du pool d'applications vers la version .NET, Net3.03.5 n'a pas le gestionnaire aspnet_isapi.dll, donc lorsque le site Web spécifié dans IIS s'applique au framework , c'est pourquoi nous ne pouvons pas voir la version .Net3.03.5 lors du mappage ISS. Le moyen le plus direct est de réenregistrer .NET 3.5 hébergé par la version .NET 2.0 : à ce stade, nous devons exécuter un. Commande Cmd :
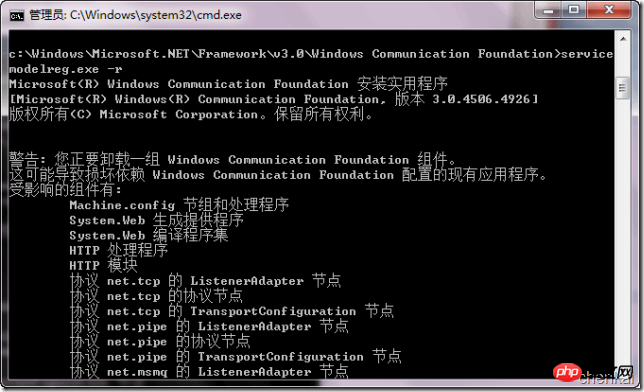
Basculez la version .net du pool d'applications vers .net 2.0. Implémentez également l'hébergement .net 3.0/3.5.
. Environnement d'utilisation et conditions de test
L'application et le code ci-dessus sont tous transmis sous Windows 7./XP2/Windows Server 2003. La version ISS correspondante va de ISS5.0/5.1 à Iss 6.0/7.0, y compris ISS7.0. Longueur limitée. Dans la pratique, il existe encore de nombreux détails sur le fonctionnement de l'ISS et je ne peux pas tout couvrir. Je pense qu'il est fondamental ou important de se concentrer sur cela. il existe de nombreux autres facteurs concernant l'ISS, il est donc difficile de contrôler cet aspect. La programmation ne peut que faire des compromis et choisir délibérément l'effet que vous souhaitez. Ne soyez pas avide de gros et recherchez la perfection, car le processus de contrôle lui-même est un processus compliqué. . L'environnement client ne peut pas être unifié
.Ce qui précède est le contenu détaillé de. pour plus d'informations, suivez d'autres articles connexes sur le site Web de PHP en chinois!

