Maison >Java >javaDidacticiel >Comment utiliser ListView dans le didacticiel de développement Android
Comment utiliser ListView dans le didacticiel de développement Android
- 高洛峰original
- 2017-01-20 15:28:411917parcourir
Le premier est le fichier de mise en page. Deux fichiers de mise en page sont nécessaires ici. L'un est le fichier de mise en page principal. Le problème est que l'identifiant du contrôle ListView doit utiliser le android:id="@android:id/ intégré. list" du système Android [Notez le formulaire]
main.xml
<?xml version="1.0" encoding="utf-8"?>
<LinearLayout xmlns:android="http://schemas.android.com/apk/res/android"
    android:layout_width="match_parent"
    android:layout_height="match_parent"
    android:orientation="vertical" >
        <ListView
        android:id="@android:id/list"
        android:layout_width="match_parent"
        android:layout_height="match_parent"
        android:padding="20dip"/>
</LinearLayout>
list_item.xml
<?xml version="1.0" encoding="utf-8"?>
<LinearLayout xmlns:android="http://schemas.android.com/apk/res/android"
    android:layout_width="match_parent"
    android:layout_height="match_parent"
    android:orientation="horizontal" >

    <TextView
        android:id="@+id/user_name"
        android:layout_width="match_parent"
        android:layout_height="match_parent"
        android:layout_weight="1"/>
    <TextView
        android:id="@+id/user_id"
        android:layout_width="match_parent"
        android:layout_height="match_parent"
        android:layout_weight="1"/>
</LinearLayout>
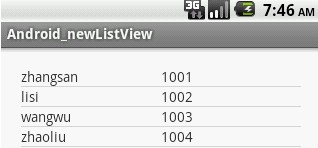
Puis définissez le code dans MainActivity : la base L'idée est d'ajouter d'abord les données à ArrayList, puis de définir l'adaptateur SimpleAdapter pour terminer le réglage, entrez ce qui suit :
package com.example.android_newlistview;
import java.util.ArrayList;
import java.util.HashMap;
import java.util.Map;
import android.os.Bundle;
import android.app.Activity;
import android.app.ListActivity;
import android.view.Menu;
import android.widget.SimpleAdapter;
public class MainActivity extends ListActivity {

    String[] from={"name","id"};              //这里是ListView显示内容每一列的列名
    int[] to={R.id.user_name,R.id.user_id};   //这里是ListView显示每一列对应的list_item中控件的id

    String[] userName={"zhangsan","lisi","wangwu","zhaoliu"}; //这里第一列所要显示的人名
    String[] userId={"1001","1002","1003","1004"};  //这里是人名对应的ID

    ArrayList<HashMap<String,String>> list=null;
    HashMap<String,String> map=null;
    @Override
    protected void onCreate(Bundle savedInstanceState) {
        // TODO Auto-generated method stub
        super.onCreate(savedInstanceState);
        setContentView(R.layout.main);       //为MainActivity设置主布局
        //创建ArrayList对象;
        list=new ArrayList<HashMap<String,String>>();
        //将数据存放进ArrayList对象中,数据安排的结构是,ListView的一行数据对应一个HashMap对象,
        //HashMap对象,以列名作为键,以该列的值作为Value,将各列信息添加进map中,然后再把每一列对应
        //的map对象添加到ArrayList中

        for(int i=0; i<4; i++){
            map=new HashMap<String,String>();       //为避免产生空指针异常,有几列就创建几个map对象
            map.put("id", userId[i]);
            map.put("name", userName[i]);
            list.add(map);
        }

        //创建一个SimpleAdapter对象
        SimpleAdapter adapter=new SimpleAdapter(this,list,R.layout.list_item,from,to);
        //调用ListActivity的setListAdapter方法,为ListView设置适配器
        setListAdapter(adapter);
    }
}
Une autre façon de répondre au clic sur une certaine ligne consiste à remplacer la méthode onListItemClick, en fonction de la position renvoyée (à partir de 0) :
@Override
 protected void onListItemClick(ListView l, View v, int position, long id) {
  // TODO Auto-generated method stub
  super.onListItemClick(l, v, position, id);
 }
Plus de tutoriels de développement Android sur l'utilisation de ListView Pour les articles liés aux méthodes, veuillez faire attention au PHP Site chinois !

