

 Tutoriel systèmeLinuxComment ajouter, supprimer et accorder des privilèges sudo aux utilisateurs de Debian 12
Comment ajouter, supprimer et accorder des privilèges sudo aux utilisateurs de Debian 12

In Debian, managing user privileges and administrative access is crucial for maintaining a secure and efficient system. By granting users the ability to execute administrative tasks without relying on the root account, you can enhance security, control access to sensitive operations, and maintain an audit trail of user activity. This detailed guide walks you through the steps to add, delete, and grant sudo privileges to users in Debian Linux.
Whether you're setting up a new Debian system or need to manage user accounts on an existing installation, this step-by-step tutorial is designed to provide clear instructions and explanations that even beginners can follow.
By the end of this guide, you'll have a solid understanding of how to create new user accounts, grant them sudo access, and remove users when necessary.
Before getting into the topic of adding, deleting, and granting sudo privileges to users in Debian, it's essential to understand what sudo is and the advantages it offers.
Table of Contents
1. What is Sudo?
The sudo (Superuser Do) command in Linux and Unix-like systems allows authorized users to execute commands with the privileges of the superuser or another user. It enables users to perform administrative tasks without logging in as the root user permanently.
The primary purpose of sudo is to provide a safer and more controlled approach to system administration. Instead of granting full root access to users, sudo enables privilege separation, limiting the scope of elevated privileges to specific commands or operations.
2. Advantages of Sudo Users
Here are some key aspects regarding sudo and the advantages of having a sudo user:
1. Privilege Separation
By default, Linux systems have a root user account with full administrative privileges. However, logging in as the root user can be risky because any command executed has unrestricted access to the entire system.
Sudo provides a way to separate regular user accounts from privileged tasks, allowing users to perform administrative actions only when needed.
2. Limited Privilege Escalation
Sudo allows specific users or groups to execute specific commands with elevated privileges. This provides a controlled and auditable way to grant temporary administrative access to trusted users.
Users can execute individual commands or a series of commands with sudo by authenticating themselves with their own password, rather than the root password.
3. Auditing and Accountability
Sudo logs all executed commands, providing an audit trail for system administrators. This audit trail helps track who executed which commands and when, enhancing system security and accountability.
The logs generated by sudo can be analyzed to investigate security incidents, troubleshoot issues, and monitor user activity.
4. Fine-Grained Access Control
With sudo, system administrators can define granular access control policies for different users or groups. This allows them to specify precisely which commands or operations each user can perform with elevated privileges.
Access control can be customized based on factors such as user roles, specific systems or services, and even specific command options.
5. Reduced Risk of Accidental Damage
Using sudo helps mitigate the risk of accidental damage caused by executing privileged commands. With sudo, users need to deliberately prefix a command with sudo to run it with elevated privileges, reducing the likelihood of unintentional system modifications or deletions.
It provides an extra layer of safety by prompting users for authentication before executing privileged operations, ensuring they are aware of the consequences of their actions.
6. Collaboration and Delegation
Sudo facilitates collaboration among system administrators by allowing them to delegate specific administrative tasks to other users without sharing the root password.
By assigning sudo privileges to trusted users, the workload can be distributed, and routine administrative tasks can be performed by designated individuals without requiring full root access.
In summary, having a sudo user provides a more secure and controlled approach to system administration. It enhances security, accountability, and flexibility by enabling limited privilege escalation, fine-grained access control, auditing, and delegation of administrative tasks.
3. Add a New User in Debian
To create a new sudo user in Debian, you need to have either an existing sudo user or root access to the system. This requirement ensures that only authorized users can grant sudo privileges to others.
In order to add a new user, follow these steps:
Log in to your Debian system using an existing sudo user account or as the root user. Open a terminal or connect to your Debian system via SSH.
If you have an existing sudo user:
Run the following command to create a new user:
$ sudo adduser senthil
Replace "senthil" with the desired username for the new sudo user.
Enter a strong password for the new user when prompted.
Provide any additional information requested during the user creation process.
If you have root access:
If the currently logged-in user does not have sudo rights, you will need to switch to the root account in order to create new sudo users.
Use any one of the following commands to switch to root user.
$ su -l
Or
$ su -
By using su -l or su -, the root shell is initialized with an environment similar to a normal 'login' shell. This means that the root user's $PATH variable is correctly initialized, ensuring that system directories such as /sbin are included.
Next, run the following command to create a new user:
# adduser senthil
Again, replace "senthil" with your own username.
You will be prompted to set a password for the new user. Enter a strong password and confirm it.
Additional information about the new user, such as their full name, phone number, etc., may be requested. You can enter the information or leave it blank by pressing Enter.
Adding user `senthil' ...
Adding new group `senthil' (1001) ...
Adding new user `senthil' (1001) with group `senthil (1001)' ...
Creating home directory `/home/senthil' ...
Copying files from `/etc/skel' ...
New password:
Retype new password:
passwd: password updated successfully
Changing the user information for senthil
Enter the new value, or press ENTER for the default
	Full Name []:
	Room Number []:
	Work Phone []:
	Home Phone []:
	Other []:
Is the information correct? [Y/n] y
Adding new user `senthil' to supplemental / extra groups `users' ...
Adding user `senthil' to group `users' ...

3.1. Check Sudo Privileges for a Specific User
After creating a new user named "senthil", it's important to note that this user does not have sudo access by default. Without sudo privileges, the user won't be able to perform administrative tasks.
To verify whether a user has sudo access or not, you can use the following command:
# sudo -l -U senthil
Replace "senthil" with the actual username you want to check.
Sample output:
User senthil is not allowed to run sudo on debian12.

As you can see, the user "senthil" has not been granted sudo privileges yet. If the user "senthil" has sudo access, the output will show the allowed commands and their associated restrictions, if any.
In the next steps, we will cover how to grant sudo privileges to the user "senthil" so they can perform administrative tasks.
4. Grant Sudo Privileges to Users in Debian
Add the newly created user to sudo group using the following command:
If you have an existing sudo user:
$ sudo adduser senthil sudo
If you have root access:
# adduser senthil sudo
Sample output:
Adding user `senthil' to group `sudo' ...
Done.

We granted sudo permission to the user "senthil".
You can also the following command to add a user to sudo group.
# sudo usermod -aG sudo senthil
Now verify if the user is added in the sudo group, using command
# sudo -l -U senthil
Sample output:
Matching Defaults entries for senthil on debian12:
    env_reset, mail_badpass,
    secure_path=/usr/local/sbin\:/usr/local/bin\:/usr/sbin\:/usr/bin\:/sbin\:/bin,
    use_pty

User senthil may run the following commands on debian12:
    <strong><mark>(ALL : ALL) ALL</mark></strong>

Here, the line (ALL : ALL) ALL in the above output indicates that the user "senthil" can run any command (ALL) as any user (ALL) with all available privileges.
The output confirms that the user "senthil" has been granted unrestricted sudo privileges on the Debian 12 system, allowing him to run any command as any user with full administrative capabilities.
If you view the contents of the sudoers file;
$ sudo cat /etc/sudoers
You would see some lines like below.
# User privilege specification
root	ALL=(ALL:ALL) ALL

# Members of the admin group may gain root privileges
%admin ALL=(ALL) ALL

# Allow members of group sudo to execute any command
<strong><mark>%sudo	ALL=(ALL:ALL) ALL</mark></strong>

# See sudoers(5) for more information on "@include" directives:

@includedir /etc/sudoers.d
The directive %sudo ALL=(ALL:ALL) ALL in the /etc/sudoers file is a rule that specifies the sudo privileges for members of the "sudo" group. Let's break down what each part of the directive means:
- %sudo: This signifies that the rule applies to all users who are members of the "sudo" group. The % character denotes a group name.
- ALL=(ALL:ALL): This portion defines the scope of the sudo rule. It indicates that the rule applies to any host (ALL) and allows users in the "sudo" group to run commands as any user and any group.
- The first "ALL" represents the hosts or machines on which the sudo rule is applicable. In this case, "ALL" means the rule applies to any host. It allows members of the "sudo" group to execute commands with sudo privileges from any machine.
- The second "ALL" represents the users or accounts as whom the commands can be executed. "ALL" means the members of the "sudo" group can run commands as any user on the system.
- The third "ALL" represents the groups that the sudo commands can be executed as. Again, "ALL" means that the members of the "sudo" group can execute commands as any group on the system.
- ALL: This specifies that the members of the "sudo" group can run any command.
In summary, the directive %sudo ALL=(ALL:ALL) ALL allows any user who is a member of the "sudo" group to execute any command with full administrative privileges. It grants broad sudo access to the users in the "sudo" group, enabling them to perform a wide range of administrative tasks on the system.
Since the user "senthil" is a member of "sudo" group, he can now run any command on any host. To put this in other word, he is one of the administrator.
5. Verify Sudo Privilege of Users
To verify if a user has the ability to perform administrative tasks with sudo, Log out from the current user session. On the login screen, select the new user you created. Enter the password for the new user and log in.
Alternatively, you can quickly switch to the new user using the following command:
# sudo -i -u senthil
This command will instantly switch you to the specified user, in this case, "senthil".
Once you are switched to the user, run any commands with the sudo prefix to perform administrative tasks. For example:
$ sudo apt update

As you witnessed in the above output, the user "senthil" has the ability to run administrative tasks with sudo privilege.
6. Remove Sudo Access from Users
Removing sudo access from a user in Debian systems is a delicate process that requires caution. It's important to ensure that you do not remove the real administrator from the "sudo" group, as there should always be at least one sudo user in the system.
To revoke sudo permissions from a user, follow these steps:
Make sure you are logged out from the user's session ("senthil") and logged in as another user with sudo privileges.
To remove the user "senthil" from the "sudo" group, use the following command:
$ sudo deluser senthil sudo
This command will revoke the user's sudo permissions by removing them from the "sudo" group. Note that this action does not permanently delete the user from the system.
Sample output:
Removing user `senthil' from group `sudo' ...
Done.
Alternatively, you can use the following command to revoke sudo permissions:
$ sudo gpasswd -d senthil sudo
Running this command will have the same effect of removing the user "senthil" from the "sudo" group.
After executing either of these commands, the user "senthil" will no longer have sudo access and will be considered a regular user without administrative privileges.
To verify if the user has indeed been removed from the "sudo" group, you can run the following command:
$ sudo -l -U senthil
This command will display the user's sudo privileges. If the user is no longer listed as having sudo access, it confirms that the sudo permissions have been successfully revoked.
User senthil is not allowed to run sudo on debian12.

The user "senthil" is now removed from sudoer list.
7. Remove Users Permanently
Please exercise caution when permanently deleting users from the system, as this action is not reversible. Double-check that you are removing the correct user, and ensure that you have taken appropriate backups or precautions to prevent any unintended data loss.
To permanently delete users from a Linux system, including their home directory and mail spool, follow these steps:
Ensure that you are logged in as the root user or a user with sudo privileges.
To delete a user, use the following command:
$ sudo deluser senthil
Replace "senthil" with the actual username of the user you want to remove.
This command will remove the specified user from the system, including their user account details. However, their home directory and mail spool will remain intact.
If you want to remove the user's home directory and mail spool along with their account, use the --remove-home option:
$ sudo deluser --remove-home senthil
This command ensures that not only the user account but also their home directory and mail spool are deleted.
Conclusion
Managing user privileges and granting sudo access in Debian systems is an essential aspect of maintaining system security and controlling administrative tasks. By following the step-by-step instructions provided, even beginners can successfully add, grant sudo access, and manage users in Debian systems.
Remember to exercise caution when using sudo, grant privileges only to trusted users, and regularly review sudo logs to monitor user activity and identify any potential security issues.
Related Read:
- Add, Delete And Grant Sudo Privileges To Users In Alpine Linux
- Add, Delete And Grant Sudo Privileges To Users In Arch Linux
- Add, Delete And Grant Sudo Privileges To Users In CentOS
- Add, Delete And Grant Sudo Privileges To Users In Fedora
- Add, Delete And Grant Sudo Privileges To Users In Ubuntu
- How To Allow Or Deny Sudo Access To A Group In Linux
Ce qui précède est le contenu détaillé de. pour plus d'informations, suivez d'autres articles connexes sur le site Web de PHP en chinois!

 Comment utiliser & # 039; suivant & # 039; Commande avec awk dans Linux - Partie 6May 15, 2025 am 10:43 AM
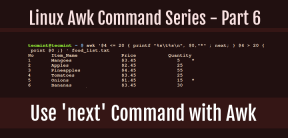
Dans ce sixième épisode de notre série AWK, nous explorerons la commande suivante, qui contribue à améliorer l'efficacité de vos exécutions de script en sautant les étapes de traitement redondantes. Quelle est la commande suivante? La commande suivante dans awk instruc
 Comment transférer efficacement les fichiers dans LinuxMay 15, 2025 am 10:42 AM
Le transfert de fichiers dans les systèmes Linux est une tâche courante que chaque administrateur système doit maîtriser, en particulier en ce qui concerne la transmission réseau entre les systèmes locaux ou distants. Linux fournit deux outils couramment utilisés pour accomplir cette tâche: SCP (réplication sécurisée) et RSYNC. Les deux fournissent un moyen sûr et pratique de transférer des fichiers entre les machines locales ou distantes. Cet article expliquera en détail comment utiliser les commandes SCP et RSYNC pour transférer des fichiers, y compris les transferts de fichiers locaux et distants. Comprendre le SCP (Secure Copy Protocol) dans la commande Linux SCP est un programme de ligne de commande utilisé pour copier en toute sécurité les fichiers et les répertoires entre deux hôtes via SSH (Secure Shell), ce qui signifie que lorsque les fichiers sont transférés sur Internet, le nombre de
 10 environnements de bureau Linux les plus populaires de tous les tempsMay 15, 2025 am 10:35 AM
Une caractéristique fascinante de Linux, contrairement à Windows et Mac OS X, est sa prise en charge d'une variété d'environnements de bureau. Cela permet aux utilisateurs de bureau de sélectionner l'environnement de bureau le plus approprié et le plus ajusté en fonction de leurs exigences informatiques.
 Comment installer LibreOffice 24.8 dans Linux DesktopMay 15, 2025 am 10:15 AM
LibreOffice se démarque comme une suite de bureaux robuste et open source, adaptée aux plates-formes Linux, Windows et Mac. Il possède un éventail de fonctionnalités avancées pour gérer les documents de mots, les feuilles de calcul, les présentations, les dessins, les calculs et la mathématica
 Comment travailler avec les fichiers PDF à l'aide de documents uniquement Office dans LinuxMay 15, 2025 am 09:58 AM
Les utilisateurs de Linux qui gèrent les fichiers PDF ont un large éventail de programmes à leur disposition. Plus précisément, il existe de nombreux outils PDF spécialisés conçus pour diverses fonctions.
 Comment filtrer la sortie de la commande à l'aide de awk et stdinMay 15, 2025 am 09:53 AM
Dans les segments précédents de la série de commandes AWK, notre objectif était principalement de lire les entrées des fichiers. Cependant, que se passe-t-il si vous avez besoin de lire l'entrée de Stdin? Dans la partie 7 de la série AWK, nous explorerons plusieurs exemples où vous pouvez utiliser la sortie de O
 CLIFM - Gestionnaire de fichiers de terminal-rapide à Lightning pour LinuxMay 15, 2025 am 09:45 AM
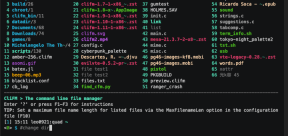
Clifm se distingue comme un gestionnaire de fichiers de ligne de commande distinctif et incroyablement rapide, conçu sur la base d'une interface de type coquille. Cela signifie que les utilisateurs peuvent s'engager avec leur système de fichiers en utilisant les commandes qu'ils connaissent déjà.
 Comment passer de Linux Mint 21.3 à Linux Mint 22May 15, 2025 am 09:44 AM
Si vous préférez ne pas effectuer une nouvelle installation de Linux Mint 22 Wilma, vous avez la possibilité de passer à partir d'une version précédente.


Outils d'IA chauds

Undresser.AI Undress
Application basée sur l'IA pour créer des photos de nu réalistes

AI Clothes Remover
Outil d'IA en ligne pour supprimer les vêtements des photos.

Undress AI Tool
Images de déshabillage gratuites

Clothoff.io
Dissolvant de vêtements AI

Video Face Swap
Échangez les visages dans n'importe quelle vidéo sans effort grâce à notre outil d'échange de visage AI entièrement gratuit !

Article chaud
Outils chauds

Navigateur d'examen sécurisé
Safe Exam Browser est un environnement de navigation sécurisé permettant de passer des examens en ligne en toute sécurité. Ce logiciel transforme n'importe quel ordinateur en poste de travail sécurisé. Il contrôle l'accès à n'importe quel utilitaire et empêche les étudiants d'utiliser des ressources non autorisées.

VSCode Windows 64 bits Télécharger
Un éditeur IDE gratuit et puissant lancé par Microsoft

MantisBT
Mantis est un outil Web de suivi des défauts facile à déployer, conçu pour faciliter le suivi des défauts des produits. Cela nécessite PHP, MySQL et un serveur Web. Découvrez nos services de démonstration et d'hébergement.

Adaptateur de serveur SAP NetWeaver pour Eclipse
Intégrez Eclipse au serveur d'applications SAP NetWeaver.

Listes Sec
SecLists est le compagnon ultime du testeur de sécurité. Il s'agit d'une collection de différents types de listes fréquemment utilisées lors des évaluations de sécurité, le tout en un seul endroit. SecLists contribue à rendre les tests de sécurité plus efficaces et productifs en fournissant facilement toutes les listes dont un testeur de sécurité pourrait avoir besoin. Les types de listes incluent les noms d'utilisateur, les mots de passe, les URL, les charges utiles floues, les modèles de données sensibles, les shells Web, etc. Le testeur peut simplement extraire ce référentiel sur une nouvelle machine de test et il aura accès à tous les types de listes dont il a besoin.

