


Sometimes a chance to show somebody how things are done proves more effective than having to come up with lengthy instructions. This is often true for educators, developers, IT support, YouTubers, online businesses, and teams working from different locations and even different time zones.
Taking a video of your actions as they happen on the screen of your Mac is called screen recording. (You can record your entire screen, a selected portion of the screen, or an app window.)
Ways to record screen with audio |
Steps to follow |
With a specialized third-party app |
Install and open CleanShot X. Choose Record Screen > Press Space bar > Click the microphone icon to Record MacBook Microphone or other source. Install and open iShowU. Set recording preferences and press the red circled dot in the bottom right corner of the app to start recording. |
With Mac’s webcam |
Install and open Capto. Choose the Record option from the toolbar > Select Record Camera > FaceTime HD Camera > Start recording. |
Using Mac’s built-in tools |
Use QuickTime from the menu bar to record the screen. |
With a Mac keyboard shortcut using a microphone |
Press Command + Shift + 5 > Click Options to turn on the audio recording > Record. |

Record your Mac’s screen with Capto
Capture, edit, and share your Mac screen effortlessly with Capto. Record any screen area and add real-time voiceovers.
Try free Security-testedThe best Mac screen recorder option for your Mac
A great comprehensive all-in-one tool for screen recording Mac users can rely on is Capto.
With Capto you get to not only record your screen with real-time voiceover and webcam feed, but also edit your video and audio tracks, add text or speech bubbles, and share instantly from the app:
- Capture a specific app window, a browser, your whole screen, or select an area of any size with any number of windows in it
- Hide desktop while recording
- Take screenshots
- Edit video and images: crop, cut, fade in and fade out for audio
- Add annotations
- Share to Dropbox, YouTube, Facebook, and all possible shared storages, including FTP/SFTP servers

You can also use iShowU to record your screen. This app is particularly handy for creating product walkthroughs and demos and it can record high quality video with a selfie cam overlay. This allows you to create videos with a “talking head” inserted in them.
iShowU can also replace the background in your selfie video to make it look more polished and professional.

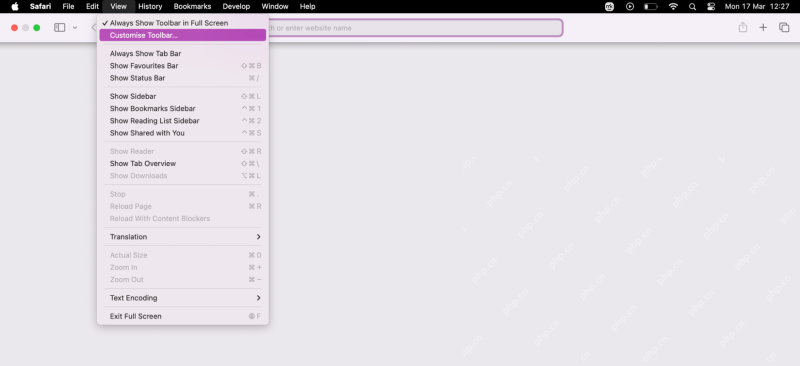
How to record your screen on Mac using the Screenshot toolbar
If you’re wondering, “Can I screen record on my Mac with a native macOS utility?” the answer is — yes. Apple has its own built-in screen recording feature called Screenshot that lets you capture video of whatever’s happening on your screen (with real-time audio, should you choose to).
You can use the Screenshot toolbar for taking both screenshots and video recordings of your screen (for video choose from the last two screen icons with a dot in the lower right corner).
To record with Screenshot:
- Press Shift + Command + 5 to open the toolbar
- Choose Record Entire Screen or Record Selected Portion (you’ll be able to drag and resize the frame of the screen area you want to be recorded, if you choose this option)
- Go to Options and choose microphone settings, decide where you’d like to save your recording to, or set a countdown timer
- Click on Record to start the recording
- Click on Stop Recording menu bar icon when you’re done
If your Screenshot toolbar is already set to screen recording, you can use hotkeys for recording your screen: press Shift + Command + 5 to start the recording and Command + Control + Esc to stop the recording.
How to record audio in screen recordings
When you think about how to screen record on MacBook, it’s important to also understand how to include sound in your videos.
As we have already discussed, your native Mac screen recorder allows you to capture audio from your Mac’s built-in microphone, but if you’re looking for more advanced capabilities (like creating and editing voiceovers or learning to record your Skype meetings), you can find out more from our dedicated article on how to record your screen on Mac with sound.
How to screen record on Mac using QuickTime
Another option to record a screen Mac users can try is QuickTime Player. We know this app for playing media files, but it can also be used for recording your screen and sound.
To use QuickTime Player as a Mac screen recorder, simply launch it from Applications and choose New Screen Recording from the File menu. This will open the Screenshot toolbar that lets you configure and start your recording.
The only difference with Screenshot is that with QuickTime Player, once you’re done recording, your file will automatically open inside the app and you can edit it right away.

Read also:
- Crop Video on Mac
- No Clutter Screen Capturing for Mac
- Record Edit Share Videos on Mac
- Take A Scrolling Screenshot
How to screen record for collaboration
Another great tool for asynchronous screen sharing is CleanShot X.It’s a simple screen recording macOS app that comes with a rich toolkit, allowing you to capture your screen without desktop icons, record as MP4 or GIF, trim video, annotate, and keep your recordings saved on CleanShot’s cloud for free — all a few clicks on the menu bar icon away.

How to record a screen with OBS Studio
Another popular contender for Mac screen recorder of choice is OBS Studio.
OBS Studio is a free open-source app used for both streaming and screen recording by many content creators. It’s known for a variety of advanced features, but can also be easily used by beginners.
Understanding how to screen record on Mac with OBS Studio starts with the basics:
- Download (obsproject.com), install, and launch the app
- Set up video: Sources ➙ + icon ➙ Display Capture ➙ name the source ➙ OK
- Set up audio: OBS Studio is set to capture audio from the built-in microphone on your Mac by default — you can add external audio sources or apps for capturing system sound in Sources
- Choose where you want to save your recorded files: Controls ➙ Settings ➙ Output ➙ Recording ➙ Browse ➙ OK
- Choose Start Recording under Controls to begin screen recording Mac
- Press Stop Recording when you're finished

If you’re also looking for an advanced app to help you edit your recordings, check CamerBag Pro. It’s a powerful photo and video editor that allows for professional adjustments and offers pro-quality preset filters to add style to your creations.
How to record your screen on Mac and have an impact?
Being able to clearly get your point across even if you aren’t in the same room with your audience or colleagues is very important. Having a video recording to illustrate it — is priceless. Learning how to screen record on Mac is, without a doubt, a useful skill, and you can master it in no time with Mac’s built-in Screenshot and QuickTime Player or a more advanced OBS Studio screen recording setup.
If you’d like an effective tool that lets you both record and edit your videos from the same app on Mac, opt forCaptoorCleanShot X(if you also like creating GIFs). And, finally, for advance editing and pro quality image adjustments arm yourself withCamerBag Proto present your ideas with style.
Be sure to try Capto, CleanShot X, CameraBag Pro, and iShowU for free with the 7-day trial ofSetapp, a platform of high-performance apps for tasks on Mac and iPhone. Learn how to screen record MacBook and check out more than 250 other options to boost productivity.
FAQ
How to record screen and audio at the same time on Mac
All the above mentioned methods of screen recording Mac users can choose from allow for recording audio from Mac’s built-in mic: you can capture your voice commentary, as well as any sounds playing at the moment (music, app sounds, etc.)
How can I record my screen on Mac with sound but without a mic?
All Macs have an internal microphone built-in, so you don’t have to have an external microphone for capturing sound when screen recording Mac.
Where does screen recording go on a Mac?
The answer differs depending on the app you choose for recording your screen:
Mac’s native Screenshot utility saves recorded files to Desktop (you can choose a different location in Options ➙ Save to)
QuickTime Player automatically opens the video after you hit Stop Recording, and you can then choose where to save your file (File ➙ Save)
OBS Studio lets you locate recordings using the File menu (File ➙ Show Recordings)
-
Apps like CleanShot X save your files to your free in-app cloud account
What is the recording shortcut on Mac?
Use Shift + Command + 5 to start screen recording Mac.Ce qui précède est le contenu détaillé de. pour plus d'informations, suivez d'autres articles connexes sur le site Web de PHP en chinois!

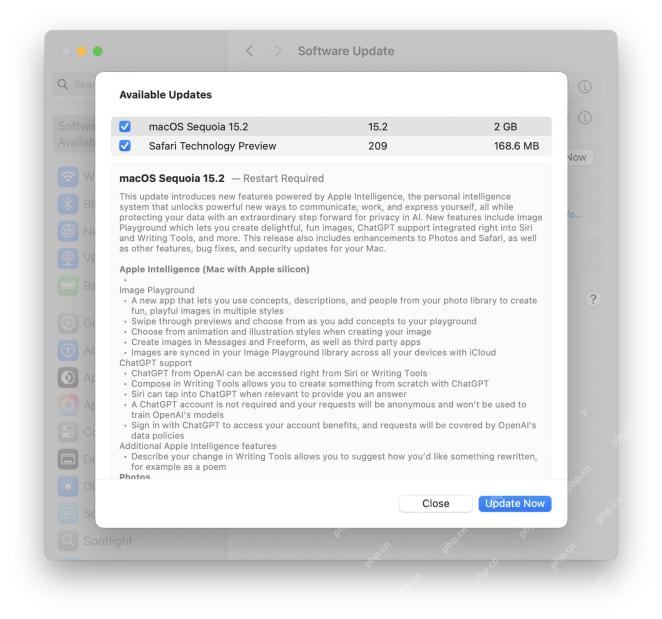
 Comment résumer les pages Web dans Safari pour MacMay 09, 2025 am 10:47 AM
La puissante fonctionnalité de simplification du Web du navigateur Safari: utilisez Apple Intelligence pour lire efficacement! L'une des fonctionnalités intégrées d'Apple Intelligence de Safari Browser est la fonctionnalité Web Snippet. Que le contenu d'une page Web soit un site Web de longue durée ou normal, Apple Intelligence peut générer rapidement un résumé, vous aidant rapidement à comprendre le contenu de la page Web et à gagner du temps. Cette fonctionnalité est très pratique à utiliser dans Safari pour Mac. Comment utiliser la fonctionnalité Web SSummary dans Safari pour Mac? Si vous utilisez un Apple Silicon Mac avec MacOS Sequoia 15 ou version ultérieure
 Comment résoudre les problèmes de recherche sur les projecteurs sur macOS SequoiaMay 09, 2025 am 10:36 AM
Un bon nombre d'utilisateurs de Mac ont découvert que la recherche de projecteurs ne fonctionne pas bien dans MacOS Sequoia, soit des fichiers, des applications manquants, et parfois ne fonctionne pas du tout pour trouver un fichier local. Pour certains utilisateurs, les problèmes de projecteur se produisent juste après t
 Comment personnaliser Safari sur Mac? Comment le personnaliser sur MacBook Air / Pro?May 09, 2025 am 10:35 AM
Personnalisez votre expérience safari sur MacBook: un guide complet Vous pouvez facilement personnaliser Safari sur votre MacBook pour améliorer votre expérience de navigation. Ce guide fournit une approche étape par étape pour personnaliser divers aspects de Safari, du T
![Comment faire taire les notifications sur iPhone? [Messages mutes et applications sur iOS]](https://img.php.cn/upload/article/001/242/473/174675709271104.jpg?x-oss-process=image/resize,p_40) Comment faire taire les notifications sur iPhone? [Messages mutes et applications sur iOS]May 09, 2025 am 10:18 AM
Comment faire taire les notifications sur iPhone? [Messages mutes et applications sur iOS]May 09, 2025 am 10:18 AMSilence Notifications iPhone: 6 façons de trouver votre paix Besoin d'une pause dans le buzz constant des notifications iPhone? Ce guide propose six méthodes pour faire taire votre iPhone, des bascules rapides au temps de calme planifié. Plongeons-nous! 1. Mode de mise au point: le
 Comment enregistrer les appels sur iPhoneMay 09, 2025 am 10:15 AM
La nouvelle fonction d'enregistrement d'appels iPhone ajoutée dans iOS 18.1 et plus rend l'enregistrement sans précédent! Appuyez simplement sur le bouton d'enregistrement à l'écran pour commencer l'enregistrement. Ce bouton est sur le même écran que les boutons de haut-parleur, muets et raccrocher, ce qui le rend pratique et rapide. Après le début de l'enregistrement, le système joue automatiquement la tonalité invite pour informer les deux parties que l'enregistrement est enregistré, mais il est préférable de le confirmer verbalement pour montrer le respect. Dites au revoir aux méthodes d'enregistrement fastidieuses passées, telles que l'utilisation d'un appel à trois partis pour transférer dans une messagerie vocale ou un enregistrement avec un ordinateur Mac. Le contenu d'appel enregistré sur iPhone sera automatiquement enregistré dans l'application Memo et enregistré avec le titre "Appelez avec (nom de contact ou numéro de téléphone)" afin que vous puissiez écouter, afficher la voix des enregistrements texte à tout moment et ajouter
 RC de MacOS Sequoia 15.2, iOS 18.2, iPados 18.2, publié pour les testsMay 09, 2025 am 09:55 AM
Apple a publié les candidats iOS 18.2, MacOS Sequoia 15.2 et iPados 18.2 (RC) pour tous les utilisateurs participant au programme de test bêta du logiciel Apple Systems. La version RC est généralement la version finale de la version bêta avant sa version publique, qui indique que la version officielle d'iOS 18.2, iPados 18.2 et MacOS Sequoia 15.2 sera publiée bientôt. En plus des correctifs de bogues réguliers et des améliorations de la sécurité, ces mises à jour logicielles à venir se concentrent sur l'apport de nouvelles fonctionnalités de renseignement Apple sur des appareils compatibles, y compris l'imag
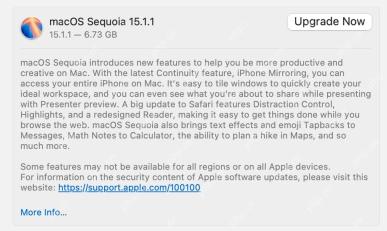 MacOS Sequoia 15.1.1 avec des correctifs de sécurité disponibles maintenantMay 09, 2025 am 09:40 AM
Apple a publié la mise à jour MacOS Sequoia 15.1.1, une petite mise à jour logicielle qui contient principalement des correctifs de sécurité Mac importants. Cette mise à jour ne contient aucune nouvelle fonctionnalité, mais corrige plusieurs vulnérabilités de sécurité qui sont activement exploitées, il est donc fortement recommandé d'installer cette mise à jour importante sur votre appareil Apple. De plus, Apple a publié iOS 18.1.1 pour iPhone, iPados 18.1.1, Visionos 2.1.1 et iOS 17.7.2 et iPados 17.7.2, qui incluent tous les mêmes correctifs de sécurité. Comment télécharger et installer Mac
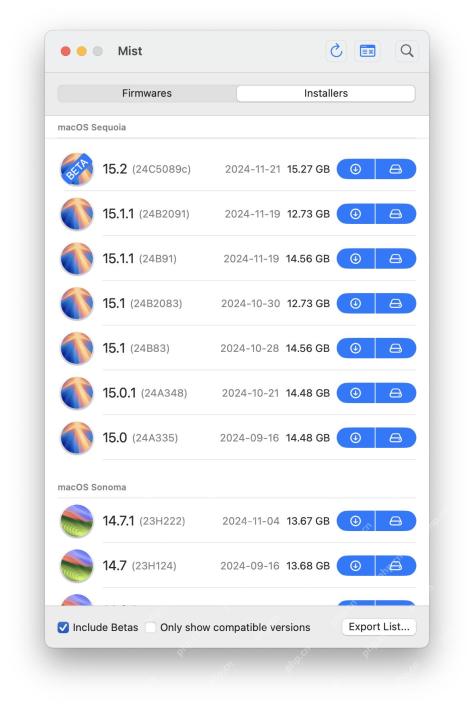 Mist facilite le téléchargement des installateurs de macOS et des firmwaresMay 09, 2025 am 09:37 AM
Mist: un outil puissant pour le téléchargement facile des installateurs et du micrologiciel macOS De nombreux utilisateurs de Mac, du personnel informatique et des administrateurs système aiment se tenir au courant des programmes d'installation de MacOS, y compris les versions actuelles et précédentes des logiciels système MacOS. De plus, de nombreux utilisateurs avancés de Mac et des professionnels de l'informatique doivent accéder à des fichiers de micrologiciels MACOS IPSW à tout moment pour restaurer les Mac de silicium Apple, les utiliser pour des machines virtuelles, et même pour le déploiement, le dépannage ou la simple reconfiguration et la configuration de votre Mac. C'est là que l'outil Free Mist entre en lecture, il est très facile de télécharger tout fichier de firmware MacOS IPSW disponible ou toute version de MacOS installateur. Bien que nous le maintenions


Outils d'IA chauds

Undresser.AI Undress
Application basée sur l'IA pour créer des photos de nu réalistes

AI Clothes Remover
Outil d'IA en ligne pour supprimer les vêtements des photos.

Undress AI Tool
Images de déshabillage gratuites

Clothoff.io
Dissolvant de vêtements AI

Video Face Swap
Échangez les visages dans n'importe quelle vidéo sans effort grâce à notre outil d'échange de visage AI entièrement gratuit !

Article chaud
Outils chauds

Navigateur d'examen sécurisé
Safe Exam Browser est un environnement de navigation sécurisé permettant de passer des examens en ligne en toute sécurité. Ce logiciel transforme n'importe quel ordinateur en poste de travail sécurisé. Il contrôle l'accès à n'importe quel utilitaire et empêche les étudiants d'utiliser des ressources non autorisées.

Dreamweaver Mac
Outils de développement Web visuel

Listes Sec
SecLists est le compagnon ultime du testeur de sécurité. Il s'agit d'une collection de différents types de listes fréquemment utilisées lors des évaluations de sécurité, le tout en un seul endroit. SecLists contribue à rendre les tests de sécurité plus efficaces et productifs en fournissant facilement toutes les listes dont un testeur de sécurité pourrait avoir besoin. Les types de listes incluent les noms d'utilisateur, les mots de passe, les URL, les charges utiles floues, les modèles de données sensibles, les shells Web, etc. Le testeur peut simplement extraire ce référentiel sur une nouvelle machine de test et il aura accès à tous les types de listes dont il a besoin.

ZendStudio 13.5.1 Mac
Puissant environnement de développement intégré PHP

SublimeText3 version Mac
Logiciel d'édition de code au niveau de Dieu (SublimeText3)

