
Maison >développement back-end >Tutoriel Python >Déployer un conteneur sans état sur Cloud Run
Déployer un conteneur sans état sur Cloud Run

- DDDoriginal
- 2024-10-08 06:10:30836parcourir
Je vais vous montrer comment déployer un conteneur simple sur Cloud Run.
Cloud Run est une plate-forme entièrement gérée qui vous permet d'exécuter votre code directement sur l'infrastructure évolutive de Google. Cloud Run est simple, automatisé et conçu pour vous rendre plus productif.
- Créez une application Hello World simple à l'aide de la bibliothèque fastapi (python)
- Conteneuriser l'application
- Configurer le workflow avec GCP
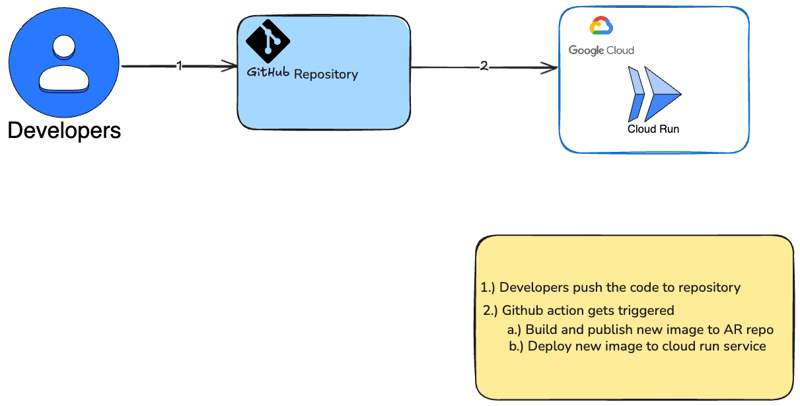
- Déployez le conteneur sur le service cloud via le workflow github
J'ai suivi la documentation officielle de Fastapi pour créer une application Hello World
Créez un fichier requirements.txt
fastapi[standard]
pydantic>=2.7.0,<3.0.0
- Créez un répertoire d'applications et entrez-le
- Créer un fichier vide init.py
- Créez un fichier main.py avec :
from typing import Union

from fastapi import FastAPI

app = FastAPI()


@app.get("/")
def read_root():
    return {"Hello": "World"}


@app.get("/items/{item_id}")
def read_item(item_id: int, q: Union[str, None] = None):
    return {"item_id": item_id, "q": q}
Créer un fichier Docker
FROM python:3.9

WORKDIR /code

COPY ./requirements.txt /code/requirements.txt

RUN pip install --no-cache-dir --upgrade -r /code/requirements.txt

COPY ./app /code/app

CMD ["fastapi", "run", "app/main.py", "--port", "80"]
Action GitHub
Pour que le processus d'actions GitHub récupère le fichier YAML, il existe un emplacement spécifique pour qu'il vive. Chaque référentiel utilisant des actions nécessite une structure de répertoires appelée /.github/workflows
*Configurer ce workflow avec GCP plus d'infos *
# This workflow build and push a Docker container to Google Artifact Registry
# and deploy it on Cloud Run when a commit is pushed to the $default-branch
# branch.
#
# To configure this workflow:
#
# 1. Enable the following Google Cloud APIs:
#
#    - Artifact Registry (artifactregistry.googleapis.com)
#    - Cloud Run (run.googleapis.com)
#    - IAM Credentials API (iamcredentials.googleapis.com)
#
#    You can learn more about enabling APIs at
#    https://support.google.com/googleapi/answer/6158841.
#
# 2. Create and configure a Workload Identity Provider for GitHub:
#    https://github.com/google-github-actions/auth#preferred-direct-workload-identity-federation.
#
#    Depending on how you authenticate, you will need to grant an IAM principal
#    permissions on Google Cloud:
#
#    - Artifact Registry Administrator (roles/artifactregistry.admin)
#    - Cloud Run Developer (roles/run.developer)
#
#    You can learn more about setting IAM permissions at
#    https://cloud.google.com/iam/docs/manage-access-other-resources
#
# 3. Change the values in the "env" block to match your values.
Créez un fichier google-cloudrun-docker.yml
name: 'Build and Deploy to Cloud Run'

on:
  push:
    branches:
      - '$default-branch'

env:
  PROJECT_ID: 'my-project' # TODO: update to your Google Cloud project ID
  REGION: 'us-central1' # TODO: update to your region
  SERVICE: 'my-service' # TODO: update to your service name
  WORKLOAD_IDENTITY_PROVIDER: 'projects/123456789/locations/global/workloadIdentityPools/my-pool/providers/my-provider' # TODO: update to your workload identity provider

jobs:
  deploy:
    runs-on: 'ubuntu-latest'

    permissions:
      contents: 'read'
      id-token: 'write'

    steps:
      - name: 'Checkout'
        uses: 'actions/checkout@692973e3d937129bcbf40652eb9f2f61becf3332' # actions/checkout@v4

      # Configure Workload Identity Federation and generate an access token.
      #
      # See https://github.com/google-github-actions/auth for more options,
      # including authenticating via a JSON credentials file.
      - id: 'auth'
        name: 'Authenticate to Google Cloud'
        uses: 'google-github-actions/auth@f112390a2df9932162083945e46d439060d66ec2' # google-github-actions/auth@v2
        with:
          workload_identity_provider: '${{ env.WORKLOAD_IDENTITY_PROVIDER }}'

      # BEGIN - Docker auth and build
      #
      # If you already have a container image, you can omit these steps.
      - name: 'Docker Auth'
        uses: 'docker/login-action@9780b0c442fbb1117ed29e0efdff1e18412f7567' # docker/login-action@v3
        with:
          username: 'oauth2accesstoken'
          password: '${{ steps.auth.outputs.auth_token }}'
          registry: '${{ env.REGION }}-docker.pkg.dev'

      - name: 'Build and Push Container'
        run: |-
          DOCKER_TAG="$${{ env.REGION }}-docker.pkg.dev/${{ env.PROJECT_ID }}/${{ env.SERVICE }}:${{ github.sha }}"
          docker build --tag "${DOCKER_TAG}" .
          docker push "${DOCKER_TAG}"
      - name: 'Deploy to Cloud Run'

        # END - Docker auth and build

        uses: 'google-github-actions/deploy-cloudrun@33553064113a37d688aa6937bacbdc481580be17' # google-github-actions/deploy-cloudrun@v2
        with:
          service: '${{ env.SERVICE }}'
          region: '${{ env.REGION }}'
          # NOTE: If using a pre-built image, update the image name below:

          image: '${{ env.REGION }}-docker.pkg.dev/${{ env.PROJECT_ID }}/${{ env.SERVICE }}:${{ github.sha }}'
      # If required, use the Cloud Run URL output in later steps
      - name: 'Show output'
        run: |2-

          echo ${{ steps.deploy.outputs.url }}
Structure des répertoires
Vous devriez maintenant avoir une structure de répertoires comme :
├── app
│   ├── __init__.py
│   └── main.py
├── Dockerfile
└── requirements.txt
└── requirements.txt
├── .github
│   ├── workflows
         ├── google-cloudrun-docker.yml
> 1. Create a new repo in gitHUb
> 2. Push your exisisting code to new repository on default branch
Ce qui précède est le contenu détaillé de. pour plus d'informations, suivez d'autres articles connexes sur le site Web de PHP en chinois!