
Maison >développement back-end >Golang >Construire un équilibreur de charge simple dans Go
Construire un équilibreur de charge simple dans Go

- WBOYWBOYWBOYWBOYWBOYWBOYWBOYWBOYWBOYWBOYWBOYWBOYWBoriginal
- 2024-09-07 22:30:37634parcourir
Les équilibreurs de charge sont cruciaux dans le développement de logiciels modernes. Si vous vous êtes déjà demandé comment les requêtes sont réparties sur plusieurs serveurs ou pourquoi certains sites Web semblent plus rapides même en cas de trafic intense, la réponse réside souvent dans un équilibrage de charge efficace.
Dans cet article, nous allons créer un équilibreur de charge d'application simple en utilisant l'algorithme Round Robin dans Go. Le but de cet article est de comprendre comment fonctionne un équilibreur de charge sous le capot, étape par étape.
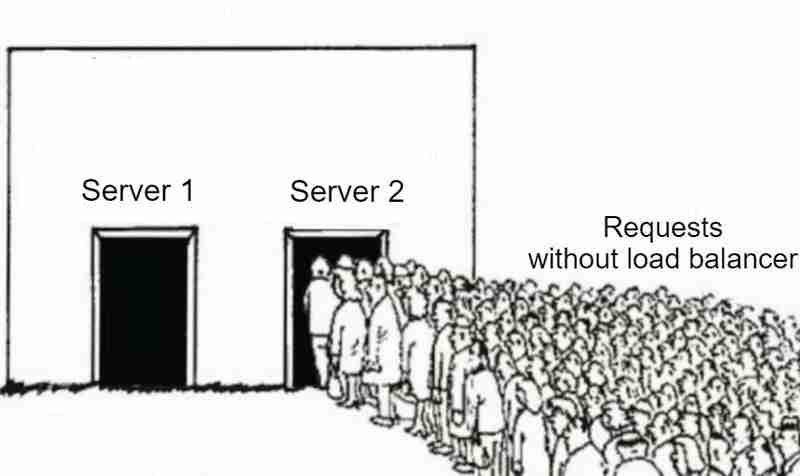
Qu'est-ce qu'un équilibreur de charge ?
Un équilibreur de charge est un système qui répartit le trafic réseau entrant sur plusieurs serveurs. Il garantit qu'aucun serveur ne supporte trop de charge, évitant ainsi les goulots d'étranglement et améliorant l'expérience utilisateur globale. L'approche d'équilibrage de charge garantit également que si un serveur tombe en panne, le trafic peut être automatiquement redirigé vers un autre serveur disponible, réduisant ainsi l'impact de la panne et augmentant la disponibilité.
Pourquoi utilisons-nous des équilibreurs de charge ?
- Haute disponibilité : en répartissant le trafic, les équilibreurs de charge garantissent que même en cas de panne d'un serveur, le trafic peut être acheminé vers d'autres serveurs sains, ce qui rend l'application plus résiliente.
- Évolutivité : les équilibreurs de charge vous permettent de faire évoluer votre système horizontalement en ajoutant plus de serveurs à mesure que le trafic augmente.
- Efficacité : il maximise l'utilisation des ressources en garantissant que tous les serveurs partagent la charge de travail de manière égale.
Algorithmes d'équilibrage de charge
Il existe différents algorithmes et stratégies pour répartir le trafic :
- Round Robin : L'une des méthodes les plus simples disponibles. Il répartit les requêtes de manière séquentielle entre les serveurs disponibles. Une fois qu'il atteint le dernier serveur, il recommence depuis le début.
- Weighted Round Robin : similaire à l'algorithme de round robin, sauf que chaque serveur se voit attribuer une pondération numérique fixe. Ce poids donné est utilisé pour déterminer le serveur pour acheminer le trafic.
- Moins de connexions : achemine le trafic vers le serveur avec les connexions les moins actives.
- IP Hashing : Sélectionnez le serveur en fonction de l'adresse IP du client.
Dans cet article, nous nous concentrerons sur la mise en œuvre d'un équilibreur de charge Round Robin.
Qu’est-ce qu’un algorithme Round Robin ?
Un algorithme round robin envoie chaque requête entrante au prochain serveur disponible de manière circulaire. Si le serveur A gère la première requête, le serveur B gérera la seconde et le serveur C gérera la troisième. Une fois que tous les serveurs ont reçu une requête, celle-ci redémarre depuis le serveur A.
Maintenant, passons au code et construisons notre équilibreur de charge !
Étape 1 : Définir l'équilibreur de charge et le serveur
type LoadBalancer struct {
    Current int
    Mutex   sync.Mutex
}
Nous allons d'abord définir une structure LoadBalancer simple avec un champ Current pour savoir quel serveur doit gérer la prochaine requête. Le Mutex garantit que notre code peut être utilisé en toute sécurité simultanément.
Chaque serveur que nous équilibrons est défini par la structure Server :
type Server struct {
    URL       *url.URL
    IsHealthy bool
    Mutex     sync.Mutex
}
Ici, chaque serveur a une URL et un indicateur IsHealthy, qui indique si le serveur est disponible pour traiter les requêtes.
Étape 2 : algorithme de tournoi à la ronde
Le cœur de notre équilibreur de charge est l'algorithme round robin. Voici comment cela fonctionne :
func (lb *LoadBalancer) getNextServer(servers []*Server) *Server {
    lb.Mutex.Lock()
    defer lb.Mutex.Unlock()

    for i := 0; i < len(servers); i++ {
        idx := lb.Current % len(servers)
        nextServer := servers[idx]
        lb.Current++

        nextServer.Mutex.Lock()
        isHealthy := nextServer.IsHealthy
        nextServer.Mutex.Unlock()

        if isHealthy {
            return nextServer
        }
    }

    return nil
}
- Cette méthode parcourt la liste des serveurs de manière circulaire. Si le serveur sélectionné est sain, il renvoie ce serveur pour gérer la demande entrante.
- Nous utilisons Mutex pour nous assurer qu'une seule goroutine peut accéder et modifier le champ Current de l'équilibreur de charge à la fois. Cela garantit que l’algorithme round robin fonctionne correctement lorsque plusieurs requêtes sont traitées simultanément.
- Chaque serveur possède également son propre Mutex. Lorsque nous vérifions le champ IsHealthy, nous verrouillons le Mutex du serveur pour empêcher l'accès simultané de plusieurs goroutines.
- Sans verrouillage Mutex, il est possible qu'un autre goroutine modifie la valeur, ce qui pourrait entraîner la lecture de données incorrectes ou incohérentes.
- Nous déverrouillons le Mutex dès que nous avons mis à jour le champ Current ou lu la valeur du champ IsHealthy pour garder la section critique aussi petite que possible. De cette façon, nous utilisons Mutex pour éviter toute condition de concurrence.
Étape 3 : configuration de l'équilibreur de charge
Notre configuration est stockée dans un fichier config.json, qui contient les URL du serveur et les intervalles de vérification de l'état (plus d'informations dans la section ci-dessous).
type Config struct {
    Port                string   `json:"port"`
    HealthCheckInterval string   `json:"healthCheckInterval"`
    Servers             []string `json:"servers"`
}
Le fichier de configuration pourrait ressembler à ceci :
{
  "port": ":8080",
  "healthCheckInterval": "2s",
  "servers": [
    "http://localhost:5001",
    "http://localhost:5002",
    "http://localhost:5003",
    "http://localhost:5004",
    "http://localhost:5005"
  ]
}
Step 4: Health Checks
We want to make sure that the servers are healthy before routing any incoming traffic to them. This is done by sending periodic health checks to each server:
func healthCheck(s *Server, healthCheckInterval time.Duration) {
    for range time.Tick(healthCheckInterval) {
        res, err := http.Head(s.URL.String())
        s.Mutex.Lock()
        if err != nil || res.StatusCode != http.StatusOK {
            fmt.Printf("%s is down\n", s.URL)
            s.IsHealthy = false
        } else {
            s.IsHealthy = true
        }
        s.Mutex.Unlock()
    }
}
Every few seconds (as specified in the config), the load balancer sends a HEAD request to each server to check if it is healthy. If a server is down, the IsHealthy flag is set to false, preventing future traffic from being routed to it.
Step 5: Reverse Proxy
When the load balancer receives a request, it forwards the request to the next available server using a reverse proxy. In Golang, the httputil package provides a built-in way to handle reverse proxying, and we will use it in our code through the ReverseProxy function:
func (s *Server) ReverseProxy() *httputil.ReverseProxy {
    return httputil.NewSingleHostReverseProxy(s.URL)
}
What is a Reverse Proxy?
A reverse proxy is a server that sits between a client and one or more backend severs. It receives the client's request, forwards it to one of the backend servers, and then returns the server's response to the client. The client interacts with the proxy, unaware of which specific backend server is handling the request.
In our case, the load balancer acts as a reverse proxy, sitting in front of multiple servers and distributing incoming HTTP requests across them.
Step 6: Handling Requests
When a client makes a request to the load balancer, it selects the next available healthy server using the round robin algorithm implementation in getNextServer function and proxies the client request to that server. If no healthy server is available then we send service unavailable error to the client.
http.HandleFunc("/", func(w http.ResponseWriter, r *http.Request) {
        server := lb.getNextServer(servers)
        if server == nil {
            http.Error(w, "No healthy server available", http.StatusServiceUnavailable)
            return
        }
        w.Header().Add("X-Forwarded-Server", server.URL.String())
        server.ReverseProxy().ServeHTTP(w, r)
    })
The ReverseProxy method proxies the request to the actual server, and we also add a custom header X-Forwarded-Server for debugging purposes (though in production, we should avoid exposing internal server details like this).
Step 7: Starting the Load Balancer
Finally, we start the load balancer on the specified port:
log.Println("Starting load balancer on port", config.Port)
err = http.ListenAndServe(config.Port, nil)
if err != nil {
        log.Fatalf("Error starting load balancer: %s\n", err.Error())
}
Working Demo
TL;DR
In this post, we built a basic load balancer from scratch in Golang using a round robin algorithm. This is a simple yet effective way to distribute traffic across multiple servers and ensure that your system can handle higher loads efficiently.
There's a lot more to explore, such as adding sophisticated health checks, implementing different load balancing algorithms, or improving fault tolerance. But this basic example can be a solid foundation to build upon.
You can find the source code in this GitHub repo.
Ce qui précède est le contenu détaillé de. pour plus d'informations, suivez d'autres articles connexes sur le site Web de PHP en chinois!
Articles Liés
Voir plus- Comment obtenir efficacement une heure précise pour le lendemain en Go ?
- Comment puis-je utiliser Reflection pour appeler la fonction variadique « Rows.Scan() » dans Go ?
- Que signifie « vendre une dépendance » dans Go ?
- Comment supprimer en toute sécurité des éléments d'un tableau de structures dans des boucles Go ?
- Comment créer une chaîne à terminaison nulle dans Go ?