Maison  >  Article  >  interface Web  >  Créer des tableaux en HTML

Créer des tableaux en HTML

王林
王林original
2024-09-04 16:37:511155parcourir

Les tableaux HTML comportent un certain nombre de lignes et de colonnes dans lesquelles nous pouvons insérer, organiser et afficher des données. Ces données sont ensuite affichées sur la page Web sous forme de tableau. Ces tableaux nous aident à présenter les données de manière ordonnée, comme afficher une liste d'articles, afficher des données tabulaires telles que des rapports de ventes, créer des mises en page pour les sections de pages Web, etc.

Dans cet article, nous apprendrons comment créer les types de tableaux HTML suivants :

  • Tableau simple
  • Tableau avec bordures et rembourrage
  • Table avec style
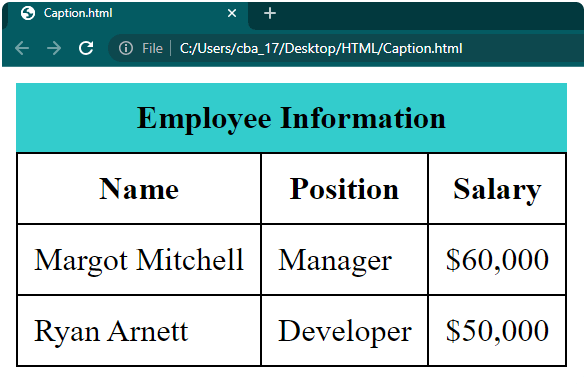
  • Tableau avec légendes
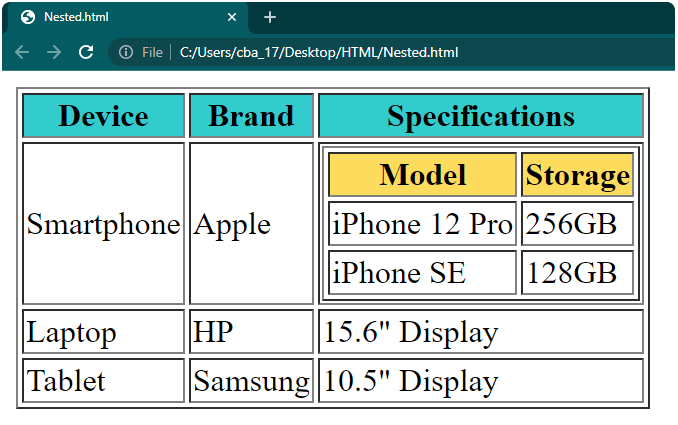
  • Table avec tables imbriquées
  • Tableau avec étendue de colonnes et étendue de lignes
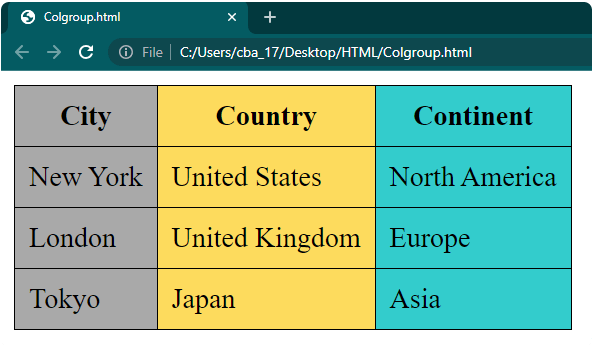
  • Table avec colgroup

Essentiels pour créer un tableau en HTML

  1. Éditeur de texte ou éditeur HTML : Ouvrez un éditeur de texte ou un éditeur HTML comme Notepad++, Sublime Text ou Visual Studio Code pour écrire et enregistrer votre code HTML. Nous avons utilisé Notepad++ comme éditeur par défaut, mais vous pouvez utiliser n'importe quel éditeur de votre choix.
  2. Fichier HTML : Créez un nouveau fichier dans Notepad++. Appelons-le « table.html » ou tout autre nom que vous préférez, mais n'oubliez pas de terminer le nom du fichier par « .html ». Ce fichier est l’endroit où vous écrirez votre code pour votre page Web. Si vous avez besoin d'aide pour créer ce fichier, vous pouvez consulter notre tutoriel « Concevoir une page Web en HTML ».
  3. Code HTML : Nous avons fourni dans cet article tous les codes essentiels pour créer différents types de tableaux. Copiez et collez simplement le code dans votre fichier « table.html ».
  4. Navigateur Web : Après avoir fini d'écrire votre code HTML dans le fichier « table.html », vous devez afficher et tester votre page Web. Vous pouvez utiliser un navigateur Web comme Google Chrome, Mozilla Firefox ou Microsoft Edge. Nous avons utilisé Google Chrome pour afficher les pages Web pour tous les exemples de cet article, mais vous pouvez choisir le navigateur de votre choix.

Balises utilisées en HTML

Avant de créer un tableau en HTML, il est important de comprendre les balises utilisées pour le créer et le structurer. Voici les balises clés utilisées pour créer des tableaux HTML :

Tag Description
Defines a table and its content.
Defines a title or caption for a table.
Groups the header content in a table.
Groups the body content in a table.
Groups the footer content in a table.
Defines a table row.
Defines a table header cell.
Defines a table data/cell.
Specifies a set of one or more columns in a table for the purpose of formatting.
Defines the attributes for a group of columns in a table.
Tag
Description

Examples of Tables in HTML

Example 1: Simple Table

Let’s create a basic HTML table that showcases product information. We will include two columns labeled “Product” and “Price.” The table will contain a single row displaying data for the product “Apple” with a price of $20.

To create a simple HTML table:

  1. Open an HTML file in a text or HTML editor.
  2. Add the
Définit un tableau et son contenu.
Définit un titre ou une légende pour un tableau.
Regroupe le contenu de l'en-tête dans un tableau.
Regroupe le contenu du corps dans un tableau.
Regroupe le contenu du pied de page dans un tableau.
Définit une ligne de tableau.
Définit une cellule d'en-tête de tableau.
Définit une donnée/cellule de tableau.
Spécifie un ensemble d'une ou plusieurs colonnes dans un tableau à des fins de formatage.
Définit les attributs d'un groupe de colonnes dans un tableau.
element to define the table.
  • Use the
  • element to create table rows.
  • The
  • tag. For instance, you can use style=”background-color: #33cccc;” to set the background color to a nice shade of teal.

    Code:

    <table>
    <tr>
    <th style="background-color: #33cccc;">Country</th>
    <th style="background-color: #33cccc;">Population</th>
    <th style="background-color: #33cccc;">Capital</th>
    </tr>
    <tr>
    <td>Spain</td>
    <td>47 Million</td>
    <td>Madrid</td>
    </tr>
    <tr>
    <td>Finland</td>
    <td>5.5 Million</td>
    <td>Helsinki</td>
    </tr>
    </table>

    Output:
    Créer des tableaux en HTML

    Example 4: Table with Caption

    Using an HTML table with a caption is a great way to present information on a webpage in a tidy and organized manner. It’s like giving your table a title or a brief description to help people grasp its content easily. To include a caption, all you have to do is use the

    element defines table headers (column labels).
  • Use the
  • element to create table cells (data).
  • Insert the desired data within the table cells.
  • Save the file with the .html extension, and then open it in a web browser to view the table.
  • Code:

    <!DOCTYPE html>
    <html>
    <head>
    <title>Simple Table</title>
    </head>
    <body>
    <table>
    <tr>
    <th>Product</th>
    <th>Price</th>
    </tr>
    <tr>
    <td>Apple</td>
    <td>$20</td>
    </tr>
    </table>
    </body>
    </html>

    Output:
    The resultant table for product and price will be displayed as seen below:
    Créer des tableaux en HTML

    To add an additional column to the table in the example, you can use the

    element within your table’s column. This element is used to define header cells for the column.

    And if you want to add a new row to the table, you can use the

    element. This element is used to define regular cells within the table row.

    Code:

    <table>
    <tr>
    <th>Product</th>
    <th>Price</th>
    <th>Quantity</th>
    </tr>
    <tr>
    <td>Apple</td>
    <td>$20</td>
    <td>10</td>
    </tr>
    <tr>
    <td>Orange</td>
    <td>$10</td>
    <td>15</td>
    </tr>
    </table>

    Output:
    Créer des tableaux en HTML

    Let’s see how to add borders to an HTML table. This is a way to visually separate the different sections of the table and make it easier to read and understand.

    Example 2: Table with Borders and Padding

    In this example, we will add a table element and set the border and cellpadding attribute. We will use the border attribute and set the width of the table’s border to 1 pixel. For the cellpadding attribute, we will use 5 pixels of padding for the content inside each cell.

    Code:

    <table border="1" cellpadding="5">
    <tr>
    <th>Name</th>
    <th>Age</th>
    <th>Country</th>
    </tr>
    <tr>
    <td>Michael</td>
    <td>27</td>
    <td>Alaska</td>
    </tr>
    <tr>
    <td>Evelyn</td>
    <td>32</td>
    <td>Ohio</td>
    </tr>
    </table>

    Output:
    Créer des tableaux en HTML

    Example 3: Table with Styling

    If you want to improve the appearance of your table, you can use CSS (Cascading Style Sheets) to add various styles and formatting.

    One way to enhance the table is by giving different cells a background color. To do this, you can simply add the style attribute with the background-color property inside the opening

    tag and place it right below the tag.

    Code:

    <style>
    table {
    border-collapse: collapse;
    }
    th, td {
    border: 1px solid black;
    padding: 8px;
    }
    caption {
    background-color: #33cccc;
    padding: 8px;
    font-weight: bold;
    }
    </style>
    <table>
    <caption>Employee Information</caption>
    <tr>
    <th>Name</th>
    <th>Position</th>
    <th>Salary</th>
    </tr>
    <tr>
    <td>Margot Mitchell</td>
    <td>Manager</td>
    <td>$60,000</td>
    </tr>
    <tr>
    <td>Ryan Arnett</td>
    <td>Developer</td>
    <td>$50,000</td>
    </tr>
    </table>

    Output:
    Créer des tableaux en HTML

    Example 5: Table with Nested Tables

    In HTML, when we talk about a nested table, it means we have a table placed inside another table. So, basically, some cells in the outer table contain a whole new table structure within them. If you want to include a nested table, you just need to insert another table inside any cell of your main table. To understand better, here is an example:

    Code:

    <table border="1">
    <tr>
    <th style="background-color: #33cccc;">Device</th>
    <th style="background-color: #33cccc;">Brand</th>
    <th style="background-color: #33cccc;">Specifications</th>
    </tr>
    <tr>
    <td>Smartphone</td>
    <td>Apple</td>
    <td>
    <table border="1">
    <tr>
    <th style="background-color: #fddb5d;">Model</th>
    <th style="background-color: #fddb5d;">Storage</th>
    </tr>
    <tr>
    <td>iPhone 12 Pro</td>
    <td>256GB</td>
    </tr>
    <tr>
    <td>iPhone SE</td>
    <td>128GB</td>
    </tr>
    </table>
    </td>
    </tr>
    <tr>
    <td>Laptop</td>
    <td>HP</td>
    <td>15.6" Display</td>
    </tr>
    <tr>
    <td>Tablet</td>
    <td>Samsung</td>
    <td>10.5" Display</td>
    </tr>
    </table>

    Output:
    Créer des tableaux en HTML

    Example 6: Table with Col Span and Row Span

    In HTML, the “colspan” and “rowspan” give you the power to merge or split cells horizontally (colspan) and vertically (rowspan) to create more advanced table structures.

    If you want to merge cells horizontally, simply use “colspan” followed by the number of cells you want to merge. And if you want to merge cells vertically, you can use “rowspan” along with the number of cells you want to merge.

    To use the colspan and rowspan attributes, you can add them directly within the

    element to group columns in an HTML table. We can also use the tag within the tag to set a background color for specific columns. To implement this, you can simply add a right after the opening
    or elements that you want to merge.

    Code:

    <!DOCTYPE html>
    <html>
    <head>
    <style>
    table {
    border-collapse: collapse;
    width: 100%;
    }
    th, td {
    border: 1px solid black;
    padding: 8px;
    text-align: left;
    }
    .football {
    background-color: #33cccc;
    }
    .tennis {
    background-color: #33cccc;
    }
    .lebron {
    background-color: #fddb5d;
    }
    .heading {
    background-color: #808080; /* Grey */
    color: #fff; /* White */
    }
    </style>
    </head>
    <body>
    <table>
    <tr>
    <th class="heading">Sport</th>
    <th colspan="2" class="heading">Player</th>
    </tr>
    <tr>
    <td rowspan="2" class="football">Football</td>
    <td>Lionel Messi</td>
    <td>Cristiano Ronaldo</td>
    </tr>
    <tr>
    <td>Neymar</td>
    <td>Harry Kane</td>
    </tr>
    <tr>
    <td class="tennis" rowspan="2">Tennis</td>
    <td>Novak Djokovic</td>
    <td>Rafael Nadal</td>
    </tr>
    <tr>
    <td>Serena Williams</td>
    <td>Naomi Osaka</td>
    </tr>
    <tr>
    <td>Basketball</td>
    <td colspan="2" class="lebron">LeBron James</td>
    </tr>
    </table>
    </body>
    </html>

    Output: 
    Créer des tableaux en HTML

    Example 7: Table with Colgroup

    In HTML, we use the

    tag.

    Code:

    <!DOCTYPE html>
    <html>
    <head>
    <style>
    table {
    border-collapse: collapse;
    }
    th, td {
    border: 1px solid black;
    padding: 8px;
    }
    </style>
    </head>
    <body>
    <table>
    <colgroup>
    <col style="background-color: #a9a9a9;">
    <col style="background-color: #fddb5d;">
    <col style="background-color: #33cccc;">
    </colgroup>
    <tr>
    <th>City</th>
    <th>Country</th>
    <th>Continent</th>
    </tr>
    <tr>
    <td>New York</td>
    <td>United States</td>
    <td>North America</td>
    </tr>
    <tr>
    <td>London</td>
    <td>United Kingdom</td>
    <td>Europe</td>
    </tr>
    <tr>
    <td>Tokyo</td>
    <td>Japan</td>
    <td>Asia</td>
    </tr>
    </table>
    </body>
    </html>

    Output: 
    Créer des tableaux en HTML

    Ce qui précède est le contenu détaillé de. pour plus d'informations, suivez d'autres articles connexes sur le site Web de PHP en chinois!

    Déclaration:
    Le contenu de cet article est volontairement contribué par les internautes et les droits d'auteur appartiennent à l'auteur original. Ce site n'assume aucune responsabilité légale correspondante. Si vous trouvez un contenu suspecté de plagiat ou de contrefaçon, veuillez contacter admin@php.cn
    Article précédent:Éléments sémantiques HTML5Article suivant:Éléments sémantiques HTML5