Maison > Article > développement back-end > Construire une calculatrice en utilisant Flet avec python
Construire une calculatrice en utilisant Flet avec python

- WBOYoriginal
- 2024-08-29 20:30:50689parcourir
Introduction
Bonjour, Arsey ici, un locuteur Python, ceci est mon premier blog et je vais vous guider pour créer cette application de calculatrice simple à l'aide de Flet. Je suis tellement excitée de partager cela avec vous et c'est parti.
À l’ère numérique d’aujourd’hui, créer des applications multiplateformes est une nécessité. Avec une multitude de frameworks disponibles, sélectionner le bon peut être difficile. L'un de ces frameworks est Flet, une bibliothèque Python qui permet aux développeurs de créer sans effort des applications Web, de bureau et mobiles à l'aide de Flutter, mais pour Python.
Dans ce blog, nous explorerons comment créer une application de calcul de base à l'aide de Flet, illustrant à quel point ce cadre peut être simple et efficace.
POURQUOI FLET ?
Quand j'ai commencé à programmer, mon objectif était de créer des applications mobiles. Sans guide clair, j'ai choisi Python comme premier langage. C'était amusant à apprendre, mais au fur et à mesure que j'acquérais plus d'expérience, j'ai réalisé que Python n'est traditionnellement pas adapté au développement d'applications, il est plus couramment utilisé pour l'analyse de données et les tâches connexes.
Apprenant maintenant le développement Android avec Kotlin pour le développement natif et Dart avec Flutter pour le multiplateforme, mon objectif se rapproche grâce à ce flet de bibliothèques.
Cette prise de conscience était décourageante jusqu'à ce que je découvre des frameworks comme Kivy, Tkinter, Flet, etc., qui permettent d'utiliser Python pour créer des applications. Contrairement à Kivy ou Tkinter, ces frameworks sont bons mais nécessitent beaucoup de personnalisation pour développer une belle application mobile qui fonctionne bien pour Android et iOS. Et c'est là que Flet brille.
Flet est un framework Python inspiré de Flutter, une boîte à outils d'interface utilisateur populaire de Google. Les résultats que vous pouvez obtenir avec flet sont impressionnants et je suis ravi d'en partager davantage.
Qu'est-ce que flet ?
Flet est un package Python qui permet aux développeurs de créer des interfaces utilisateur directement à l'aide de la boîte à outils d'interface utilisateur de Flutter.
Le principal avantage de Flet est qu'il combine la simplicité de Python et les riches capacités d'interface utilisateur de Flutter, permettant le développement rapide d'applications multiplateformes sans nécessiter une expérience frontale approfondie.
Flet est une bibliothèque comprenant des piles, donc pas besoin de SDK et peut être facilement étendue avec le SDK de Flutter.
Remarque : Il est utile d'avoir une compréhension de base de certains concepts front-end, tels que le modèle de boîte, les structures de mise en page comme Flexbox et Grid et le positionnement. Bien que vous puissiez toujours suivre sans cette connaissance, je vous recommande fortement de vous familiariser avec ces concepts.
Maintenant que cela est réglé, passons à la construction de notre calculatrice !
CONFIGURATION DE L'ENVIRONNEMENT
Avant de vous lancer dans le codage, assurez-vous que Python est installé sur votre machine. Ensuite, suivez ces étapes pour configurer votre environnement pour Flet.
- Installer Flet : vous pouvez installer Flet en utilisant pip. Vous pouvez simplement ouvrir votre terminal ou votre invite de commande, saisir cette commande et l'exécuter.
pip install flet
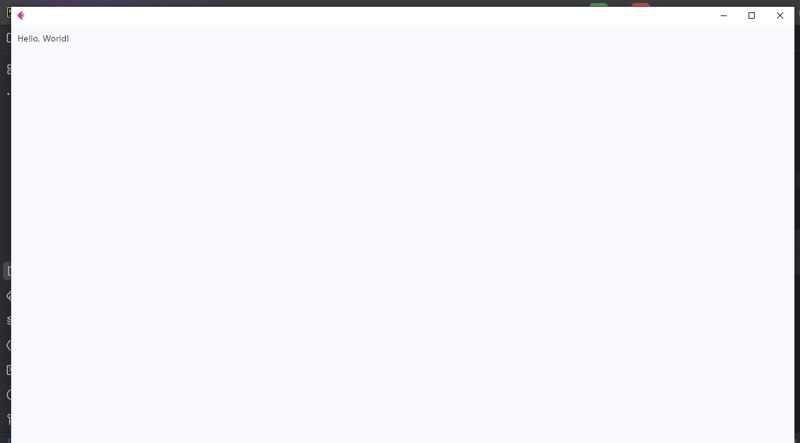
- Créez un nouveau fichier Python : après une installation réussie, ouvrez votre éditeur de code préféré comme VS-Code, Pycharm, etc.) et créez un nouveau fichier Python, nommez-le main.py ou ce que vous préférez. Vous vous sentez excité ? Je parie que oui ! Testons d'abord notre installation avec la phrase la plus appréciée de la communauté des développeurs, "Hello World!"
Dans notre fichier Python, tapez ce code
import flet as ft

def main(page: ft.Page):
    page.add(ft.Text(value="Hello, World!"))

ft.app(target=main)
Exécutez le code pour voir si tout fonctionne. Si vous voyez « Bonjour tout le monde ! » affiché, vous êtes prêt à passer à la construction de notre calculatrice.
sortie
CRÉATION DE LA MISE EN PAGE
Dans cette section, nous nous concentrerons sur la structure de la calculatrice ; ici, nous utiliserons le widget de colonne pour empiler notre affichage et nos boutons. L'écran affichera l'entrée actuelle et les boutons permettront l'interaction de l'utilisateur. C'est étrange, je n'ai jamais remarqué que l'interface utilisateur peut signifier une interface utilisateur vers une interaction utilisateur.
Écrivez maintenant le code ci-dessous comme suit.
from flet import (
    app, Page, Container, Column, Row,
    TextField, colors, border_radius, ElevatedButton, TextAlign, TextStyle
)


def main(page: Page):
    page.title = "Calculator"
    result = TextField(
        hint_text='0', text_size=20,
        color='white', text_align=TextAlign.RIGHT,
        hint_style=TextStyle(
            color=colors.WHITE, size=20
        ),
        read_only=True
    )

    def button_click(e):
        pass

    button_row0 = Row(
        [
            ElevatedButton(text='C',  on_click=button_click),
            ElevatedButton(text='^',  on_click=button_click),
            ElevatedButton(text='%',  on_click=button_click),
            ElevatedButton(text='/',  on_click=button_click),
        ]
    )
    button_row1 = Row(
        [
            ElevatedButton(text='7',  on_click=button_click),
            ElevatedButton(text='8',  on_click=button_click),
            ElevatedButton(text='9',  on_click=button_click),
            ElevatedButton(text='*',  on_click=button_click),
        ]
    )
    button_row2 = Row(
        [
            ElevatedButton(text='4',  on_click=button_click),
            ElevatedButton(text='5',  on_click=button_click),
            ElevatedButton(text='6',  on_click=button_click),
            ElevatedButton(text='-',  on_click=button_click),
        ]
    )
    button_row3 = Row(
        [
            ElevatedButton(text='1',  on_click=button_click),
            ElevatedButton(text='2',  on_click=button_click),
            ElevatedButton(text='3',  on_click=button_click),
            ElevatedButton(text='+',  on_click=button_click),
        ]
    )
    button_row4 = Row(
        [
            ElevatedButton(text='0',  on_click=button_click),
            ElevatedButton(text='.',  on_click=button_click),
            ElevatedButton(text='=',  on_click=button_click),
        ]
    )
    container = Container(
        width=350, padding=20,
        bgcolor=colors. BLACK,
        content=Column(
            [
                result,
                button_row0, button_row1, button_row2,
                button_row3, button_row4
            ]
        )
    )
    page.add(container)


if __name__ == '__main__':
    app(target=main)
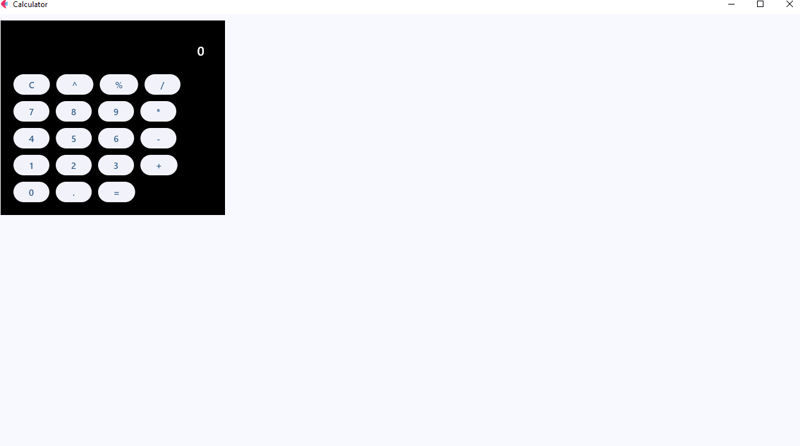
Après avoir exécuté le code ci-dessus, vous verrez le résultat de la disposition de la calculatrice, cela n'a peut-être pas l'air bien, mais ce n'est pas grave ! Nous l'améliorerons en ajoutant un espacement, un rayon sur le conteneur et un thème pour donner à notre calculatrice un aspect plus soigné.
Sortie
EXPLICATION DES CODES
D'accord, nous avons construit la mise en page, n'est-ce pas ? Eh bien, je sais quand même que certains d’entre vous n’ont pas compris ce que nous venons de faire ici. Asseyez-vous, pas de questions, et laissez-moi vous expliquer ce que fait le code.
In the first line, we import our controls. Flet controls are widgets used to lay out our application into a meaningful User Interface. But here we have imported app, Page, Container, Column, Row,
TextField, colors, border_radius, ElevatedButton, TextAlign, TextStyle.
Even though some of them are not entire widgets, like app, colors, border_radius, TextAlign, and TextStyle. These are classes and methods that provide us with extra functionalities of our application, for example
The app, allows us to launch our app in a standalone mode targeting to the main instance of our application.* colors* allow us to style our controls that support the color and bgcolor attribute without us struggling to define their names and border_radius allows us to curve the corners of our containers.
In line 7 we define the main app instance to Page; a page is a container for View Controls. So here I won’t go deep into views since it’s beyond the scope of this tutorial, but you reference here.
We now give the title to our page, with the page.titleattribute, the title on the title bar of our app.
In lines 9-16 is the result control with its required attributes, though it has many, we are gonna use these ones for this project, as you can see we have add a place holder of 0, giving it a size of 20, color to white, align text to right, and the read-only to true so we don’t allow external of soft keyboards to work directly in it.
Line 18 we defined our event handler, button_click this is where we will apply the logic to function our application, eventually making it a working calculator, but for now I just used a pass statement as a placeholder.
From lines 21 – 59, we defined our rows using the Row Widget, the row widget is a control that displays its children in a horizontal array or layout from left to right, similar to the linear layout in Android development, or inline elements in CSS the row controls works in the same way as them, it lays out controls in a horizontal axis or linearly.
Then the ElevatedButton_will represent buttons on the calculator’s UI, but notice we have given it the text and _onclick attributes, the text defines the data that will be displayed on the results when clicked using the onclick attribute that will call for the function button_click to handle events accordingly.
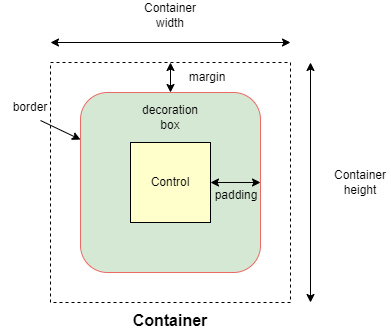
We have the container, the container is a control that will allow us to decorate a control with background color, spacing, applying borders and border radius, and position it with padding, margin, and alignment.
A container follows the box-model concept like the one for CSS as in the figure below,
The column control, like the Row control, this one displays its children in a vertical array or layout from top to bottom, this will allow us to vertically lay our buttons in the right order.
Now after defining our UI elements, we need to display them to our application and then call it. We do that by using the page.add() method which allows us to add and build our UI logically.
Then we have to call our app in the stand-alone mode, and that’s what lines 74-75 accomplished.
Adding functionality
Update your button click function to match this code below.
def button_click(e):
        if e.control.text == "=":
            try:
                result.value = str(eval(result.value))
            except Exception:
                result.value = "Error"
        elif e.control.text == "C":
            result.value = ""
        # elif e.control.text == "^":
        # logic for powers
        # pass
        else:
            result.value += e.control.text
        result.update()
CODE EXPLANATION
Okay, what does this code do under the hood; the button_click function is designed to handle various button click events within our calculator app.
Save to apply our current changes then run the calculator and see the results.
Here is a breakdown of how the code works
- Retrieving the button text: when a button is clicked, the function retrieves the button’s text (e.g., ‘1’, ‘2’, ‘+’, ‘-‘, ‘C’, ‘=’) through the e.control.text. this tells the functions which button the user has interacted with
- Clearing the display: when the user clicks the ‘C’ button, the calculator’s input is cleared. The result is set to an empty string (“”), and the display is reset to 0. This effectively clears the display making the calculator ready for a new input. Talk but a fresh number meal.
- Evaluating expressions: if the user clicks the “=” button, the calculator needs to evaluate the current mathematical expression, here we used the str() and eval() functions, and the str() function houses the eval() function so that the result is directly converted into a string and theeval() function will compute the result of the expression, then displayed as a string to our calculator’s display. Or else if the expression is invalid, an exception is caught, and the “Error” message will be displayed instead.
- For the rest of the buttons like numbers and operators: the function will append the button’s text to the display (which is initially “0” or when cleared), it replaces “0” with the button value, otherwise it adds button value to the end of the display.
- After processing the button click, the page is updated via page.update() method call to refresh the UI and show the updated input or result on the calculator's display. So every time you click the button and see the value on the display or a result, this is what the page.update() does.
NOTE: The eval() function is a quick way to evaluate expression but it can be risky with un-trusted input because it executes/evaluates any Python code. In a more secure app, you’d use a safer method for evaluating mathematical expressions.
Exercise: test your knowledge, of how would you handle the exponent ‘^’ expression so that if the user clicks the exponent button it returns the required output. For example, if the user inputs 2^2 the output will be 4, 5^5=25, and 3^4=81. You get the idea.
Let me know how you approached to this problem in the comments, okay, all done, let’s continue.
Improving our UI
Previously the user interface did not look that catchy and awesome, so let’s improve it, and update the buttons to match the following code.
button_row0 = Row(
    [
        ElevatedButton(text='C', expand=1, on_click=button_click,
                       bgcolor=colors.RED_ACCENT, color=colors.WHITE),
        ElevatedButton(text='^', expand=1, on_click=button_click,
                       bgcolor=colors.BLUE_ACCENT_100,
                       color=colors.RED_900
                       ),
        ElevatedButton(text='%', expand=1, on_click=button_click,
                       bgcolor=colors.BLUE_ACCENT_100,
                       color=colors.RED_900
                       ),
        ElevatedButton(text='/', expand=1, on_click=button_click,
                       bgcolor=colors.BLUE_ACCENT_100,
                       color=colors.RED_900
                       ),
    ]
)
button_row1 = Row(
    [
        ElevatedButton(text='7', expand=1, on_click=button_click),
        ElevatedButton(text='8', expand=1, on_click=button_click),
        ElevatedButton(text='9', expand=1, on_click=button_click),
        ElevatedButton(text='*', expand=1, on_click=button_click,
                       bgcolor=colors.BLUE_ACCENT_100,
                       color=colors.RED_900
                       ),
    ]
)
button_row2 = Row(
    [
        ElevatedButton(text='4', expand=1, on_click=button_click),
        ElevatedButton(text='5', expand=1, on_click=button_click),
        ElevatedButton(text='6', expand=1, on_click=button_click),
        ElevatedButton(text='-', expand=1, on_click=button_click,
                       bgcolor=colors.BLUE_ACCENT_100
                       ),
    ]
)
button_row3 = Row(
    [
        ElevatedButton(text='1', expand=1, on_click=button_click),
        ElevatedButton(text='2', expand=1, on_click=button_click),
        ElevatedButton(text='3', expand=1, on_click=button_click),
        ElevatedButton(text='+', expand=1, on_click=button_click,
                       bgcolor=colors.BLUE_ACCENT_100,
                       color=colors.RED_900),
    ]
)
button_row4 = Row(
    [
        ElevatedButton(text='0', expand=1, on_click=button_click),
        ElevatedButton(text='.', expand=1, on_click=button_click),
        ElevatedButton(
            text='=', expand=2, on_click=button_click,
            bgcolor=colors.GREEN_ACCENT, color=colors.AMBER
        ),
    ]
)
What have we changed exactly, hmm!
For the buttons, we could have used the width attribute but that won’t work as we want it would break the UI, feel free to test it.
But we have this expand attribute which allows only a Boolean and an int data type value.
For the normal buttons like the operators, numbers, and the clear button we expanded them to 1, and for the equals button, we expanded it by 2.
Now what does the expand attribute do, the expand attribute allows a control to fill the available space in a given container.
So the buttons with expand 1 will have an equal size of width and for the equals button it will expand 2, or in simple terms span two buttons or will equal two buttons in width.
Notice that we have added colors and background colors to some of our buttons to make them stand out from the numbers buttons.
Understand, great.
In the container add these attributes, just after the padding attribute to make it look more appealing and user friendly.
border_radius=border_radius.all(20),
Output
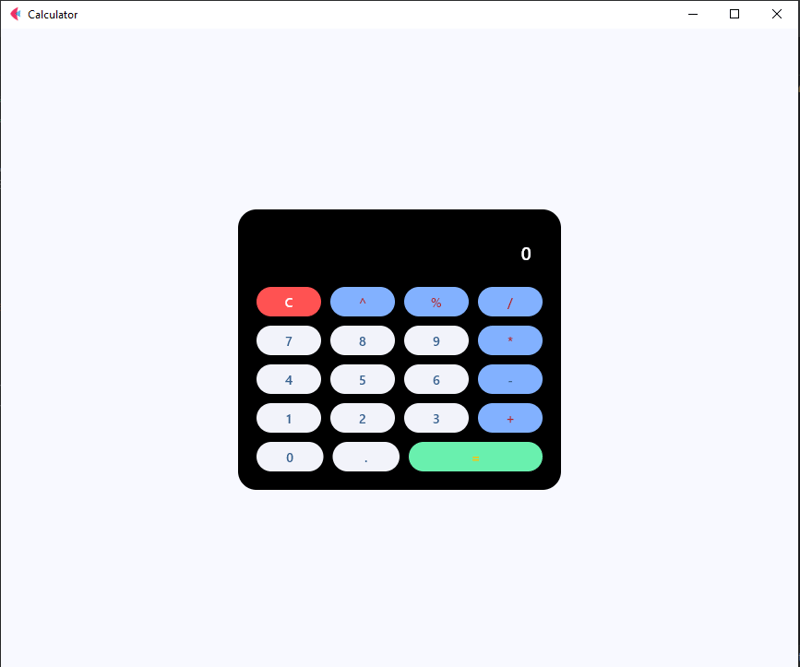
Now, you have a fully functional calculator built with Flet! Feel free to customize it to your liking or add more features. You can even package it as a standalone APK, AAB to launch on Google Play Store or Apple App Store
Here is the full code,
from flet import (
    app, Page, Container, Column, Row,
    TextField, colors, border_radius, ElevatedButton, TextAlign, TextStyle
)
from flet_core import ThemeMode


def main(page: Page):
    page.title = "Calculator"
    page.theme_mode = ThemeMode.DARK
    page.horizontal_alignment = page.vertical_alignment = 'center'
    result = TextField(
        hint_text='0', text_size=20,
        color='white', text_align=TextAlign.RIGHT,
        hint_style=TextStyle(
            color=colors.WHITE, size=20
        ),
        read_only=True
    )

    def button_click(e):
        if e.control.text == "=":
            try:
                result.value = str(eval(result.value))
            except Exception:
                result.value = "Error"
        elif e.control.text == "C":
            result.value = ""
        # elif e.control.text == "^":
        # logic for powers
        # pass
        else:
            result.value += e.control.text
        result.update()

    button_row0 = Row(
        [
            ElevatedButton(text='C', expand=1, on_click=button_click,
                           bgcolor=colors.RED_ACCENT, color=colors.WHITE),
            ElevatedButton(text='^', expand=1, on_click=button_click,
                           bgcolor=colors.BLUE_ACCENT_100,
                           color=colors.RED_900
                           ),
            ElevatedButton(text='%', expand=1, on_click=button_click,
                           bgcolor=colors.BLUE_ACCENT_100,
                           color=colors.RED_900
                           ),
            ElevatedButton(text='/', expand=1, on_click=button_click,
                           bgcolor=colors.BLUE_ACCENT_100,
                           color=colors.RED_900
                           ),
        ]
    )
    button_row1 = Row(
        [
            ElevatedButton(text='7', expand=1, on_click=button_click),
            ElevatedButton(text='8', expand=1, on_click=button_click),
            ElevatedButton(text='9', expand=1, on_click=button_click),
            ElevatedButton(text='*', expand=1, on_click=button_click,
                           bgcolor=colors.BLUE_ACCENT_100,
                           color=colors.RED_900
                           ),
        ]
    )
    button_row2 = Row(
        [
            ElevatedButton(text='4', expand=1, on_click=button_click),
            ElevatedButton(text='5', expand=1, on_click=button_click),
            ElevatedButton(text='6', expand=1, on_click=button_click),
            ElevatedButton(text='-', expand=1, on_click=button_click,
                           bgcolor=colors.BLUE_ACCENT_100
                           ),
        ]
    )
    button_row3 = Row(
        [
            ElevatedButton(text='1', expand=1, on_click=button_click),
            ElevatedButton(text='2', expand=1, on_click=button_click),
            ElevatedButton(text='3', expand=1, on_click=button_click),
            ElevatedButton(text='+', expand=1, on_click=button_click,
                           bgcolor=colors.BLUE_ACCENT_100,
                           color=colors.RED_900),
        ]
    )
    button_row4 = Row(
        [
            ElevatedButton(text='0', expand=1, on_click=button_click),
            ElevatedButton(text='.', expand=1, on_click=button_click),
            ElevatedButton(
                text='=', expand=2, on_click=button_click,
                bgcolor=colors.GREEN_ACCENT, color=colors.AMBER
            ),
        ]
    )
    container = Container(
        width=350, padding=20,
        bgcolor=colors.BLACK, border_radius=border_radius.all(20),
        content=Column(
            [
                result,
                button_row0, button_row1, button_row2,
                button_row3, button_row4
            ]
        )
    )
    page.add(container)


if __name__ == '__main__':
    app(target=main)
Conclusion
Building this calculator has been a fun experience for me and a learning experience for you, and I hope you enjoyed it too.
Let me know what kind of project you’d like to build using this framework or any other like PyQt, Kivy, or Tkinter. I’d be glad to make a tutorial on it. Or even web design and development tutorials, also are allowed.
Feel free to ask questions, I’ll do my best to answer them.
If you've read this far, thank you—I appreciate it!
Ce qui précède est le contenu détaillé de. pour plus d'informations, suivez d'autres articles connexes sur le site Web de PHP en chinois!