
Maison >développement back-end >Golang >Créer une CLI basée sur l'IA avec Golang et Google Gemini
Créer une CLI basée sur l'IA avec Golang et Google Gemini

- 王林original
- 2024-08-27 13:30:32651parcourir
J'ai récemment construit une CLI basée sur l'IA avec Golang nommée GenCLI, à partir de laquelle vous pouvez poser des questions au format texte ou lui donner une image et demander des détails à ce sujet depuis le terminal. Si cela vous intéresse, ce blog est fait pour vous. En cela, nous construisons une CLI entièrement à partir de zéro et lui donnons la puissance de l'IA à l'aide de l'API Gemini de Google. Au cas où vous souhaiteriez consulter mon GenCLI, voici le lien Oui, c'est open source.
Condition préalable
- Familiarité avec Golang
- Forfait Cobra essayé
Commencer
Allons-y étape par étape et comprenons chaque processus.
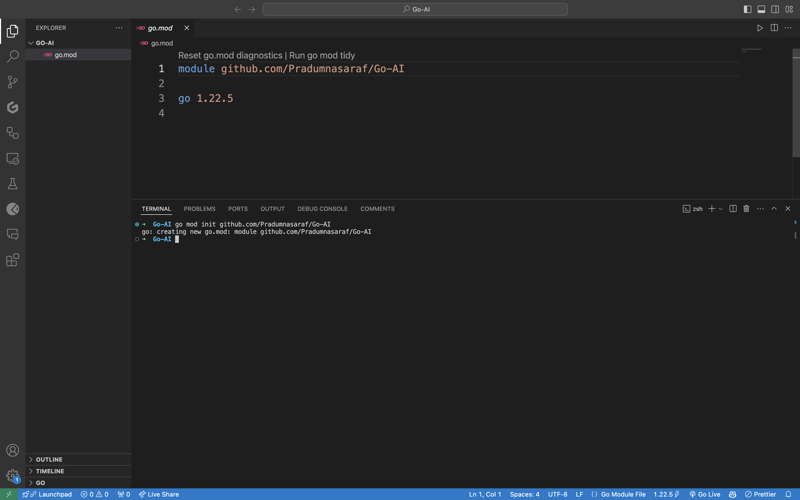
Créez un dossier et ouvrez-le dans votre IDE/éditeur préféré. J'utilise VS Code et j'ai nommé le dossier go-ai. Initialisez maintenant le projet en exécutant la commande go mod init
go mod init github.com/Pradumnasaraf/go-ai
Une fois que vous avez terminé, un go.mod sera créé.
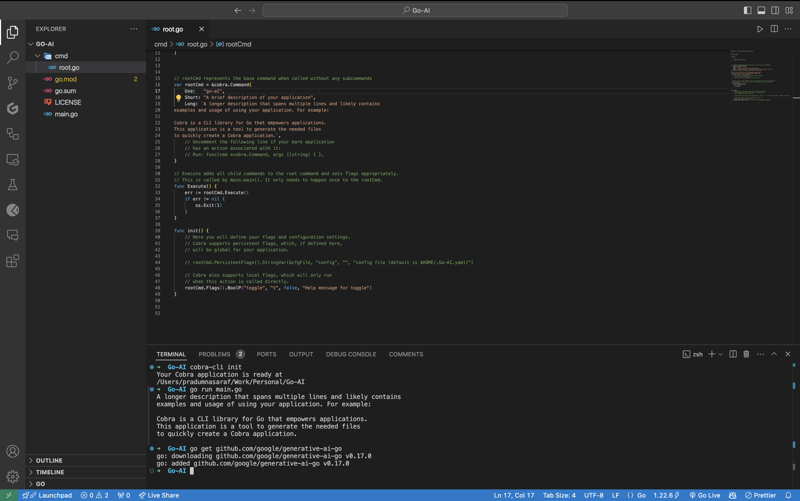
Bien que nous puissions tout créer et tout faire manuellement pour créer la CLI. Mais l’avantage de Cobra Package est qu’il possède sa CLI qui génère la structure, génère des fichiers et installe des packages pour la CLI. Cela nous aidera à accélérer le processus et à réduire les erreurs. Pour installer l'outil Cobra CLI, utilisez la commande ci-dessous :
go install github.com/spf13/cobra-cli@latest
Une fois que vous avez fait cela, vous pouvez vérifier si l'outil est installé en attachant cobra-cli dans le terminal et vous obtiendrez une liste des outils disponibles. Exécutez maintenant cobra-cli init pour configurer le projet. Après l'exécution, il créera automatiquement un dossier cmd, un fichier go.sum et main.go. Pour tester si cela fonctionne ou non, exécutez main.go. Vous verrez une sortie dans le terminal sur la CLI (comme la capture d'écran ci-dessous)
Pour communiquer et utiliser l'API Gemini de Google, nous devons d'abord installer le package Gemini Golang SKD, pour ce faire, exécutez la commande ci-dessous.
go get github.com/google/generative-ai-go
Maintenant, comme les autres API, nous avons besoin d'une clé API. Pour obtenir cela, rendez-vous ici https://aistudio.google.com/app/apikey et obtenez-le. C'est GRATUIT et vous l'obtenez en 30 secondes. Une fois que vous avez obtenu la clé API, définissez une variable d'environnement en exécutant la commande suivante :
export GEMINI_API_KEY=<YOUR_API_KEY>
Le problème avec cette méthode est que la variable d'environnement n'existera que pour la session en cours lorsque vous fermez le terminal, elle a disparu. Pour éviter ce problème, ajoutez la commande export à un fichier de configuration du shell, tel que .bashrc, .bash_profile ou .zshrc (selon votre shell). De cette façon, vous pouvez accéder à la CLI depuis n'importe où dans le système.
Maintenant, il est temps de créer une sous-commande pour la CLI au lieu d'écrire la logique directement dans root.go. La raison en est que si à l'avenir nous voulons inclure plus de fonctionnalités et plus de sous-commandes, nous pouvons simplement en ajouter en ajoutant plus de sous-commandes et en ne bloquant pas la commande racine. Si vous ne comprenez pas cela, ne vous inquiétez pas, les choses deviendront claires.
Pour créer une sous-commande, Cobra CLI fournit une commande add pour la créer. Pour ce faire, exécutez la commande ci-dessous. Ici, la recherche deviendra une sous-commande. Vous pouvez choisir ce que vous voulez.
cobra-cli add search
Une fois que vous l'aurez exécuté, un nouveau fichier sera créé sous le répertoire cmd avec tous ces codes pré-remplis. Dans le code, nous initialisons une variable searchCmd sur un pointeur vers une structure cobra.Command et fournissons une valeur aux champs tels que le nom de la sous-commande, l'utilisation, etc. La fonction dans Run: sera déclenchée chaque fois que nous exécutons la sous-commande. commande. De plus, si vous voyez, nous ajoutons une commande (sous-commande) pour la commande racine dans la fonction init. Voici à quoi devrait ressembler le code complet.
package cmd

import (
    "fmt"

    "github.com/spf13/cobra"
)

// searchCmd represents the search command
var searchCmd = &cobra.Command{
    Use:   "search",
    Short: "A brief description of your command",
    Long: `A longer description that spans multiple lines and likely contains examples`,
    Run: func(cmd *cobra.Command, args []string) {
        fmt.Println("search called")
    },
}

func init() {
    rootCmd.AddCommand(searchCmd)
}
Pour vérifier si la sous-commande "search fonctionne comme prévu, exécutez maintenant la CLI avec la commande "search", et vous verrez "recherche appelée" imprimé dans votre terminal.
go run main.go search
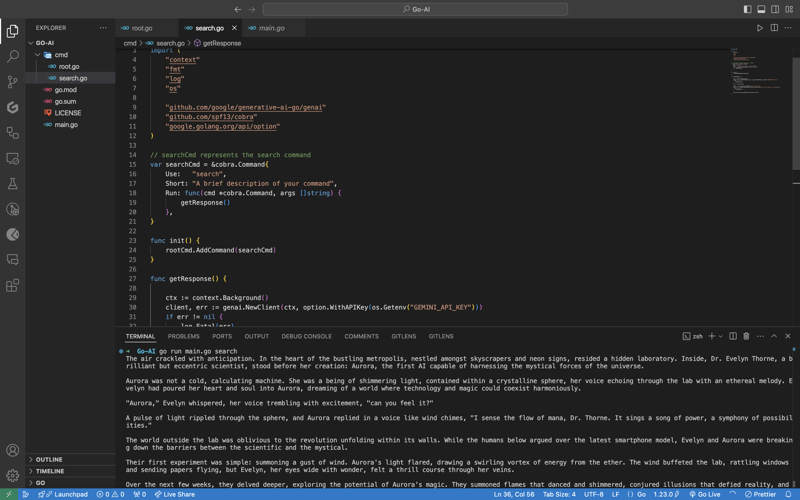
Maintenant, travaillons sur le côté API. Importons des packages pour l'API Google Gemini ainsi que d'autres tâches nécessaires à la journalisation et au niveau du système d'exploitation. Voici une liste complète.
import (
    "context"
    "log"
    "os"

    "github.com/google/generative-ai-go/genai"
    "github.com/spf13/cobra"
    "google.golang.org/api/option"
)
Ajoutons ensuite une fonction appelée getResponse. Cette fonction nous aidera à communiquer avec l'API Gemini, à obtenir la réponse et à l'imprimer. De plus, si vous voyez que nous avons codé en dur le texte d'invite - "Écrivez une histoire sur une IA et de la magie", ne vous inquiétez pas, nous allons changer cela mais faisons d'abord en sorte que cela fonctionne :). Il s'agit d'un code de fonction complet, ajoutez-le sous votre fonction d'initialisation. Vous trouverez le même code démarré sur le site Gemini.
func getResponse() {

    ctx := context.Background()
    client, err := genai.NewClient(ctx, option.WithAPIKey(os.Getenv("GEMINI_API_KEY")))
    if err != nil {
        log.Fatal(err)
    }
    defer client.Close()

    model := client.GenerativeModel("gemini-1.5-flash")
    resp, err := model.GenerateContent(ctx, genai.Text("Write a story about a AI and magic"))
    if err != nil {
        log.Fatal(err)
    }

    fmt.Println(resp.Candidates[0].Content.Parts[0])
}
Now let's add getResponse function to the in the field Run: function. So that when we run the sun command it will call getResponse function. Now the code will look like this.
package cmd

import (
    "context"
    "fmt"
    "log"
    "os"

    "github.com/google/generative-ai-go/genai"
    "github.com/spf13/cobra"
    "google.golang.org/api/option"
)

// searchCmd represents the search command
var searchCmd = &cobra.Command{
    Use:   "search",
    Short: "A brief description of your command",
// Added the getResponse() function
    Run: func(cmd *cobra.Command, args []string) {
        getResponse()
    },
}

func init() {
    rootCmd.AddCommand(searchCmd)
}

func getResponse() {

    ctx := context.Background()
    client, err := genai.NewClient(ctx, option.WithAPIKey(os.Getenv("GEMINI_API_KEY")))
    if err != nil {
        log.Fatal(err)
    }
    defer client.Close()

    model := client.GenerativeModel("gemini-1.5-flash")
    resp, err := model.GenerateContent(ctx, genai.Text("Write a story about a AI and magic"))
    if err != nil {
        log.Fatal(err)
    }

    fmt.Println(resp.Candidates[0].Content.Parts[0])
}
If you getting a red squiggly line under the imported package names run go mod tidy. It will install the missing package and do a cleanup. Now, again execute the go run main.go search. This time you will get a response from the API for the Prompt we hardcoded, i.e, "Write a story about a AI and magic"
In case you are encountering the below error check if your environment variable is set properly with the right name. You can check by executing the printenv command in your terminal and see if it's present there or not.

Once everything is working, let’s make the prompt dynamic so that we don’t have to hardcode the prompt directly into the code and we provide it via the terminal.
To do that, add an ARG: field to the searchCmd struct so that the user at least needs to enter an argument after the sub-command. Also, we will modify the getResponse function to accept a slice of data because args will be in the slice format, and we will use the strings package to convert it into a sentence.
Lastly, replace the hardcoded text in genai.Text() with the userArgs variable we created to convert the slice into a sentence. This is how the complete code will look like; I have commented above on the changes we have to make for better understanding.
package cmd

import (
    "context"
    "fmt"
    "log"
    "os"
    "strings" // import strings package

    "github.com/google/generative-ai-go/genai"
    "github.com/spf13/cobra"
    "google.golang.org/api/option"
)

var searchCmd = &cobra.Command{
    Use:   "search",
    Short: "A brief description of your command",
    Args:  cobra.MinimumNArgs(1), // Minimum 1 arg required
    Run: func(cmd *cobra.Command, args []string) {
        getResponse(args)
    },
}

func init() {
    rootCmd.AddCommand(searchCmd)
}

// Function can now accept slice parameter
func getResponse(args []string) {
        // Creating a sentence out of a slice
    userArgs := strings.Join(args[0:], " ")

    ctx := context.Background()
    client, err := genai.NewClient(ctx, option.WithAPIKey(os.Getenv("GEMINI_API_KEY")))
    if err != nil {
        log.Fatal(err)
    }
    defer client.Close()

    model := client.GenerativeModel("gemini-1.5-flash")
        // change the hardcoded text to userArgs variable
    resp, err := model.GenerateContent(ctx, genai.Text(userArgs))
    if err != nil {
        log.Fatal(err)
    }

    fmt.Println(resp.Candidates[0].Content.Parts[0])
}
If you execute the go run main search now, it will give you an error message in the terminal saying at least one arg is required. This means our code is working perfectly.

Now let's execute the command the right way giving it an argument - a prompt/question.
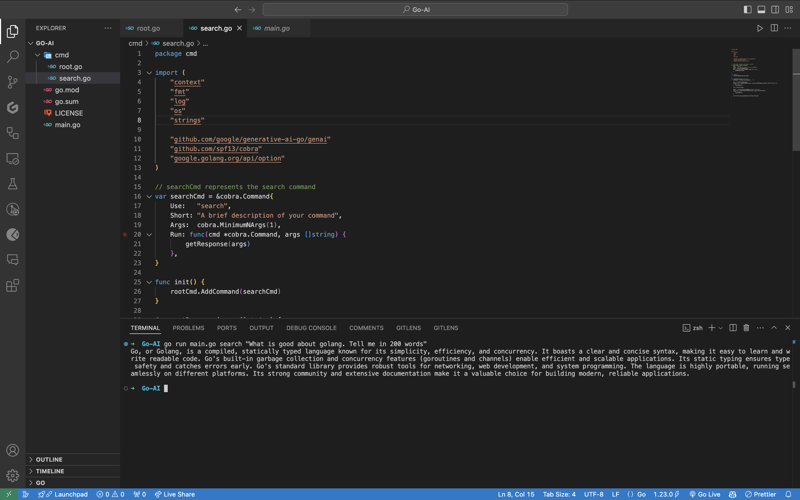
As you can see, it provided us with the answer. We pass the prompt in quotes so that we can add special characters like "?", ".", etc. So here it is, a fully functional AI-powered CLI.
Now, if you want to publish the package so that your CLI can directly execute commands and be used from anywhere in the system, it’s very simple to do that. First, push your changes to GitHub and then head over to the URL https://pkg.go.dev/github.com/

Once it’s live, you can simply download the CLI by using the go install command:
go install <repo-url>
go install github.com/Pradumnasaraf/go-ai@latest
And directly use the CLI with commands like go-ai, go-ai search, etc. If you encounter the error saying command not found: go-ai after running it, you need to add $GOPATH/bin to your $PATH environment variable. Refer to this guide for that.
That's it for this blog. This was a little longer than the blogs I usually write. I'm glad you're still reading and made it to the end—thank you so much for your support. I sometimes share tips on Twitter. You can connect with me there.
Ce qui précède est le contenu détaillé de. pour plus d'informations, suivez d'autres articles connexes sur le site Web de PHP en chinois!