
Maison >Java >javaDidacticiel >Sécuriser les microservices avec Spring Security : implémentation de JWT
Sécuriser les microservices avec Spring Security : implémentation de JWT

- PHPzoriginal
- 2024-08-24 06:42:38708parcourir
JETON WEB JSON (JWT)
JWT (JSON Web Token) est une méthode permettant de transmettre en toute sécurité des informations entre deux parties (comme un client et un serveur) en tant qu'objet JSON. Il est conçu pour être compact et sécurisé pour les URL, ce qui facilite sa diffusion dans les URL et les en-têtes.
- En-tête
- Charge utile
- Signature
En-tête
L'en-tête se compose généralement de deux parties : le type de jeton (JWT) et l'algorithme de signature utilisé, tel que HMAC SHA256 ou RSA.
{
"alg": "HS256",
"typ": "JWT"
>
Charge utile
C'est là que les données réelles sont stockées. Il peut inclure des informations telles que l'ID utilisateur, les rôles, l'heure d'expiration et d'autres réclamations (données sur l'utilisateur ou la session).
{
"email": "ayushstwt@gmail.com",
"nom": "Ayush"
>
Signature
Garantit l’intégrité du jeton. Il s’agit d’une fonction de sécurité qui garantit que le jeton n’a pas été modifié. Il est créé en combinant l’en-tête et la charge utile codés avec une clé secrète à l’aide de l’algorithme spécifié. La signature aide le serveur à vérifier que le jeton est légitime et n'a pas été falsifié.
Les avantages de JWT
Pas besoin d'envoyer des informations d'identification à plusieurs reprises : Avec JWT, vous n'avez pas besoin d'envoyer votre nom d'utilisateur et votre mot de passe à chaque demande. Au lieu de cela, vous vous connectez une fois et le serveur vous donne un jeton. Vous envoyez ensuite ce jeton à chaque demande pour prouver votre identité, rendant le processus plus sécurisé et efficace.
Expiration intégrée : Chaque JWT est livré avec un délai d'expiration, ce qui signifie qu'il n'est valable que pour une période spécifique. Cela réduit le risque d’utilisation abusive à long terme si un jeton est intercepté d’une manière ou d’une autre. Après son expiration, l'utilisateur doit se reconnecter pour obtenir un nouveau jeton, ajoutant ainsi une couche de sécurité supplémentaire.
JWT avec Spring Boot gère en toute sécurité l'authentification des utilisateurs en émettant des jetons après la connexion. Ces jetons sont envoyés avec chaque demande, garantissant une communication sécurisée et sans état sans envoyer d'informations d'identification à plusieurs reprises.
Communication sans état signifie que le serveur ne se souvient pas des demandes passées. Chaque requête contient tout ce dont vous avez besoin (comme un JWT), de sorte que le serveur ne stocke pas les informations de session.
L'implémentation de JWT dans une application Java Spring Boot implique plusieurs étapes. Voici un aperçu simplifié pour vous aider à démarrer :
1. Ajouter des dépendances
Incluez les dépendances nécessaires dans votre fichier pom.xml
                <dependency>
            <groupId>io.jsonwebtoken</groupId>
            <artifactId>jjwt-api</artifactId>
            <version>0.12.5</version>
        </dependency>
        <dependency>
            <groupId>io.jsonwebtoken</groupId>
            <artifactId>jjwt-impl</artifactId>
            <version>0.12.5</version>
            <scope>runtime</scope>
        </dependency>
        <dependency>
            <groupId>io.jsonwebtoken</groupId>
            <artifactId>jjwt-jackson</artifactId>
            <version>0.12.5</version>
            <scope>runtime</scope>
        </dependency>
Toutes les dépendances dont nous avons besoin pour créer l'application spring-boot avec JWT
<?xml version="1.0" encoding="UTF-8"?>
<project xmlns="http://maven.apache.org/POM/4.0.0" xmlns:xsi="http://www.w3.org/2001/XMLSchema-instance"
    xsi:schemaLocation="http://maven.apache.org/POM/4.0.0 https://maven.apache.org/xsd/maven-4.0.0.xsd">
    <modelVersion>4.0.0</modelVersion>
    <parent>
        <groupId>org.springframework.boot</groupId>
        <artifactId>spring-boot-starter-parent</artifactId>
        <version>3.3.3</version>
        <relativePath/> <!-- lookup parent from repository -->
    </parent>
    <groupId>com.tier3Hub</groupId>
    <artifactId>user-auth-service</artifactId>
    <version>0.0.1-SNAPSHOT</version>
    <name>user-auth-service</name>
    <description>The user-auth-service is a microservice responsible for handling user authentication and authorization within a distributed system. It is designed to manage user login, registration, and secure access to various services using robust security practices. This service implements authentication mechanisms like JSON Web Tokens (JWT) and integrates with OAuth 2.0 for third-party authentication. Built with Spring Boot, it ensures scalability, reliability, and easy integration with other microservices in the system.</description>
    <url/>
    <licenses>
        <license/>
    </licenses>
    <developers>
        <developer/>
    </developers>
    <scm>
        <connection/>
        <developerConnection/>
        <tag/>
        <url/>
    </scm>
    <properties>
        <java.version>21</java.version>
    </properties>
    <dependencies>
        <dependency>
            <groupId>org.springframework.boot</groupId>
            <artifactId>spring-boot-starter-actuator</artifactId>
        </dependency>
        <dependency>
            <groupId>org.springframework.boot</groupId>
            <artifactId>spring-boot-starter-data-jpa</artifactId>
        </dependency>
        <dependency>
            <groupId>org.springframework.boot</groupId>
            <artifactId>spring-boot-starter-security</artifactId>
        </dependency>
        <dependency>
            <groupId>org.springframework.boot</groupId>
            <artifactId>spring-boot-starter-web</artifactId>
        </dependency>
        <dependency>
            <groupId>io.jsonwebtoken</groupId>
            <artifactId>jjwt-api</artifactId>
            <version>0.12.5</version>
        </dependency>
        <dependency>
            <groupId>io.jsonwebtoken</groupId>
            <artifactId>jjwt-impl</artifactId>
            <version>0.12.5</version>
            <scope>runtime</scope>
        </dependency>
        <dependency>
            <groupId>io.jsonwebtoken</groupId>
            <artifactId>jjwt-jackson</artifactId>
            <version>0.12.5</version>
            <scope>runtime</scope>
        </dependency>
        <dependency>
            <groupId>com.mysql</groupId>
            <artifactId>mysql-connector-j</artifactId>
            <scope>runtime</scope>
        </dependency>
        <dependency>
            <groupId>org.projectlombok</groupId>
            <artifactId>lombok</artifactId>
            <optional>true</optional>
        </dependency>
        <dependency>
            <groupId>org.springframework.boot</groupId>
            <artifactId>spring-boot-starter-test</artifactId>
            <scope>test</scope>
        </dependency>
        <dependency>
            <groupId>org.springframework.security</groupId>
            <artifactId>spring-security-test</artifactId>
            <scope>test</scope>
        </dependency>
        <dependency>
            <groupId>org.springframework.boot</groupId>
            <artifactId>spring-boot-starter-validation</artifactId>
        </dependency>
        <dependency>
            <groupId>org.springdoc</groupId>
            <artifactId>springdoc-openapi-starter-webmvc-ui</artifactId>
            <version>2.5.0</version>
        </dependency>
        <dependency>
            <groupId>org.modelmapper</groupId>
            <artifactId>modelmapper</artifactId>
            <version>3.1.1</version>
        </dependency>
    </dependencies>

    <build>
        <plugins>
            <plugin>
                <groupId>org.springframework.boot</groupId>
                <artifactId>spring-boot-maven-plugin</artifactId>
                <configuration>
                    <excludes>
                        <exclude>
                            <groupId>org.projectlombok</groupId>
                            <artifactId>lombok</artifactId>
                        </exclude>
                    </excludes>
                </configuration>
            </plugin>
        </plugins>
    </build>

</project>
nous utilisons différents types de dépendances comme
- Spring Boot Starter Actuator : 3.3.3 - Ajoute des fonctionnalités prêtes pour la production telles que la surveillance et les contrôles de santé.
- Spring Boot Starter Data JPA : 3.3.3 - Simplifie les interactions avec la base de données avec le support JPA.
- Spring Boot Starter Security : 3.3.3 - Fournit des fonctionnalités de sécurité telles que l'authentification et l'autorisation.
- Spring Boot Starter Web : 3.3.3 - Prend en charge la création d'applications Web, y compris les services RESTful.
- API JJWT : 0.12.5 - Gère la création et l'analyse de JWT pour une gestion sécurisée des jetons.
- JJWT Impl : 0.12.5 - Implémente les fonctionnalités de base de JWT.
- JJWT Jackson : 0.12.5 - Active l'analyse JWT JSON à l'aide de Jackson.
- Connecteur MySQL : Runtime - Connecte votre application à une base de données MySQL.
- Lombok : Non spécifié - Réduit le code passe-partout avec des annotations.
- Spring Boot Starter Test : 3.3.3 - Fournit une prise en charge des tests pour les applications Spring Boot.
- Spring Security Test : 3.3.3 - Aide à tester les configurations de sécurité.
- Spring Boot Starter Validation : 3.3.3 - Ajoute la prise en charge de la validation pour les objets de requête et de réponse.
- SpringDoc OpenAPI Starter WebMVC UI : 2.5.0 - Intègre l'interface utilisateur Swagger pour la documentation de l'API.
- ModelMapper : 3.1.1 - Simplifie le mappage d'objets entre différentes couches.
*2. Structure du projet *

3. Ajoutez la configuration dans le fichier application.properties
spring.application.name=user-auth-service

server.port=8000

spring.datasource.url=jdbc:mysql://localhost:3306/auth_services
spring.datasource.username=root
spring.datasource.password=ayush@123

spring.jpa.hibernate.ddl-auto=update
spring.jpa.show-sql=true

#debug logs
logging.level.org.springframework.security=debug

spring.main.allow-circular-references=true
4. Créer l'entité USER
package com.tier3Hub.user_auth_service.entity;

import jakarta.persistence.*;
import lombok.AllArgsConstructor;
import lombok.Builder;
import lombok.Data;
import lombok.NoArgsConstructor;

import java.time.LocalDateTime;
import java.util.List;

@AllArgsConstructor
@NoArgsConstructor
@Data
@Builder
@Table
@Entity(name = "User")
public class User {
    @Id
    @GeneratedValue(strategy = GenerationType.IDENTITY)
    private Long id;
    private String username;
    private String password;
    private String email;
    private String phoneNumber;
    private List<String> roles;
    private LocalDateTime createdAt;
    private LocalDateTime updatedAt;
}
** 5. créer la classe et l'interface du service et du référentiel**
Dépôt.java
package com.tier3Hub.user_auth_service.Repository;

import com.tier3Hub.user_auth_service.entity.User;
import org.springframework.data.jpa.repository.JpaRepository;

public interface AuthRepository extends JpaRepository<User, Long> {

    User findByUsername(String username);
}
service.java
package com.tier3Hub.user_auth_service.service;

import com.tier3Hub.user_auth_service.dto.LoginResponse;
import com.tier3Hub.user_auth_service.dto.RegisterDTO;
import com.tier3Hub.user_auth_service.dto.RegisterResponse;

public interface AuthService {
    RegisterResponse register(RegisterDTO registerDTO);
}
6. créer les DTO pour la demande et la réponse de connexion et de connexion
Créer une connexionDTO.java
package com.tier3Hub.user_auth_service.dto;

import jakarta.validation.constraints.NotBlank;
import jakarta.validation.constraints.Size;
import lombok.AllArgsConstructor;
import lombok.Data;
import lombok.NoArgsConstructor;

@AllArgsConstructor
@NoArgsConstructor
@Data
public class LoginDTO {
    @NotBlank(message = "Username is required")
    @Size(min = 3, max = 20, message = "Username must be between 3 and 20 characters")
    private String username;

    @NotBlank(message = "Password is required")
    private String password;
}
loginResponse.java
package com.tier3Hub.user_auth_service.dto;

import lombok.AllArgsConstructor;
import lombok.Builder;
import lombok.Data;
import lombok.NoArgsConstructor;

@Data
@AllArgsConstructor
@NoArgsConstructor
@Builder
public class LoginResponse {
    private String accessToken;
    private String tokenType = "Bearer";
}
EnregistrerDTO.java
package com.tier3Hub.user_auth_service.dto;

import jakarta.validation.constraints.Email;
import jakarta.validation.constraints.NotBlank;
import jakarta.validation.constraints.Size;
import lombok.AllArgsConstructor;
import lombok.Data;
import lombok.NoArgsConstructor;

@AllArgsConstructor
@NoArgsConstructor
@Data
public class RegisterDTO {
    @NotBlank(message = "Username is required")
    @Size(min = 3, max = 20, message = "Username must be between 3 and 20 characters")
    private String username;

    @NotBlank(message = "Password is required")
    @Size(min = 8, message = "Password must be at least 8 characters")
    private String password;

    @NotBlank(message = "Email is required")
    @Email(message = "Email should be valid")
    private String email;
}
RegisterResponse.java
package com.tier3Hub.user_auth_service.dto;

import lombok.AllArgsConstructor;
import lombok.Data;
import lombok.NoArgsConstructor;

import java.time.LocalDateTime;

@AllArgsConstructor
@NoArgsConstructor
@Data
public class RegisterResponse {
    private Long id;
    private String username;
    private String email;
    private LocalDateTime createdAt;
    private LocalDateTime updatedAt;
}
*7. pour envoyer une réponse personnalisée depuis l'API, nous utilisons ResponseHandler.java *
package com.tier3Hub.user_auth_service.utils;

import org.springframework.http.HttpStatus;
import org.springframework.http.ResponseEntity;

import java.util.HashMap;
import java.util.Map;

public class ResponseHandler {
    public static ResponseEntity<Object> generateResponse(String message, HttpStatus status, Object responseObj) {
        Map<String, Object> map = new HashMap<String, Object>();
        map.put("message", message);
        map.put("status", status.value());
        map.put("data", responseObj);
        return new ResponseEntity<Object>(map, status);
    }

}
8. for storing some constants we create the class inside the utils package that is ApplicationConstants.java
package com.tier3Hub.user_auth_service.utils;

public class AppConstants {
    public static final String[] PUBLIC_URLS = { "/v3/api-docs/**", "/swagger-ui/**", "/api/auth/register/**", "/api/auth/login/**","/api/auth/registerAdmin/**" };
}
9. for converting the object one to another we use the dependency that is model mapper for configuration that we create the class inside the config package that is ApplicationConfigs.java
package com.tier3Hub.user_auth_service.config;

import org.modelmapper.ModelMapper;
import org.springframework.context.annotation.Bean;
import org.springframework.context.annotation.Configuration;

@Configuration
public class ApplicationConfigs {
    @Bean
    public ModelMapper modelMapper()
    {
        return new ModelMapper();
    }
}
**
This is the basic setup that we do for every spring-boot application we create now securing the rest endpoint with JWT we started.
**
now inside the security package we create the class called JWTFilter.java
The JWTFilter is a custom Spring Security filter that intercepts HTTP requests to validate JWTs. It checks for the "Authorization" header, extracts the token, and retrieves the username. If the token is valid, it creates an authentication token with user details and sets it in the security context, allowing the application to recognize the authenticated user for further processing.
package com.tier3Hub.user_auth_service.security;

import jakarta.servlet.FilterChain;
import jakarta.servlet.ServletException;
import jakarta.servlet.http.HttpServletRequest;
import jakarta.servlet.http.HttpServletResponse;
import org.springframework.beans.factory.annotation.Autowired;
import org.springframework.security.authentication.UsernamePasswordAuthenticationToken;
import org.springframework.security.core.context.SecurityContextHolder;
import org.springframework.security.core.userdetails.UserDetails;
import org.springframework.security.core.userdetails.UserDetailsService;
import org.springframework.security.web.authentication.WebAuthenticationDetailsSource;
import org.springframework.stereotype.Service;
import org.springframework.web.filter.OncePerRequestFilter;

import java.io.IOException;

@Service
public class JWTFilter extends OncePerRequestFilter {
    @Autowired
    private UserDetailsService userDetailsService;

    @Autowired
    private JWTUtil jwtUtil;

    @Override
    protected void doFilterInternal(HttpServletRequest request, HttpServletResponse response, FilterChain chain) throws ServletException, IOException {
        String authorizationHeader = request.getHeader("Authorization");
        String username = null;
        String jwt = null;
        if (authorizationHeader != null && authorizationHeader.startsWith("Bearer ")) {
            jwt = authorizationHeader.substring(7);
            username = jwtUtil.extractUsername(jwt);
        }
        if (username != null) {
            UserDetails userDetails = userDetailsService.loadUserByUsername(username);
            if (jwtUtil.validateToken(jwt)) {
                UsernamePasswordAuthenticationToken auth = new UsernamePasswordAuthenticationToken(userDetails, null, userDetails.getAuthorities());
                auth.setDetails(new WebAuthenticationDetailsSource().buildDetails(request));
                SecurityContextHolder.getContext().setAuthentication(auth);
            }
        }
        chain.doFilter(request, response);
    }
}
create the class JWTUtil.java
The JWTUtil class manages JWT operations, including extracting usernames and expiration dates from tokens. It generates new tokens using a secret key and validates existing tokens by checking their expiration. The class uses HMAC for signing and includes methods to parse claims and determine if tokens are expired, ensuring secure authentication and authorization in the application.
package com.tier3Hub.user_auth_service.security;

import io.jsonwebtoken.Claims;
import io.jsonwebtoken.Jwts;
import io.jsonwebtoken.security.Keys;
import org.springframework.stereotype.Service;

import javax.crypto.SecretKey;
import java.util.Date;
import java.util.HashMap;
import java.util.Map;

@Service
public class JWTUtil {

    private String SECRET_KEY = "TaK+HaV^uvCHEFsEVfypW#7g9^k*Z8$V";

    private SecretKey getSigningKey() {
        return Keys.hmacShaKeyFor(SECRET_KEY.getBytes());
    }

    public String extractUsername(String token) {
        Claims claims = extractAllClaims(token);
        return claims.getSubject();
    }

    public Date extractExpiration(String token) {
        return extractAllClaims(token).getExpiration();
    }

    private Claims extractAllClaims(String token) {
        return Jwts.parser()
                .verifyWith(getSigningKey())
                .build()
                .parseSignedClaims(token)
                .getPayload();
    }

    private Boolean isTokenExpired(String token) {
        return extractExpiration(token).before(new Date());
    }

    public String generateToken(String username) {
        Map<String, Object> claims = new HashMap<>();
        return createToken(claims, username);
    }

    private String createToken(Map<String, Object> claims, String subject) {
        return Jwts.builder()
                .claims(claims)
                .subject(subject)
                .header().empty().add("typ","JWT")
                .and()
                .issuedAt(new Date(System.currentTimeMillis()))
                .expiration(new Date(System.currentTimeMillis() + 1000 * 60 * 50)) // 5 minutes expiration time
                .signWith(getSigningKey())
                .compact();
    }

    public Boolean validateToken(String token) {
        return !isTokenExpired(token);
    }
}
*configure the Spring security and add some modifictaion we create the class SecurityConfig.java *
The SecurityConfig class sets up security for the application using Spring Security. It defines access rules, allowing public endpoints while restricting others based on user roles. The class incorporates a JWT filter to validate tokens and uses BCrypt for password encoding. It also configures an authentication manager with a custom user details service for secure user authentication.
package com.tier3Hub.user_auth_service.config;

import com.tier3Hub.user_auth_service.security.JWTFilter;
import com.tier3Hub.user_auth_service.service.UserInfoConfigManager;
import com.tier3Hub.user_auth_service.utils.AppConstants;
import org.springframework.beans.factory.annotation.Autowired;
import org.springframework.context.annotation.Bean;
import org.springframework.context.annotation.Configuration;
import org.springframework.security.authentication.AuthenticationManager;
import org.springframework.security.config.annotation.authentication.builders.AuthenticationManagerBuilder;
import org.springframework.security.config.annotation.authentication.configuration.AuthenticationConfiguration;
import org.springframework.security.config.annotation.web.builders.HttpSecurity;
import org.springframework.security.config.annotation.web.configuration.EnableWebSecurity;
import org.springframework.security.config.annotation.web.configurers.AbstractHttpConfigurer;
import org.springframework.security.crypto.bcrypt.BCryptPasswordEncoder;
import org.springframework.security.crypto.password.PasswordEncoder;
import org.springframework.security.web.SecurityFilterChain;
import org.springframework.security.web.authentication.UsernamePasswordAuthenticationFilter;

@Configuration
@EnableWebSecurity
public class SecurityConfig {
    @Autowired
    private JWTFilter jwtFilter;

    @Autowired
    private UserInfoConfigManager userInfoConfigManager;

    @Bean
    public SecurityFilterChain securityFilterChain(HttpSecurity http) throws Exception {
        return http.authorizeHttpRequests(request -> request
                        .requestMatchers(AppConstants.PUBLIC_URLS).permitAll()
                        .requestMatchers("/api/test/public/hello/**").hasAnyRole("USER","ADMIN")
                        .requestMatchers("/api/test/private/**").hasRole("ADMIN")
                        .anyRequest()
                        .authenticated())
                .csrf(AbstractHttpConfigurer::disable)
                .addFilterBefore(jwtFilter, UsernamePasswordAuthenticationFilter.class)
                .build();
    }

    @Autowired
    public void configureGlobal(AuthenticationManagerBuilder auth) throws Exception {
        auth.userDetailsService(userInfoConfigManager).passwordEncoder(passwordEncoder());
    }

    @Bean
    public PasswordEncoder passwordEncoder() {
        return new BCryptPasswordEncoder();
    }

    @Bean
    public AuthenticationManager authenticationManager(AuthenticationConfiguration auth) throws Exception {
        return auth.getAuthenticationManager();
    }
}
The securityFilterChain method configures access rules for different API endpoints in the Spring application. It permits public URLs and applies role-based access control for user and admin roles. Role-based authentication restricts resource access based on user roles (e.g., USER, ADMIN). In Spring Boot, you define roles and configure security settings in the SecurityConfig class to specify access permissions. During user registration, assign roles, and use annotations like @PreAuthorize to enforce role checks in controllers. This approach enhances security, allows easy permission management, and simplifies user access rights as the application scales. Implementing role-based auth provides flexibility and maintainability for your user management system. CSRF protection is disabled, and a custom JWT filter is added to authenticate requests based on JSON Web Tokens, ensuring secure and controlled access to resources.
configureGlobal method handle configures global authentication settings in a Spring application. It uses a custom user details service for loading user data and a BCrypt password encoder for secure password hashing. Additionally, it provides an AuthenticationManager bean for handling authentication processes, ensuring a secure and efficient user authentication system that leverages strong password management practices.
create the endpoints for register and login
package com.tier3Hub.user_auth_service.Controller;


import com.tier3Hub.user_auth_service.dto.LoginDTO;
import com.tier3Hub.user_auth_service.dto.LoginResponse;
import com.tier3Hub.user_auth_service.dto.RegisterDTO;
import com.tier3Hub.user_auth_service.security.JWTUtil;
import com.tier3Hub.user_auth_service.service.AuthService;
import com.tier3Hub.user_auth_service.service.UserInfoConfigManager;
import com.tier3Hub.user_auth_service.utils.ResponseHandler;
import jakarta.validation.Valid;
import org.springframework.beans.factory.annotation.Autowired;
import org.springframework.http.HttpStatus;
import org.springframework.http.ResponseEntity;
import org.springframework.security.authentication.AuthenticationManager;
import org.springframework.security.authentication.UsernamePasswordAuthenticationToken;
import org.springframework.security.core.Authentication;
import org.springframework.security.core.context.SecurityContext;
import org.springframework.security.core.userdetails.UserDetails;
import org.springframework.web.bind.annotation.PostMapping;
import org.springframework.web.bind.annotation.RequestBody;
import org.springframework.web.bind.annotation.RequestMapping;
import org.springframework.web.bind.annotation.RestController;

@RestController
@RequestMapping("/api/auth")
public class AuthController {
    @Autowired
    JWTUtil jwtUtil;

    @Autowired
    AuthService authService;

    @Autowired
    AuthenticationManager authenticationManager;

    @Autowired
    private UserInfoConfigManager userInfoConfigManager;

    @PostMapping("/register")
    public ResponseEntity<Object> register(@Valid @RequestBody RegisterDTO registerDTO) {
        return ResponseHandler.generateResponse("User registered successfully", HttpStatus.OK, authService.register(registerDTO));
    }

    @PostMapping("/login")
    public ResponseEntity<Object> login(@Valid @RequestBody LoginDTO loginDTO) {
        try {
            Authentication authenticate = authenticationManager
                    .authenticate(new UsernamePasswordAuthenticationToken(loginDTO.getUsername(), loginDTO.getPassword()));
            UserDetails userDetails = userInfoConfigManager.loadUserByUsername(loginDTO.getUsername());
            String jwt = jwtUtil.generateToken(userDetails.getUsername());
            LoginResponse loginResponse = LoginResponse
                    .builder()
                    .accessToken(jwt)
                    .build();
            return ResponseHandler.generateResponse("User logged in successfully", HttpStatus.OK, loginResponse);
        }
        catch (Exception e)
        {
            return new ResponseEntity<>("Incorrect username or password", HttpStatus.BAD_REQUEST);
        }
    }
}
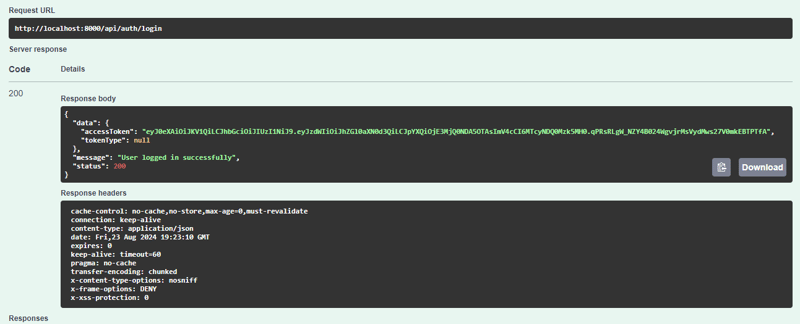
This login method in the AuthController handles user login requests. It takes a LoginDTO containing the username and password, validates them, and attempts authentication using the AuthenticationManager. Upon successful authentication, it retrieves user details and generates a JWT token using the JWTUtil class. The token is then included in a LoginResponse object and returned with a success message. If authentication fails, it catches the exception and returns a "Incorrect username or password" response with a 400 status code.
generateToken(String username): This method creates an empty claims map and calls the createToken method with the username as the subject. It serves as the entry point for token generation.
c*reateToken(Map claims, String subject):* This method builds the JWT using the Jwts.builder(). It sets the claims, subject, and token metadata, such as issue date and expiration time (set to 5 minutes). The token is then signed with a secret key and compacted into a string format for transmission.
Testing
now we run the application
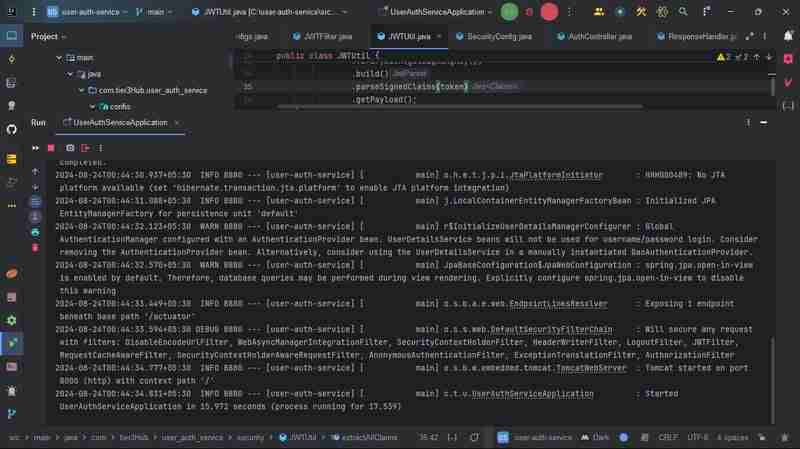
and hit the URL here our application is runing on 8000 port
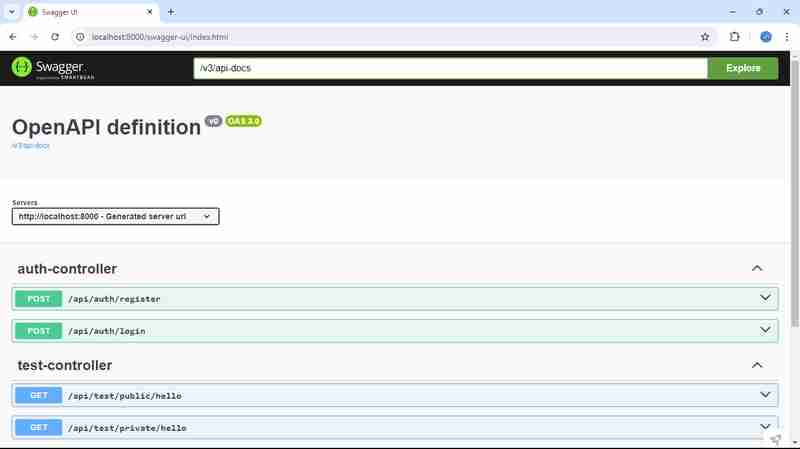
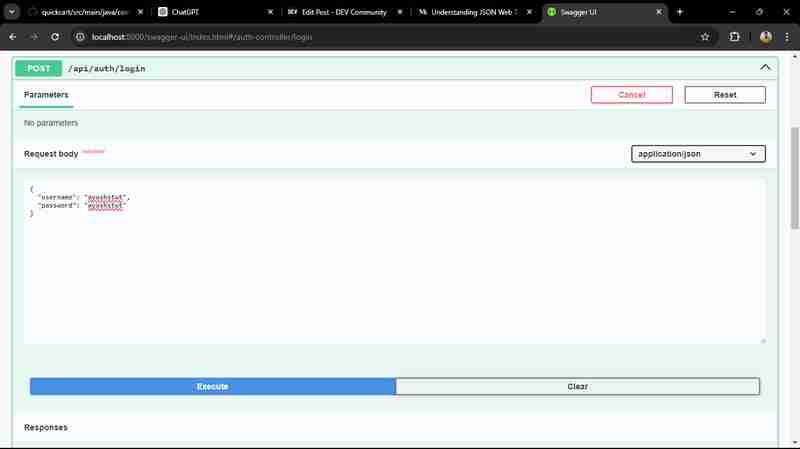
http://localhost:8000/swagger-ui/index.html
L'utilisation de Swagger dans votre projet améliore la documentation et les tests de l'API. Il fournit une interface conviviale permettant aux développeurs d'explorer vos API, de comprendre les structures de requête/réponse et de tester les points de terminaison directement à partir de la documentation. En intégrant Swagger, vous activez la génération automatique de documents API basés sur vos annotations de code, ce qui facilite la collaboration efficace des développeurs front-end et back-end.
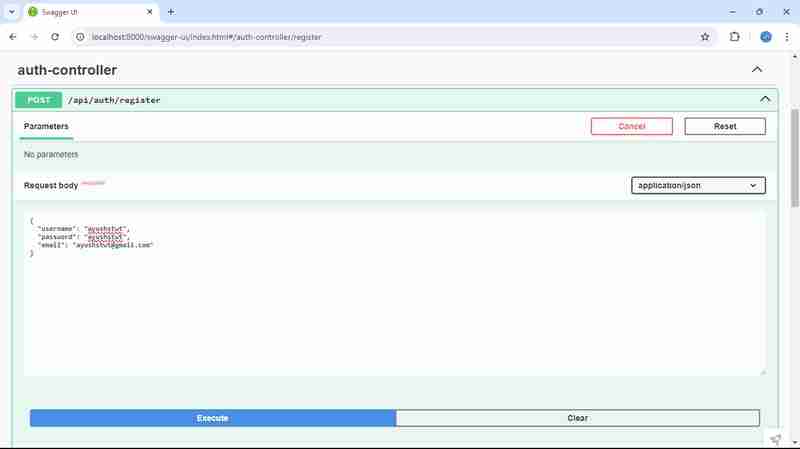
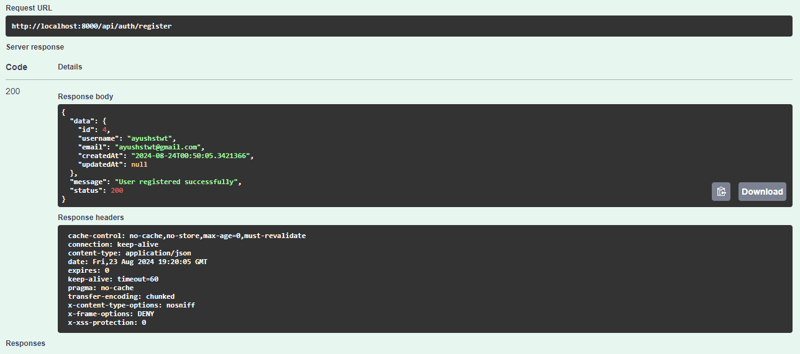
Nous enregistrons d'abord l'utilisateur
nous obtenons la réponse comme celle-ci
après cela, nous connectons l'utilisateur
nous obtenons la réponse comme celle-ci
Conclusion
Le projet implémente l'authentification basée sur les rôles à l'aide de JWT (JSON Web Tokens) dans une application Spring Boot. Il dispose d'un mécanisme d'authentification sécurisé permettant aux utilisateurs de s'inscrire et de se connecter, en recevant un JWT qui accorde l'accès en fonction des rôles qui leur sont attribués (comme USER ou ADMIN). La classe SecurityConfig configure les autorisations d'accès, garantissant que les points de terminaison publics sont accessibles à tous tout en limitant les opérations sensibles aux utilisateurs autorisés uniquement. La classe JWTUtil gère la création, la validation et l'extraction des jetons. Dans l'ensemble, cette configuration améliore la sécurité, permettant un contrôle d'accès transparent et robuste dans l'ensemble de l'application.
Le projet utilise un cadre de sécurité complet qui exploite Spring Security pour l'authentification et l'autorisation des utilisateurs. L'AuthController facilite l'enregistrement et la connexion des utilisateurs, générant un JWT en cas d'authentification réussie. L'application utilise un JWTFilter pour intercepter les demandes et valider les jetons, garantissant ainsi que seuls les utilisateurs authentifiés peuvent accéder aux ressources protégées. En intégrant un contrôle d'accès basé sur les rôles, le projet fournit un système de gestion des utilisateurs flexible et sécurisé. Cette conception améliore non seulement la sécurité, mais améliore également l'expérience utilisateur en minimisant le besoin de connexions répétées. Dans l’ensemble, il constitue une base solide pour la création de microservices évolutifs et sécurisés.
Vous pouvez explorer le code source complet du service d'authentification utilisateur sur mon référentiel GitHub. Ce projet présente diverses fonctionnalités telles que l'enregistrement des utilisateurs, la connexion et l'accès sécurisé à l'aide de JWT pour l'authentification. N'hésitez pas à le consulter, à contribuer ou à l'utiliser comme référence pour vos propres projets !
Dépôt GitHub : https://github.com/ishrivasayush/user-auth-service
Pour ceux qui souhaitent approfondir leurs connaissances sur les jetons Web JSON (JWT), je recommande de visiter jwt.io. Cette ressource fournit des informations complètes sur JWT, notamment son fonctionnement, sa structure et des exemples pratiques. Il s'agit d'un excellent point de départ pour comprendre l'authentification et l'autorisation basées sur des jetons, essentielles aux applications Web modernes. Que vous soyez débutant ou que vous cherchiez à rafraîchir vos connaissances, jwt.io offre des informations précieuses sur la gestion sécurisée des sessions utilisateur.
Ce qui précède est le contenu détaillé de. pour plus d'informations, suivez d'autres articles connexes sur le site Web de PHP en chinois!