
Maison >interface Web >js tutoriel >Rapide et synchronisé avec Svelte
Rapide et synchronisé avec Svelte

- PHPzoriginal
- 2024-08-22 22:33:10789parcourir
Êtes-vous prêt à créer une application Web réactive en temps réel ?
tl;dr Vous n'avez pas le temps de lire et de parcourir l'intégralité de ce tutoriel ? Vous avez de la chance ! Vous pouvez trouver un exemple entièrement fonctionnel sur GitHub. N'hésitez pas à vous y rendre, cloner le référentiel et commencer à explorer.
Dans ce tutoriel, nous explorerons la combinaison de Svelte et Couchbase Capella pour créer une application de chat dynamique et interactive. Svelte, avec un taux d'admiration impressionnant de 72,8 % selon l'enquête auprès des développeurs Stack Overflow 2024, est célébré pour plusieurs raisons. Il simplifie efficacement une grande partie du travail du navigateur en compilant vos composants dans un code impératif très efficace qui manipule directement le DOM, éliminant ainsi le besoin d'un DOM virtuel et conduisant à des mises à jour plus rapides et à des tailles de bundles plus petites.
La réactivité intégrée de Svelte suit automatiquement les changements d'état, garantissant des mises à jour rapides et efficaces sans avoir besoin de bibliothèques de gestion d'état complexes. Cette réactivité simplifie le processus de développement et améliore les performances. De plus, l’architecture basée sur les composants de Svelte facilite la création et la maintenance d’interfaces utilisateur complexes, offrant ainsi une expérience de développement plus simple et plus agréable. Et, lorsque votre application a besoin de données réactives et adaptatives, Couchbase Capella propose une solution simple à mettre en œuvre.
Couchbase Capella n'est pas seulement une plateforme de base de données cloud NoSQL ; il s'agit d'une plate-forme de données tout-en-un offrant une recherche en texte intégral, une recherche vectorielle, une mise en cache des données, des analyses, etc. Cette fonctionnalité complète vous permet de créer des applications robustes avec diverses exigences en matière de données. Ensemble, Svelte et Couchbase Capella créent des applications en temps réel incroyablement rapides et performantes.
D'accord, assez parlé. Commençons !
Configuration de l'environnement de développement
Création d'un nouveau projet SvelteKit
Avant de plonger dans la configuration, clarifions la différence entre Svelte et SvelteKit. Svelte est un framework frontal qui compile votre code en un code impératif très efficace qui manipule directement le DOM. Cela se traduit par des mises à jour plus rapides et des tailles de bundle plus petites. D'autre part, SvelteKit est un framework construit sur Svelte, conçu pour créer des applications Web full-stack. SvelteKit fournit des fonctionnalités supplémentaires telles que le routage, le rendu côté serveur et la génération de sites statiques, ce qui en fait un outil puissant pour développer des applications Web modernes.
Dans votre projet, SvelteKit gérera la structure de l'application, le routage et le rendu côté serveur, tandis que Svelte gérera le rendu efficace des composants de l'interface utilisateur.
Pour démarrer un nouveau projet vous pouvez l'initialiser en ligne de commande :
> npm create svelte@latest svelte-couchbase-real-time-chat
> cd svelte-couchbase-real-time-chat
L'outil CLI vous proposera plusieurs choix. Répondez avec les réponses suivantes :
- - Projet squelette : Sélectionnez oui pour commencer avec une structure de projet de base.
- Typescript : Sélectionnez non pour l'instant pour garder les choses simples.
- ESLint : sélectionnez oui pour inclure le peluchage, ce qui aide à maintenir la qualité du code.
- Plus joli : Sélectionnez oui pour le formatage du code.
- Dramaturge : Sélectionnez non sauf si vous envisagez d'écrire des tests de bout en bout depuis le début.
Ensuite, installez les dépendances en exécutant npm install depuis la ligne de commande. Après avoir exécuté ces commandes, vous aurez un nouveau projet SvelteKit configuré et prêt à démarrer !
Installation des dépendances
Ensuite, nous installerons les dépendances supplémentaires requises pour notre projet, notamment Tailwind CSS pour le style, le SDK Couchbase pour les interactions avec la base de données et la prise en charge de WebSocket pour la communication en temps réel.
> npm install -D tailwindcss postcss autoprefixer couchbase ws dotenv
> npx tailwindcss init -p
Que fait chacune de ces dépendances dans votre application ?
- TailwindCSS is a utility-first CSS framework that makes it more straightforward to style your application with predefined classes.
- The Couchbase Node.js SDK introduces functionality to interact with your data on Couchbase Capella using methods that abstract away a lot of the work.
- ws is a small Websocket library for Node.js. You will be enabling the real-time chat functionality in the application with Websockets.
- Lastly, dotenv loads environment variables from a .env file into process.env making it easier to manage configuration.
Configuring TailwindCSS
As mentioned above, TailwindCSS introduces classes that you can use to define the styling for your application. This is helpful if you are not a frontend expert, or even if you are, if you wish to shortcut the process of building elegantly designed applications. To use TailwindCSS in your Svelte project, follow these steps:
Configure tailwind.config.js
Update the tailwind.config.cjs file to specify the content sources. This ensures that Tailwind CSS can remove unused styles from your production build, making it more efficient.
/** @type {import('tailwindcss').Config} */
module.exports = {
  content: ['./src/**/*.{html,js,svelte,ts}'],
  theme: {
    extend: {},
  },
  plugins: [],
}
Add Tailwind CSS directives
Create or update the src/app.css file to include Tailwind CSS directives. These directives load Tailwind’s base, components, and utility styles.
@tailwind base;
@tailwind components;
@tailwind utilities;
Include the CSS in your Svelte project
Open or create the src/routes/+layout.svelte file and import the CSS file. This ensures that Tailwind’s styles are available throughout your application.
<script>
  import "../app.css";
</script>

<slot />
Now that you’ve completed these steps, TailwindCSS has been successfully initialized in your application! You’re ready to move on to setting up Couchbase Capella and building the backend for your chat application.
Setting Up Couchbase Capella
Creating a Cluster
It is free to sign up and try Couchbase Capella, and if you have not done so yet, you can do so by navigating to cloud.couchbase.com and creating an account using your GitHub or Google credentials, or by making a new account with an email address and password combination.
Once you have done so, from within your Capella dashboard, you will create your first cluster. For the purposes of this walkthrough, let’s name it SvelteChatApp.
The summary of your new cluster will be presented on the left-hand side of the dashboard. Capella is multi-cloud and can work with AWS, Google Cloud or Azure. For this example, you will deploy to AWS.
After you have created your cluster, you need to create a bucket. A bucket in Couchbase is the container where the data is stored. Each item of data, known as a document, is kept in JSON making its syntax familiar to most developers. You can name your bucket whatever you want. However, for the purposes of this walkthrough, let’s name this bucket svelte_chat_app_messages.
Now that you have created both your database and your bucket, you are ready to create your database access credentials and to fetch your connection URL that you will be using in your Lambda function.
Obtaining Connection Details
The connection details are essential as you will be using them in your application to establish a connection to your Couchbase data and to interact with the data. Navigate to the Connect section in the Capella dashboard and take note of the Connection String.
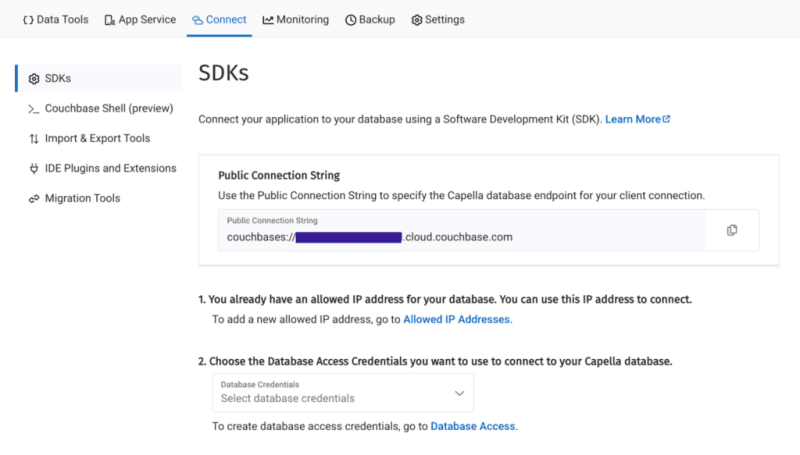
Then, click on the Database Access link under section two. In that section, you will create credentials – a username and password – that your application will use to authenticate with the database. You can scope the credentials to the specific bucket you created or give it permission for all buckets and databases in your account. You need to make sure it has both read and write access, regardless.
Once you have finished, the last step in this part of the process is to add your new connection string and connection credentials to your application as environment variables.
Setting Up Environment Variables
In a production environment, you will store your credentials and other confidential information for your application in a secure format. Different cloud providers have different paths to store sensitive information, and you should follow the procedure defined by the cloud provider you are using, whether it is AWS, Google Cloud, Azure, Netlify, Vercel or any other. For our purposes, you are adding your credentials to a .env file in the root folder of your application. The dotenv package reads those credentials from there and loads them into your application.
# .env
COUCHBASE_BUCKET=your_bucket_name
COUCHBASE_CONNECTION_STRING=your_connection_string
COUCHBASE_USER=your_username
COUCHBASE_PASSWORD=your_password
That’s it! Your Couchbase cluster is all set up and ready to be used. At this point, you are ready to build the application. Let’s start with the backend server with Nodejs and then move on to the frontend with Svelte.
Building the Backend with Node.js
With our development environment set up, it’s time to build the backend for our real-time chat application. We’ll use Node.js to create the server, connect to Couchbase Capella for data storage, and set up a WebSocket server for real-time communication.
Creating server.cjs
First, we’ll create a file named server.cjs which will serve as the entry point for our backend.
-
- Create server.cjs: In the root directory of your project, create a new file named server.cjs.
- Setup Express and Dependencies: We’ll use Express for our server framework, the Couchbase SDK for database operations, WebSocket for real-time communication, and dotenv for environment variables management. Add the following code to server.cjs:
const express = require('express');
const couchbase = require('couchbase');
const { createServer } = require('http');
const { WebSocketServer } = require('ws');
const dotenv = require('dotenv');

dotenv.config();

const app = express();
const server = createServer(app);
const wss = new WebSocketServer({ server });
Connecting to Couchbase
Next, we’ll set up the connection to Couchbase Capella. Ensure your .env file contains the correct connection details. Add the following code to server.cjs to connect to Couchbase:
let cluster, bucket, collection;

async function connectToCouchbase() {
    try {
        console.log('Connecting to Couchbase...');
        const clusterConnStr = process.env.COUCHBASE_CONNECTION_STRING;
        const username = process.env.COUCHBASE_USER;
        const password = process.env.COUCHBASE_PASSWORD;
        const bucketName = process.env.COUCHBASE_BUCKET;

        cluster = await couchbase.connect(clusterConnStr, {
          username: username,
          password: password,
          configProfile: 'wanDevelopment',
        });
        bucket = cluster.bucket(bucketName);
        collection = bucket.defaultCollection();

        console.log('Connected to Couchbase successfully.');
    } catch (error) {
        console.error('Error connecting to Couchbase:', error);
        process.exit(1);
    }
}

connectToCouchbase();
This function handles the connection to Couchbase, ensuring that all necessary parameters are properly configured. All that is left for our backend is to create the websocket server to handle the sending and receiving of new chat messages.
Setting up the Websocket Server
The Websocket server functionality is also added to the server.cjs file. The server will broadcast all new messages for the frontend of the application to receive, and send all newly created messages to Couchbase for saving in the bucket you created.
wss.on('connection', (ws) => {
    console.log('New WebSocket connection established.');
    ws.on('message', async (message) => {
        try {
            const messageString = message.toString();
            console.log('Received message:', messageString);
            // Save message to Couchbase
            const id = `message::${Date.now()}`;
            await collection.upsert(id, { text: messageString });
            console.log('Message saved to Couchbase:', id);

            // Broadcast message
            wss.clients.forEach((client) => {
                if (client.readyState === WebSocket.OPEN) {
                    client.send(messageString);
                    console.log('Broadcasted message to client:', messageString);
                }
            });
        } catch (error) {
            console.error('Error handling message:', error);
        }
    });
});

server.listen(3000, () => {
    console.log('Server started on http://localhost:3000');
});
Note that before sending the message to Couchbase, you first convert the message into a String as it is received as binary data buffers by default. The conversion to String format is achieved by calling the toString() function on the message. The newly defined messageString variable now contains the data in readable format for both sending to Couchbase and rendering in the application.
That is the entire backend of your new real-time chat application. However, as good as any backend for a web application is, it needs a frontend to render it for the user. Svelte offers us the performance and reactivity to do so with speed and with an excellent developer experience.
Creating the Frontend with Svelte
With your backend set up, it’s time to build the frontend of our real-time chat application using Svelte. You’ll leverage Svelte’s strengths to create a responsive and dynamic chat interface.
Building the Chat Interface
- Create the Svelte Component In your SvelteKit project, create a new file named +page.svelte in the src/routes directory. This file will serve as the main component for our chat interface.
touch src/routes/+page.svelte
- Set Up the Basic Structure Open +page.svelte and set up the basic HTML structure with TailwindCSS classes for styling:
<script>
  import { onMount } from 'svelte';

  let messages = [];
  let newMessage = '';

  let ws;

  onMount(() => {
    ws = new WebSocket('ws://localhost:3000');

    ws.onmessage = (event) => {
      messages = [...messages, event.data];
    };

    ws.onopen = () => {
      console.log('WebSocket connection opened');
    };

    ws.onclose = () => {
      console.log('WebSocket connection closed');
    };
  });

  function sendMessage() {
    ws.send(newMessage);
    newMessage = '';
  }
</script>

<div class="container mx-auto p-4">
  <h1 class="text-2xl mb-4">Chat Application</h1>
  <div class="border p-4 mb-4 h-64 overflow-y-scroll">
    {#each messages as message}
      <div>{message}</div>
    {/each}
  </div>
  <input
    type="text"
    bind:value={newMessage}
    class="border p-2 w-full mb-2"
    placeholder="Type a message"
  />
  <button on:click={sendMessage} class="bg-blue-500 text-white p-2 w-full">Send</button>
</div>
The section of the above code example initializes Websocket and handles the messages, both sending and receiving. The onMount function ensures that the Websocket connection is established when the component is initialized. Svelte’s reactivity automatically updates the DOM whenever the messages array changes, ensuring new messages are displayed in real-time. With that your frontend is now complete.
You did it! You have built an entire chat application enabling real-time communication utilizing the performance, flexibility and adaptability of both Svelte and Couchbase to deliver an optimal experience for your users. Yes, this is a fairly simple implementation, however, it provides the skeleton for you to build even more expansive and complex real-time applications. The potential is only limited by your imagination.
Vous voulez essayer ? Démarrons votre application et commençons à discuter.
Exécuter l'application
Pour exécuter votre application, vous initialiserez à la fois le serveur backend Node.js et le frontend SvelteKit. Tout d’abord, démarrons le backend depuis votre terminal :
Ensuite, démarrez le frontend dans une nouvelle fenêtre de terminal :
Maintenant, naviguez dans votre navigateur jusqu'à http://localhost:5173 et commencez à discuter !
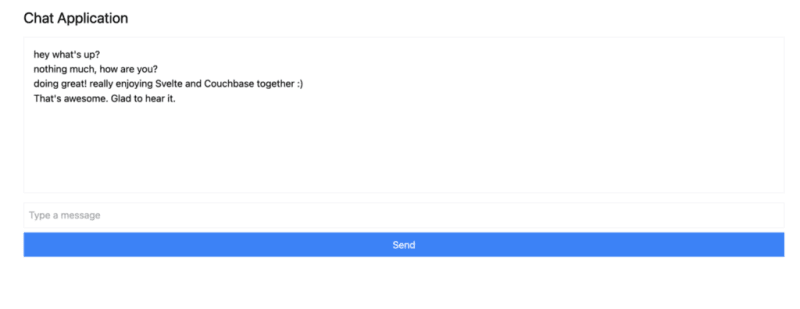
Vous pouvez ouvrir plusieurs onglets de navigateur pour simuler plusieurs utilisateurs ou utiliser un service comme ngrok pour partager l'application avec vos amis et discuter en temps réel avec eux.
Conclusion
Dans ce didacticiel, vous avez appris à quelle vitesse vous pouvez créer une application entièrement réactive qui fonctionne avec des données en temps réel. Svelte met facilement à jour le DOM, tandis que Couchbase vous permet de commencer à créer et à stocker des messages en quelques secondes seulement.
Il y a tellement de raisons pour lesquelles Svelte gagne rapidement en admiration et en popularité dans le domaine hautement compétitif des frameworks Web. Couchbase, en tant que backend de données, associé à Svelte, augmente le potentiel de ce que vous pouvez créer et réaliser bien plus. Pas besoin de définir un schéma compliqué, pas besoin d'ajouter des dépendances supplémentaires plus tard si vous souhaitez implémenter des fonctionnalités de mise en cache de données ou de recherche, tout est intégré à Couchbase et est prêt à l'emploi.
La seule question qui reste est : qu'allez-vous construire ensuite ?
Démarrez gratuitement avec Couchbase Capella.
Ce qui précède est le contenu détaillé de. pour plus d'informations, suivez d'autres articles connexes sur le site Web de PHP en chinois!
Articles Liés
Voir plus- Une analyse approfondie du composant de groupe de liste Bootstrap
- Explication détaillée du currying de la fonction JavaScript
- Exemple complet de génération de mot de passe JS et de détection de force (avec téléchargement du code source de démonstration)
- Angularjs intègre l'interface utilisateur WeChat (weui)
- Comment basculer rapidement entre le chinois traditionnel et le chinois simplifié avec JavaScript et l'astuce permettant aux sites Web de prendre en charge le basculement entre les compétences en chinois simplifié et traditionnel_javascript