
Maison >interface Web >js tutoriel >Comment déployer une application Next.js sur un VPS Hetzner à l'aide de SST et Docker
Comment déployer une application Next.js sur un VPS Hetzner à l'aide de SST et Docker

- WBOYWBOYWBOYWBOYWBOYWBOYWBOYWBOYWBOYWBOYWBOYWBOYWBoriginal
- 2024-08-13 14:35:331110parcourir
Mon article de blog original : https://www.prudkohliad.com/articles/deploy-next-js-to-vps-using-sst-2024-08-11
SST est un framework qui facilite la création d'applications full-stack modernes sur votre propre infrastructure. SST v3 utilise Pulumi et Terraform
– Documentation SST
Dans ce guide, nous allons déployer une application Next.js sur un VPS Hetzner à l'aide de SST et Docker. Ce guide fait suite à mon article précédent. Si vous trouvez quelque chose qui n'a pas de sens ici, il y a de fortes chances que vous y trouviez les réponses : Comment déployer une application Next.js sur un VPS sur Hetzner à l'aide de Docker et des actions GitHub.
Ajouter SST au projet
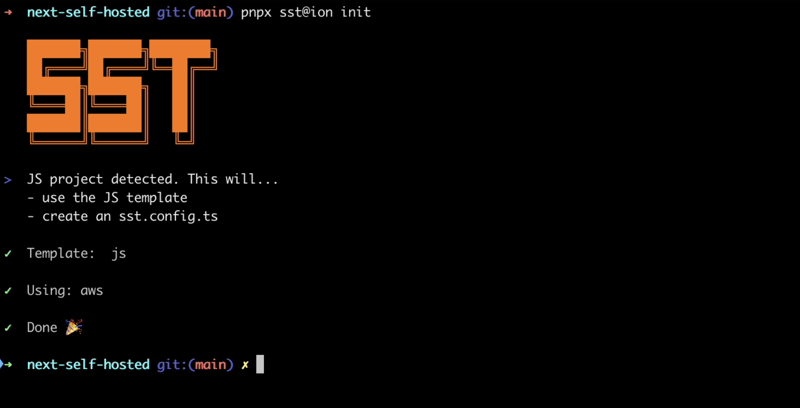
Pour ajouter SST au projet, exécutez la commande suivante :
pnpx sst@ion init
Cela affichera une invite interactive. Sélectionnez « Oui » puis « aws » :
Assurez-vous que tous les packages nécessaires sont installés :
pnpm install
Cela créera le fichier sst.config.ts dans lequel nous ajouterons toute la configuration.
De plus, d'autres fichiers/répertoires seront créés. Ajoutons-les à .dockerignore, nous ne voulons pas qu'ils finissent dans l'image Docker :
# sst
.sst
sst.config.ts
tsconfig.json
Voici à quoi ressemble actuellement le fichier de configuration sst :
/// <reference path="./.sst/platform/config.d.ts" />

export default $config({
  app(input) {
    return {
      name: "next-self-hosted",
      removal: input?.stage === "production" ? "retain" : "remove",
      home: "aws",
    };
  },
  async run() {},
});
Nous n'allons pas utiliser AWS, définissons donc le paramètre home sur "local":
/// <reference path="./.sst/platform/config.d.ts" />

export default $config({
  app(input) {
    return {
      name: "next-self-hosted",
      removal: input?.stage === "production" ? "retain" : "remove",
      home: "local",
    };
  },
  async run() {},
});
Vous pouvez maintenant commencer à ajouter des éléments à la fonction run().
Créer un jeton API sur Hetzner
Afin de créer un VPS sur Hetzner en utilisant SST, nous aurons besoin d'un jeton API Hetzner. Générons-en un nouveau.
Ouvrez le projet dans la console Hetzner, accédez à l'onglet « Sécurité » :
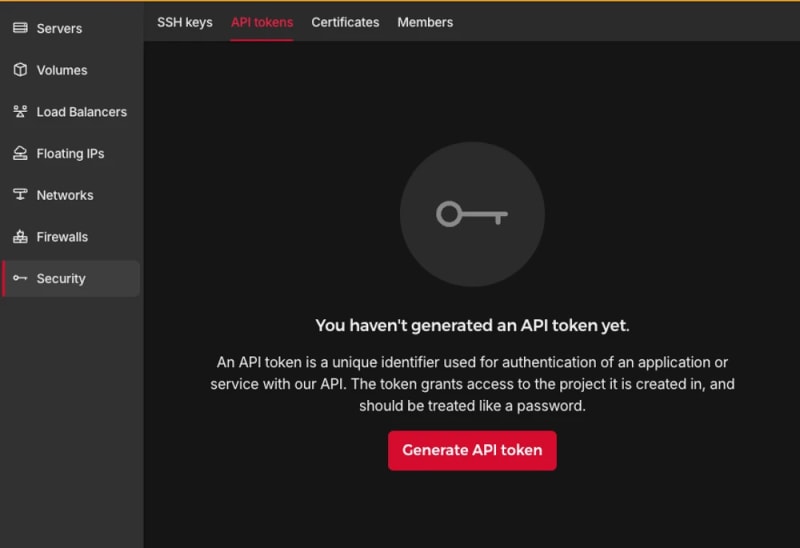
Générer un jeton API :

Un nouveau token sera ajouté à votre projet :

Le jeton ne sera affiché qu'une seule fois, assurez-vous de ne pas le perdre.
Ajouter des fournisseurs TLS et Hetzner :
pnpm sst add tls
pnpm sst add hcloud
pnpm install
Générer une clé SSH
Afin d'exécuter d'autres commandes après avoir créé un VPS Hetzner, nous devons nous assurer qu'une clé SSH y est ajoutée lors de la création. Pour ce faire, nous allons créer un token SSH localement puis ajouter sa partie publique à Hetzner. Ajoutez le code suivant à la fonction run :
// In the run() function:

// Generate an SSH key
const sshKeyLocal = new tls.PrivateKey("SSH Key - Local", {
  algorithm: "ED25519",
});

// Add the SSH key to Hetzner
const sshKeyHetzner = new hcloud.SshKey("SSH Key - Hetzner", {
  publicKey: sshKeyLocal.publicKeyOpenssh,
});
Déployer l'application :
pnpm sst deploy

SST ❍ ion 0.1.90  ready!

➜  App:        next-self-hosted
   Stage:      antonprudkohliad

~  Deploy

|  Created     SSH Key - Local tls:index:PrivateKey
|  Created     SSH Key - Hetzner hcloud:index:SshKey

✓  Complete
Vous verrez qu'une nouvelle clé SSH a été ajoutée à Hetzner :

Nous pouvons maintenant procéder à la création d'un VPS.
Créer un serveur
La commande suivante garantira qu'un nouveau VPS est créé dans votre projet :
// In the run() function:

// Create a Server on Hetzner
const server = new hcloud.Server("Server", {
  image: "docker-ce",
  serverType: "cx22",
  location: "nbg1",
  sshKeys: [sshKeyHetzner.id],
});
Ici, j'utilise l'image docker-ce, car elle est livrée avec Docker déjà installé. Vous pouvez utiliser l'API Hetzner Cloud pour répertorier toutes les images, types de serveurs et centres de données disponibles.
Vérifiez que le serveur est créé correctement :
pnpm sst deploy
SST ❍ ion 0.1.90  ready!

➜  App:        next-self-hosted
   Stage:      antonprudkohliad

~  Deploy

|  Created     Server hcloud:index:Server (34.5s)

✓  Complete
Vous devriez également pouvoir voir le serveur nouvellement créé dans la console :

Connectez-vous au serveur Docker sur le VPS
Afin de créer l'image Docker de l'application sur le VPS et de pouvoir créer des réseaux, des volumes et des conteneurs, nous devons créer un pont entre notre machine locale et le serveur Docker sur le VPS. Pour ce faire, nous allons avoir besoin du fournisseur Docker :
pnpm sst add docker
pnpm install
Stockez la clé SSH privée sur le disque afin que le client SSH puisse y accéder. Сréez une connexion au serveur Docker sur le VPS :
// At the top of the file:
import { resolve as pathResolve } from "node:path";
import { writeFileSync as fsWriteFileSync } from "node:fs";

// In the run() function:

// Store the private SSH Key on disk to be able to pass it to the Docker
// Provider
const sshKeyLocalPath = sshKeyLocal.privateKeyOpenssh.apply((k) => {
  const path = "id_ed25519_hetzner";
  fsWriteFileSync(path, k, { mode: 0o600 });
  return pathResolve(path);
});

// Connect to the Docker Server on the Hetzner Server
const dockerServerHetzner = new docker.Provider("Docker Server - Hetzner", {
  host: $interpolate`ssh://root@${server.ipv4Address}`,
  sshOpts: ["-i", sshKeyLocalPath, "-o", "StrictHostKeyChecking=no"],
});
Assurez-vous également d'ajouter la clé SSH privée id_ed25519_hetzner à .gitignore et .dockerignore, afin qu'elle ne figure pas dans votre dépôt GitHub et dans l'image Docker.
Déclenchez le déploiement pour vérifier les modifications :
pnpm sst deploy
SST ❍ ion 0.1.90  ready!

➜  App:        next-self-hosted
   Stage:      antonprudkohliad

~  Deploy

|  Created     Docker Server - Hetzner pulumi:providers:docker

✓  Complete
Build the Docker image
Now we can build the Docker image on the remove Docker server:
// In the run() function:

// Build the Docker image
const dockerImageHetzner = new docker.Image(
  "Docker Image - App - Hetzner",
  {
    imageName: "next-self-hosted/next-self-hosted:latest",
    build: {
      context: pathResolve("./"),
      dockerfile: pathResolve("./Dockerfile"),
      target: "production",
      platform: "linux/amd64",
    },
    skipPush: true,
  },
  {
    provider: dockerServerHetzner,
    dependsOn: [server],
  }
);
Let’s trigger the deployment to see if everything works:
pnpm sst deploy
SST ❍ ion 0.1.90  ready!

➜  App:        next-self-hosted
   Stage:      antonprudkohliad

~  Deploy

|  Log         Starting Docker build
< ... A PRETTY LONG BUILD LOG HERE ... >
|  Log         Image built successfully, local id "sha256:629a6cdfc298c74599a3056278e31c64197a87f6d11aab09573bc9171d2f3362"
|  Created     Docker Image - App - Hetzner docker:index:Image (36.0s)

✓  Complete
Now, let’s check that Docker image made it to the server:
ssh root@116.203.183.180 -i ./id_ed25519_hetzner -o StrictHostKeyChecking=no -C "docker image ls"
REPOSITORY                          TAG       IMAGE ID       CREATED              SIZE
next-self-hosted/next-self-hosted   latest    629a6cdfc298   About a minute ago   712MB
Awesome!
Docker networks
We will create two networks: Public and Internal. The Public network is for services to which NGINX is connected, i.e. for services that have to be exposed to the outside (e.g. the Next.js application or an API server). The Internal network is for services that are not meant to be exposed to the outside e.g. Postgres database, Redis cache:
// In the run() function:

// Setup Docker Networks
const dockerNetworkPublic = new docker.Network(
  "Docker Network - Public",
  { name: "app_network_public" },
  { provider: dockerServerHetzner, dependsOn: [server] }
);
const dockerNetworkInternal = new docker.Network(
  "Docker Network - Internal",
  { name: "app_network_internal" },
  { provider: dockerServerHetzner, dependsOn: [server] }
);
Trigger the deployment:
pnpm sst deploy
SST ❍ ion 0.1.90  ready!

➜  App:        next-self-hosted
   Stage:      antonprudkohliad

~  Deploy

|  Created     Docker Network - Public docker:index:Network (2.3s)
|  Created     Docker Network - Internal docker:index:Network (3.1s)

✓  Complete
Check that networks app_network_internal and app_network_public are present on the remote:
ssh root@116.203.183.180 -i ./id_ed25519_hetzner -o StrictHostKeyChecking=no -C "docker network ls"
NETWORK ID     NAME                   DRIVER    SCOPE
0590360bd4ae   app_network_internal   bridge    local
e3bd8be72506   app_network_public     bridge    local
827fa5ca5de2   bridge                 bridge    local
dc8880514199   host                   host      local
f1481867db18   none                   null      local
Docker volumes
We will create a volume to store the application build files (the .next folder):
// In the run() function:

// Setup Docker Volumes
const dockerVolumeAppBuild = new docker.Volume(
  "Docker Volume - App Build",
  { name: "app_volume_build" },
  { provider: dockerServerHetzner, dependsOn: [server] }
);
Deploy and verify that the docker volume app_volume_build is present on the VPS:
pnpm sst deploy
SST ❍ ion 0.1.90  ready!

➜  App:        next-self-hosted
   Stage:      antonprudkohliad

~  Deploy

|  Created     Docker Volume - App Build docker:index:Volume

✓  Complete

ssh root@116.203.183.180 -i ./id_ed25519_hetzner -o StrictHostKeyChecking=no -C "docker volume ls"
DRIVER    VOLUME NAME
local     app_volume_build
The Build container
We are going to run a one-off container (a.k.a. Init Container) to build the Next.js application and store the result in the .next folder, that will be shared with the main application container through the volume that we have created above:
// In the run() function:

// Run a one-off container to build the app
const dockerAppBuildContainer = new docker.Container(
  "Docker Container - App Build",
  {
    name: "app_container_build",
    image: dockerImageHetzner.imageName,
    volumes: [
      {
        volumeName: dockerVolumeAppBuild.name,
        containerPath: "/app/.next",
      },
    ],
    command: ["pnpm", "build"],
    mustRun: true,
  },
  {
    provider: dockerServerHetzner,
  }
);
Deploy and verify via logs that the build has been successful:
pnpm sst deploy
SST ❍ ion 0.1.90  ready!

➜  App:        next-self-hosted
   Stage:      antonprudkohliad

~  Deploy

|  Created     Docker Container - App Build docker:index:Container (1.1s)

✓  Complete

ssh root@116.203.183.180 -i ./id_ed25519_hetzner -o StrictHostKeyChecking=no -C "docker logs -f app_container_build"

> next-self-hosted@ build /app
> next build

  ▲ Next.js 14.2.5

   Creating an optimized production build ...
 ✓ Compiled successfully
   Linting and checking validity of types ...
   Collecting page data ...
   Generating static pages (0/4) ...
   Generating static pages (1/4)
   Generating static pages (2/4)
   Generating static pages (3/4)
 ✓ Generating static pages (4/4)
   Finalizing page optimization ...
   Collecting build traces ...

Route (app)                              Size     First Load JS
┌ ○ /                                    142 B          87.2 kB
└ ○ /_not-found                          871 B          87.9 kB
+ First Load JS shared by all            87 kB
  ├ chunks/52d5e6ad-40eff88d15e66edb.js  53.6 kB
  ├ chunks/539-e1fa9689ed3badf0.js       31.5 kB
  └ other shared chunks (total)          1.84 kB

○  (Static)  prerendered as static content
The App container
Now we will add a “runner” container, that will use the build output from the Build container, and run next start:
// In the run() function:

const dockerAppContainer = new docker.Container(
  "Docker Container - App",
  {
    name: "app",
    image: dockerImageHetzner.imageName,
    volumes: [
      {
        volumeName: dockerVolumeAppBuild.name,
        containerPath: "/app/.next",
      },
    ],
    networksAdvanced: [
      { name: dockerNetworkPublic.id },
      { name: dockerNetworkInternal.id },
    ],
    command: ["pnpm", "start"],
    restart: "always",
  },
  { provider: dockerServerHetzner, dependsOn: [dockerAppBuildContainer] }
);
Deploy and verify that the app has started successfully:
pnpm sst deploy
SST ❍ ion 0.1.90  ready!

➜  App:        next-self-hosted
   Stage:      antonprudkohliad

~  Deploy

|  Created     Docker Container - App docker:index:Container (1.1s)

✓  Complete

ssh root@116.203.183.180 -i ./id_ed25519_hetzner -o StrictHostKeyChecking=no -C "docker logs -f app"

> next-self-hosted@ start /app
> next start

  ▲ Next.js 14.2.5
  - Local:        http://localhost:3000

 ✓ Starting...
 ✓ Ready in 497ms
The app container might fail, because the build container has not finished building yet, but it will soon recover and function normally.
Add Cloudflare certificates
In order to upload files to the VPS, we need to install the Command provider and the Polumi package:
pnpm sst add @pulumi/command
pnpm add -D @pulumi/pulumi
pnpm install
Make sure that the /root/app and /root/app/certs directories exist on the VPS and upload Cloudflare Origin Server certificates:
// At the top of the file
import { asset as pulumiAsset } from "@pulumi/pulumi";

// In the run() function:

// Make sure that app directory exists
new command.remote.Command("Command - Ensure app directory", {
  create: "mkdir -p /root/app",
  connection: {
    host: server.ipv4Address,
    user: "root",
    privateKey: sshKeyLocal.privateKeyOpenssh,
  },
});

// Make sure that app/certs directory exists
new command.remote.Command("Command - Ensure app/certs directory", {
  create: "mkdir -p /root/app/certs",
  connection: {
    host: server.ipv4Address,
    user: "root",
    privateKey: sshKeyLocal.privateKeyOpenssh,
  },
});

// Copy Certificates to the VPS
new command.remote.CopyToRemote(
  "Copy - Certificates - Key",
  {
    source: new pulumiAsset.FileAsset(
      pathResolve("./certs/cloudflare.key.pem")
    ),
    remotePath: "/root/app/certs/cloudflare.key.pem",
    connection: {
      host: server.ipv4Address,
      user: "root",
      privateKey: sshKeyLocal.privateKeyOpenssh,
    },
  }
);
new command.remote.CopyToRemote(
  "Copy - Certificates - Cert",
  {
    source: new pulumiAsset.FileAsset(
      pathResolve("./certs/cloudflare.cert.pem")
    ),
    remotePath: "/root/app/certs/cloudflare.cert.pem",
    connection: {
      host: server.ipv4Address,
      user: "root",
      privateKey: sshKeyLocal.privateKeyOpenssh,
    },
  }
);
new command.remote.CopyToRemote(
  "Copy - Certificates - Authenticated Origin Pull",
  {
    source: new pulumiAsset.FileAsset(
      pathResolve("./certs/authenticated_origin_pull_ca.pem")
    ),
    remotePath: "/root/app/certs/authenticated_origin_pull_ca.pem",
    connection: {
      host: server.ipv4Address,
      user: "root",
      privateKey: sshKeyLocal.privateKeyOpenssh,
    },
  }
);
Start Nginx
Copy Nginx configuration file to the VPS and start the Nginx container:
// In the run() function:

// Copy Nginx config to the VPS
const commandCopyNginxConfig = new command.remote.CopyToRemote(
  "Copy - Nginx Config",
  {
    source: new pulumiAsset.FileAsset(
      pathResolve("./nginx/production.conf")
    ),
    remotePath: "/root/app/nginx.conf",
    connection: {
      host: server.ipv4Address,
      user: "root",
      privateKey: sshKeyLocal.privateKeyOpenssh,
    },
  }
);

// Run the Nginx container
const dockerNginxContainer = new docker.Container(
  "Docker Container - Nginx",
  {
    name: "app_container_nginx",
    image: "nginx:1.27.0-bookworm",
    volumes: [
      {
        hostPath: "/root/app/nginx.conf",
        containerPath: "/etc/nginx/nginx.conf",
      },
      {
        hostPath: "/root/app/certs",
        containerPath: "/certs",
      },
    ],
    command: ["nginx", "-g", "daemon off;"],
    networksAdvanced: [{ name: dockerNetworkPublic.id }],
    restart: "always",
    ports: [
      {
        external: 443,
        internal: 443,
      },
    ],
    healthcheck: {
      tests: ["CMD", "service", "nginx", "status"],
      interval: "30s",
      timeout: "5s",
      retries: 5,
      startPeriod: "10s",
    },
  },
  { provider: dockerServerHetzner, dependsOn: [dockerAppContainer] }
);

return { ip: server.ipv4Address };
Deploy and verify that the Nginx container is running:
pnpm sst deploy
SST ❍ ion 0.1.90  ready!

➜  App:        next-self-hosted
   Stage:      antonprudkohliad

~  Deploy

|  Deleted     Docker Container - App Build docker:index:Container
|  Created     Command - Ensure app/certs directory command:remote:Command
|  Created     Command - Ensure app directory command:remote:Command
|  Created     Docker Container - App Build docker:index:Container
|  Created     Copy - Certificates - Cert command:remote:CopyToRemote (1.2s)
|  Created     Copy - Nginx Config command:remote:CopyToRemote (1.2s)
|  Created     Copy - Certificates - Key command:remote:CopyToRemote (1.2s)
|  Created     Copy - Certificates - Authenticated Origin Pull command:remote:CopyToRemote (1.2s)
|  Deleted     Docker Container - App docker:index:Container
|  Created     Docker Container - App docker:index:Container (1.2s)
|  Created     Docker Container - Nginx docker:index:Container (7.1s)

✓  Complete
   ip: 116.203.183.180

ssh root@116.203.183.180 -i ./id_ed25519_hetzner -o StrictHostKeyChecking=no -C "docker ps -a"

CONTAINER ID   IMAGE                                      COMMAND                  CREATED         STATUS                     PORTS                          NAMES
9c2cb18db304   nginx:1.27.0-bookworm                      "/docker-entrypoint.…"   3 minutes ago   Up 3 minutes (healthy)     80/tcp, 0.0.0.0:443->443/tcp   app_container_nginx
32e6a4cee8bc   next-self-hosted/next-self-hosted:latest   "docker-entrypoint.s…"   4 minutes ago   Up 3 minutes               3000/tcp                       app
f0c50aa32493   next-self-hosted/next-self-hosted:latest   "docker-entrypoint.s…"   4 minutes ago   Exited (0) 3 minutes ago                                  app_container_build
As you can see, Nginx and the application are running smoothly.
The final check
It’s time to make sure that the DNS record is pointing to the right IP address (yes, it is possible to add this to the SST config too, via the Cloudflare provider):

Then, we can open the application and verify that it works:

Congratulations! We have now completed out SST dive and can enjoy the freshly deployed application ?
Cleaning up
SST makes it very easy to clean up – just run pnpm sst remove and the whole setup will go away:
pnpm sst remove
SST ❍ ion 0.1.90  ready!

➜  App:        next-self-hosted
   Stage:      antonprudkohliad

~  Remove

|  Deleted     Docker Container - Nginx docker:index:Container (1.9s)
|  Deleted     Docker Container - App docker:index:Container
|  Deleted     Docker Container - App Build docker:index:Container
|  Deleted     Docker Image - App - Hetzner docker:index:Image
|  Deleted     Docker Volume - App Build docker:index:Volume (2.1s)
|  Deleted     Docker Network - Public docker:index:Network (3.1s)
|  Deleted     Docker Network - Internal docker:index:Network (3.2s)
|  Deleted     Copy - Nginx Config command:remote:CopyToRemote
|  Deleted     Docker Server - Hetzner pulumi:providers:docker
|  Deleted     Copy - Certificates - Authenticated Origin Pull command:remote:CopyToRemote
|  Deleted     Command - Ensure app/certs directory command:remote:Command
|  Deleted     Copy - Certificates - Key command:remote:CopyToRemote
|  Deleted     Command - Ensure app directory command:remote:Command
|  Deleted     Copy - Certificates - Cert command:remote:CopyToRemote
|  Deleted     Server hcloud:index:Server (16.8s)
|  Deleted     SSH Key - Hetzner hcloud:index:SshKey
|  Deleted     SSH Key - Local tls:index:PrivateKey

✓  Removed
Ce qui précède est le contenu détaillé de. pour plus d'informations, suivez d'autres articles connexes sur le site Web de PHP en chinois!
Articles Liés
Voir plus- Une analyse approfondie du composant de groupe de liste Bootstrap
- Explication détaillée du currying de la fonction JavaScript
- Exemple complet de génération de mot de passe JS et de détection de force (avec téléchargement du code source de démonstration)
- Angularjs intègre l'interface utilisateur WeChat (weui)
- Comment basculer rapidement entre le chinois traditionnel et le chinois simplifié avec JavaScript et l'astuce permettant aux sites Web de prendre en charge le basculement entre les compétences en chinois simplifié et traditionnel_javascript