Home >Web Front-end >JS Tutorial >Some simple applications of Javascript drag and drop (analyze the code line by line, allowing you to easily understand the principles of drag and drop)_javascript skills
Some simple applications of Javascript drag and drop (analyze the code line by line, allowing you to easily understand the principles of drag and drop)_javascript skills
- WBOYWBOYWBOYWBOYWBOYWBOYWBOYWBOYWBOYWBOYWBOYWBOYWBOriginal
- 2016-05-16 16:18:221109browse
Today we will take a look at how to prevent the dragged object from being dragged out of a certain div and the dragging adsorption function
As mentioned last time, our dragging cannot be dragged out of the visual area. On this basis, we add a parent div to prevent it from being dragged out of the parent. The principle is the same as before, simple.
html code:
<div id="div2">
      <div id="div1">

      </div>
    </div>
css code:
<style type="text/css">
      #div1 {
        width: 100px;
        height: 100px;
        background: red;
        position: absolute;
      }
      #div2 {
        width: 400px;
        height: 300px;
        background: #CCCCCC;
        position: relative;
      }
    </style>
javascript code:
<script type="text/javascript">
       // 拖拽空div 低版本的火狐有bug
      window.onload = function() {
        var oDiv = document.getElementById("div1");
        var oDiv2 = document.getElementById("div2");
        var disX = 0;
        var disY = 0;
        oDiv.onmousedown = function(ev) {
          var oEvent = ev || event;
          disX = oEvent.clientX - oDiv.offsetLeft;
          disY = oEvent.clientY - oDiv.offsetTop;

          document.onmousemove = function(ev) {
            var oEvent = ev || event;
            // 存储div当前的位置
            var oDivLeft = oEvent.clientX - disX;
            var oDivTop = oEvent.clientY - disY;

            if (oDivLeft < 0) {
              oDivLeft = 0;
            } else if (oDivLeft > oDiv2.offsetWidth - oDiv.offsetWidth) {
              oDivLeft = oDiv2.offsetWidth - oDiv.offsetWidth;
            }

            if (oDivTop < 0) {
              oDivTop = 0;
            } else if (oDivTop > oDiv2.offsetHeight - oDiv.offsetHeight) {
              oDivTop = oDiv2.offsetHeight - oDiv.offsetHeight;
            }

            oDiv.style.left = oDivLeft + 'px';
            oDiv.style.top = oDivTop + 'px';
          };

          document.onmouseup = function() {
            document.onmousemove = null;
            document.onmouseup = null;
          };
          return false; // 阻止默认事件,解决火狐的bug
        };
      };
    </script>
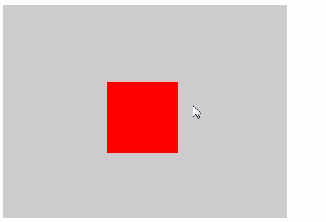
The rendering is as follows:

Keep it simple.
The next step is how to make it automatically absorb.
In fact, everyone will use this often. For example, when there is a small window in PS and dragged to the edge of the page, it will automatically adsorb to it.
How can our drag and drop have such a function?
This is actually mentioned before when talking about exercise. Just like taking a taxi, you cannot ask the driver to stop exactly where you want him to. He must stop somewhere close to the destination.
The procedure is the same, just assign the value directly when it is almost there. Assume that when the object I drag is 50px from the left, I think it has reached the left, and then assign it a value of 0, and it will automatically stick to it.
The principle is very simple, let’s see how the code implements it. Just make some modifications
<script type="text/javascript">
      window.onload = function() {
        var oDiv = document.getElementById("div1");
        var oDiv2 = document.getElementById("div2");
        var disX = 0;
        var disY = 0;
        oDiv.onmousedown = function(ev) {
          var oEvent = ev || event;
          disX = oEvent.clientX - oDiv.offsetLeft;
          disY = oEvent.clientY - oDiv.offsetTop;

          document.onmousemove = function(ev) {
            var oEvent = ev || event;
            var oDivLeft = oEvent.clientX - disX;
            var oDivTop = oEvent.clientY - disY;


            // 当left 小于50 就自动归0 这样实现吸附
            if (oDivLeft < 50) {
              oDivLeft = 0;
            } else if (oDivLeft > oDiv2.offsetWidth - oDiv.offsetWidth) {
              oDivLeft = oDiv2.offsetWidth - oDiv.offsetWidth;
            }

            if (oDivTop < 0) {
              oDivTop = 0;
            } else if (oDivTop > oDiv2.offsetHeight - oDiv.offsetHeight) {
              oDivTop = oDiv2.offsetHeight - oDiv.offsetHeight;
            }

            oDiv.style.left = oDivLeft + 'px';
            oDiv.style.top = oDivTop + 'px';
          };

          document.onmouseup = function() {
            document.onmousemove = null;
            document.onmouseup = null;
          };
          return false;
        };
      };
    </script>
Next time we will talk about advanced applications, which will be more responsible and useful. Our drag and drop functionality has been improved.
For example, dragging pictures and selecting text. For example, our current drag and drop page only has one div, which we will never encounter in normal development.
In fact, when there is something on the page, what problems will occur with this drag and drop? ? ?
It will be solved next time ~ Please look forward to it
Related articles
See more- An in-depth analysis of the Bootstrap list group component
- Detailed explanation of JavaScript function currying
- Complete example of JS password generation and strength detection (with demo source code download)
- Angularjs integrates WeChat UI (weui)
- How to quickly switch between Traditional Chinese and Simplified Chinese with JavaScript and the trick for websites to support switching between Simplified and Traditional Chinese_javascript skills

