环境 编译平台: Ubuntu12.04 交叉工具链: gcc-3.4.6 一、移植 Sqlite 解压 Sqlite-3.6.20.tar.gz 到工具目录下: tarzxfSqlite-3.6.20.tar.gz-C/home/xxx/tools 进入 sqlite-3.6.20 目录中: cdsqlite-3.6.20 1 ): ./configure--host=mipsel-linux( 指定
环境
编译平台:Ubuntu12.04
交叉工具链:gcc-3.4.6
一、移植Sqlite
解压Sqlite-3.6.20.tar.gz 到工具目录下:tar zxf Sqlite-3.6.20.tar.gz -C /home/xxx/tools
进入sqlite-3.6.20目录中:cd sqlite-3.6.20
1):./configure --host=mipsel-linux(指定交叉编译工具链) --prefix=/opt/mispel-linux-sqlite
2) make
3) make install
在执行make中会出现下面错误:
libtool: link: mipsel-linux-gcc -shared .libs/tclsqlite.o -Wl,-rpath -Wl,/opt/sqlite-3.6.20-embedded/.libs -Wl,-rpath -Wl,/opt/mipsel-linux-sqlite/lib ./.libs/libsqlite3.so -L/opt/tcl8.5.15/unix -ltclstub8.5 -lpthread -Wl,-soname -Wl,libtclsqlite3.so -o .libs/libtclsqlite3.so/opt/gcc-4.3-ls232-softfloat/lib/gcc/mipsel-linux/4.3.0/../../../../mipsel-linux/bin/ld: skipping incompatible /opt/gcc-4.3-ls232-softfloat/lib/gcc/mipsel-linux/4.3.0/../../../../mipsel-linux/lib/libtclstub8.5.a when searching for -ltclstub8.5/opt/gcc-4.3-ls232-softfloat/lib/gcc/mipsel-linux/4.3.0/../../../../mipsel-linux/bin/ld: cannot find -ltclstub8.5collect2: ld returned 1 exit statusmake: *** [libtclsqlite3.la] 错误 1
出现:skipping incompatible 一般是不同处理器架构引用了不属于自己处理器架构的库,
上面出现的情况,就是mipsel架构的引用了x86架构的库 libtclstub8.5。
所以要源码交叉编译tclsh才能解决上述问题。
解决方法:解压tcl8.5.15-src.tar.gz,并进入源码文件夹tcl8.5.15
执行:
1)./configure --host=mipsel-linux --prefix=/opt/mipsel-linux-tclsh
2) make
3) make install
但在 ./configure --host=mipsel-linux --prefix=/opt/mipsel-linux-tclsh
过程中会出现以下错误:
fixstrtod.o: In function `fixstrtod':fixstrtod.c:(.text+0x0): multiple definition of `fixstrtod'strtod.o:strtod.c:(.text+0x0): first defined herecollect2:
ld returned 1 exit statusmake: *** [libtcl8.5.so] 错误 1
执行下面语句:
[root@CaM/opt/tcl-embedded/unix 11:45]#export ac_cv_func_strtod=yes
[root@CaM/opt/tcl-embedded/unix 11:46]#export tcl_cv_strtod_buggy=1
就可以解决了。
编译安装完成后,在mipsel-linux-sqlite目录下分别生成bin、include和lib目录。
将bin/sqlite3与lib/libsqlite3.so.0.8.6分别拷至文件系统/bin目录与/lib目录下,
并将libsqlite3.so.0.8.6更名为libsqlite3.so.0完成移植。
二、移植apache
$ su (切换到root用户)
1. 本机编译
$ cd /usr/local/apache-pc/apache_1.3.39
$ ./configure
错误提示:
Configuring for Apache, Version 1.3.39
+ Warning: Your ‘echo’ command is slightly broken.
+ It interprets escape sequences per default. We already
+ tried ‘echo -E’ but had no real success. If errors occur
+ please set the SEO variable in ‘configure’ manually to
+ the required ‘echo’ options, i.e. those which force your
+ ‘echo’ to not interpret escape sequences per default.
+ using installation path layout: Apache (config.layout)
Creating Makefile
Creating Configuration.apaci in src
Syntax error — The configuration file is used only to
define the list of included modules or to set Makefile in src
options or Configure rules, and I don’t see that at all:
`$(SRCDIR)/apaci`
default
default
no
no
no
yes
no
default
no
default
default
解决:
这是由于某些shell脚本文件使用了错误的interpreter,使用下面的命令就可以解决。
# rm -f /bin/sh
# ln -s /bin/bash /bin/sh
$ make
错误提示:

解决:
将提示的c文件中冲突的函数另改别名:如getline 改成get_line,总共有三个c文件要改。
执行完make后就完成本机编译了,生成了我们需要使用的编译工具。
、2. 交叉编译
(注意交叉工具链的环境)
$ cd /usr/local/apache-mipsel/apache_1.3.39
$ CC=mipsel-linux-gcc ./configure --prefix=/usr/local/apache-php/apache --enable-module=so
接着如下修改:
cp /usr/local/apache-pc/apache-1.3.39/src/main/gen_test_char /usr/local/apache-pc/apache-1.3.39/src/main/gen_uri_delims /usr/local/apache-mipsel/apache-1.3.39/src/main/
$ make
错误提示:

解决:
$ cp /usr/local/apache-pc/apache_1.3.39/src/main/gen_test_char /usr/local/apache-pc/apache_1.3.39/src/main/gen_uri_delims /usr/local/apache-mipsel/apache_1.3.39/src/main/
$ make install

如图所示,则安装成功
查看是否为交叉编译文件
$ file /usr/local/apache-php/apache/bin/httpd
三、移植PHP
1. 本地编译php
$ cd /usr/local/apache-pc/php-5.2.0
$ ./configure
错误提示 :

解决 :
sudo apt-get install flex
错误提示2 :

解决 :
sudo apt-get install libxml2-dev
$ make
2. 交叉编译
安装zlib-1.2.3
$ cd /usr/local/apache-mipsel/zlib-1.2.3
$ CC=mipsel-linux-gcc ./configure --prefix=/usr/local/apache-php/zlib
$ make
$ make install
$ cd /usr/local/apache-mipsel/php-5.2.0
$ CC=mipsel-linux-gcc ./configure --host=mipsel-linux
--prefix=/usr/local/apache-php/php --with-apxs=/usr/local/apache-php/apache/bin/apxs --enable-pdo=shared --with-sqlite=shared --with-pdo-sqlite=shared --with-zlib --with-zlib-dir=/usr/local/apache-php/zlib --without-iconv
错误提示1:

解决:
打开脚本/usr/local/apache-mipsel/php-5.2.0/configure搜索“$APXS -q
CFLAGS >/dev/null 2>&1”进行如下代码的注释。

错误提示2:

解决 :
安装libxml2-2.6.11
$ cd libxml2-2.6.11
$ CC=mipsel-linux-gcc ./configure --host=mipsel-linux --prefix=/usr/local/apache-php/zlib
$ make
$ make install
./configure后
首先修改php的Makefile在开始出添加LDFLAGS += -ldl ,这里是为了链接dlopen库
然后修改main/php.h 在开始处添加#define HAVE_LIBDL 1 ,这个宏是为了交叉编译时强制使用dlopen。
紧接着修改ext/standard/dl.c 这段代码中添加#include
件。
#if defined(HAVE_LIBDL) || HAVE_MACH_O_DYLD_H
#include
#include
#include
最后修改 sapi/apache/php_apache_http.h
#include "httpd.h"
#include "http_config.h"
# include "ap_compat.h"
# include "compat.h"
#include "http_core.h"
#include "http_main.h"
#include "http_protocol.h"
#include "http_request.h"
#include "http_log.h"
#include "util_script.h"
将其修改为#include "/usr/local/apache-php/apache/include/httpd.h"这个路径(这些头文件的目录)
# make (时间有点长,去喝杯水休息一下吧0﹏0!!)
错误提示1:

解决:
修改mod_php5.c中23行错误头文件加上/usr/local/apache-arm11/apache/include路径
错误提示2 :

解决:
$ cp /opt/gcc-3.4.6-2f/lib/libxml2.so /us r/lib/i386-linux-gnu/
错误提示3: :

解决 :
暂时不知道哪里出了问题,只能注释了其中的代码
$ make install
错误提示 1 :

解决 :
$mv /usr/local/apache-php/apche/bin/httpd /usr/local/apache-php/apache/bin/httpd_backup
$ cp /usr/local/apache-pc/apache/bin/http /usr/local/apache-php/apache/bin/httpd
错误提示2 :

解决 :
$mv /usr/local/apache-mipsel/php-5.2.0/sapi/cli/php /usr/local/apache-mipsel/php-5.2.0/sapi/cli/php_backup
$ cp /usr/local/apache-pc/php-5.2.0/sapi/cli/php /usr/local/apache-mipsel/php-5.2.0/sapi/cli/
不出意外应该成功了,可以去/usr/local/apache-php/php/看下是否有目录
把原来的mips版的php、httpd还原回去 :
cp /usr/local/apache-mips/php-5.2.0/scpi/cli/php_backup /usr/local/apache-php/php/bin/
cp /usr/local/apache-mips/apache/bin/httpd_backup /usr/local/apache-php/apache/bin/httpd
四、配置httpd.conf和php.ini
l 修改httpd.conf
$ vim /usr/local/apache-php/apache/conf/httpd.conf 添加红色部分
#
# DirectoryIndex: Name of the file or files to use as a pre-written HTML
# directory index. Separate multiple entries with spaces.
#
DirectoryIndex index.html
DirectoryIndex index.php
DirectoryIndex index.php3
DirectoryIndex index.phtml
#
# AccessFileName: The name of the file to look for in each directory
# for access control information.
#
AccessFileName .htaccess
...
# documents in the realname directory are treated as applications and
# run by the server when requested rather than as documents sent to the client.
# The same rules about trailing "/" apply to ScriptAlias directives as to
# Alias.
#
ScriptAlias /cgi-bin/ "/usr/local/apache-php/apache/cgi-bin/"
ScriptAlias /php5/ "/usr/local/apache-php/php/bin/"
#
# "/usr/local/apache-php/apache/cgi-bin" should be changed to whatever your ScriptAliased
# CGI directory exists, if you have that configured.
...
#
# AddType allows you to tweak mime.types without actually editing it, or to
# make certain files to be certain types.
#
AddType application/x-tar .tgz
AddType application/x-httpd-php .php3
AddType application/x-httpd-php .php
AddType application/x-httpd-php .phtml
#
# AddEncoding allows you to have certain browsers uncompress
# information on the fly. Note: Not all browsers support this.
# Despite the name similarity, the following Add* directives have nothing
l 修改php.ini
$ cp /usr/local/apache-mips/php-5.2.0/php.ini-dist /usr/local/apache-php/php/lib/
$ mv /usr/local/apache-php/lib/php.ini-dist /usr/local/apache-php/lib/php.int
$ vim /usr/local/apache-php/lib/php.int
; to possible security problems, if the code is not very well thought of.
register_globals = On
; Whether or not to register the old-style input arrays, HTTP_GET_VARS
; and friends. If you're not using them, it's recommended to turn them off,
五、移植至loongson1B
ps进过九九八十一难终于可以烧进板啦
1、打包apache和php
# tar cjf apache-php.tar.bz2 apache-php
2、经nfs共享至开发板
3、开发板建立/usr/local/
4、解压至/usr/local/ :与宿主机一致
5、进入/usr/local/apache-php/apache/bin
# ./apachectl start
其中需要注意,因为Aapche不支持root用户,所以需要确认Linux文件系统中有nobody组和nogroup组。
在/etc添加两个用户
vi /etc/passwd :
root::0:0:root:/:/bin/bash
nobody::65534:65533:nobody:/:/bin/bash
vi /etc/group :
body::65533:
nogroup::65534:nobody
root::0:
users::100:
正常启动会弹出

若有其他问题goole、度娘一下,都是常见问题
6、打开浏览器输入http://ip:8080就能看见apache测试画面啦

7、后面加程序名就能运行程序:http://ip:8080/test.php

至此,搭建lasp环境完成...
 Nuitka简介:编译和分发Python的更好方法Apr 13, 2023 pm 12:55 PM
译者 | 李睿审校 | 孙淑娟随着Python越来越受欢迎,其局限性也越来越明显。一方面,编写Python应用程序并将其分发给没有安装Python的人员可能非常困难。解决这一问题的最常见方法是将程序与其所有支持库和文件以及Python运行时打包在一起。有一些工具可以做到这一点,例如PyInstaller,但它们需要大量的缓存才能正常工作。更重要的是,通常可以从生成的包中提取Python程序的源代码。在某些情况下,这会破坏交易。第三方项目Nuitka提供了一个激进的解决方案。它将Python程序编
 ChatGPT 的五大功能可以帮助你提高代码质量Apr 14, 2023 pm 02:58 PM
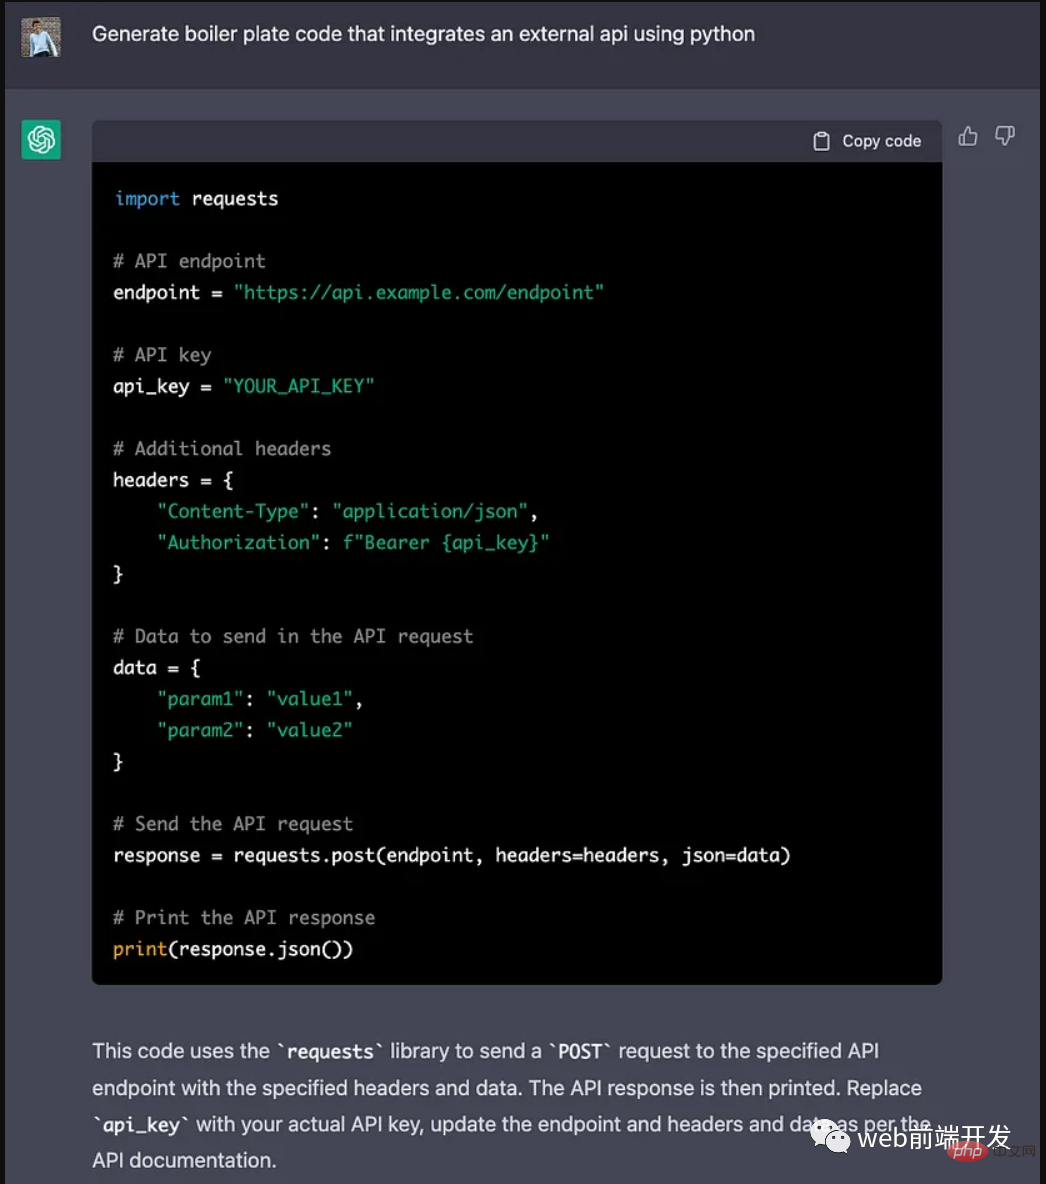
ChatGPT 目前彻底改变了开发代码的方式,然而,大多数软件开发人员和数据专家仍然没有使用 ChatGPT 来改进和简化他们的工作。这就是为什么我在这里概述 5 个不同的功能,以提高我们的日常工作速度和质量。我们可以在日常工作中使用它们。现在,我们一起来了解一下吧。注意:切勿在 ChatGPT 中使用关键代码或信息。01.生成项目代码的框架从头开始构建新项目时,ChatGPT 是我的秘密武器。只需几个提示,它就可以生成我需要的代码框架,包括我选择的技术、框架和版本。它不仅为我节省了至少一个小时
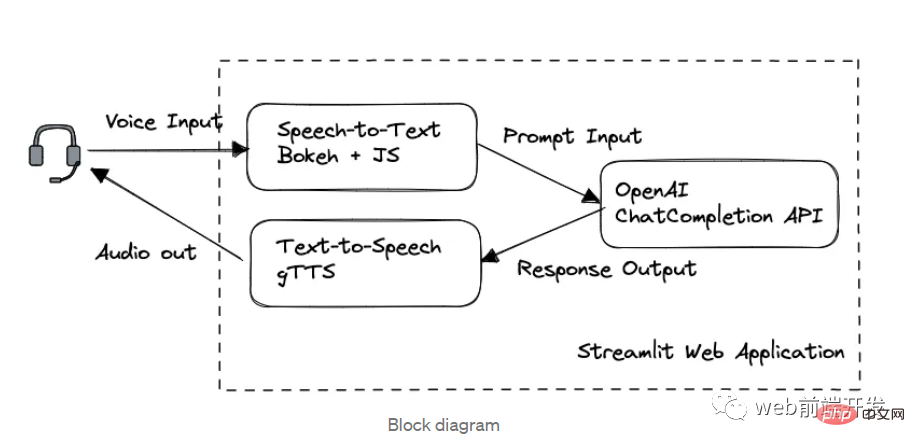
 我创建了一个由 ChatGPT API 提供支持的语音聊天机器人,方法请收下Apr 07, 2023 pm 11:01 PM
今天这篇文章的重点是使用 ChatGPT API 创建私人语音 Chatbot Web 应用程序。目的是探索和发现人工智能的更多潜在用例和商业机会。我将逐步指导您完成开发过程,以确保您理解并可以复制自己的过程。为什么需要不是每个人都欢迎基于打字的服务,想象一下仍在学习写作技巧的孩子或无法在屏幕上正确看到单词的老年人。基于语音的 AI Chatbot 是解决这个问题的方法,就像它如何帮助我的孩子要求他的语音 Chatbot 给他读睡前故事一样。鉴于现有可用的助手选项,例如,苹果的 Siri 和亚马
 解决Batch Norm层等短板的开放环境解决方案Apr 26, 2023 am 10:01 AM
测试时自适应(Test-TimeAdaptation,TTA)方法在测试阶段指导模型进行快速无监督/自监督学习,是当前用于提升深度模型分布外泛化能力的一种强有效工具。然而在动态开放场景中,稳定性不足仍是现有TTA方法的一大短板,严重阻碍了其实际部署。为此,来自华南理工大学、腾讯AILab及新加坡国立大学的研究团队,从统一的角度对现有TTA方法在动态场景下不稳定原因进行分析,指出依赖于Batch的归一化层是导致不稳定的关键原因之一,另外测试数据流中某些具有噪声/大规模梯度的样本
 摔倒检测-完全用ChatGPT开发,分享如何正确地向ChatGPT提问Apr 07, 2023 pm 03:06 PM
哈喽,大家好。之前给大家分享过摔倒识别、打架识别,今天以摔倒识别为例,我们看看能不能完全交给ChatGPT来做。让ChatGPT来做这件事,最核心的是如何向ChatGPT提问,把问题一股脑的直接丢给ChatGPT,如:用 Python 写个摔倒检测代码 是不可取的, 而是要像挤牙膏一样,一点一点引导ChatGPT得到准确的答案,从而才能真正让ChatGPT提高我们解决问题的效率。今天分享的摔倒识别案例,与ChatGPT对话的思路清晰,代码可用度高,按照GPT返回的结果完全可以开
 17 个可以实现高效工作与在线赚钱的 AI 工具网站Apr 11, 2023 pm 04:13 PM
自 2020 年以来,内容开发领域已经感受到人工智能工具的存在。1.Jasper AI网址:https://www.jasper.ai在可用的 AI 文案写作工具中,Jasper 作为那些寻求通过内容生成赚钱的人来讲,它是经济实惠且高效的选择之一。该工具精通短格式和长格式内容均能完成。Jasper 拥有一系列功能,包括无需切换到模板即可快速生成内容的命令、用于创建文章的高效长格式编辑器,以及包含有助于创建各种类型内容的向导的内容工作流,例如,博客文章、销售文案和重写。Jasper Chat 是该
 为什么特斯拉的人形机器人长得并不像人?一文了解恐怖谷效应对机器人公司的影响Apr 14, 2023 pm 11:13 PM
1970年,机器人专家森政弘(MasahiroMori)首次描述了「恐怖谷」的影响,这一概念对机器人领域产生了巨大影响。「恐怖谷」效应描述了当人类看到类似人类的物体,特别是机器人时所表现出的积极和消极反应。恐怖谷效应理论认为,机器人的外观和动作越像人,我们对它的同理心就越强。然而,在某些时候,机器人或虚拟人物变得过于逼真,但又不那么像人时,我们大脑的视觉处理系统就会被混淆。最终,我们会深深地陷入一种对机器人非常消极的情绪状态里。森政弘的假设指出:由于机器人与人类在外表、动作上相似,所以人类亦会对
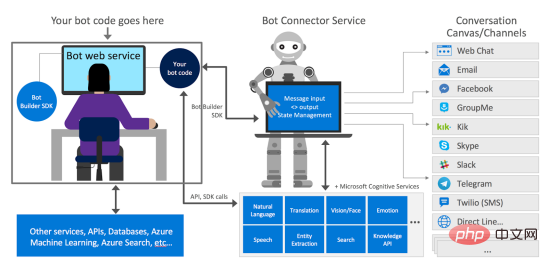
 如何使用Azure Bot Services创建聊天机器人的分步说明Apr 11, 2023 pm 06:34 PM
译者 | 李睿审校 | 孙淑娟信使、网络服务和其他软件都离不开机器人(bot)。而在软件开发和应用中,机器人是一种应用程序,旨在自动执行(或根据预设脚本执行)响应用户请求创建的操作。在本文中, NIX United公司的.NET开发人员Daniil Mikhov介绍了使用微软Azure Bot Services创建聊天机器人的一个例子。本文将对想要使用该服务开发聊天机器人的开发人员有所帮助。 为什么使用Azure Bot Services? 在Azure Bot Services上开发聊


Hot AI Tools

Undresser.AI Undress
AI-powered app for creating realistic nude photos

AI Clothes Remover
Online AI tool for removing clothes from photos.

Undress AI Tool
Undress images for free

Clothoff.io
AI clothes remover

AI Hentai Generator
Generate AI Hentai for free.

Hot Article

Hot Tools

EditPlus Chinese cracked version
Small size, syntax highlighting, does not support code prompt function

VSCode Windows 64-bit Download
A free and powerful IDE editor launched by Microsoft

ZendStudio 13.5.1 Mac
Powerful PHP integrated development environment

MantisBT
Mantis is an easy-to-deploy web-based defect tracking tool designed to aid in product defect tracking. It requires PHP, MySQL and a web server. Check out our demo and hosting services.

SublimeText3 Chinese version
Chinese version, very easy to use


