最终效果: 

1、打开要处理的图片。并复制一层
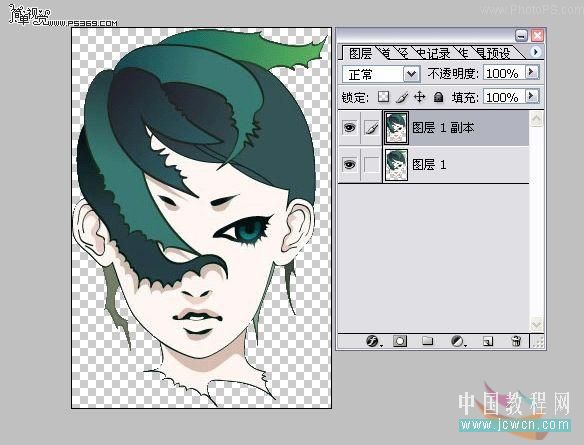
2、然后选择(图层1)用魔棒工具点出想要处理的地方
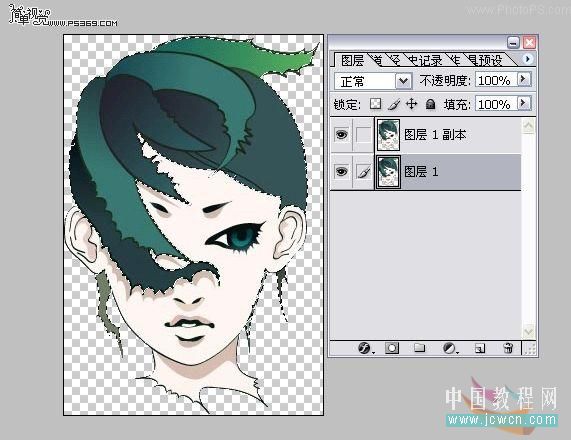
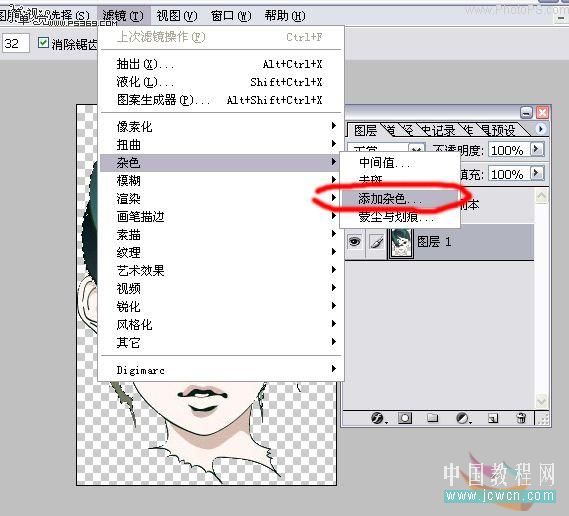
3、选择添加杂色(设置如图)
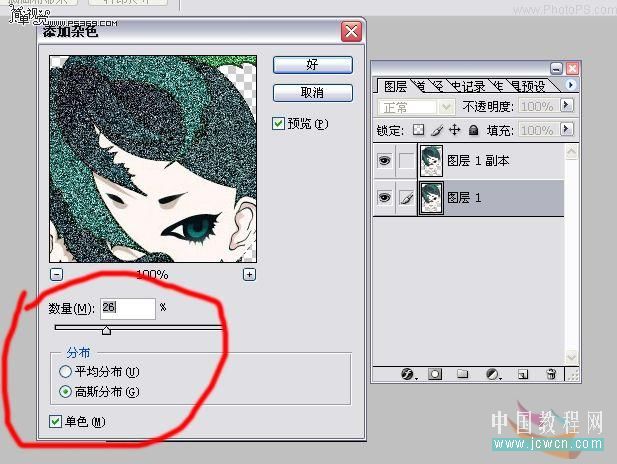
4、现在选择(图层1副本)也进入杂色(设置如图)
5、现在都弄好了。。为了得到更好的效果我在两个图层上面不规则的画上了星星(用到星星笔刷)
没有星星笔刷的朋友可以到这里下载:http://www.missyuan.com/viewthread.php?tid=327947
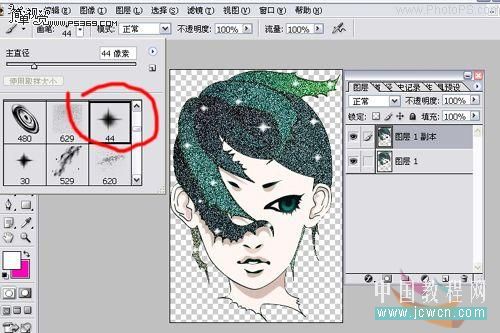
6、现在转到ImageReady.复制一贞(设为0.2秒)再点掉图层副本1的眼睛
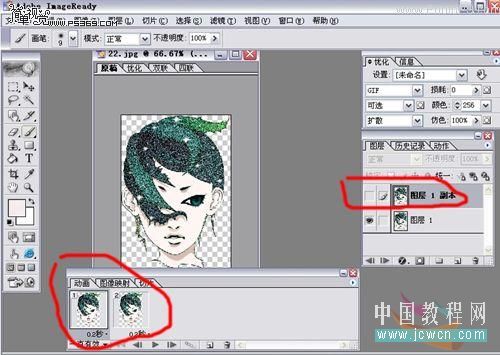
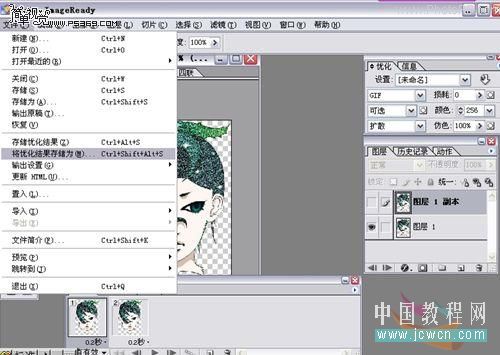
7、最后保存就OK了
 photoshopcs5序列号永久免费的有哪些Jul 06, 2023 am 10:00 AM
photoshopcs5序列号永久免费的有:1、1330-1440-1602-3671-9749-7897;2、1330-1191-2998-6712-2520-5424;3、1330-1367-4285-4928-0630-3107;4、1330-1570-9599-9499-8092-8237;5、1330-1028-1662-3206-1688-5114等。
 解决方案:修复 Photoshop 中键盘快捷键无效的问题Sep 22, 2023 pm 03:17 PM
AdobePhotoshop是数字设计的行业标准,每天都受到在线社区的喜爱和使用。但是,当键盘快捷键卡顿或完全失败时,它会显着降低任何项目或您在Windows11上的整体生产力。无论您是经验丰富的设计师还是只是涉足照片编辑,这些故障都不仅仅是Photoshop和PhotoshopCC中的小麻烦。首先,让我们看看自定义快捷方式或默认快捷方式停止工作的常见原因。为什么我的快捷方式在Photoshop中不起作用?自定义工作区设置:有时,在工作区设置之间调整或切换可能会重置键盘快捷键。粘滞键:此辅助功能
 扫描出来的文件模糊怎么处理Jan 05, 2021 pm 03:09 PM
处理方法:1、在ps软件中打开要处理的扫描图片;2、点击顶部工具栏的“滤镜”-“锐化”-“智能锐化”;3、在弹出的窗口中,根据需求选择锐化半径,点击“确定”;4、点击“文件”-“储存为”,另存为一个文件即可。
 photoshop是哪个公司的Jul 20, 2022 am 11:47 AM
photoshop是Adobe公司的。Photoshop是由Adobe公司开发和发行的图像处理软件,主要处理以像素所构成的数字图像。Adobe是美国的一家电脑软件,公司总部位于加州的圣何塞,主要从事多媒体制作类软件的开发;其客户包括世界各地的企业、知识工作者、创意人士和设计者、OEM合作伙伴,以及开发人员。
 Adobe Photoshop 官方网页版 AI 生成填充和生成扩展图像工具Sep 29, 2023 pm 10:13 PM
Adobe的Photoshop网络服务(在线网页版本)现已全面推出。网页版Photoshop即将支持AI生成填充和生成扩展图像工具,这些工具最近已针对桌面版Photoshop发布。这些功能由AdobeFirefly生成式AI模型提供支持,可用于商业用途,并允许用户使用100多种语言的基于文本的描述快速添加、删除或扩展图像,同时匹配原始图像的照明条件和视角。Photoshop网页版还提供了许多桌面版最常用的工具,但重新设计了布局,为Photoshop新用户提供了更“简化”的用户体验。其中包括今年早
 photoshop是哪个公司开发的Jul 08, 2022 am 11:34 AM
photoshop是Adobe系统公司开发的;photoshop是由“Adobe Systems”开发和发行的图形处理软件,主要处理以像素所构成的数字图像,Adobe系统公司是美国一家跨国电脑软件公司,总部位于加州的圣何塞。
 photoshop使用什么工具来绘制路径Mar 19, 2021 pm 05:11 PM
在photoshop中,可以使用“钢笔工具”来绘制路径。钢笔工具是用来创造路径的工具,创造路径后,还可再编辑。钢笔工具属于矢量绘图工具,其优点是可以勾画平滑的曲线,在缩放或者变形之后仍能保持平滑效果。
 用Python处理MP4与GIF格式互转,简单到爆!Apr 12, 2023 pm 07:58 PM
上次公众号写文章的时候,遇到个问题,公众号插入视频文件太繁琐,一个很小的视频,作为视频传上去平台还要审核,播放的时候也没gif来的直接。于是想着找个工具将mp4转换成gif。网上搜一下,在线的工具好多,但是各种套路,有些要点广告,有些要先扫二维码。还是国外的网站好,没那么多套路。我想Python肯定也可以处理这种问题,毕竟万能的Python除了不会生孩子,什么都能做。这样后面我把它做成一个在线工具,方便自己也顺便可以给其他人使用。mp4转gif的原理其实很简单,就是将mp4文件的帧读出来,然后合


Hot AI Tools

Undresser.AI Undress
AI-powered app for creating realistic nude photos

AI Clothes Remover
Online AI tool for removing clothes from photos.

Undress AI Tool
Undress images for free

Clothoff.io
AI clothes remover

AI Hentai Generator
Generate AI Hentai for free.

Hot Article

Hot Tools

Dreamweaver Mac version
Visual web development tools

MantisBT
Mantis is an easy-to-deploy web-based defect tracking tool designed to aid in product defect tracking. It requires PHP, MySQL and a web server. Check out our demo and hosting services.

Notepad++7.3.1
Easy-to-use and free code editor

SAP NetWeaver Server Adapter for Eclipse
Integrate Eclipse with SAP NetWeaver application server.

SublimeText3 Mac version
God-level code editing software (SublimeText3)


