纳尼亚传奇这部经典电影可能大家都看过。是部不多的奇幻冒险影片。故事情节非常吸引人。为了突出影片的可观性,下面我们来为它制作一张华丽的电影海报。
纳尼亚传奇这部经典电影可能大家都看过。是部不多的奇幻冒险影片。故事情节非常吸引人。为了突出影片的可观性,下面我们来为它制作一张华丽的电影海报。
最终效果 
1、打开Photoshop 软件,执行菜单:“文件”/“新建”(快捷键Ctrl+N),弹出的新建对话框,名称:纳尼亚传奇,宽度:1600像素,高度:560像素,分辨率:72像素/英寸,颜色模式:RGB颜色、8位,背景内容:白色,设置完毕后单击确定按钮,并在图层面板中点击新建图层按钮,新建一个“背景 ”点击填充工具,弹出填充对话框,设置前景色为蓝色,给背景填充,接着使用的字体从传奇Dafont.com ,在工作区输入英文字母the chronicles of narnia,如图1所示。加,然后稍作修改皆可。 
<图1>
2、选择英文字图层,双击图层缩览图,进入到图层样式,分别勾选投影复选项、斜面与浮雕、等高线、渐变叠加、图案叠加、描边,分别设置各项的参考值与混合模式,如图2所示。 
<图2> 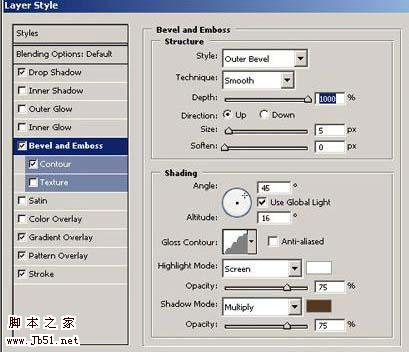
<图2> 
<图2> 
<图2> 
<图2> 
<图2>
3、调整与设置后的效果图。如图3所示。 
<图3> 
<图3> 
<图3> 
<图3> 4、在图层面板中点击新建图层按钮,新建一个图层,接着在工具箱选择钢笔工具,并在工作区绘制出纳尼亚传奇一半的旗帜。如图4所示。 
<图4>
5、点击通道按钮,将通道载入选区或者快捷键按键盘快捷键Ctrl+Enter转换为选区,并设置前景色的颜色RGB值为#fdd72f,接着按键盘快捷键Alt+Delete填充,按键盘快捷键Ctrl+D取消选区。如图5所示。 
<图5>
6、在工具箱选择套索工具,并在纳尼亚传奇一半的旗帜选择一个范围,选择加深工具,设置曝光设置为50 % ,并开始在纳尼亚传奇一半的旗帜地方加深涂抹颜色。 在使用选择工具加深或者减淡工具不同地区需要创建之间的边界光线和阴影区。 使用加深、减淡工具来减轻制作纳尼亚传奇一半的旗帜效果。如图6所示。 
<图6> 7、选中纳尼亚传奇一半的旗帜土曾,执行菜单:“编辑”/“变换”/“水平翻转”。 合并两个图层按快捷键CTRL+E,如图7所示。 
<图7>
8、执行菜单:“图像”/“调整”/“替换颜色”,弹出替换颜色对话框,设置颜色RGB值分别为232、64、2,设置颜色容差为200,勾选选区,设置饱和度为-50,设置明度为-21,如图8所示。 
<图8>
9、双击图层缩览图,进入到图层样式,分别勾选投影复选项、内阴影、等图案叠加、,分别设置各项的参考值与混合模式,如图9所示。 
<图9> #p# 10、调整后的效果图,并单击工具箱中的横排文字工具 ,输入the lion,the wrrch and the wardrobe,然后按Ctrl+T切换字符和段落面板,设置字体:times new roman,大小:29点,颜色:黑色,设置消除锯齿的方法:浑厚,如图10所示。 
<图10>
11、在文字属性栏,点击创建文字变形,弹出创建文字变形对话框,设置为样式为拱形,勾选水平,设置弯曲为3%,设置水平扭曲为0%,设置垂直扭曲为-3%。 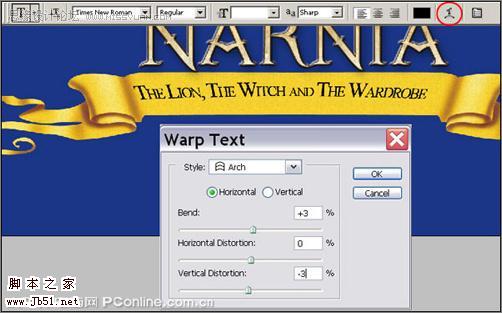
<图11>
12、执行菜单:“文件”/“导入”天空素材,并调整大小与移动位置,放在适当的位置,如图12所示。 
<图12>
13、执行菜单:“图像”/“调整”/“曲线”(快捷键Ctrl+M),弹出曲线对话框,设置输入值为43,输出为0,如图13所示。 
<图13> 14、在图层面板中点击新建图层按钮,新建一个图层命名为图案,接着在工具箱选择钢笔工具,在工具区绘制无规的图案,如如图14所示。 
<图14>
15、按快捷键按键盘快捷键Ctrl+Enter转换为选区,并设置前景色的颜色RGB值为#be9649,接着按按键盘快捷键Alt+Delete填充,按键盘快捷键Ctrl+D取消选区,执行菜单:“编辑”/“变换”/“水平翻转”。 如图15所示。 
<图15>
16、选中图案图层,双击图层缩览图,进入到图层样式,分别勾选内阴影选项、斜面与浮雕、图案叠加,分别设置各项的参考值与混合模式,如图16所示。 
<图16> 
<图16> 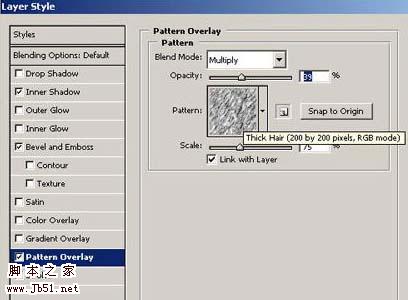
<图16> 
<图16> 17、创建一个新层,命名为三角形,在工具箱选择多边形套索,并在工作区绘制三角形,设置前景色RGB值为167、182、185,按键盘快捷键Alt+Delete填充,按键盘快捷键Ctrl+D取消选区。如图17所示。 
<图17>
18、选中三角形图层,双击图层缩览图,进入到图层样式,分别勾选斜面与浮雕选项、渐变叠加、图案叠加,分别设置各项的参考值与混合模式,如图18所示。 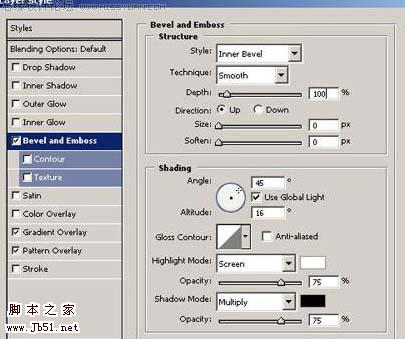
<图18> #p# 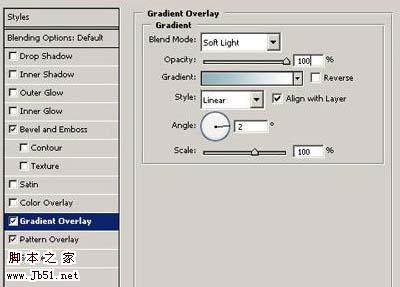
<图18> 
<图18> 
<图18> 19、按Ctrl + J复制一个三角形图层副本, 然后按Ctrl + T缩小,并调整位置,如图19所示。 
<图19>
20、选中三角形副本图层,双击图层缩览图,进入到图层样式,分别勾选斜面与浮雕选项、渐变叠加、图案叠加,分别设置各项的参考值与混合模式,如图20所示。 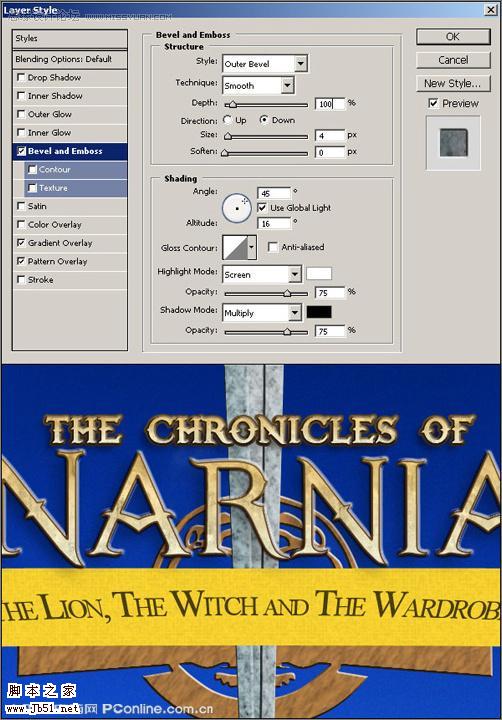
<图20>
21、创建一个新层,命名为天空,在工具箱选择椭圆工具,再工作区拖出一个椭圆形状,并设置前景色RGB值为207、158、161,按键盘快捷键Alt+Delete填充,按键盘快捷键Ctrl+D取消选区。如图21所示。 
<图21>
22、执行菜单:“编辑”/“变换”/“旋转90顺时钟”,接着执行菜单:“滤镜”/“风格化”/“风”(检查风,左起)按Ctrl + F多次重复上, 并运用运动模糊(滤镜-模糊-运动模糊), 如图22所示。 
<图22> 23、旋转90,并设置层的混合模式,线性加深,如图23所示。 
<图23>
24、在工具箱选择套索工具,在工作区画出园形,并在工具箱选择渐变工具,弹出渐变编辑器,设置渐变前景色到透明,颜色为黄色到白色,不透明从100 %到0 % ,接着设置图层混合模式为强光,如图24所示。 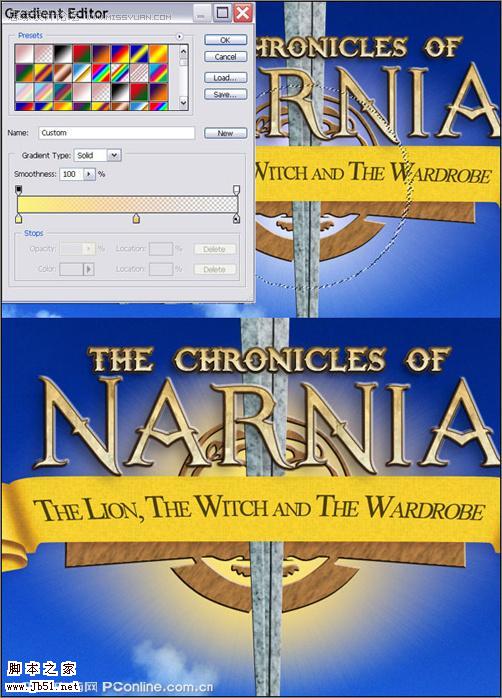
<图24>
25、为增强效果,调整一些参考值,效果图如图25所示。 
<图25> 26、选择画笔(快捷键B),按快捷键5打开“画笔预设”窗口,设置画笔参考值,如图如图26所示。 
<图26>
27、调整一些星星比较大些,如图如图27所示。 
<图27>
28、创建新层命名为横幅。 选择阴影的旗帜与椭圆选框工具。 右键单击选择,选择“羽化”并将其设置为15 。 填充选择黑色,改变层不透明的80 %和混合模式叠加。 如图28所示。 
<图28>
29、调整后的效果,也是最终效果,如图29所示。 
<图289>
 Photoshop Applications: From Photo Editing to Digital ArtApr 30, 2025 am 12:10 AM
Photoshop is widely used in the fields of image processing and digital art, and is suitable for photo editing and digital art creation. 1. Photo editing: Adjust brightness and contrast Use the "Brightness/Contrast" tool. 2. Digital art: Use brush tools to create paintings. 3. Basic usage: Use the "Red Eye Tool" to remove red eyes. 4. Advanced usage: Use layers and masks for image synthesis. 5. Debug: Recover the lost layers by checking the layer panel. 6. Performance optimization: Adjust memory usage to improve running speed.
 Photoshop's Core Function: Image Editing and ManipulationApr 29, 2025 am 12:17 AM
Photoshop's core functions are image editing and operation, including adjusting the color, brightness, contrast of images, applying filter effects, cropping and adjusting image size, performing image synthesis, etc. 1. Adjust brightness and contrast: Open the image, select the "Adjust" option in the "Image" menu, select "Brightness/Contrast", and adjust the slider. 2. Use the color level adjustment layer and layer mask: Click the "Create a new fill or adjust layer" button, select "Scale", adjust the color level, add a layer mask, and use the brush tool to control the adjustment effect.
 Photoshop: The Power of Raster Graphics EditingApr 28, 2025 am 12:13 AM
Photoshop is a powerful tool for handling raster graphics, and its core functions include layers and masks, filters and adjustments. 1. Layers and masks allow independent editing and non-destructive modifications. 2. Filters and adjustments can quickly change the appearance of the image, but they should be used with caution to avoid affecting the image quality. By mastering these functions and advanced skills, you can greatly improve your image editing and creative abilities.
 Photoshop: A Versatile Tool for Image ManipulationApr 27, 2025 am 12:13 AM
Photoshop is so powerful in the field of image processing because of its versatility and intuitive operating interface. 1) It can handle various tasks from basic adjustment to complex synthesis, such as adjusting brightness and contrast. 2) Working based on layers and masks allows non-destructive editing. 3) Examples of usage include adjusting color balance and creating layer masks. 4) Common errors such as excessive editing can be avoided through the History panel. 5) Performance optimization suggestions include the use of smart objects and shortcut keys.
 Photoshop Trials and Alternatives: Exploring Free AccessApr 26, 2025 am 12:23 AM
Photoshop offers a free 7-day trial period. To maximize the use of the trial period, 1) sign up for multiple Adobe accounts, 2) use the student or education version, and 3) subscribe to Adobe CreativeCloud. Free alternatives include: 1) GIMP, 2) Photopea, 3) Krita, these software can meet daily image editing needs.
 Photoshop for Photographers: Enhancing and Retouching ImagesApr 25, 2025 am 12:01 AM
Enhance and retouching photos in Photoshop can be achieved by adjusting brightness and contrast, using the Repair Brush Tool. 1) Adjust brightness and contrast: Increase brightness and contrast to improve underexposed photos through the Image->Adjustments->Brightness/Contrast menu. 2) Use the Repair Brush Tool: Select HealingBrushTool in the toolbar and apply to remove miscellaneous points or scars in the image.
 Accessing Photoshop: Methods and AvailabilityApr 24, 2025 am 12:07 AM
Photoshop can be obtained by purchasing a permanent license or subscribing to CreativeCloud. 1. Purchase a permanent license for long-term use, no monthly payment, but no latest updates are available. 2. Subscribe to CreativeCloud to access the latest version and other Adobe software, and you need to pay a monthly or annual fee. The choice should be based on frequency of use and requirements.
 What Photoshop Does Best: Common Tasks and ProjectsApr 23, 2025 am 12:06 AM
Photoshop is specialized in image editing, layering and masking, digital painting and a variety of design applications. 1) Image editing and repair: remove defects and adjust color and brightness. 2) Layers and masks: non-destructive editing and creation. 3) Digital paintings and illustrations: create art works. 4) Practical applications: graphic design, web design and digital art creation.


Hot AI Tools

Undresser.AI Undress
AI-powered app for creating realistic nude photos

AI Clothes Remover
Online AI tool for removing clothes from photos.

Undress AI Tool
Undress images for free

Clothoff.io
AI clothes remover

Video Face Swap
Swap faces in any video effortlessly with our completely free AI face swap tool!

Hot Article

Hot Tools

Dreamweaver CS6
Visual web development tools

SAP NetWeaver Server Adapter for Eclipse
Integrate Eclipse with SAP NetWeaver application server.

PhpStorm Mac version
The latest (2018.2.1) professional PHP integrated development tool

Atom editor mac version download
The most popular open source editor

Safe Exam Browser
Safe Exam Browser is a secure browser environment for taking online exams securely. This software turns any computer into a secure workstation. It controls access to any utility and prevents students from using unauthorized resources.


