


效果图看上去比较复杂,不过鱼身部分都是用最简单的图形拼凑而成。只要用钢笔工具勾出图形形状,加上渐变色及图层样式。然后叠加到一起即可。制作方法不难,难的是创意思维。
最终效果 

1、开始创建一个文档,我用的是800*600像素的,这是个很好的创造图标的工作环境。 
2、用钢笔工具画一个鱼身体的基本形状。你可以画任何你喜欢的鱼。 
3、打开图层风格,运用黄色-橙色-红色的梯度渐变创建火焰的效果,设置渐变风格为镜像,角度为45°。 
4、到目前为止你所做的鱼的形状应该看起来像这样(如果你按照我做的步骤走的话)。 
5、现在我们要做鱼的眼睛。 
选择椭圆工具画一个正圆。按住shift画正圆。打开图层风格,运用这种风格(见下图)。 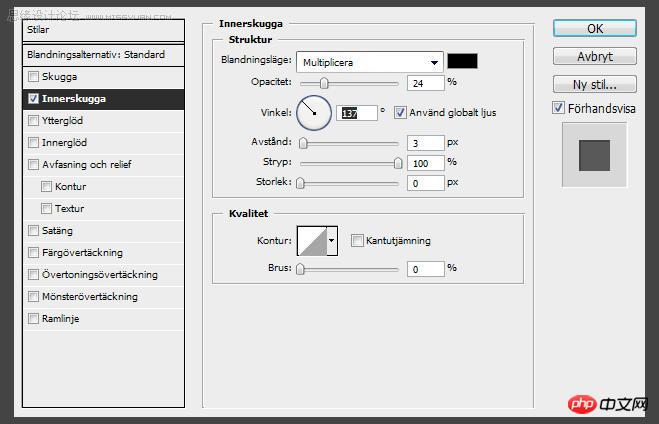

6、在正圆上创建另外一个形状,添加一些外发光。 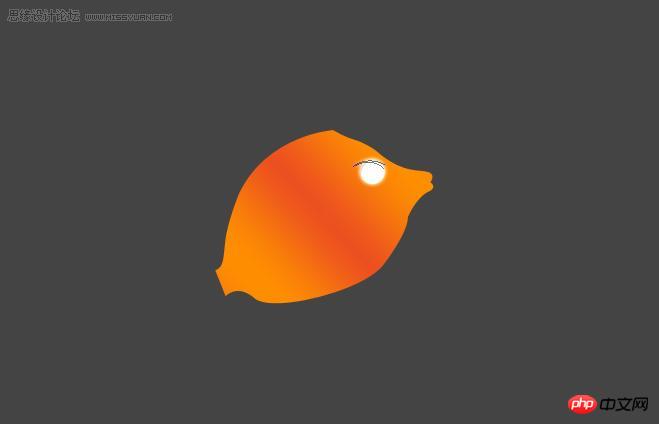
7、做一个火苗的形状。这将为鱼的眼睛增添一个不错的火焰效果。打开图层风格,应用外发光。 
8、现在我们准备用钢笔工具设置鱼身体上的火焰效果(我知道,这种说法是很滑稽的)。 
画一条长长的尖角形状。应用图层蒙版,用渐变工具使它褪色。
#p# 9、重覆执行步骤8共18次(这个随你愿 100次也没人管你:)),使用不同的形状和颜色。 


10、现在把每一个形状都放在你所建的文件夹中,并以“Fireshapes”命名。现在复制整个文件夹,按CTRL / CMD + E将文件夹合并为一个图层。重命名图层为“Fireshapes2”,然后按CTRL / CMD + T,把选区放在最底部。 
现在把它放到鱼身上。 
11、重覆执行步骤10,重命名这一层为“Fireshapes3”,把它放在“Fireshapes2”之上。现在让我们使用铅笔工具在底部添加黄色的形状,使它看起来更像鱼。 

12、现在我们将使用图层风格选项完成下一步。 

13、现在你大致懂得了用钢笔工具来制作鱼形状的技术了。我将会在鱼的尾巴上增加一些渐变的形状(按照步骤12设置渐变),把它们放在文件夹里,并命名为”Tall”(尾巴)。尾部是蓝色路径内的区域。 
14、现在在尾部文件夹添加图层蒙版,应用渐变使其褪色,这样就在蓝色路径内实现了这种效果。 
15、这就是我们目前为止所作的成果。 
16、现在我们要制作鱼鳍。鱼游泳是不能没有鱼鳍的对吧~参照上图制作一个形状(我使用的颜色是#fcb100),使用图层蒙版和渐变工具使其褪色。 
17、现在让我们使用与步骤16相同的技术在鱼鳍上增加一些火焰的形状。 


#p#
18、在鱼头上制作一个形状,这将能增加一个感觉不错的火焰效果。 
19、重复步骤18,运用图层蒙版和渐变工具使其褪色(就是渐变效果)。 
20、现在把我们所做的一切都放在一个文件夹中,并命名为“鱼”。 
21、设置鱼文件夹的不透明度为69%。 
22、复制鱼文件夹,按CTRL / CMD + E,这将使复制层在鱼文件夹的上方。在上方添加样式。 
23、这是目前为止的效果。 
24、现在我们要去应用烟雾效果和一些星状笔刷。在鱼上方复制粘贴烟雾,在同一层上画一些星星,设置图层的不透明度为69%,再添加图层样式。 


25、现在粘贴地球图标,添加一个图层蒙版。选择一个大小合适的笔刷,设置硬度为0,使用这个大型笔刷淡化地球图标,使用#000000的颜色在图层蒙版上涂抹。 

26、现在把地球图标放在火鱼的后面。 
27、按CTRL / CMD + T,按住shift键调整地球直到它与火鱼的大小相配。 
28、现在我们开始做背景。让我们选择一个背景色。我用的是#112047。 
#p#
29、这是使用了背景色的效果。 
30、在背景之上、地球和火鱼的后方新建一个图层。使用选择工具标志你三分之一的文档。用更深的颜色填充它(#0e1939)。 
31、应用图层蒙版,选择渐变填充工具使其褪色。 
32、使用椭圆工具画一个椭圆形。把它放在火鱼的下面。这将成为火鱼的影子。 
33、现在去滤镜>模糊>动态模糊,运用这些设置(你需要做两次,一次沿x轴,一次沿y轴)。 

34、现在使用直线工具在地球的上方画一条直线,打开图层样式,运用一些斜角和浮雕(这时我会让大家选择自己想应用的设置)。 
35、重复步骤34,这是我们现在所完成的效果。 
36、新建一个图层,使用星状笔刷绘制一些星星,这将使“天空”看起来更真实。

 Photoshop and Digital Art: Painting, Illustration, and CompositingApr 18, 2025 am 12:01 AM
Photoshop's applications in digital art include painting, illustration and image synthesis. 1) Painting: Using brushes, pencils and mixing tools, the artist can create realistic effects. 2) Illustration: With vector and shape tools, artists can accurately draw complex graphics and add effects. 3) Synthesis: Using mask and layer blending mode, artists can seamlessly blend different image elements.
 Advanced Photoshop Tutorial: Master Retouching & CompositingApr 17, 2025 am 12:10 AM
Photoshop's advanced photo editing and synthesis technologies include: 1. Use layers, masks and adjustment layers for basic operations; 2. Use image pixel values to achieve photo editing effects; 3. Use multiple layers and masks for complex synthesis; 4. Use "liquefaction" tools to adjust facial features; 5. Use "frequency separation" technology to perform delicate photo editing, these technologies can improve image processing level and achieve professional-level effects.
 Using Photoshop for Graphic Design: Branding and MoreApr 16, 2025 am 12:02 AM
The steps to using Photoshop for brand design include: 1. Use the Pen tool to draw basic shapes, 2. Add shadows and highlights through layer styles, 3. Adjust colors and details, 4. Use smart objects and actions to automatically generate different versions of the design. Photoshop helps designers create and optimize brand elements with the flexibility of layers and masks, ensuring consistency and professionalism of designs, from simple logos to complex branding guides.
 Photoshop's Subscription Model: What You Get for Your MoneyApr 15, 2025 am 12:17 AM
Photoshop's subscription model is worth buying. 1) Users can access the latest version and use across devices at any time. 2) The subscription fee is low, and continuous updates and technical support are provided. 3) Advanced functions such as neural filters can be used for complex image processing. Despite the high long-term costs, its convenience and feature updates are valuable to professional users.
 Photoshop: Investigating Free Trials and Discount OptionsApr 14, 2025 am 12:06 AM
You can get the access to Photoshop in the most economical way: 1. Experience the software features with a 7-day free trial; 2. Find student or teacher discounts, as well as seasonal promotions; 3. Use coupons on third-party websites; 4. Subscribe to Adobe CreativeCloud's monthly or annual plan.
 Photoshop for Designers: Creating Visual ConceptsApr 13, 2025 am 12:09 AM
Creating visual concepts in Photoshop can be achieved through the following steps: 1. Create a new document, 2. Add a background layer, 3. Use the brush tool to draw basic shapes, 4. Adjust colors and brightness, 5. Add text and graphics, 6. Use masks for local editing, 7. Apply filter effects, these steps help designers build a complete visual work from scratch.
 Is Photoshop Free? Understanding Subscription PlansApr 12, 2025 am 12:11 AM
Photoshop is not free, but there are several ways to use it at low cost or free: 1. The free trial period is 7 days, and you can experience all functions during this period; 2. Student and teacher discounts can cut costs by half, and school proof is required; 3. The CreativeCloud package is suitable for professional users and includes a variety of Adobe tools; 4. PhotoshopElements and Lightroom are low-cost alternatives, with fewer functions but lower prices.
 Photoshop's Value: Weighing the Cost Against Its FeaturesApr 11, 2025 am 12:02 AM
Photoshop is worth the investment because it provides powerful features and a wide range of application scenarios. 1) Core functions include image editing, layer management, special effects production and color adjustment. 2) Suitable for professional designers and photographers, but amateurs may consider alternatives such as GIMP. 3) Subscribe to AdobeCreativeCloud can be used as needed to avoid high one-time spending.


Hot AI Tools

Undresser.AI Undress
AI-powered app for creating realistic nude photos

AI Clothes Remover
Online AI tool for removing clothes from photos.

Undress AI Tool
Undress images for free

Clothoff.io
AI clothes remover

AI Hentai Generator
Generate AI Hentai for free.

Hot Article
Hot Tools

PhpStorm Mac version
The latest (2018.2.1) professional PHP integrated development tool

SublimeText3 Linux new version
SublimeText3 Linux latest version

VSCode Windows 64-bit Download
A free and powerful IDE editor launched by Microsoft

ZendStudio 13.5.1 Mac
Powerful PHP integrated development environment

Notepad++7.3.1
Easy-to-use and free code editor

