


本教程虽然过程比较多,不过制作起来比较容易,都是些基础的操作。大致过程:先用选区工具制作一些不规则的图形,填色后执行一些滤镜操作。然后调色并加上一些装饰元素即可。
最终效果 
1、首先创建一个新文档,文档的宽度和高度可根据用户实现的需要而定,如图所示。 
<图1>
2、使用“油漆桶工”具在新文档中填充黑色,如图所示。 
<图2> 3、使用“套索工具”在图中随意创建一个选区,选区的大概形状如图所示,然后按下Ctrl+Alt+D快捷,设置羽化半径为25像素,如图所示。 
<图3>
4、在图层面板中创建一个新的图层,然后使用“油漆桶工”具在选区中填充白色,如图所示。 
<图4>
5、在菜单栏中选择“滤镜—渲染—云彩”命令,为选区的内容添加云彩效果,如图所示。 
<图5>
6、在菜单栏中选择“图像—调整—色阶”命令,在色阶对话框中拖动“调整点”,加强图中的云彩部分的对比度,如图所示。 
<图6> 
<图7> 7、按下Ctrl+D快捷键取消选择,然后在菜单在选择“滤镜—模糊—径向模糊”命令,设置数量为“100”、模糊方法为“缩放”、品质为“最好”,如图所示。 
<图8> 
<图9>
8、在菜单栏中选择“图像—调整—色彩平衡”命令,按下图所示设置中间调的色阶为“-82”添加紫色,如图所示。 
<图10> 
<图11>
9、按下Ctrl+J快捷键复制出“图层1副本”,然后在菜单栏再次打开“色彩平衡”对话框,按下图所示设置色彩平衡,此时图层的颜色变为绿色,如图所示。 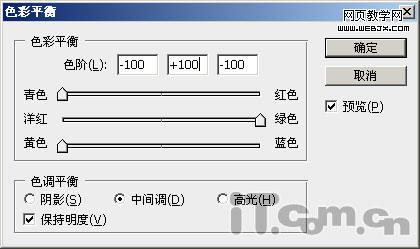
<图12> 
<图13> #p# 10、使用“套索工具”选择一个选区,选区形状如图所示,然后设置羽化效果,羽化半径为“25”像素,如图所示。 
<图14>
11、按下Delete键,删除选区的内容,然后设置“图层1副本”的混合模式为“叠加”,如图所示。 
<图15>
12、在图层面板再次复制图层1,得到“图层1副本2”,拖动图层调整图层1副本2到最上方,如图所示。 
<图16>
13、打开“色彩平衡”对话框,调整图层1副本2的颜色为青色,如图所示。 
<图17> 
<图18> 14、参考步骤9的方法,使用套索工具创建选区,然后设置羽化效果,如图所示。 
<图19>
15、按下Delete键,删除选区的内容,然后设置图层1副本2的混合模式为“叠加”,如图所示。 
<图20>
16、再次复制图层1,得到图层1副本3并至于图层面板的最上方,如图所示。 
<图21>
17、设置 图层1副本3的混合模式为“线性减淡”,填充为“50%”,如图所示。 
<图22> 
<图23> 18、选择图层1副本3,然后按着Ctrl键单击“图层1副本2”载入其选区,如图所示。 
<图24> #p# 19、按下Delete键,删除选区的内容,如图所示。 
<图25>
20、参考步骤17、18的方法,载入“图层1”副本的选区,然后删除“图层1副本3”选区的内容,如图所示。 
<图26> 
<图27> 
<图28> 21、选择“画笔工具”,接着在菜单栏中选择“窗口—画笔”命令,打开画笔面板,然后分别按下图所示,设置“画笔笔尖形状”、“形状动态”、“散布”。 
<图29> 
<图30> 
<图31>
22、设置完画笔后,在图层面板中创建一个新图层,然后在新图层中涂抹出一点点的星光,如图所示。 
<图32> 23、在菜单栏中选择“图层—图层样式—外发光”命令,设置“图层2”发出紫色的光,设置参数如图所示。 
<图33> 
<图34>
24、使用“横排文字工具”输入一个“X”字母,如图所示。 
<图35>
25、打开图层样式对话框,然后分别为字母图层添加“外发光”、“投影”、“渐变叠加”、“描边”效果,如图所示。 
<图36> 
<图37> 
<图38> 26、设置“描边”效果时,填充类型选择“渐变”并打开“渐变编辑器”设置如下图所示。 
<图39> 
<图40>
添加图层样式效果: 
<图41> 27、载入字母图层的选区,然后使用“椭圆选框工具”修改选区,如图所示。 
<图42> 
<图43>
28、创建一个新图层,然后使用“渐变工具”在选区中添加“白色到透明”的渐变效果,如图所示。完成! 
<图44>
<图45>

 Advanced Photoshop Tutorial: Master Retouching & CompositingApr 17, 2025 am 12:10 AM
Photoshop's advanced photo editing and synthesis technologies include: 1. Use layers, masks and adjustment layers for basic operations; 2. Use image pixel values to achieve photo editing effects; 3. Use multiple layers and masks for complex synthesis; 4. Use "liquefaction" tools to adjust facial features; 5. Use "frequency separation" technology to perform delicate photo editing, these technologies can improve image processing level and achieve professional-level effects.
 Using Photoshop for Graphic Design: Branding and MoreApr 16, 2025 am 12:02 AM
The steps to using Photoshop for brand design include: 1. Use the Pen tool to draw basic shapes, 2. Add shadows and highlights through layer styles, 3. Adjust colors and details, 4. Use smart objects and actions to automatically generate different versions of the design. Photoshop helps designers create and optimize brand elements with the flexibility of layers and masks, ensuring consistency and professionalism of designs, from simple logos to complex branding guides.
 Photoshop's Subscription Model: What You Get for Your MoneyApr 15, 2025 am 12:17 AM
Photoshop's subscription model is worth buying. 1) Users can access the latest version and use across devices at any time. 2) The subscription fee is low, and continuous updates and technical support are provided. 3) Advanced functions such as neural filters can be used for complex image processing. Despite the high long-term costs, its convenience and feature updates are valuable to professional users.
 Photoshop: Investigating Free Trials and Discount OptionsApr 14, 2025 am 12:06 AM
You can get the access to Photoshop in the most economical way: 1. Experience the software features with a 7-day free trial; 2. Find student or teacher discounts, as well as seasonal promotions; 3. Use coupons on third-party websites; 4. Subscribe to Adobe CreativeCloud's monthly or annual plan.
 Photoshop for Designers: Creating Visual ConceptsApr 13, 2025 am 12:09 AM
Creating visual concepts in Photoshop can be achieved through the following steps: 1. Create a new document, 2. Add a background layer, 3. Use the brush tool to draw basic shapes, 4. Adjust colors and brightness, 5. Add text and graphics, 6. Use masks for local editing, 7. Apply filter effects, these steps help designers build a complete visual work from scratch.
 Is Photoshop Free? Understanding Subscription PlansApr 12, 2025 am 12:11 AM
Photoshop is not free, but there are several ways to use it at low cost or free: 1. The free trial period is 7 days, and you can experience all functions during this period; 2. Student and teacher discounts can cut costs by half, and school proof is required; 3. The CreativeCloud package is suitable for professional users and includes a variety of Adobe tools; 4. PhotoshopElements and Lightroom are low-cost alternatives, with fewer functions but lower prices.
 Photoshop's Value: Weighing the Cost Against Its FeaturesApr 11, 2025 am 12:02 AM
Photoshop is worth the investment because it provides powerful features and a wide range of application scenarios. 1) Core functions include image editing, layer management, special effects production and color adjustment. 2) Suitable for professional designers and photographers, but amateurs may consider alternatives such as GIMP. 3) Subscribe to AdobeCreativeCloud can be used as needed to avoid high one-time spending.
 The Core Purpose of Photoshop: Creative Image DesignApr 10, 2025 am 09:29 AM
Photoshop’s core use in creative image design is its powerful functionality and flexibility. 1) It allows designers to transform creativity into visual reality through layers, masks and filters. 2) Basic usages include cropping, resizing and color correction. 3) Advanced usages such as layer styles, blend modes and smart objects can create complex effects. 4) Common mistakes include improper layer management and excessive use of filters, which can be solved by organizing layers and using filters reasonably. 5) Performance optimization and best practices include rational use of layers, regular saving of files, and using shortcut keys.


Hot AI Tools

Undresser.AI Undress
AI-powered app for creating realistic nude photos

AI Clothes Remover
Online AI tool for removing clothes from photos.

Undress AI Tool
Undress images for free

Clothoff.io
AI clothes remover

AI Hentai Generator
Generate AI Hentai for free.

Hot Article
Hot Tools

MinGW - Minimalist GNU for Windows
This project is in the process of being migrated to osdn.net/projects/mingw, you can continue to follow us there. MinGW: A native Windows port of the GNU Compiler Collection (GCC), freely distributable import libraries and header files for building native Windows applications; includes extensions to the MSVC runtime to support C99 functionality. All MinGW software can run on 64-bit Windows platforms.

EditPlus Chinese cracked version
Small size, syntax highlighting, does not support code prompt function

SublimeText3 Chinese version
Chinese version, very easy to use

SublimeText3 Linux new version
SublimeText3 Linux latest version

Zend Studio 13.0.1
Powerful PHP integrated development environment

