


How to obtain the development team computer host?

Want to know how to obtain the computer host of the development team? PHP editor Banana will give you a detailed answer. This tutorial will take you step by step to master the method of obtaining the development team computer host, from preparation work to specific operations, allowing you to get started easily and improve development efficiency. Come and read below for detailed guidance!

How to obtain the development team computer host?
You can obtain a computer host by purchasing or leasing it. Because the computer host is one of the necessary tools for the development team, it can be purchased with personal funds or by applying for funds from the unit. In addition, you can also choose to lease a computer host, which not only saves costs, but also makes maintenance more convenient. It should be noted that when purchasing or leasing, you should choose a more cost-effective computer host based on your own needs and budget. You should also consider whether its performance and configuration meet the needs of development work to ensure the smooth progress of development work.
How to start the host after installing it?
After the host is installed, you need to follow the following steps to turn it on. 1. Plug the monitor, mouse, keyboard and other peripherals into the corresponding interfaces of the host computer. 2. Connect the host to the power supply and confirm that the power cord and power connection port are firmly connected. 3. Press the power button on the host and wait for the computer to start. The reason is that the computer will not start until the power button is pressed. At the same time, connecting peripherals and plugging in the power supply are also prerequisites for booting. If the computer cannot be turned on normally, you may need to check whether the power supply is powered on, whether the hardware is connected securely, etc., or check the computer's startup prompt information to help locate the fault point.
After the host computer is installed, how to install the system?
Are you referring to installing the system on a new computer?
1. If there are no special circumstances, press F2 to enter the bios and set the startup items when the startup bar appears (some computers can also press F12);
2. If it is a CD installation, select the CD-ROM drive. For the first startup item, if it is a USB disk installation, select the USB device. F5/F6 are the direction keys to adjust the position of the startup item;
3. After setting, save and exit. Generally, you can press F10 to save, or you can press ESC to exit, select save and restart, and the computer will automatically restart and enter the installation process.
Should I choose the brand of computer host or just assemble it?
Choose a good brand.
Branded computers have better compatibility than ordinary computers. Of course, if they are assembled by professional technicians, there will definitely be no compatibility. Now, with the development of computers, the compatibility problem of computers is getting smaller and smaller. .
Should I assemble the computer host myself or buy a finished product?
In fact, the difference between computer assembly and finished products is that assembly is to combine accessories with different performance according to your own needs. You can install them in a computer store or by yourself. The price is low and cost-effective. It is suitable for people who have a certain understanding of computer hardware. people buy.
The finished product is assembled and installed in the factory. The price is relatively high and the after-sales service is good. It is suitable for people who do not understand computer hardware.
How to install the system after the host is installed?
Step 1. Create a USB boot disk
1. Insert the prepared USB disk into the computer, open the installation bar and reinstall the system with one click, and click to create the USB disk.
2. Select the system you need to make it (win10, which has better compatibility, is taken as an example here).
3. Wait for the USB boot disk to be created.
Step 2. Set up the computer USB disk to boot
1. Find the computer’s USB boot hotkey. The one-click reinstallation system in the installation bar provides startup hotkey query, and you can also search through the network.
2. Restart the computer and continuously press the startup hotkey just recorded. After the startup options appear on the screen, select the USB option and press the Enter key to boot from the USB disk.
Step 3. Install the system
1. After entering the USB boot, select the option and press the Enter key to open the PE system.
2. After entering the PE system, the installation tool will automatically start. Use the installation tool to install the win10 system.
3. Select the C drive as the system drive and click to start the installation.
4. After the system installation is completed, pull out the USB flash drive and click Restart Now.
5. Wait for the computer to restart to install the win10 system. After completing the initial system settings, enter the win10 system desktop and the system installation is completed.
How to connect to the host after UFIDA is installed?
First of all, make sure that the server and client software are installed without application errors. That is, the server must be able to create an account set and enable the module of the account set. At the same time, you must be able to log in to the software to perform business operations
2. Check the IP address of the server. Find Run in the lower right corner of the win7 computer, enter cmd and press Enter, you will see a black dialog box. Enter IPconfig in it and press Enter to see the IP address of the server. Generally it is 192.168.0. Number, or 192.168.1. Number
Check the name of the computer, My Computer - Right-click Properties - Advanced System Settings - Computer Name.
At the same time, you need to turn off the computer's firewall and allow other computers to access the data on your computer. Start - Control Panel - Windows Firewall - Turn Windows Firewall on or off - Just turn off the firewall.
On the client's computer, open the C drive - windows - system32 - drivers - etc-hosts with Notepad and enter the server's IP address and computer name at the beginning.
Generally, you can connect to the server after setting it up like this. If it still doesn't work, please send me a private message to help you deal with it.
Computer host configuration assembled in 2012?
2012 configuration, the CPU must be at least I3, the motherboard must support I3 or higher CPU model, the graphics card is 1G version, the memory is 2G or more, and the hard disk is 500G. As for the power supply, I The recommended Great Wall power supply, optical drive case, keyboard and mouse case depends on your own preferences.
Is it better to have the computer host assembled or a branded one?
Computer host brand machine is good
Brand computer compatibility is better than ordinary computers. Of course, if it is assembled by professional technicians, there will definitely be no compatibility. Now the compatibility of computers The problem has become smaller and smaller with the development of computers.
Is it better to buy a brand-name host with a computer? Or assemble it yourself?
This is a common confusion. Buying a branded host with a computer and assembling the host yourself have their own advantages and disadvantages:
Benefits of buying a branded host:
1. Simple and convenient, No need to assemble it yourself, just plug and play. This is very practical for users with weak DIY skills.
2. Quality assurance, the brand chamber of commerce will provide certain quality assurance and after-sales service, which is more reassuring.
3. Good fluency. The hardware accessories of the brand host are of the same brand, so the driver compatibility is better and the operation is smoother.
But the disadvantages are:
1. The price is higher, and some self-organized hosts with similar configurations will be cheaper.
2. It is not very customizable. You can only choose the configuration provided by the brand, and you cannot choose your favorite hardware equipment by yourself.
The advantages of assembling the host yourself:
1. The price is cheap, you can choose cost-effective hardware, and reduce the overall cost.
2. Free customization, you can choose and customize the ideal CPU, motherboard, graphics card, memory and other configurations according to your own needs.
3. The function is more powerful, you can choose high-end hardware equipment, and the performance is more powerful.
But the shortcomings are also obvious:
1. The assembly is complicated and requires certain DIY skills and experience, which may be difficult for novices.
2. The quality is not guaranteed, and the compatibility of various hardware brands is difficult to control, and malfunctions or conflicts may occur.
3. After-sales service is inconvenient. Different brands of hardware need to contact after-sales service separately, which is more troublesome.
To sum up, if you don’t have high technical requirements and don’t pursue ultra-high performance, buying a branded host is a relatively simple and reliable choice. If you want to customize high-performance products and have certain DIY skills, you can achieve higher frame rates and stronger performance by assembling your own console, but you need to weigh factors such as after-sales difficulty. Personally speaking, both have their own pros and cons, and it is better to judge based on your needs and skills.
The above is the detailed content of How to obtain the development team computer host?. For more information, please follow other related articles on the PHP Chinese website!

 Black Boxes on Desktop Icons: Find Powerful Tips to RemoveMay 12, 2025 pm 08:07 PM
Encountering black squares instead of desktop icons in Windows 11/10? This comprehensive guide offers several straightforward solutions to restore your icons to their original appearance. Quick Navigation: Black Squares on Desktop Icons Solution 1:
 CapCut Project File Location: How to Find, Recover, and ShareMay 12, 2025 pm 08:06 PM
This MiniTool guide offers a complete walkthrough for managing CapCut projects, covering location, recovery, and sharing. Mastering these steps ensures efficient project handling. Quick Navigation: CapCut Project File Location on PC Backing Up CapC
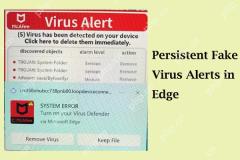 Persistent Fake Virus Alerts in Edge: How to Identify & AvoidMay 12, 2025 pm 08:05 PM
Edge browser fake virus warning: a guide to identifying, handling and prevention Many users report encountering fake virus warnings in Microsoft Edge browser. These warnings usually appear in the form of pop-ups, claiming that malware or viruses are detected, attempting to induce users to download malware or take harmful actions. This article will guide you on how to identify, deal with, and prevent such false warnings. How to identify fake virus warnings in Edge browser? False virus warnings usually have the following characteristics: Use emergency and panic language: Try to force users to act by creating panic. Use fake company logos: Imitate the logo of well-known security software or Microsoft. Regular companies will not issue warnings in this way. Request to dial
 Effective Ways to Fix EVERSPACE 2 Crashing/Not LaunchingMay 12, 2025 pm 08:03 PM
EVERSPACE 2 Crash Problem and Solutions Have you encountered a crash problem while playing EVERSPACE 2? If this problem bothers you, this MiniTool article will help you. This article will explain common causes and effective solutions to EVERSPACE 2 crashes. Quick navigation: EVERSPACE 2 Startup Crash How to fix EVERSPACE 2 crash Summarize EVERSPACE 2 Startup Crash The EVERSPACE 2 crash problem has always been the focus of players. Many players have reported different types of crashes, including crashes at startup, sudden exits during the game, and interactions with Unreal Engine
 Apex Integrity Error 0x8000001: 3 Useful Methods HereMay 12, 2025 pm 08:02 PM
Encountering the Apex Legends integrity error 0x8000001, causing game crashes? This guide provides effective solutions. Let's explore the fixes. Apex Integrity Error 0x8000001: A Crashing Problem Many Apex Legends players report encountering the &quo
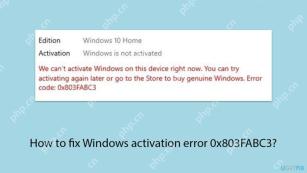 How to fix Windows activation error 0x803FABC3?May 12, 2025 pm 06:00 PM
Windows activation is a critical process in Windows 11 that verifies your operating system copy is genuine, enabling full functionality like personalization fea
 How to Use Copilot in Microsoft OneDrive? Everything You NeedMay 11, 2025 pm 08:02 PM
Unlock the Power of Microsoft OneDrive Copilot: Your AI-Powered File Assistant This MiniTool guide unveils the capabilities of Copilot in OneDrive, a revolutionary AI assistant designed to streamline your file management and boost productivity. Expl
 A Guide to Fix A Supported Game Is Required to Use This FeatureMay 11, 2025 pm 08:01 PM
Troubleshooting the NVIDIA GeForce Experience "Supported Game Required" Error Encountering the "A supported game is required to use this feature" error in NVIDIA GeForce Experience while using game filters, screen recording, or ad


Hot AI Tools

Undresser.AI Undress
AI-powered app for creating realistic nude photos

AI Clothes Remover
Online AI tool for removing clothes from photos.

Undress AI Tool
Undress images for free

Clothoff.io
AI clothes remover

Video Face Swap
Swap faces in any video effortlessly with our completely free AI face swap tool!

Hot Article
Hot Tools

Dreamweaver Mac version
Visual web development tools

SublimeText3 Mac version
God-level code editing software (SublimeText3)

EditPlus Chinese cracked version
Small size, syntax highlighting, does not support code prompt function

MinGW - Minimalist GNU for Windows
This project is in the process of being migrated to osdn.net/projects/mingw, you can continue to follow us there. MinGW: A native Windows port of the GNU Compiler Collection (GCC), freely distributable import libraries and header files for building native Windows applications; includes extensions to the MSVC runtime to support C99 functionality. All MinGW software can run on 64-bit Windows platforms.

SecLists
SecLists is the ultimate security tester's companion. It is a collection of various types of lists that are frequently used during security assessments, all in one place. SecLists helps make security testing more efficient and productive by conveniently providing all the lists a security tester might need. List types include usernames, passwords, URLs, fuzzing payloads, sensitive data patterns, web shells, and more. The tester can simply pull this repository onto a new test machine and he will have access to every type of list he needs.

