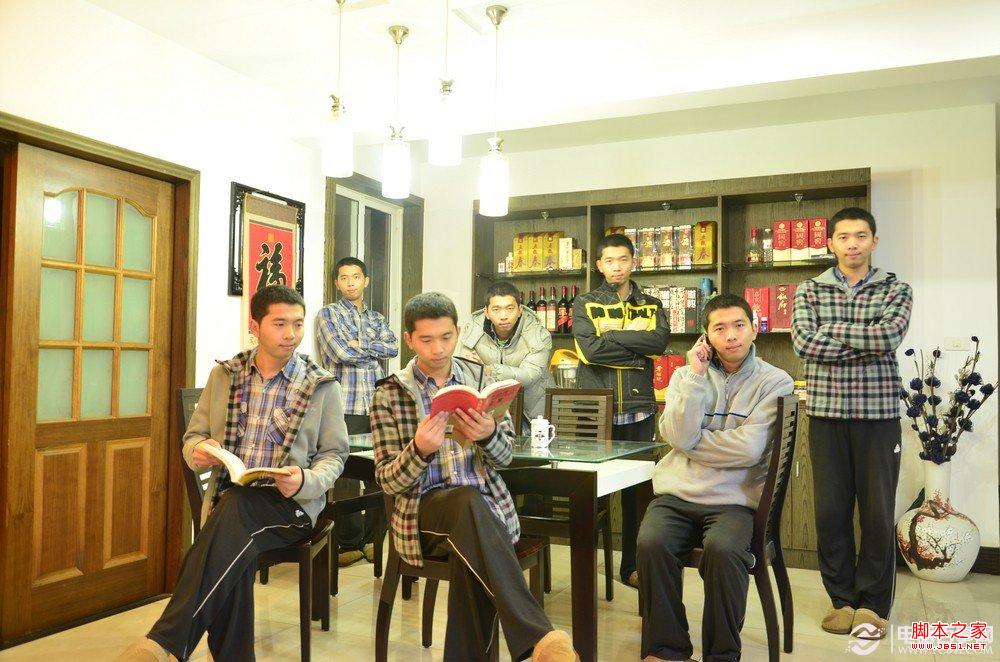
这里给好友们分享一下分身术照片制作过程。这种图片的名称有很多叫法,像分身、多重合成等(我以前不知道时称之为 “一张图片同一个人不同姿势动作”),感兴趣的朋友可以练练手哈
看到很多泥友问这种图片的制作方法?其实我也是在网上偶然看到这种效果图感觉很NB,然后去网上找资料乱学的。大家说到教实在是不敢当,这里给好友们分享一下。班门弄斧大家别见笑!!!这种图片的名称有很多叫法,像分身、多重合成等(我以前不知道时称之为 “一张图片同一个人不同姿势动作”!!!)

要制作这种照片效果,有如下几点事项必须遵守:
1、每张相片的背景一定要完全一样。因此,最好要搭配三脚架拍摄。 (因为我囊中羞涩所以放在鞋柜上拍的,嘿嘿)
2、因为每张相片的亮度必须一致,所以曝光模式一定要用手动模式。此外,为了保持焦点的一致性,所以第一张相片用AF模式拍摄后,最好切换到MF模式。
3、拍摄前试拍,调好自己满意的参数。调好就不要变了!
4、因为需要数张照片,所以拍摄时,我们要在其他要素固定不变的状态下,只改变被摄体的位置,此乃是制作重复曝光照片的重点。就算要用道具,拍了后也要丢到其他地方去!
5、先考虑清楚要合成为何种影像,然后才开始进行拍摄。若能利用服装或道具,让每拍一张就有些改变,这样子拍出来的相片会更添乐趣。
6、作出各种不同的表情配合拍摄,完成拍摄作业之后,使用Photoshop将数张相片进行加工,就可以合成一张有趣的分身照片了。
=======我叫华丽的分割线========
具体做法如下:
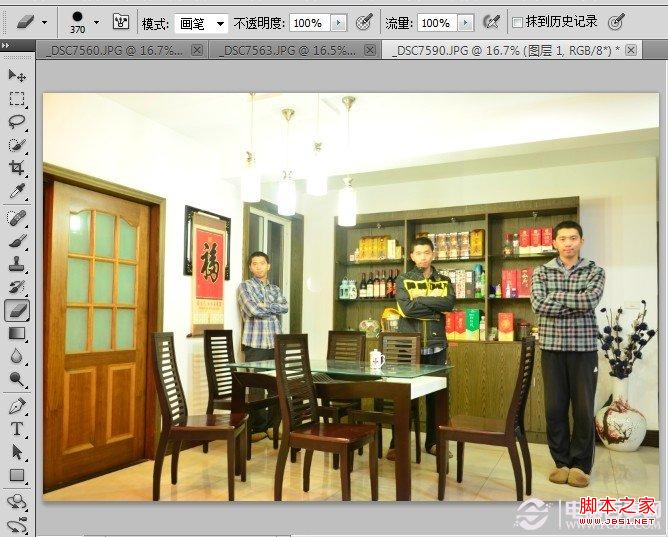
1、将你拍摄选好的照片放到桌面上,然后丢进PS里面(这里我以三张为例我丢了三张)

2、先合成其中两张相片(不管从哪张相片开始处里都没有关系,我是从左到右, 这个看个人喜好),选择其中一张相片之后,按【Ctrl+A】全选影像范围,再按【Ctrl+C】予以复制。
3、接着,按下【Ctrl+V】贴到另一张要合成的相片上,也就是把第一张图复盖到第二张上面去。这时你会发现就剩你复制图了,不要担心, 好戏在后面!
4、选择“橡皮擦工具”,在左上方点选“黑点”,设定“直径”,根据相片的尺寸来选择适合的粗细,硬度100%。不透明100%。

5、然后就用橡皮擦被你上一张图片覆盖的图片人像消失的地方。把人擦出来后,按下【Ctrl+Shift+E】将图层合并,再按【Ctrl+A】全选被合并的影像范围,再按【Ctrl+C】予以复制贴到另一张要合成的相片上,擦拭OK后再按【Ctrl+Shift+E】将图层合并(图片不止三张的话依次循环就可以了)最后保存 另存为就行了~~~


最后祝好友们大功告成~~~对了再告诉大家一个小秘密:“ 这图是我一个人拍的···在拍摄时设定了自拍延迟十秒”这样时间比较够。当然有人帮你拍那当然最好了!!!切记切记相机不能动!!!背景一乱就完了!!!哈哈哈哈哈哈哈哈哈····
分享几张网上经典图案··

 How do I use Photoshop for creating social media graphics?Mar 18, 2025 pm 01:41 PM
The article details using Photoshop for social media graphics, covering setup, design tools, and optimization techniques. It emphasizes efficiency and quality in graphic creation.
 How do I prepare images for web use in Photoshop (file size, resolution, color space)?Mar 13, 2025 pm 07:28 PM
Article discusses preparing images for web use in Photoshop, focusing on optimizing file size, resolution, and color space. Main issue is balancing image quality with quick loading times.
 How do I use Photoshop's Content-Aware Fill and Content-Aware Move tools effectively?Mar 13, 2025 pm 07:35 PM
Article discusses using Photoshop's Content-Aware Fill and Move tools effectively, offering tips on selecting source areas, avoiding mistakes, and adjusting settings for optimal results.
 How do I use Photoshop's video editing capabilities?Mar 18, 2025 pm 01:37 PM
The article explains how to use Photoshop for video editing, detailing steps to import, edit, and export videos, and highlighting key features like the Timeline panel, video layers, and effects.
 How do I calibrate my monitor for accurate color in Photoshop?Mar 13, 2025 pm 07:31 PM
Article discusses calibrating monitors for accurate color in Photoshop, tools for calibration, effects of improper calibration, and recalibration frequency. Main issue is ensuring color accuracy.
 How do I prepare images for web using Photoshop (optimize file size, resolution)?Mar 18, 2025 pm 01:35 PM
Article discusses optimizing images for web using Photoshop, focusing on file size and resolution. Main issue is balancing quality and load times.
 How do I create animated GIFs in Photoshop?Mar 18, 2025 pm 01:38 PM
Article discusses creating and optimizing animated GIFs in Photoshop, including adding frames to existing GIFs. Main focus is on balancing quality and file size.
 How do I prepare images for print using Photoshop (resolution, color profiles)?Mar 18, 2025 pm 01:36 PM
The article guides on preparing images for print in Photoshop, focusing on resolution, color profiles, and sharpness. It argues that 300 PPI and CMYK profiles are essential for quality prints.


Hot AI Tools

Undresser.AI Undress
AI-powered app for creating realistic nude photos

AI Clothes Remover
Online AI tool for removing clothes from photos.

Undress AI Tool
Undress images for free

Clothoff.io
AI clothes remover

AI Hentai Generator
Generate AI Hentai for free.

Hot Article

Hot Tools

VSCode Windows 64-bit Download
A free and powerful IDE editor launched by Microsoft

SublimeText3 Mac version
God-level code editing software (SublimeText3)

Zend Studio 13.0.1
Powerful PHP integrated development environment

mPDF
mPDF is a PHP library that can generate PDF files from UTF-8 encoded HTML. The original author, Ian Back, wrote mPDF to output PDF files "on the fly" from his website and handle different languages. It is slower than original scripts like HTML2FPDF and produces larger files when using Unicode fonts, but supports CSS styles etc. and has a lot of enhancements. Supports almost all languages, including RTL (Arabic and Hebrew) and CJK (Chinese, Japanese and Korean). Supports nested block-level elements (such as P, DIV),

SAP NetWeaver Server Adapter for Eclipse
Integrate Eclipse with SAP NetWeaver application server.


