


使用对焦堆叠技术扩展微距摄影作品的景深范围,微距摄影最迷人的地方莫过于浅景深所营造出的梦幻虚化效果,感兴趣的朋友可以参考下哈,希望对大家有所帮助
我们会告诉大家如何使用对焦堆叠技术扩展微距摄影作品的景深范围。
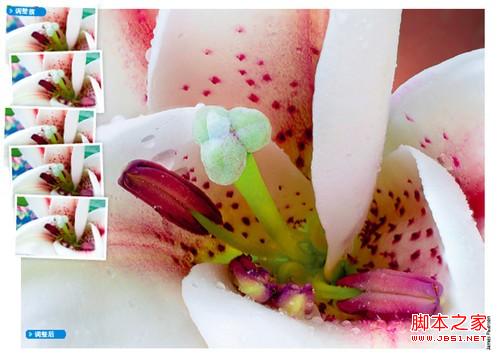
微距摄影最迷人的地方莫过于浅景深所营造出的梦幻虚化效果。但这种虚化的美有时候也可能造成些问题,特别在我们希望清晰表现被摄对象的时候。尽管缩小光圈能扩大景深范围,但这一手段并不能每每奏效,赋予景物从前到后完全一致的清晰。那么,不妨试试下面这个解决方法:将相机固定在三脚架上连续拍摄若干张照片,每次略微改变对焦距离,然后使用Photoshop将其中的清晰部分合成在一起,得到一幅细节表现极其锐利的作品。
我们将从一系列对焦点略有差异的鲜花摄影作品开始本期教程,首先使用Camera Raw对它们进行统一的调整,然后使用Photoshop中的自动混合命令将其清晰部分合成在一起。
1、打开文件
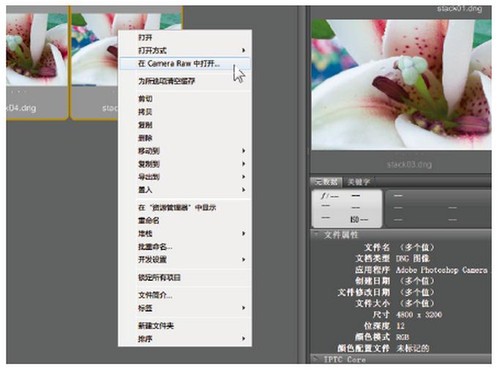
将拍好的5张RAW文件放在一个文件夹中,启动Adobe Bridge,打开该文件夹。单击鼠标选中文件夹中的第一个文件,然后按住Shift键单击最后一个文件,将它们全部选中。单击右键选择“在Camera Raw中打开”命令。
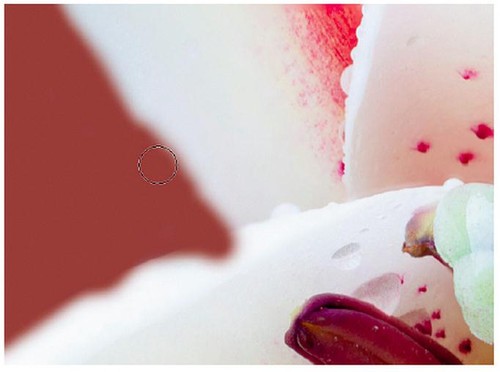
2、移除污点
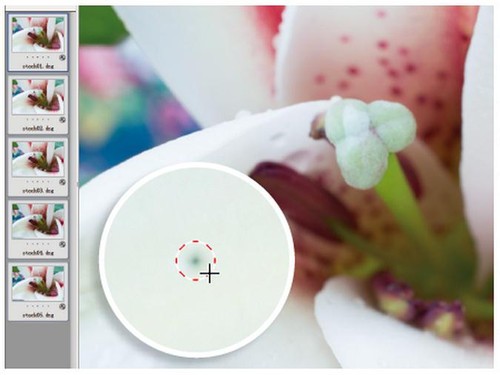
在ACR中,单击左上角全选按钮选择所有文件,使接下来的设置调整同时作用于所有文件。从上方工具栏中选择污点去除工具,在右侧面板中将类型设置为修复,不透明度100%,在污点上拖放鼠标创建一个小修复圈将其移除。
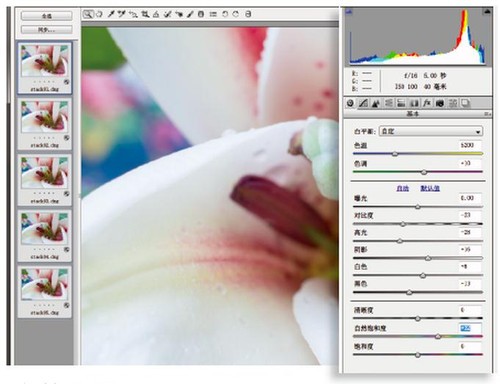
3、改善影调
打开基本面板,依照从上到下的次序对滑块进行设置,调整画面影调。色温5200、色调+10、对比度-23、高光-28、阴影+16、白色+8、黑色-13、自然饱和度+32。
4、保存文件
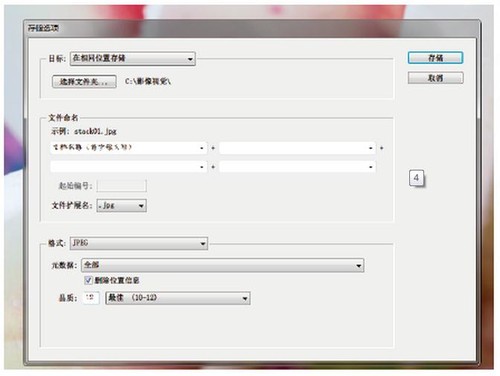
对RAW文件直接进行对焦堆叠很花时间,我们最好先将文件保存为JPGE格式。单击界面左下角的存储图像按钮,将目标下拉菜单设置为在相同位置存储,将格式设置为JPGE、品质12,单击存储。
5、导入图层

处理完成后,单击完成按钮返回Bridge界面。按住Ctrl键依次单击,选择我们刚才储存的所有JPEG文件。执行菜单命令“工具>Phptpshop>将文件载入Phptpshop图层”,将所有照片子啊一个新的Phptpshop文档中打开。
6、对齐图层
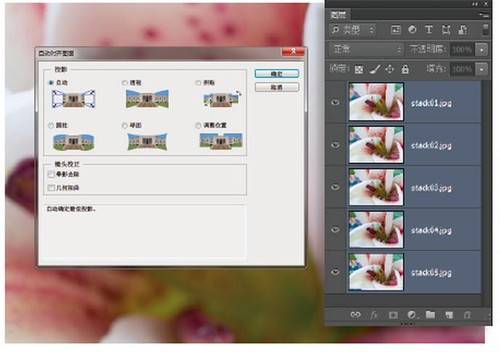
接下来要做的就是在Photoshop中进行进一步处理。所有文件载入Phptpshop之后,执行“窗口>图层”。将所有图层全部选中,然后执行“编辑>自动对齐图层”命令。在这个例子中,默认的自动对齐模式符合我们的需要,直接单击确定按钮。
7、移除边缘
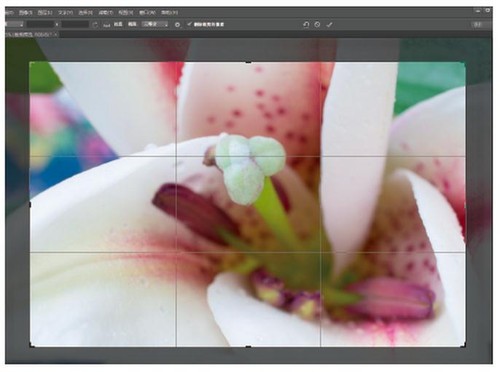
自动对齐命令将会依照各图层的画面内容将他们一一对齐,但对齐后的画面边缘显得有些杂乱。从工具栏中选择裁切公爵,单击右键,从弹出菜单中将裁切比例设置为不受约束,然后在画面中拖动鼠标创建裁切框,移除杂乱的边缘。
8、复制与堆叠
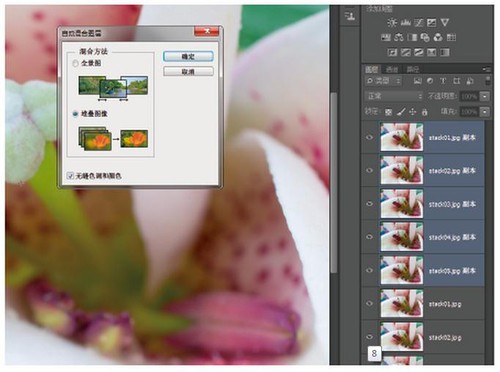
确定所有图层依旧处于选中状态,将他们拖放至图层面板右下角的新建图层按钮上,得到5个副本图层。接下来,执行“编辑>自动混合图层”命令,勾选堆叠图像以及无缝色调和颜色两个选项,单击确定按钮。Photoshop将自动寻找画面中最清晰的部分进行合成。
9、合并与更名
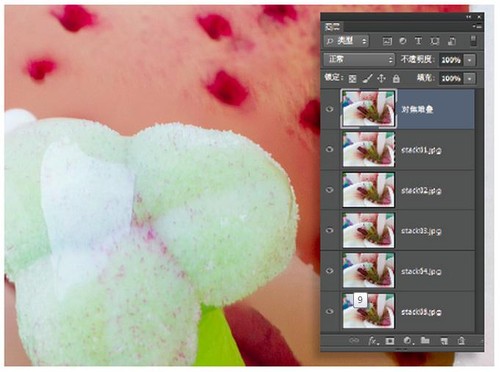
当我们完成自动混合图层的操作后,使用快捷键Ctrl+E将选中的5个图层合并在一起。在图层画板中双击合并后的图层标签,将其更名为“对焦堆叠”。放大观察就会发现画面中还存在少量处理得并不妥当的细节部分。
10、前后对比
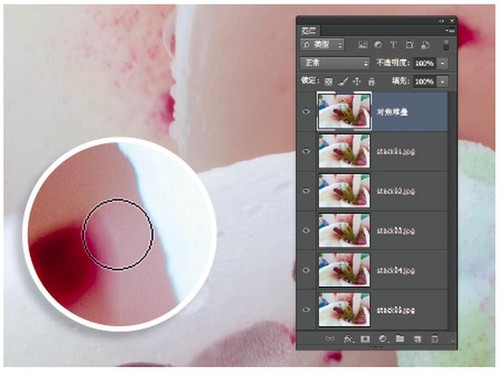
单击“对焦堆叠”图层前的眼球图标将其隐藏,按照从上到下的次序分别对比调整前后的区别。首先查看下方5张原图中的第一张,记住画面中的清晰区域范围,然后重新显示上方锐化图层,检查所有清晰部分是否一致。
11、遮盖瑕疵
如果上下两图的清晰区域完全一致,使用快捷键Ctrl+E向下合并图层。如果不是,单击添加图层蒙板按钮添加蒙板,然后使用黑色画笔工具还原下方图层中的清晰细节,再使用快捷键Ctrl+E向下合并图层。
12、合并图层
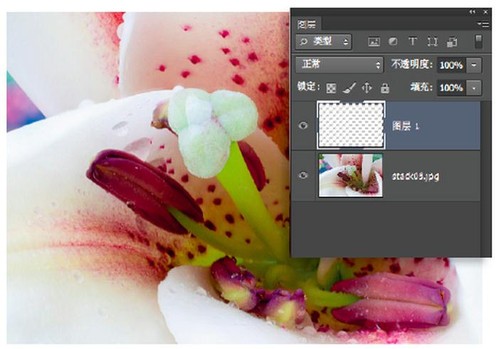
依次与下方图层的清晰部分逐一进行对比,使用快捷键Ctrl+E合并,直到剩下最后一个全画面清晰一致的图层为止。单击图层面板左下角的新建图层按钮,在“对焦堆叠”图层上方创建一个新的空白图层。
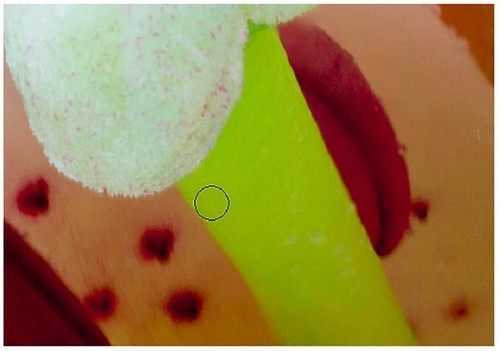
13、绘制背景
选择画笔工具,按住Alt键在深红色的花蕊上单击鼠标左键选区颜色,或者也可以单击工具栏中的前景色色块直接设定颜色,我们此处使用的颜色为R:134;G:90;B:83。在左上角和右上角涂抹,粗略覆盖原图中的背景。
14、调整背景

选择加深工具,在上方选项栏中将范围设置为中间调,曝光度设置为20%,使用该工具压暗背景的角落部分。再选择减淡工具,同样将范围设置为中间调,曝光度20%,使用该工具提亮背景靠画面中央的部分。
15、创建选区

执行“滤镜>模糊>高斯模糊”命令,将半径设置为20像素,单击确定按钮模糊绘制的背景图层。隐藏该图层,重新选中下方的“堆叠对焦”图层。使用快速选择工具在左右两侧的背景上涂抹,将背景完整地框选出来。
16、调整边缘
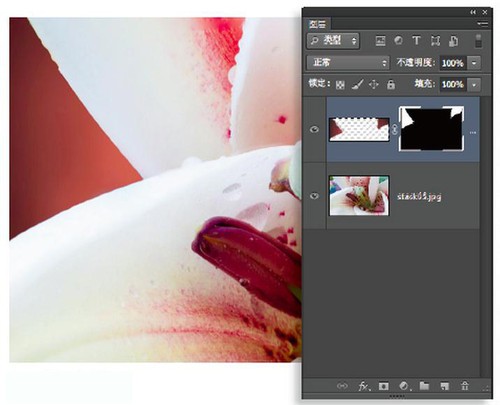
完成选区创建后,执行“选择>调整边缘”命令,在弹出窗口中将半径设置为3像素,移动边缘设置为+10。将输出到下拉菜单设置为选区,单击确定按钮。重新选择刚才绘制的背景图层,并将其设置为可见,单击图层面板下方的添加图层蒙板按钮将选区转化为蒙板。
17、修整画面
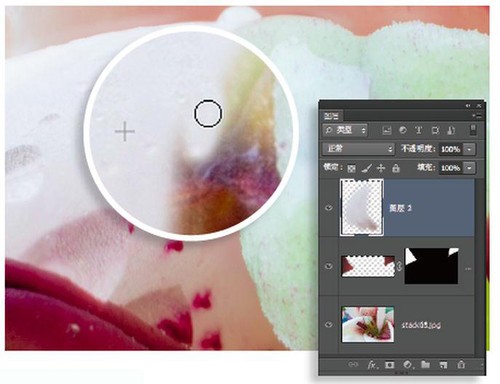
单击新建图层按钮,选择仿制图章工具,在上方选项栏中将样本下拉菜单设置为所有图层,然后放大检查画面中间的花蕊部分。按住Alt键选择仿制源,然后使用尺寸合适的画笔涂抹覆盖花蕊背后的枯萎部分。
18、高反差锐化
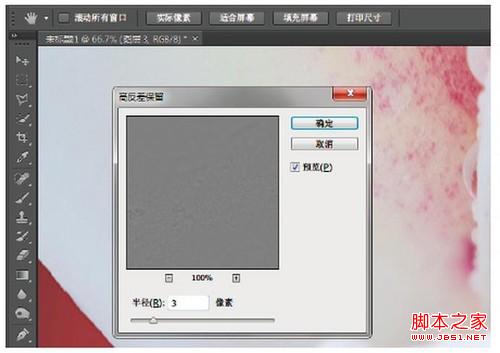
将所有图层合并至新的副本图层。执行“滤镜>其他>高反差保留”,在弹出对话框中将半径设置为3像素,单击确定按钮。然后将该图层混合模式设置为叠加锐化下方图层景物边缘。

 Image Editing Essentials: Key Features of PhotoshopMay 09, 2025 am 12:05 AM
Photoshop's core features include layers, selection tools, and adjustment tools. 1. The layer allows independent editing of image parts and supports layer style. 2. Selection tools such as lasso, magic wand and quick selection tools provide precise editing. 3. Adjustment tools such as color level, curve and hue/saturation can adjust images non-destructively.
 My Purpose: Assisting with Photoshop-Related TasksMay 08, 2025 am 12:18 AM
In Photoshop, the role of layer masks is to allow hidden or displayed portions of layers in a non-destructive manner. 1. The working principle of layer mask is to control the visibility of the layer through black, white and grayscale. 2. The basic usage includes image synthesis, such as synthesising the character image into a new background. 3. Advanced usage can be achieved by using gradient masks to achieve smooth image transition.
 Photoshop and Free Alternatives: A Comparative LookMay 06, 2025 am 12:12 AM
Photoshop's powerful features include smart objects and neural filters, while free alternatives such as GIMP, Krita and Photopea do well in specific fields such as GIMP's layer functionality, Krita's digital paintings and online editing of Photopea.
 Photoshop Color Grading: Elevate Your Images with Pro TechniquesMay 05, 2025 am 12:07 AM
Color adjustment in Photoshop can be achieved through adjustment layers to make the image more professional. 1. Use color level, curve, hue/saturation and other tools to adjust the hue, saturation and brightness. 2. Apply LUT to create unique color effects. 3. Use adjustment layers to avoid image distortion and use the History panel to track adjustment steps.
 Photoshop in the Real World: Examples of Its Diverse UsesMay 04, 2025 am 12:15 AM
Photoshop's applications in the real world include artistic creation, scientific research and commercial marketing. 1) In artistic creation, it is used for digital painting and illustration. 2) In scientific research, it is used for image processing and data visualization. 3) In commercial marketing, it is used for advertising design and brand image shaping. The versatility of this software makes it widely used in various fields.
 Beyond Editing: Photoshop's Creative CapabilitiesMay 03, 2025 am 12:12 AM
Adobe Photoshop goes beyond simple editing and becomes a creative tool for artists and designers. 1) It provides a wealth of tools such as brushes, stamp tools, blend modes and layer styles, supporting adjustments from basic images to complex digital paintings and 3D designs. 2) These tools implement functions through pixel-level operations, allowing users to create unique visual effects.
 Photoshop: Exploring Pricing Models and OptionsMay 02, 2025 am 12:12 AM
Photoshop offers two pricing models: single purchase and subscription service. 1. Single purchase: Pay $699 in one lump sum, permanent use, but no updates and cloud services. 2. Subscription service: $20.99 per month or $239.88 per year, and the latest version and cloud services are available. 3. Enterprise plan: $33.99 per user per month, including team management and additional cloud storage. 4. Educational Offer: Students and teachers are $19.99 per month, including multiple CreativeCloud applications.
 Photoshop: Mastering Layers and CompositionMay 01, 2025 am 12:05 AM
The method to create a new layer in Photoshop is: 1. Click the "New Layer" button at the bottom of the layer panel; 2. Use the shortcut keys Ctrl Shift N (Windows) or Command Shift N (Mac). The layers are like transparent sheets on canvas, allowing design elements to be managed separately, non-destructive editing and experimenting, and improving design levels.


Hot AI Tools

Undresser.AI Undress
AI-powered app for creating realistic nude photos

AI Clothes Remover
Online AI tool for removing clothes from photos.

Undress AI Tool
Undress images for free

Clothoff.io
AI clothes remover

Video Face Swap
Swap faces in any video effortlessly with our completely free AI face swap tool!

Hot Article
Hot Tools

SAP NetWeaver Server Adapter for Eclipse
Integrate Eclipse with SAP NetWeaver application server.

Notepad++7.3.1
Easy-to-use and free code editor

SecLists
SecLists is the ultimate security tester's companion. It is a collection of various types of lists that are frequently used during security assessments, all in one place. SecLists helps make security testing more efficient and productive by conveniently providing all the lists a security tester might need. List types include usernames, passwords, URLs, fuzzing payloads, sensitive data patterns, web shells, and more. The tester can simply pull this repository onto a new test machine and he will have access to every type of list he needs.

SublimeText3 Mac version
God-level code editing software (SublimeText3)

mPDF
mPDF is a PHP library that can generate PDF files from UTF-8 encoded HTML. The original author, Ian Back, wrote mPDF to output PDF files "on the fly" from his website and handle different languages. It is slower than original scripts like HTML2FPDF and produces larger files when using Unicode fonts, but supports CSS styles etc. and has a lot of enhancements. Supports almost all languages, including RTL (Arabic and Hebrew) and CJK (Chinese, Japanese and Korean). Supports nested block-level elements (such as P, DIV),

