 Software Tutorial
 Computer Software
 How to modify shortcut keys in premiere pro cc_Introduction to how to modify shortcut keys in premiere pro cc
Have you encountered problems with Premiere Pro CC shortcut keys being difficult to use? don’t worry! PHP editor Zimo today brought a detailed tutorial on modifying shortcut keys for Premiere Pro CC to help you easily customize shortcut keys and improve editing efficiency. Continue reading this article to learn how to set shortcut keys according to your work habits and preferences to make Premiere Pro CC more convenient.
First open PR and click on the edit option in the upper left corner

2 Click the shortcut key and enter and you will see the system default shortcut key option

3 Here is an example of adding editing. Now find the razor tool below as shown in the figure. The shortcut key is ctrl k. Now we set it to shift x

4. Click the left mouse button first. shift, then click x and hold it, drag the mouse to the lower shortcut key and release it

5Then cross out the previous shortcut key and the entire modification process is completed

The above is the detailed content of How to modify shortcut keys in premiere pro cc_Introduction to how to modify shortcut keys in premiere pro cc. For more information, please follow other related articles on the PHP Chinese website!
 视频剪辑台式机电脑配置推荐Apr 22, 2024 am 10:07 AM
装一台主要用于视频剪辑的电脑联想ThinkPadX1:X1内置有源手写笔,键盘在平板电脑模式下自动缩回,支持快速充电。X1拥有坚固的黑色外观和4KHDR屏幕,剪辑视频、软件编程等不在话下。缺点是以太网端口需要专用适配器。在内存问题上:内存条建议用16G以上的。因为要让电脑在剪辑高清视频的时候不卡,大的内存是必要的配置。在硬盘问题上:可以装两块硬盘。显示器:选择一台高分辨率的显示器,以便更清晰地查看和编辑视频素材。推荐使用4k或以上分辨率的显示器。操作系统:常见的剪辑软件如AdobePremier
 视频剪辑中的画面抖动和晃动解决方法是什么?画面抖动是怎么回事?May 02, 2024 am 11:37 AM
视频剪辑已经成为了一个非常重要的行业。在视频剪辑过程中,画面抖动和晃动是一个常见的问题,这给视频的质量带来了很大的影响。那么,画面抖动和晃动解决方法是什么呢?一、视频剪辑中的画面抖动和晃动解决方法是什么?1.使用稳定器稳定器是视频拍摄过程中的一种重要设备,它可以有效地减少画面的抖动和晃动。在视频剪辑过程中,如果原始视频画面存在抖动和晃动,可以使用稳定器对画面进行处理,使画面变得更加稳定。使用稳定器可以使画面变得更加稳定。2.视频剪辑软件中的稳定功能如今,大多数视频剪辑软件都具备了稳定画面的功能。
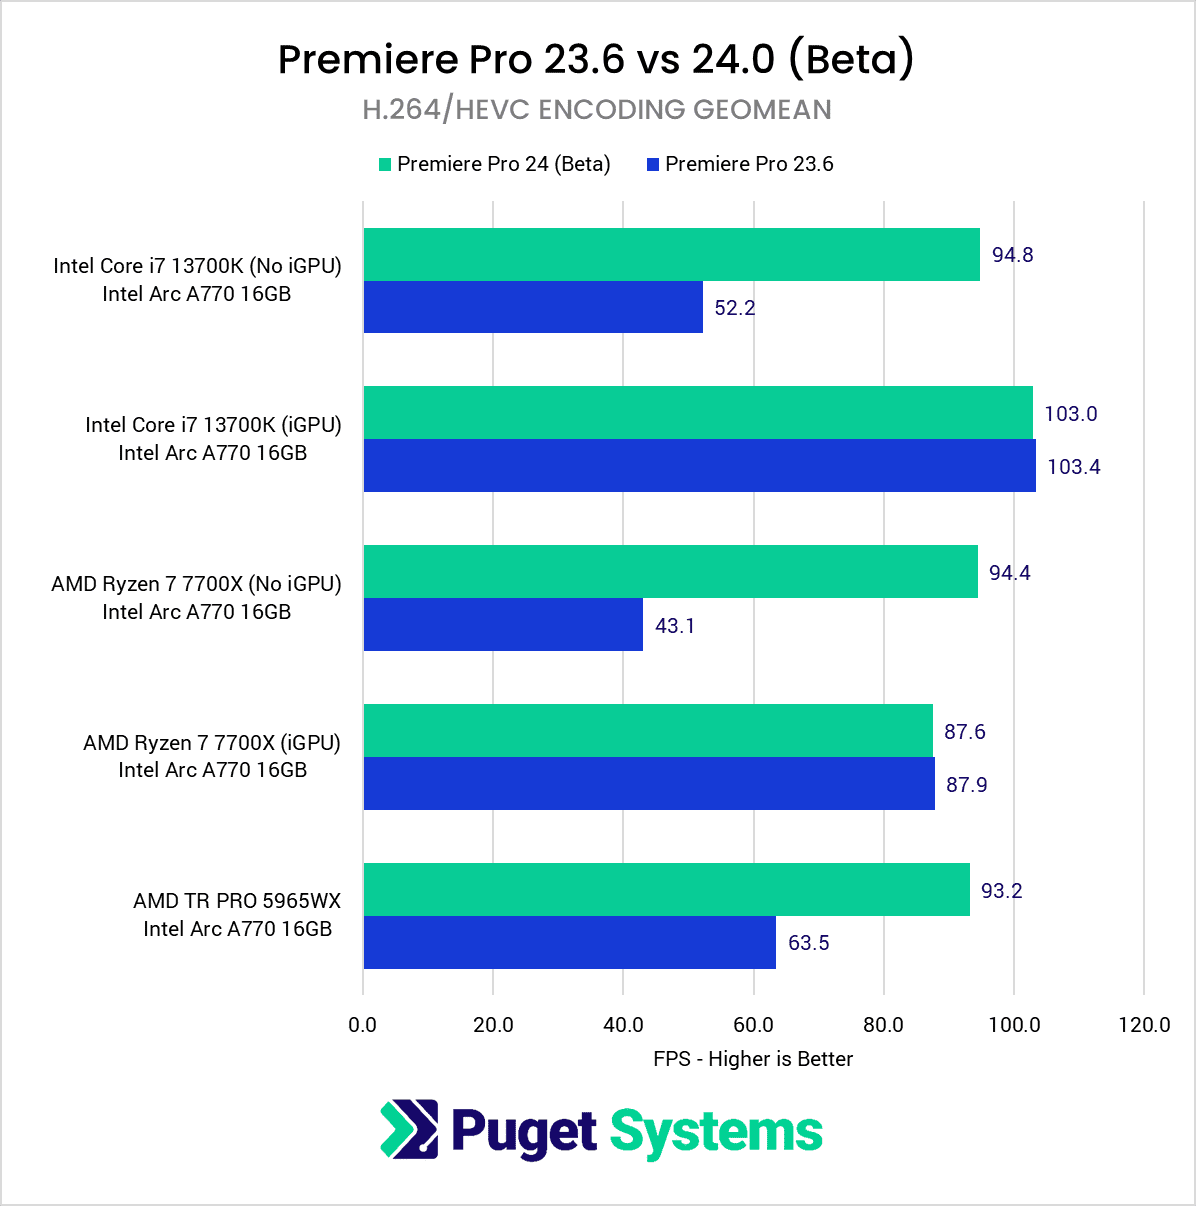 Arc A770 在 Adobe Premiere Pro 2024 Beta 中超越 RTX 4060,添加英特尔独显硬件编解码支持Aug 18, 2023 pm 01:49 PM
英特尔在2022年10月推出了第一代ArcA770和A750独立显卡,但软件支持需要一段时间才能赶上根据Pugetsystems的发现,最新的AdobePremierePro2024BetaBuild22测试版已经正式支持IntelArcGPU硬件编码和解码,包括对H.264和HEVC的全面支持尽管我们不建议大家将Beta版本作为日常使用,但对于那些不喜欢英伟达和AMD显卡的人来说,尤其是英特尔Arc系列显卡具有比NVIDIA和AMD更强的编解码器支持,这一点非常重要Adobe官方将这个系列的工
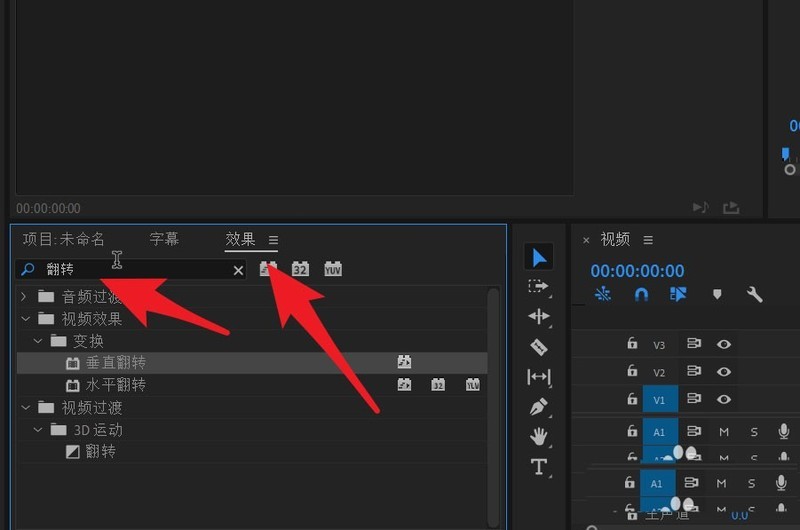 pr2020视频怎么镜像翻转_pr2020视频镜像翻转的方法Apr 29, 2024 pm 03:00 PM
首先在效果面板中搜索翻转效果。下图可以看到垂直翻转和水平翻转。其中的水平翻转,既可以实现视频的左右调换。原视频人物是在视频的右侧。然后鼠标左键按住水平翻转效果向视频轨道拖动。此时可以看到视频完成了左右翻转。视频中的人物出现在了左侧。翻转后的视频可以对其中的对象添加蒙版。
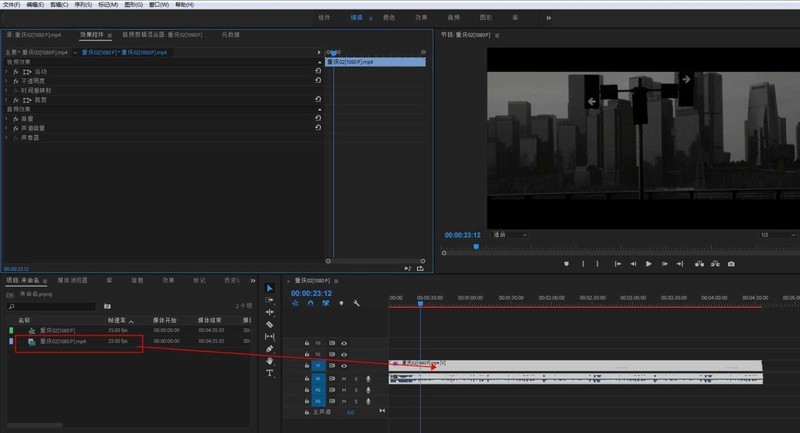 Premiere怎么做动态水印_Premiere动态水印的制作方法Apr 29, 2024 pm 04:30 PM
1、打开PR软件,新建项目,导入视频素材放到轨道上。2、用文字工具打上水印文字,小编就用XXX代替了。也可放上事先做好水印LOGO图。3、在不透明度中,适当降低参数让水印不要太抢眼。4、在位置上打上关键帧,从开始到结尾,每隔一段时间移动一下水印的位置,参数随意,每次都建立关键帧。5、点击播放,即可看到动态水印在画面内游走。
 Premiere怎么制作星星发光效果_Premiere制作星星发光效果操作步骤Apr 29, 2024 pm 01:46 PM
1.打开PR,选中需要处理的素材视频2.在效果中找到【starglow】3.直接拖动效果添加至素材4.在预设中,选择一个比较适合的样式5.适当调整发光的参数,即可
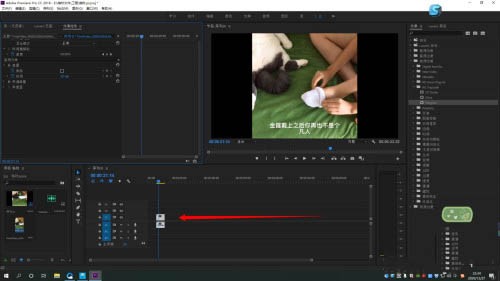
 pr怎么静音音频_premiere音频静音操作步骤Apr 29, 2024 pm 02:19 PM
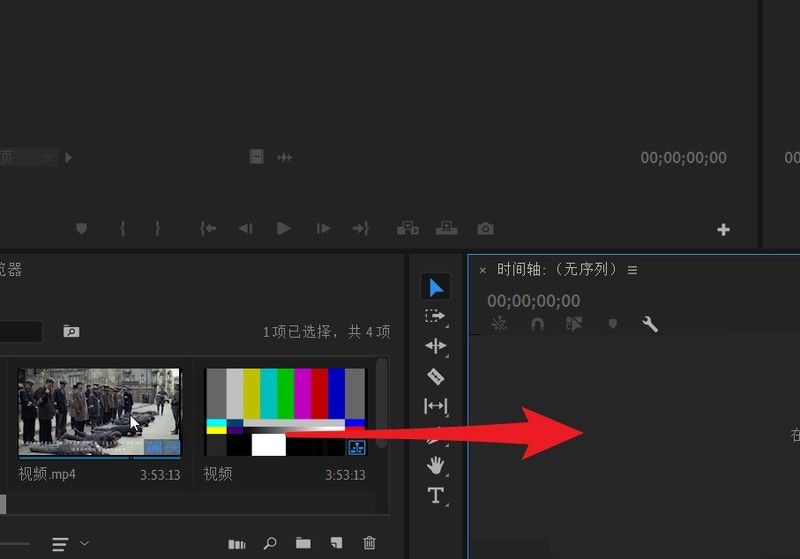
首先在项目面板中找到需要处理的视频,把它拖动到时间轴面板。此时视频被分别放置到了音轨和视频轨。A1为音轨。然后点击音轨,选定视频上的音轨,再点击箭头所指的静音轨道按钮。此时静音轨道按钮变成绿色。再次播放时视频为静音模式。此时在项目面板中选择需要的音频,将其拖动到釉面的时间轴面板。接着对音频进行处理,使其与视频能完全同步。处理完成后保存。
 Sora进驻Adobe视频编辑软件!新版Premiere Pro开启AI剪辑时代Apr 16, 2024 pm 03:20 PM
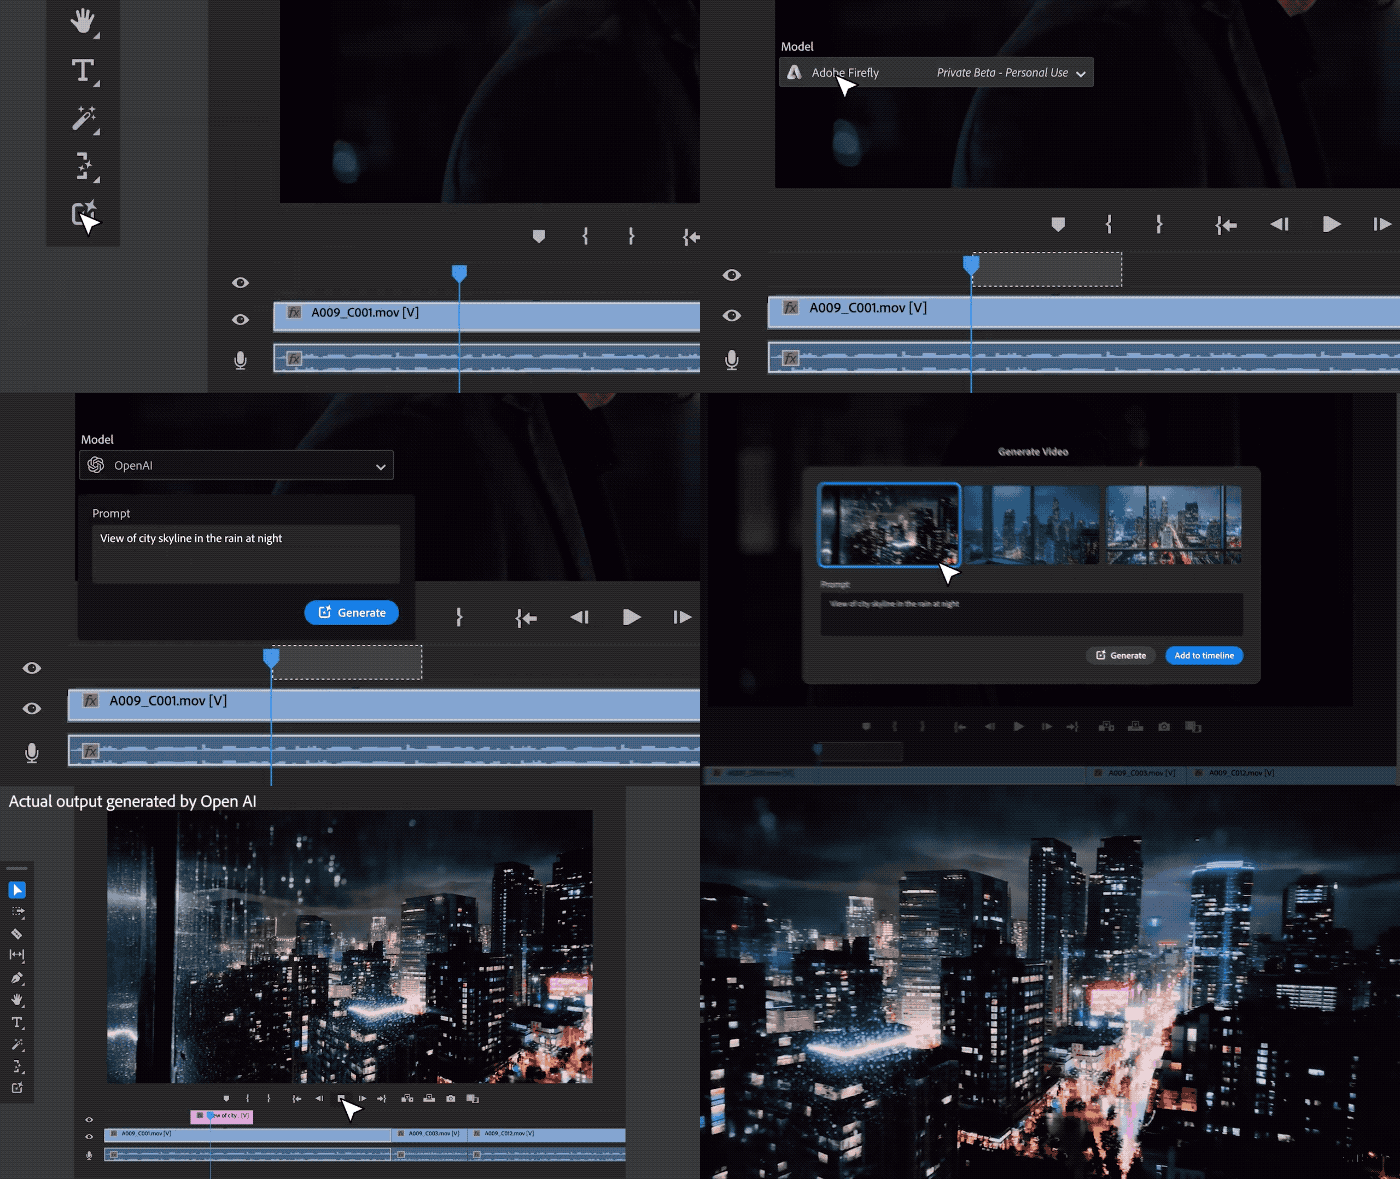
Sora要被集成在Adobe视频剪辑软件里了。在最新发布的PremierPro概念演示里,Adobe展示了与OpenAI合作的探索成果:在主镜头之外,完全由Sora生成一段B-roll辅助镜头。除了Sora之外,其他流行AI视频工具Runway和Pika也将作为可选项。其中Runway在演示中与Sora用法类似,可以生成一段全新的辅助镜头。Pika则可以做到将现有镜头自然延伸数秒。需要强调的是,这些功能还处于早期预览和研究阶段,尚未透露何时发布。与之相比,由Adobe自己的AI产品Firefly


Hot AI Tools

Undresser.AI Undress
AI-powered app for creating realistic nude photos

AI Clothes Remover
Online AI tool for removing clothes from photos.

Undress AI Tool
Undress images for free

Clothoff.io
AI clothes remover

AI Hentai Generator
Generate AI Hentai for free.

Hot Article

Hot Tools

PhpStorm Mac version
The latest (2018.2.1) professional PHP integrated development tool

Atom editor mac version download
The most popular open source editor

SublimeText3 Linux new version
SublimeText3 Linux latest version

ZendStudio 13.5.1 Mac
Powerful PHP integrated development environment

mPDF
mPDF is a PHP library that can generate PDF files from UTF-8 encoded HTML. The original author, Ian Back, wrote mPDF to output PDF files "on the fly" from his website and handle different languages. It is slower than original scripts like HTML2FPDF and produces larger files when using Unicode fonts, but supports CSS styles etc. and has a lot of enhancements. Supports almost all languages, including RTL (Arabic and Hebrew) and CJK (Chinese, Japanese and Korean). Supports nested block-level elements (such as P, DIV),


