本教程利用Photoshop的图层样式和笔刷工具,教大家制作一个写实的皮质公文包图标,整体的质感效果非常的漂亮,喜欢的朋友跟着我们一起来开始吧。
最终效果图展示:
步骤一:
用photoshop新建一个512px*512px、模式为RGB的空白文档;设置两条参考线定位画布中心;点击圆角矩形工具(U),设置圆角半径为10px,按Alt键由中心画一个棕色的圆角矩形,这就是公文包的主体部分,因此把该图层命名为“main”。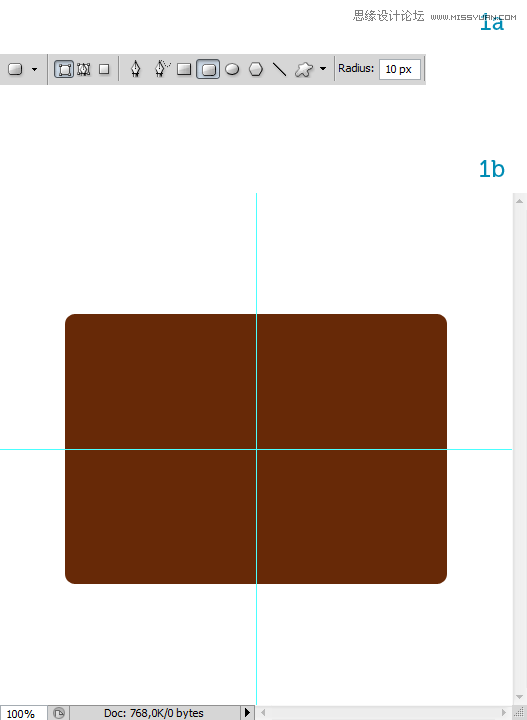
步骤二:
设置前景色为#8b493b;背景色为#672907;
选中图层main栅格化图层(PS:只有这样才可以进行下一步操作),按ctrl键点击图层变成选区,然后执行
滤镜 > 渲染 > 云彩命令,这样就创建了皮革的自然颜色。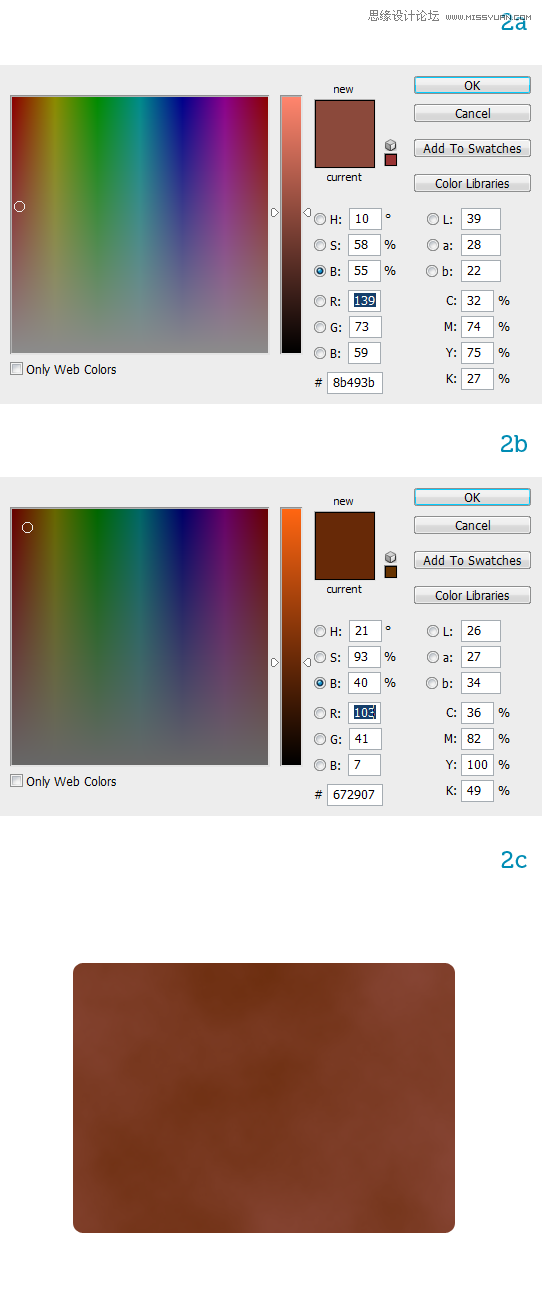
步骤三:
给矩形添加一个真实的皮革质感。下载一个皮革材质图片,放到main图层上面,命名为“texture”,调整图片大小略大于“main”图层(PS:为了方便看到下面图层,可先把texture图层的不透明度降低一些)(如图a所示),给texture添加图层蒙版,然后按Ctrl键点击main图层,出现选区再反选,填充黑色,然后设置texture图层的混合模式为柔光,不透明度为50%;再执行 图像 > 调整 > 色阶 命令,让图层变得再亮一点。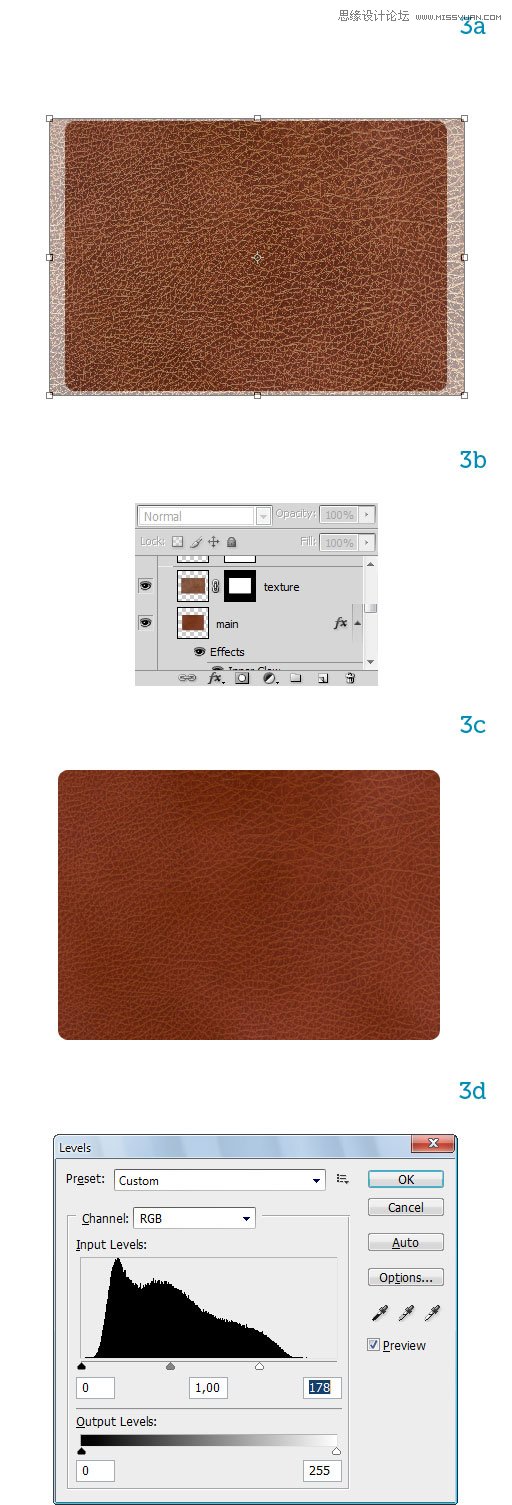
步骤四:
选择“main”图层,双击调出“图层样式”对话框,给图层添加一个3px的描边,设置如4a所示(PS:Multiply是正片叠底);再添加一个内发光效果,设置如4b所示,最终效果如4c。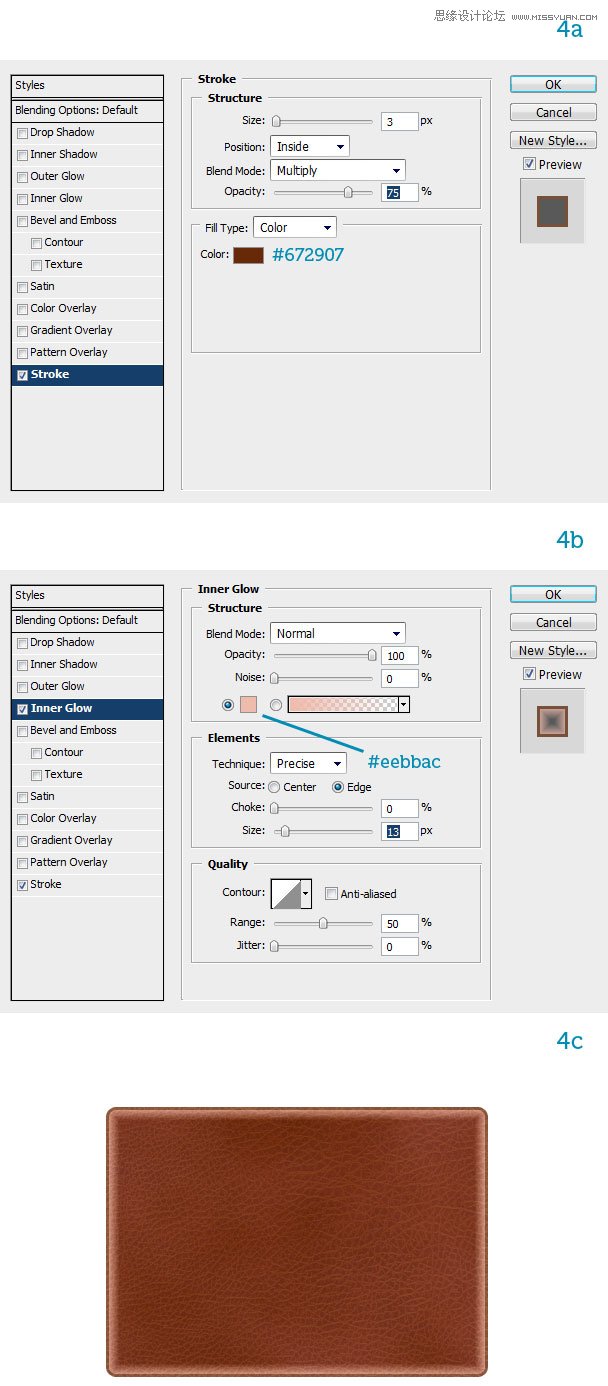
步骤五:
复制图层“main”为“main副本”,清除所有图层样式,调整大小,如图5a所示;给“main副本”添加内发光样式,具体设置如5d所示;这时图层看上去有个生硬的边框,我们可以执行 滤镜 > 模糊 > 高斯模糊,半径为3px;再选择“main”图层,添加一个 渐变叠加 的图层样式。
步骤六:
现在开始制作公文包的缝合线。新建一个文件用圆角矩形工具画一个小的圆角矩形,然后执行 编辑 > 定义画笔预设 ,弹出画笔名称对话框,将画笔命名“stitch”这样就完成了添加画笔笔刷。点击画笔工具,调出画笔预设对话框,找到刚才添加的笔刷,作如下设置(也可根据情况自己设置参数):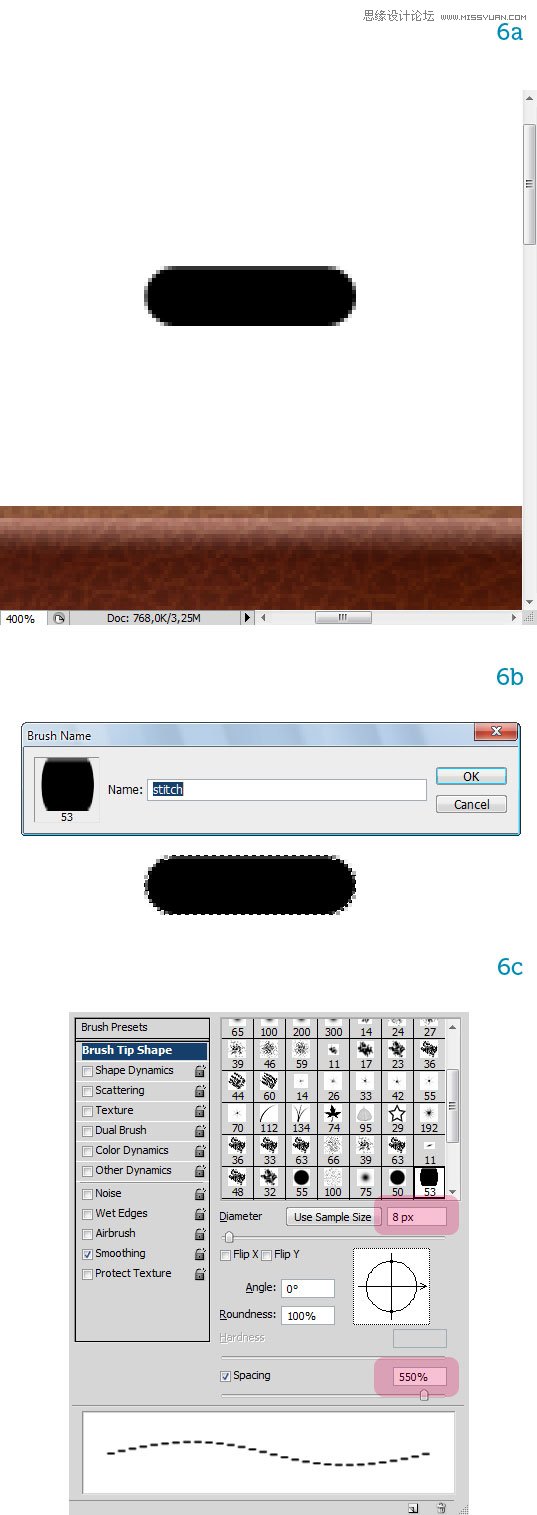
步骤七:
新建一个图层,设置前景色为浅黄色,然后按Ctrl键点击“main副本”图层出现一个圆角矩形选区,再点击路径-创建路径(此时路径面板上就有一个圆角矩形的路径,下一步可以继续使用),再点击 用画笔描边路径(完成这一步的时候必须是选择画笔工具的前提下),然后把左右两边横向的裁缝线去掉,用矩形选框工具选取最边上的一段缝合线,自由变换调整一下方向,变成下图效果。
步骤八:
再新建一个图层,选择画笔工具,调出画笔预设对话框,将角度调成90°,用上面同样的方法做出左右两边的缝合线,再用橡皮擦把上下的缝合线擦除,缝合线的制作就完成了,把这两个图层合并,命名为“stitches”。
步骤九:
现在的缝合线看起来有点平,没有立体感,我们给它添加点图层样式。双击“stitches”图层弹出图层样式对话框,添加一个斜面和浮雕效果,设置如9a所示;再添加一个投影效果(9b)。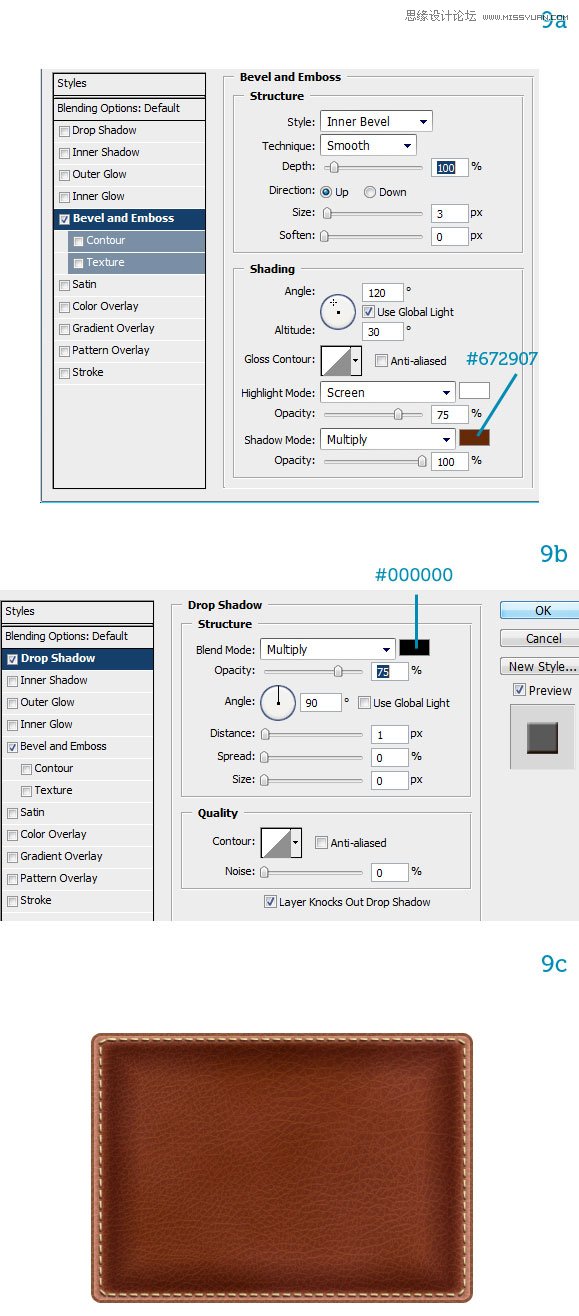
步骤十:
皮革一般都会有反光,因此我们给它添加一个反光。新建一个图层,用圆角矩形工具在公文包下方画一个圆角矩形,填充浅红色#cea295,将这个图层命名为“ambient reflection”。设置“ambient reflection”图层的混合模式为滤色,不透明度为40%,再执行滤镜 > 模糊 > 高斯模糊,半径为3px,然后按Q进入快速蒙版模式(此时前景色和背景色会变成黑色白色),再按G选中渐变填充工具,从上到下拉出一个渐变(10d);再按Q退出快速蒙版模式,这时你会看到一个矩形选区,然后点击“添加矢量蒙版”,现在可能需要把不透明度调为60%,再执行滤镜 > 模糊 > 高斯模糊,半径为5px,现在反光的效果就出来了。
步骤十一:
现在我们给公文包的两个口袋中间画一个裂缝。用椭圆工具在公文包中间偏下的地方画一个垂直的椭圆,命名为“pockets”。然后给这条裂缝添加样式,让它看起来更真实。双击“pockets”图层弹出图层样式对话框,给图层添加渐变叠加(11b);再添加一个斜面和浮雕样式,具体设置如(11c)所示;再给图层添加一个外发光效果,设置如(11d)。
步骤十二:
接下来绘制公文包的盖子。用钢笔工具先绘制盖子的右边,形状和大小自己调整,调整合适之后复制这个图层,水平翻转,合并两个图层,并命名为“flap”。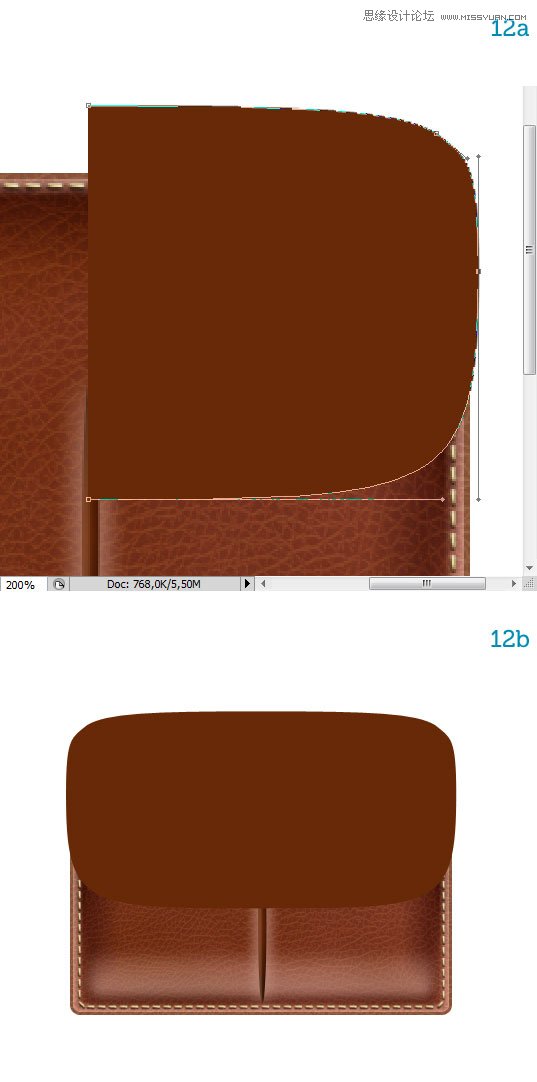
步骤十三:
给“flap”图层添加一个渐变叠加样式(13a);盖子的材质应该与公文包包身一样,因此复制texture图层,放到flap图层上面,为了避免两个纹理看上去相似,可以将复制的材质图层垂直翻转,再用前面相同的方法把复制的材质图层做成与flap一样的形状。
步骤十四:
给这个盖子添加一点厚度。复制flap图层放到该图层下面,命名为“flap thickness”,将“flap thickness”图层向下移动(具体多少可以自己把握)。然后调整 “flap thickness”图层的渐变叠加效果(14b);给“flap thickness”图层添加一个投影效果(14c),但是这个投影只投射在公文包上面,我们要把多余的投影去掉(这里有点复杂,原文教程没有详细说明,自己反复看了原文上的图片大概了解了意思)。首先复制“flap thickness”图层,命名为“flap thickness's Drop shadow”,放在“flap thickness”之后。第二,将“flap thickness”图层的投影效果去掉,在图层之上新建一个空白图层,命名为“flap thickness's Gradient fill”,然后用以下设置渐变填充图层,再右键点击图层“创建剪贴蒙版”。第三,选中“flap thickness's Drop shadow”图层,按ctrl键点击“main”图层,调出选区,添加矢量蒙版。(这段就算完成了,可能描述的有点乱,慢慢看吧)
步骤十五:
给公文包盖子制作缝合线。按ctrl键点击“flap”图层,出现选区,然后执行选择—修改—收缩,收缩量为6px(具体数值也可自行把握)。用该选区在路径面板创建一个新的路径,命名为“flap stitches”。再用直接选择工具(A)修改路径,使它从顶部伸出,因为缝合线是延伸到后面的。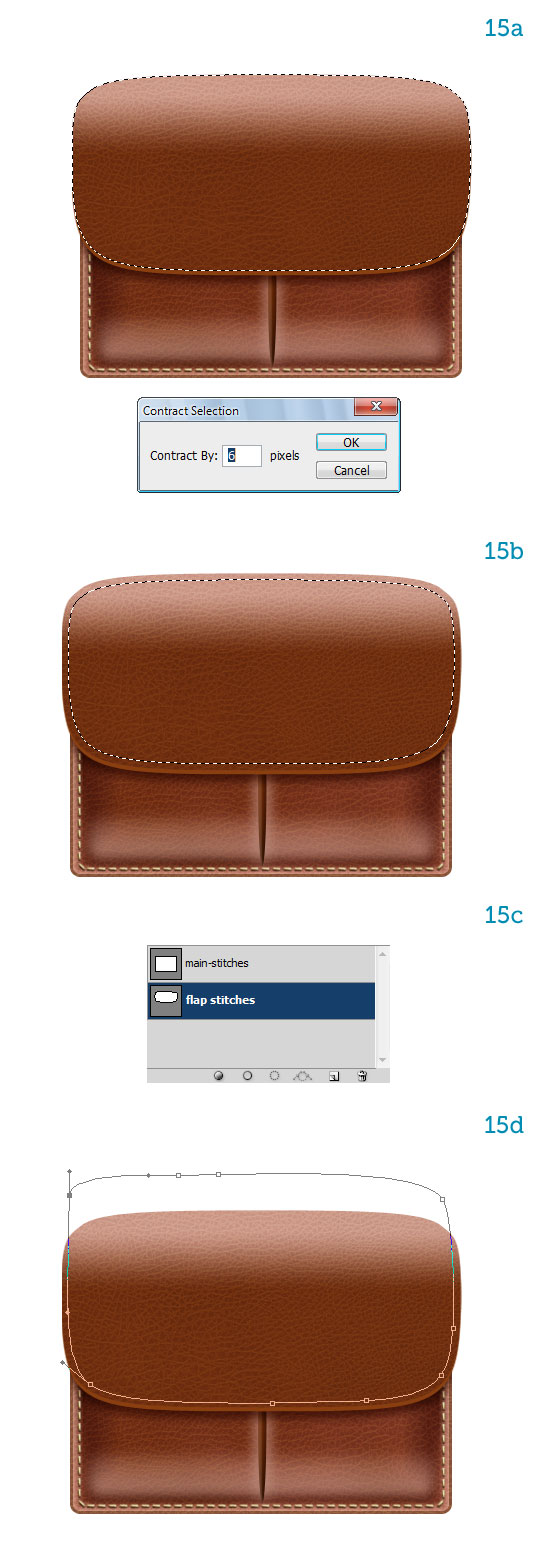
步骤十六:
这一步与步骤七、八、九的方法一样,给公文包的盖子添加缝合线。效果如下: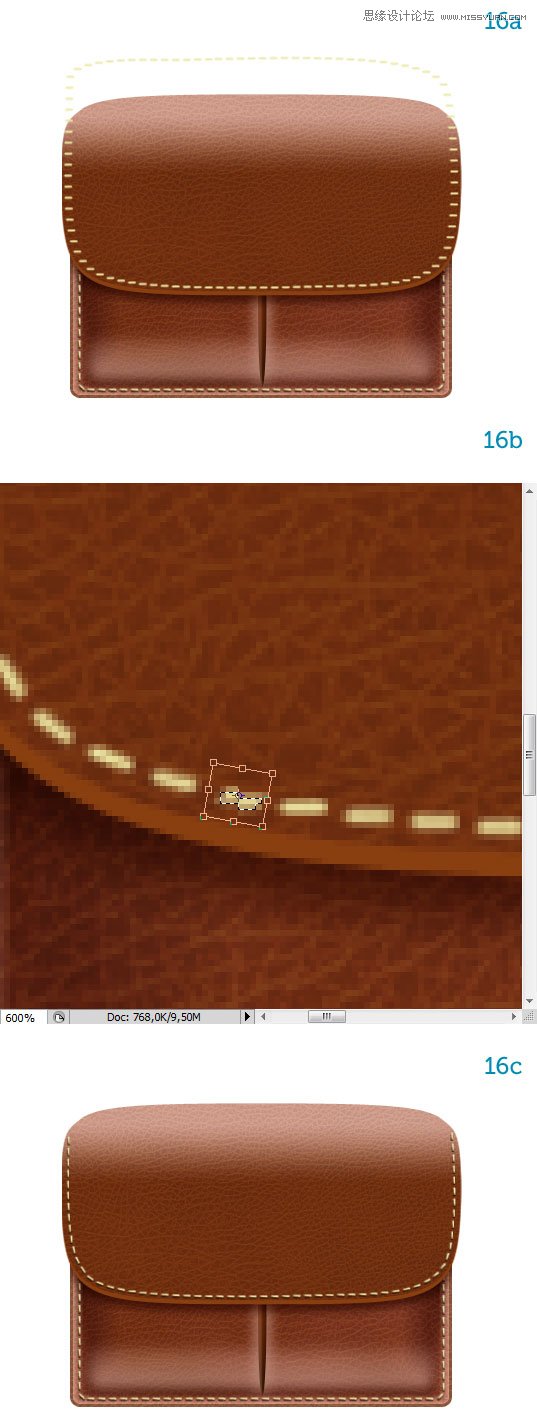
步骤十七:
接下来开始制作公文包的锁。将前景色设置一个黄色,画一个圆角矩形,将它放在“flap thickness”图层下面,命名为“lower plate” 。给该图层添加一个金色的渐变叠加效果,一个下阴影效果和一个描边效果。具体设置如下:
步骤十八:
复制“lower plate” 这个图层,将它移动到所有图层之上,命名为“upper plate”。然后把下图选区内的区域去掉(如果你的图层是形状,你可以用“从形状区域减去”隐藏想要去掉的区域,且可以自由调整),打开图层样式面板,将渐变叠加里的反向取消选择。降低投影的不透明度为30%和描边的不透明度为50%。 复 制 “lower plate”图层, 将图层命名为“lock”,适当缩小图层,同时降低描边的不透明度为50%。效果如图所示:
步骤十九:
公文包的锁通过一个短皮革链接在盖子上。 用椭圆工具在“upper plate” 图层下面画一个椭圆, 命名为“strap”,先复制粘贴“main”图层的图层样式,再进行适当修改,具体设置如图所示:
步骤二十:
给皮革“strap”添加缝合线,方法与之前制作缝合线一样,不过这次不需要旋转针线,图层样式可以复制前面缝合线的样式,具体设置可以自行把握。现在一个完整的锁制作完毕,将整个锁平移到左边口袋中心,再复制一个锁,移动到右边口袋中心(注意:图层顺序要与第一个锁一样),现在两个锁完成,为了方便管理,你可以将每个锁的所有图层链接起来。
步骤二十一:
最后我们来制作公文包的提手。用矩形工具绘制两个小金属扣,给图层添加黄色渐变叠加样式。再用矩形工具给金属扣绘制一个固定它的皮革。画好之后复制一个放到另外一个金属扣下面。效果如下: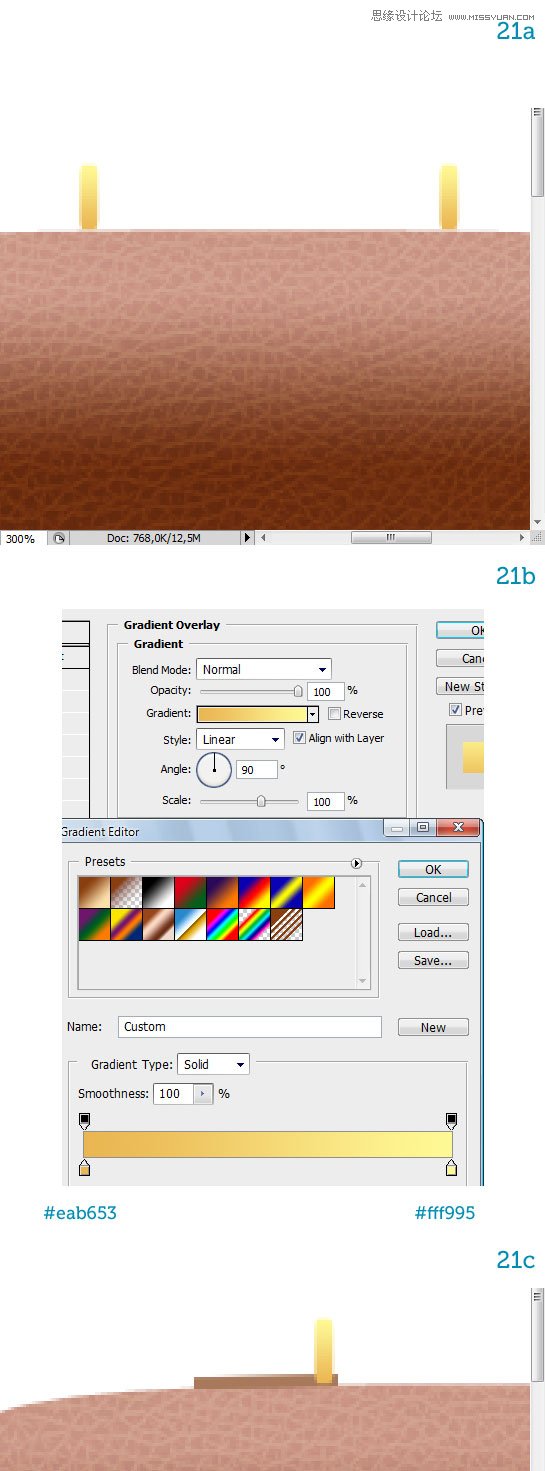
步骤二十二:
用圆角矩形绘制提手,半径为5px,置于金属扣图层下面。然后ctrl+T自由变换,右键点击,图层选择变形,选择扇形 ,弧度20把形状调成一个弧度状。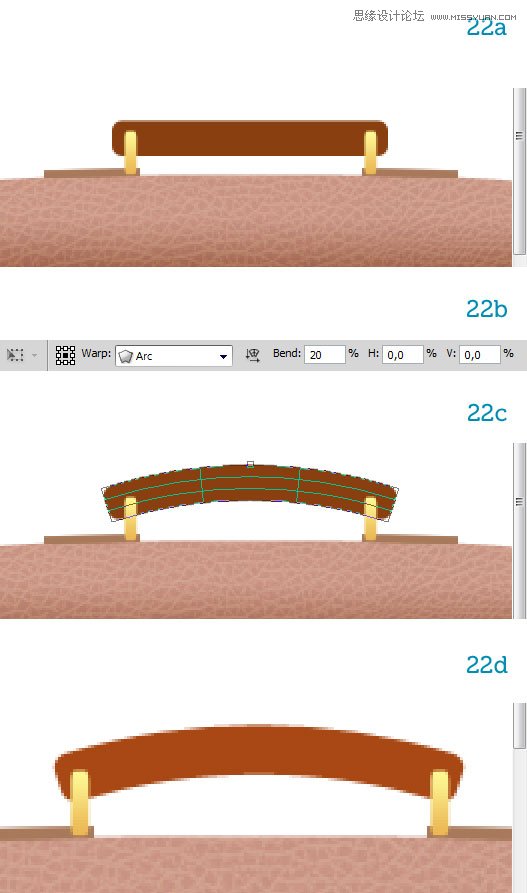
步骤二十三:
给提手添加一个光泽效果,一个内阴影效果,具体设置如下: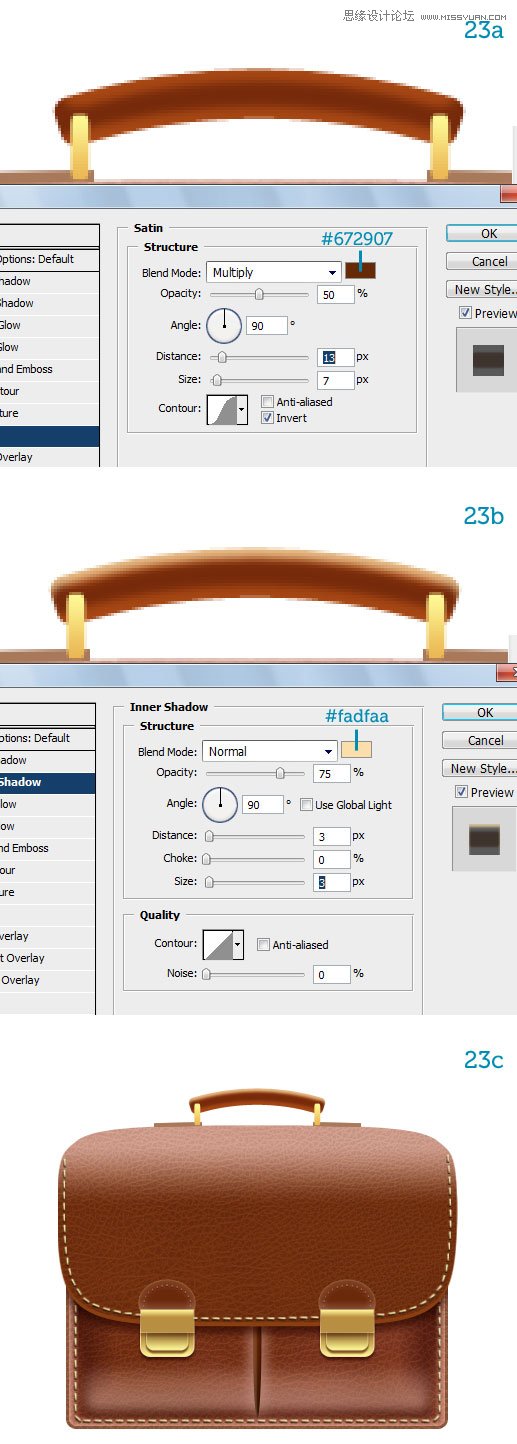
制作完成!你可以给它添加投影或者背景等效果。
 Photoshop: Exploring Pricing Models and OptionsMay 02, 2025 am 12:12 AM
Photoshop offers two pricing models: single purchase and subscription service. 1. Single purchase: Pay $699 in one lump sum, permanent use, but no updates and cloud services. 2. Subscription service: $20.99 per month or $239.88 per year, and the latest version and cloud services are available. 3. Enterprise plan: $33.99 per user per month, including team management and additional cloud storage. 4. Educational Offer: Students and teachers are $19.99 per month, including multiple CreativeCloud applications.
 Photoshop: Mastering Layers and CompositionMay 01, 2025 am 12:05 AM
The method to create a new layer in Photoshop is: 1. Click the "New Layer" button at the bottom of the layer panel; 2. Use the shortcut keys Ctrl Shift N (Windows) or Command Shift N (Mac). The layers are like transparent sheets on canvas, allowing design elements to be managed separately, non-destructive editing and experimenting, and improving design levels.
 Photoshop Applications: From Photo Editing to Digital ArtApr 30, 2025 am 12:10 AM
Photoshop is widely used in the fields of image processing and digital art, and is suitable for photo editing and digital art creation. 1. Photo editing: Adjust brightness and contrast Use the "Brightness/Contrast" tool. 2. Digital art: Use brush tools to create paintings. 3. Basic usage: Use the "Red Eye Tool" to remove red eyes. 4. Advanced usage: Use layers and masks for image synthesis. 5. Debug: Recover the lost layers by checking the layer panel. 6. Performance optimization: Adjust memory usage to improve running speed.
 Photoshop's Core Function: Image Editing and ManipulationApr 29, 2025 am 12:17 AM
Photoshop's core functions are image editing and operation, including adjusting the color, brightness, contrast of images, applying filter effects, cropping and adjusting image size, performing image synthesis, etc. 1. Adjust brightness and contrast: Open the image, select the "Adjust" option in the "Image" menu, select "Brightness/Contrast", and adjust the slider. 2. Use the color level adjustment layer and layer mask: Click the "Create a new fill or adjust layer" button, select "Scale", adjust the color level, add a layer mask, and use the brush tool to control the adjustment effect.
 Photoshop: The Power of Raster Graphics EditingApr 28, 2025 am 12:13 AM
Photoshop is a powerful tool for handling raster graphics, and its core functions include layers and masks, filters and adjustments. 1. Layers and masks allow independent editing and non-destructive modifications. 2. Filters and adjustments can quickly change the appearance of the image, but they should be used with caution to avoid affecting the image quality. By mastering these functions and advanced skills, you can greatly improve your image editing and creative abilities.
 Photoshop: A Versatile Tool for Image ManipulationApr 27, 2025 am 12:13 AM
Photoshop is so powerful in the field of image processing because of its versatility and intuitive operating interface. 1) It can handle various tasks from basic adjustment to complex synthesis, such as adjusting brightness and contrast. 2) Working based on layers and masks allows non-destructive editing. 3) Examples of usage include adjusting color balance and creating layer masks. 4) Common errors such as excessive editing can be avoided through the History panel. 5) Performance optimization suggestions include the use of smart objects and shortcut keys.
 Photoshop Trials and Alternatives: Exploring Free AccessApr 26, 2025 am 12:23 AM
Photoshop offers a free 7-day trial period. To maximize the use of the trial period, 1) sign up for multiple Adobe accounts, 2) use the student or education version, and 3) subscribe to Adobe CreativeCloud. Free alternatives include: 1) GIMP, 2) Photopea, 3) Krita, these software can meet daily image editing needs.
 Photoshop for Photographers: Enhancing and Retouching ImagesApr 25, 2025 am 12:01 AM
Enhance and retouching photos in Photoshop can be achieved by adjusting brightness and contrast, using the Repair Brush Tool. 1) Adjust brightness and contrast: Increase brightness and contrast to improve underexposed photos through the Image->Adjustments->Brightness/Contrast menu. 2) Use the Repair Brush Tool: Select HealingBrushTool in the toolbar and apply to remove miscellaneous points or scars in the image.


Hot AI Tools

Undresser.AI Undress
AI-powered app for creating realistic nude photos

AI Clothes Remover
Online AI tool for removing clothes from photos.

Undress AI Tool
Undress images for free

Clothoff.io
AI clothes remover

Video Face Swap
Swap faces in any video effortlessly with our completely free AI face swap tool!

Hot Article

Hot Tools

Zend Studio 13.0.1
Powerful PHP integrated development environment

MantisBT
Mantis is an easy-to-deploy web-based defect tracking tool designed to aid in product defect tracking. It requires PHP, MySQL and a web server. Check out our demo and hosting services.

SublimeText3 Chinese version
Chinese version, very easy to use

SublimeText3 Linux new version
SublimeText3 Linux latest version

SecLists
SecLists is the ultimate security tester's companion. It is a collection of various types of lists that are frequently used during security assessments, all in one place. SecLists helps make security testing more efficient and productive by conveniently providing all the lists a security tester might need. List types include usernames, passwords, URLs, fuzzing payloads, sensitive data patterns, web shells, and more. The tester can simply pull this repository onto a new test machine and he will have access to every type of list he needs.


