


1.新建画布,背景设置成黑色,绘制矩形添加线性渐变(我设置的画布大小为1280X1024px)。
选择两种橙色制作细微的线性渐变(本教程渐变色设置:#e56b15-#d03403)。

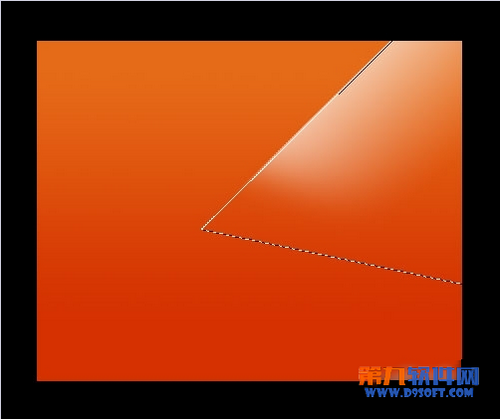
2.新建图层。使用多边形索套工具,绘制如下图所示三角形选区。
选择画笔工具,选择大直径的柔角画笔(笔刷直径300px或者其他),笔刷不透明度设置为15%,沿着选区边缘,通过多次绘制制作出白色渐隐的效果,注意白色不能太浓烈。
3.设置白色渐变所在图层的混合模式为“叠加”。
新建图层
如上,使用多边形索套工具绘制类似的三角形选区,这次笔刷颜色设置成黑色,然后使用笔刷涂抹绘出黑色渐隐效果(你也可以使用渐变工具制作,渐变色设置成黑色到透明)

4.设置黑色渐变所在图层的混合模式为“叠加”,不透明度设为34%。
新建图层
使用钢笔工具绘制如下漂亮的曲线路径。秘诀就是在绘制时尽量把锚点的调节线拉长。
备份路径然后取得选区。

5.在选区内,使用渐变工具绘制白色到透明的渐变。图层混合模式为“叠加”,效果如下:

6.新建图层
使用钢笔工具创建如下有趣的路径,Ctrl+Enter 取得选区。

7.在选区内,使用黑色画笔绘制黑色渐隐效果参照下图:
不要取消选区,下面还要用。

8.新建图层
选定选择工具,向下移动10个像素。
Ctrl+Shift+I 反选,在选区的左下角部分,使用黑色柔角画笔绘制黑色渐隐效果如下图。
设置图层的混合模式为“叠加”,不透明度60%。

9.新建图层
Ctrl+Shift+I 反选,前景色设置成白色,使用柔角画笔绘制一些漂亮的白色。选定选择工具,上移10个像素。

10.新建图层
选择渐变工具,颜色设置成白色到透明渐变,渐变类型选“径向渐变”,绘制渐变如下图:
图层混合模式选“叠加”

11.现在看起来画面的颜色不是很正。如果我想要画面更有活力,可以回到开始的背景层重新设置渐变色。我们这里采用一种更快捷的办法。
新建图层,填充橙色,设置图层混合模式为“颜色”,图层不透明度55%。

12.新建图层,使用钢笔工具绘制如下路径并取得选区。

13.为选区填充白色到透明的渐变,混合模式选择“叠加”,图层不透明度根据个人喜好自由调整。

14.新建图层。使用钢笔工具绘制如下图所示,左下角的曲线路径,Ctrl+Enter键取得选区,填充白色到透明的渐变,混合模式选“叠加”。

15.最后的处理。我为背景的左上角添加了白色到透明的叠加图形、右下角添加了黑色到透明叠加图形。完成。


 Photoshop: Investigating Free Trials and Discount OptionsApr 14, 2025 am 12:06 AM
You can get the access to Photoshop in the most economical way: 1. Experience the software features with a 7-day free trial; 2. Find student or teacher discounts, as well as seasonal promotions; 3. Use coupons on third-party websites; 4. Subscribe to Adobe CreativeCloud's monthly or annual plan.
 Photoshop for Designers: Creating Visual ConceptsApr 13, 2025 am 12:09 AM
Creating visual concepts in Photoshop can be achieved through the following steps: 1. Create a new document, 2. Add a background layer, 3. Use the brush tool to draw basic shapes, 4. Adjust colors and brightness, 5. Add text and graphics, 6. Use masks for local editing, 7. Apply filter effects, these steps help designers build a complete visual work from scratch.
 Is Photoshop Free? Understanding Subscription PlansApr 12, 2025 am 12:11 AM
Photoshop is not free, but there are several ways to use it at low cost or free: 1. The free trial period is 7 days, and you can experience all functions during this period; 2. Student and teacher discounts can cut costs by half, and school proof is required; 3. The CreativeCloud package is suitable for professional users and includes a variety of Adobe tools; 4. PhotoshopElements and Lightroom are low-cost alternatives, with fewer functions but lower prices.
 Photoshop's Value: Weighing the Cost Against Its FeaturesApr 11, 2025 am 12:02 AM
Photoshop is worth the investment because it provides powerful features and a wide range of application scenarios. 1) Core functions include image editing, layer management, special effects production and color adjustment. 2) Suitable for professional designers and photographers, but amateurs may consider alternatives such as GIMP. 3) Subscribe to AdobeCreativeCloud can be used as needed to avoid high one-time spending.
 The Core Purpose of Photoshop: Creative Image DesignApr 10, 2025 am 09:29 AM
Photoshop’s core use in creative image design is its powerful functionality and flexibility. 1) It allows designers to transform creativity into visual reality through layers, masks and filters. 2) Basic usages include cropping, resizing and color correction. 3) Advanced usages such as layer styles, blend modes and smart objects can create complex effects. 4) Common mistakes include improper layer management and excessive use of filters, which can be solved by organizing layers and using filters reasonably. 5) Performance optimization and best practices include rational use of layers, regular saving of files, and using shortcut keys.
 Photoshop for Web Design: Advanced Techniques for UI/UXApr 08, 2025 am 12:19 AM
Photoshop can be used in web design to create high-fidelity prototypes, design UI elements, and simulate user interactions. 1. Use layers, masks and smart objects for basic design. 2. Simulate user interaction through animation and timeline functions. 3. Use scripts to automate the design process and improve efficiency.
 Newbie's article: Use the ps brush to add crack effects to the font (share)Apr 07, 2025 am 06:21 AM
In the previous article "Teaching you step by step to add printing effects to plate images using ps (Favorites)", I introduced a small trick to use ps to add printing effects to plate images using ps. The following article will introduce to you how to use the ps brush to add crack effects to the font. Let’s take a look at how to do it.
 Photoshop Advanced Typography: Creating Stunning Text EffectsApr 07, 2025 am 12:15 AM
In Photoshop, you can create text effects through layer styles and filters. 1. Create a new document and add text. 2. Apply layer styles such as shadows and outer glow. 3. Use filters such as wave effects and add bevel and relief effects. 4. Use masks to adjust the effect range and intensity to optimize the visual impact of the text effect.


Hot AI Tools

Undresser.AI Undress
AI-powered app for creating realistic nude photos

AI Clothes Remover
Online AI tool for removing clothes from photos.

Undress AI Tool
Undress images for free

Clothoff.io
AI clothes remover

AI Hentai Generator
Generate AI Hentai for free.

Hot Article
Hot Tools

SublimeText3 Mac version
God-level code editing software (SublimeText3)

Safe Exam Browser
Safe Exam Browser is a secure browser environment for taking online exams securely. This software turns any computer into a secure workstation. It controls access to any utility and prevents students from using unauthorized resources.

MantisBT
Mantis is an easy-to-deploy web-based defect tracking tool designed to aid in product defect tracking. It requires PHP, MySQL and a web server. Check out our demo and hosting services.

SecLists
SecLists is the ultimate security tester's companion. It is a collection of various types of lists that are frequently used during security assessments, all in one place. SecLists helps make security testing more efficient and productive by conveniently providing all the lists a security tester might need. List types include usernames, passwords, URLs, fuzzing payloads, sensitive data patterns, web shells, and more. The tester can simply pull this repository onto a new test machine and he will have access to every type of list he needs.

ZendStudio 13.5.1 Mac
Powerful PHP integrated development environment

