这篇教程是向脚本之家的朋友介绍ps简单制作酷酷的迷彩效果方法,教程制作出来的迷彩非常地不错,难度不是很大,很适合新手来学习,推荐到脚本之家,喜欢的朋友一起来学习吧
这篇教程是向大家介绍ps简单制作酷酷的迷彩效果!教程很不错,很值得学习,下面跟着我来学习一下吧!
方法/步骤
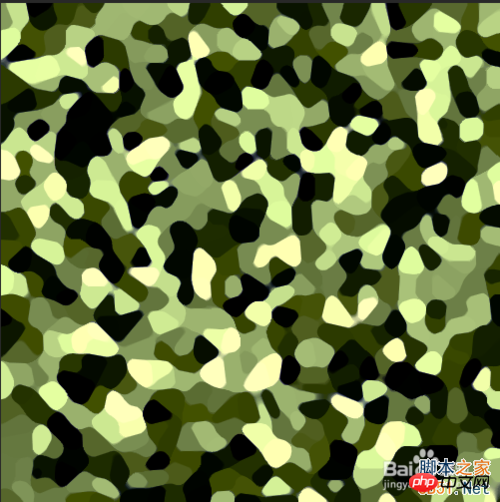
先上效果图!
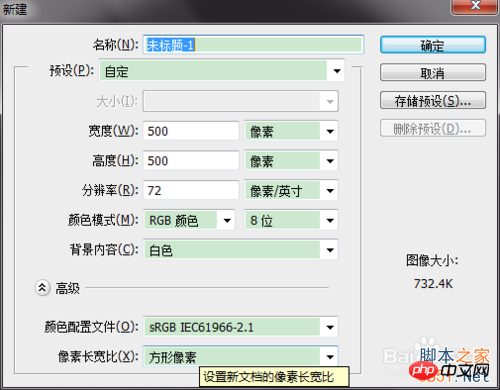
先新建个画布(废话貌似),然后设置画布大小(废话,可无视),我设置的是500×500滴。。。
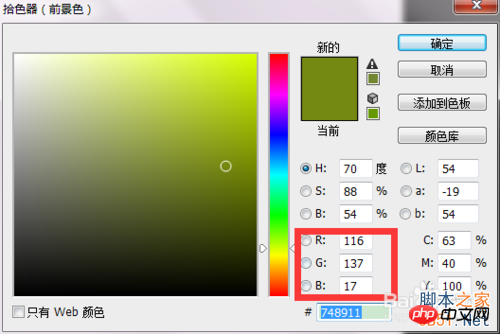
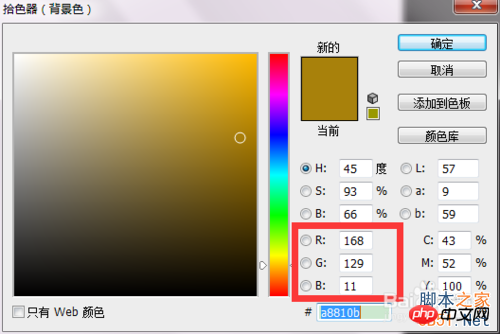
然后!设置前景色和背景色,并用前景色(按住alt+delete)填充背景!
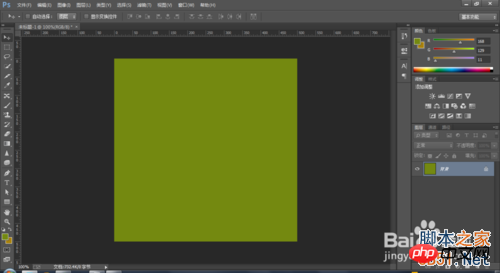
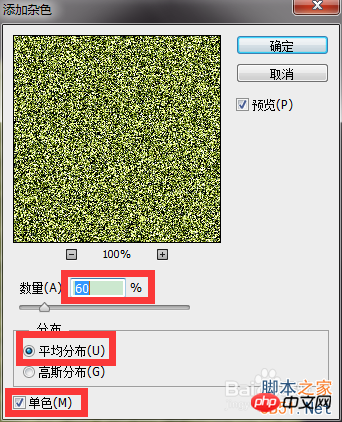
找到滤镜-杂色-添加杂色,数量设置为60,选择平均分布,单色
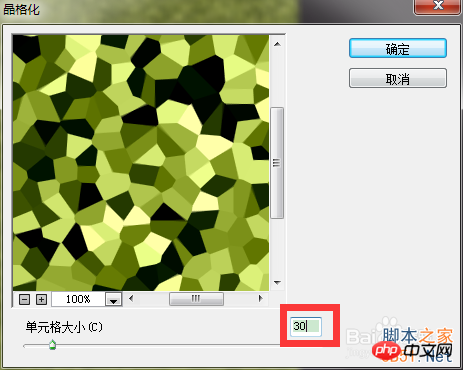
找到滤镜-像素化-晶格化,大小设置为30
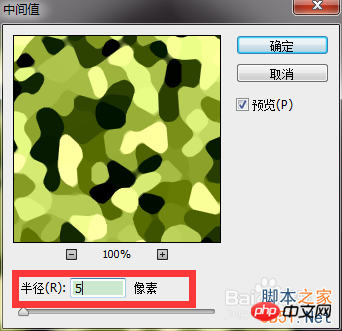
找到滤镜-杂色-中间值,设置半径5
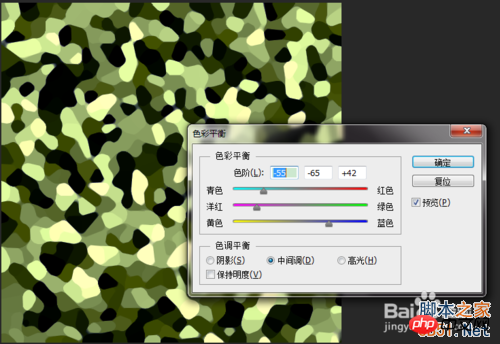
最后一步!按住ctrl+b,调整一下你喜欢的颜色就完成啦,下图是我调整的
注意事项
晶格化那一步可以适当将大小调整一下
教程结束,以上就是ps简单制作酷酷的迷彩效果方法,希望大家喜欢!
 Comparing Photoshop Pricing: Options and BenefitsMay 12, 2025 am 12:17 AM
Adobe Photoshop offers three packages: 1) a single application plan, suitable for users who only need Photoshop, with a low cost, including 20GB of cloud storage; 2) a full set of CreativeCloud plans, suitable for users who need multiple Adobe applications, with a high cost, including 100GB of cloud storage; 3) a preferential plan for students and teachers, suitable for academic users with limited budget, with a low cost, including 20GB of cloud storage.
 What Makes Photoshop Special? Its Primary FunctionMay 11, 2025 am 12:16 AM
Photoshop'sprimaryfunctionistoenableuserstomanipulate,enhance,andcreatedigitalimageswithprecisionandcontrol.Itsspecialfeaturesinclude:1)alayer-basededitingsystemforindependentelementmanipulation,2)anextensivelibraryoftoolsandfiltersforvarioustasks,an
 Photoshop: The Cost of Professional Image EditingMay 10, 2025 am 12:19 AM
Photoshop's cost includes direct costs, time and learning curve, resources and hardware investment. 1. Direct cost: Subscription system $20 to $50 per month, purchase hundreds of dollars at one time. 2. Time and Learning: It requires a lot of time and practice, and it is recommended to learn through online courses and tutorials. 3. Resources and hardware: High-performance computers and sufficient storage space are required to ensure hardware configuration to improve efficiency.
 Image Editing Essentials: Key Features of PhotoshopMay 09, 2025 am 12:05 AM
Photoshop's core features include layers, selection tools, and adjustment tools. 1. The layer allows independent editing of image parts and supports layer style. 2. Selection tools such as lasso, magic wand and quick selection tools provide precise editing. 3. Adjustment tools such as color level, curve and hue/saturation can adjust images non-destructively.
 My Purpose: Assisting with Photoshop-Related TasksMay 08, 2025 am 12:18 AM
In Photoshop, the role of layer masks is to allow hidden or displayed portions of layers in a non-destructive manner. 1. The working principle of layer mask is to control the visibility of the layer through black, white and grayscale. 2. The basic usage includes image synthesis, such as synthesising the character image into a new background. 3. Advanced usage can be achieved by using gradient masks to achieve smooth image transition.
 Photoshop and Free Alternatives: A Comparative LookMay 06, 2025 am 12:12 AM
Photoshop's powerful features include smart objects and neural filters, while free alternatives such as GIMP, Krita and Photopea do well in specific fields such as GIMP's layer functionality, Krita's digital paintings and online editing of Photopea.
 Photoshop Color Grading: Elevate Your Images with Pro TechniquesMay 05, 2025 am 12:07 AM
Color adjustment in Photoshop can be achieved through adjustment layers to make the image more professional. 1. Use color level, curve, hue/saturation and other tools to adjust the hue, saturation and brightness. 2. Apply LUT to create unique color effects. 3. Use adjustment layers to avoid image distortion and use the History panel to track adjustment steps.
 Photoshop in the Real World: Examples of Its Diverse UsesMay 04, 2025 am 12:15 AM
Photoshop's applications in the real world include artistic creation, scientific research and commercial marketing. 1) In artistic creation, it is used for digital painting and illustration. 2) In scientific research, it is used for image processing and data visualization. 3) In commercial marketing, it is used for advertising design and brand image shaping. The versatility of this software makes it widely used in various fields.


Hot AI Tools

Undresser.AI Undress
AI-powered app for creating realistic nude photos

AI Clothes Remover
Online AI tool for removing clothes from photos.

Undress AI Tool
Undress images for free

Clothoff.io
AI clothes remover

Video Face Swap
Swap faces in any video effortlessly with our completely free AI face swap tool!

Hot Article

Hot Tools

Notepad++7.3.1
Easy-to-use and free code editor

SecLists
SecLists is the ultimate security tester's companion. It is a collection of various types of lists that are frequently used during security assessments, all in one place. SecLists helps make security testing more efficient and productive by conveniently providing all the lists a security tester might need. List types include usernames, passwords, URLs, fuzzing payloads, sensitive data patterns, web shells, and more. The tester can simply pull this repository onto a new test machine and he will have access to every type of list he needs.

MantisBT
Mantis is an easy-to-deploy web-based defect tracking tool designed to aid in product defect tracking. It requires PHP, MySQL and a web server. Check out our demo and hosting services.

ZendStudio 13.5.1 Mac
Powerful PHP integrated development environment

SublimeText3 Chinese version
Chinese version, very easy to use


